Search the Community
Showing results for tags 'sbrick'.
-
 BrickController2 is an Android and iOS application that allows you to control your Lego models using a compatible gamepad. It supports the following devices: - SBrick - BuWizz 1-2 - BuWizz 3 (basic support) - Lego Powered-Up devices: Boost, PUP HUB and Technic HUB (or Control+) - PF infrared (on Android devices having infrared emitter). Features: - Multiple profiles for a single creation - Multiple motor (or output) assignment to a single controller event - Different types of devices can be used at the same time - The same motor (or output) can be assigned to multiple controller events - Different joystick characteristic settings - Different button modes: normal button, simple toggle, ping-pong toggle, carousel toggle, ... - Train mode on joysticks - Normal and servo mode for the new Control+ motors - Sequences (like for flashing light) BrickController 2 on the Google Play Store: BrickController2 android BrickController 2 is also available on the Apple App Store. BrickController2 iOS Video tutorial created by @kbalage (many thanks for this): And another great video by @kbalage: Older versions: BrickController Android application. It lets you to control Lego creations via Lego infra-red, SBrick and BuWizz V1 and V2 using any Android compatible game controller: Current version: BrickController 0.6 User guide: BrickController User Guide Minimum system requirement: Android 4.4 and bluetooth low energy support on the phone (or tablet) Video on the older SBrickController application:
 -
 Hello! We are ethusiastic adult LEGO fans and we have developed this new remote technology (kck.st/1sf6zOU). We know that lego is not just a toy, but an expression of the passion of creation. We are very interested in your opinion! Once upon a time there was a group of LEGO fans that had a dream, namely the dream of not simply taking readily existing building blocks to create a new model, but rather to create something that would take the LEGO experience to an entirely new level. They started their journey half a year ago but in order to fully realize their dream they now need your support. Take a look at what they’ve achieved so far and play your part to help turn what was simply a dream six months ago into a reality today . What they have produced is the SBrick, a universal remote control unit that slots simply into your existing LEGO models and allows you to control up to 64 Power Functions® units using your smartphone or tablet. This is just one of the very many things it does (there is a full list of the features listed below). If you browse any of the LEGO forums worldwide, it soon becomes clear that this is something that this is something fans have wanted for a very long time and the good news is that this very product is here now.
 -
hi all. i recently decided on buying an SBrick to compliment my 12 existing lego PF motors. but.... i was exploring their website to find out more about the SBrick, and went to the (support hub) section, clicked on the SBrick and scrolled down to (technical info) and it gave me this information Casing material: ABS (acrylonitrile butadiene styrene) Operating temperature range: -20°C – 60°C Operating voltage range: 3V – 5.5V Maximum continuous current total: 500mA Maximum continuous current per channel: 500mA Range: up to 50 meters. It depends on the controlling device, the SBrick’s distance from, and the electrical properties of the ground, and the orientation of the unit. Deep “null” areas might exist closer to the SBrick than the maximum range. what i dont understand is how can the operating voltage range be 3-5.5 volts if you're supposed to power the SBrick with a PF battery box (they suggest this), that contains 9 volts? so im worried that if i buy an SBrick that its not going to have enough output power, compared to the IR receiver i use. so my questions are 1: can someone who has bought an SBrick in the last 1-2 years, please tell me what the output voltage is when powered by a PF battery box containing 9 volts? 2: would u still recommend buying an SBrick? 3: and is this information above, correct?
-
 Hello all, I'm glad to introduce my project I spent approx one year to work on. Those who follow my railway MOC model topic here, on Eurobricks, should be familiar with my work, and could know I do own a big station with additional storage yard (fig.1.) to store all my long, 1:45 scaled railway models. Fig.1.: My train station in BlueBrick layout software 1. Why and what? My station displays a renovated mainline station - not a dedicated one, just a station, which looks quite average on refurbished Hungarian double-track lines. A modern station comes with working light signals - and this need started my project. I owned two completed mainline signals back in 2013 (fig.2.), using polarity reversal bricks to switch four pairs of modified PF ledlights (modification allowed that only one of the ledlights turned on, depending on the applied voltage's polarity, this modification was nicely described be Viktor Péter Kovács in RailBricks #9). These signals were operated by hand, both turning them free and red after trains, which could cause a lot of error, leaving them accidentally free after a train passed. Also my station needed 5 entry signals, 11 exit signals and one shunting signal for my storage yard. It is easy to see, that without some automatisation these can't be handled light by light. It is important, that my project is about making a system which handles my station, giving play experience by setting routes and managing train traffic, but it is not about automatisation of the trains. Train drivers should drive their own trains (9V, PF, PU, custom) according to the appearing signal aspects set by the "station driver". Fig.2.: My old signals - both of them powered with two pairs of PF ledlights. 2. The real life prototypes Before continuing, I need to explain the Hungarian signalling system in short - and also the logic behind it, and the difficulties it causes. Excluding any branchline special signals, focusing on mainline block signalling, there are two types of signals - main signals (red-white-red pole, they give a speed order to pass and forecast for next main signal) and repeat signals (yellow-white-yellow pole, forecasting only if the corresponding main signal is free or not, these are used where the tracks' curvature doesn't give enough distance to note the signal aspect of main signals). Three colours are used - green, yellow and red. Red always means to stop, giving no forecast of the next main signal. Yellow allows to pass at the maximum speed permitted for the train by other conditions (track, vehicle), forecasting next main signal will be red. Blinking yellow allows to pass at the maximum speed permitted for the train, forecasting next main signal will be allowing passing by 40 km/h (speed for normal switches in turning direction). Green indicated to pass at the maximum speed permitted for the train, the next main signal will be also allowing passing by maximum speed permitted for the train (so it forecasts next main signal being yellow, blinking yellow or green) Yellow-yellow (two lights) allows to pass with the maximum speed of 40 km/h (implying some switches in turning direction will be ahead), next main signal is expected to be stop. Yellow-blinking yellow allows to pass with the maximum speed of 40 km/h, next main signal will allow also passing by 40 km/h. Yellow-green allows to pass with the maximum speed of 40 km/h, next signal will allow maximum speed to pass by. As you look at my track configuration, you may see, that all these variations mentioned above should be considered when putting ledlights to my signals. Fig.3. shows my station with installed signals and the secured neighbouring blocks. This signalling logic also means, that I should know if zero, one or two sections are free after a main signal, including the route (turning on points, or not). Fig.3.: Shematic track layout of my station including the neighbouring signalling blocks, too. 3. System components Why are the neighbouring openline tracks considered? When I allow a train to leave my station (setting a free exit signal for it) it should mean that at least the first section is free and no other train is there. So I should have control over that section - detecting trains entering and leaving them from both direction. Train detection was also needed to turn the signals automatically back to red when a train passed, reducing the chance of accidentally leaving them free by manual operation. I chose the products of SBrick mixed with LEGO-elements. SBrick offer very nice, Bluetooth-controlled light hubs (SBrick Light), which can control 24 independent channels or 8 RGB channels, changing light colours. Since I didn't need the RGB-option (different colours are at different points in the real signals), I could use all the 24 channels of each hub (and since my signals needed 3 or 4 lights each and I have 24 of them, it was quite useful). The other SBrick product, the "+" smart brick can handle inputs and outputs - only for the Power Functions era. But besides train motors, technic motors, ledlights the PF-era had two types of sensors and I used the distance/moiton sensors to detect trains. These were never really put into commercial, the WeDo 1.0 elements were available for schools for education purposes. Fortunately Bricklink and eBay had them... And all these inputs (distance sensors) and outputs (SBrick light ledlights, PF M-motors to set points) are connected through the surface called SBrick Pro. I connect to the SBrick hubs with my PC, running the code simply from browser. You can write all your code on this surface, using some Scratch-based language (before this project I never did any programming). You can add scripts to different events (like if the distance sensors' values change, on stratup, pressing virtual buttons you added to your "remote control"), writing texts, and of course, managing the outputs. Each physical ledlight, motor or sensor is paired in the code with different variables (like strings describing the signal aspect, number values for distance sensor measurement, logical variables to store occupation of segments, etc). And yes, it took one year to write the code from zero (as I said, I never wrote any code before I started this project), collect the physical elements and building them into my layout. It was tested at five events this year, these events brought a lot of problems (and I had no option to test it before events since my layout is 11+ meters), but for the last event, our lugs annual exhibition at Martonvásár city (Hungary) finally it worked 2×10 hours at opening days without any major issue, so now I can finally proudly present it (fig.4.). Fig.4.: The remote control created in SBrick Pro for my station. I used the following components: 4 SBrick+ hubs + 2 WeDo 1.0 sensor on each 2 SBrick hubs + 5 PF M-motors on them 6 SBrick Light hubs + 88 SBrick leglights on them for different signals some PF extension wires 3 9V speed regulator to power SBrick+ and SBrick hubs from 230V AC. 4. How does it work? a) Setting a route Routes can be set selecting the big metallic buttons on the remote control surface (one button for each neighbouring openline section and one for each station track), while direction is selected with the top corner buttons (from left to right, or from right to left). If the route can be set (no occupied segment is involved and it is not conflicting any other existing route), the program: set the points via SBrick and PF M-motor, it virtually locks the points (no other routes can be set including the locked points), and after this sets the corresponding signals free. The buttons of sections involved in the locked route stay red. Removing a route (if you don't want it or the train already passed it) can be done with the bright blue buttons next to each route displayed the bottom left corner. Removing a route can't be accidental, for safety it requires "two-hand operation", keeping spacebar pressed while saying okay to the warning message. After this is done, a counter start giving safety time before the route and the switch locks get cleared. b) Motion sensors Sensors of WeDo 1.0 can detect objects in front of them from approx. 15-20 cm. For the largest distance they have a value of 10, while if you put something very close (<1,5 cm) it gives the value of 0. Since they are mostly placed 2 cm from the tracks (to make sure wide steams can also pass), a value of 3 is set at treshold value, if the value given by the sensor goes below this value it is counted as detection. For first, the code checks if a train is expected to be there. All sensors check one position, but trains could arrive from both direction, the sensors can't decide, which direction the train came from. The program evaluates the logic variables - direction set for the section, is any route set for the involved sensor and the neighbouring signal aspects - if it finds out that the train shouldn't be passing the sensor, gives a high pitch warning on the PC, and also resets any free signals back to red which would possibly let a train to the section where an another train violated the red signal. If the train is expected to be in front of the sensor, the signal belonging to the route and direction will fall back to red. After the train passes the sensor, there is a safety checking - seven detection cycles ran with timing, all should find the sensor value above treshold before saying the train really passed. If the automated looping mode is turned on (letting trains go through the station), after the train passed the sensor and clearence timer is also out, the cleared section's signal will automatically set free. All routes can be resetted in once with the bottom right bright blue button. This is necessary if some errors pop up, or someone passes a red signal - in this case to clear the error message reset must be performed. A reset has also a clearence time, and all sections' must be checked if they are occupied or not and this information is asked by the software. Setting a section clear is also a "two-hand operation" to avoid making a section accidentally free while there is a train on it. 5. Experiences a) Problems I used this setup on five different events from this year's April. At the first three events there were too much false error detections - these were related to bugs in the code. Sometimes the routine for checking a train started twice or more times thus leading to "redrunning" errors. To find out, where my code runs into a bug, I started to write some values on the remote and also making error codes and messages for different events to spot out my errors. Later I left this parts in, since now these error messages clearly can point out, where and what happened in a case of redpass. The varying width of different trains and setting sensor cycle time was also hard to do - I must deal with 12 wide steams (with rods) and sometimes 6 wide short sets. The steam engines always crashed into my sensors, so I put them more far away from the tracks, resulting in non-detection of 6 wide trains. And if the sensor doesn't catch a train at all, it will go on error at the next sensors, since it won't expect the train to be there, if the previous one haven't counted it before. The code issues have been solved, but I don't now what to do with different widths - at least at our own events we have train varyings between 8 and 10 studs of width, there are no oversized models and no original LEGO set trains. Also setting too frequent sensor value writing to variables lead to out of memory error, while setting it less frequent brought the possibility of missing short and fast trains. b) Play experience It is really nice to manage the traffic! When it finally started to work properly (at the fifth event), it was really cool to leave it in automated mode (it lets trains going through the station, and if a section get's free, it lets the next train) or set an ending or starting route for arriving and departing trains. The best part was BSBT 2022 in Schkeuditz, most of the participants really liked, that they need to drive their own trains according to the appearing signal aspects and not only following an another train as close as possible. :P I also created a loop-operation mode for myself if I'm not collaborating with someone else to create a layout. In this case the two group of block signals are logically connected, forming a third section between themselves (fig.5.), creating a double track loop, with four sections of each (three openline, one station section). Fig.5.: My Stadler KISS EMU on the outer loop, between two block signals. The inner loop's block signal gives one green, indicating that the following two sections are clear. You can note the SBrick Light hub and SBrick+ blocks in the middle, the WeDo 1.0 sensors on the sides of track, between the signals of the group. c) System components Bluetooth has is limitations, and pushing 12 different hubs to this project was quite overkill and unexpected even from the SBrick-team - but it works. For first I had many connection issues, it was really lucky moment when all the 12 hubs went online and connected to my PC, but later I found a "wizard" option, which seemed to be doing nothing, but after quitting from it all connections got resetted and all hubs went online instantly. So no more angry waiting, pairing and swearing at it. SBrick lights are really nice, they can be powered both from internal batteries or 230V AC with power supply cable, for a use like mine the plug-in power supply is preferred. The option of programmed handling of 24 different channels is superb. SBrick hubs are now well-known over the world, they do well, the SBrick+ hubs can handle the input, unfortunately the newer sensors have no more PF-connectors, so these SBrick+ hubs work only with the rare WeDo 1.0 units, it is quite a hard limitation. You can see my system in action in the following video: ...and I felt really honored to have a mention from @michaelgale and Enrico Lussi at their articles from BSBT 2022: Michael Gale's article at BrickNerd Enrico's article at BMR 6. Future plans The system will be fully done, when the P40 switches of FXTracks will come out and I can replace all my old R40 9V points to fancy new R104 ones (fig.6.). I am too lazy to motorize all my 9V points currently, and when I competely rebuild my layout to incorporate the new points I'll do the missing motorisation progress, too. Fig.6.: Comparison of my current layout using R40 switces (bottom) and the future layout with FX Tracks R104 switches (upwards). Your comments and critics - as always - welcome. Feel free to share your impressions! :)
 -
 Hi everyone Last weekend the Bricking Bavaria 2022 took place in Fürth, Germany. LEGO builders from around Europe travelled to Fürth to show their models. This year large cranes, lang heavy load transporters and even a technic locomotive in scale 1:17 were shown. It was really inspiring to meet other builders and learn about their building techniques, concepts and how their model work. For all people who had not the possibility to come to BB22 I cut a video with as many models in action as possible.
 -
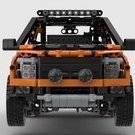
Hello everyone, let me introduce my latest creation. Ever since I get 42093 corvette I had an idea to disassemble it and use all this parts to create something playable and offroad capable. This 1:15 model of legendary F-150 truck was made with Power Functions elements and Sbrick for future truck trial competion or just for indoor fun (because of the weight (1250 g) I think this is not very competitive truck). It was a long project for me because of time constraints so I had started it before LEGO release their bigger one. This model has 4WD transmission with 2 L-motors driving each axle separetly (driving ratio - 3,5:1), servo motor for steering. Front suspension is independent double wishbone, rear is live axle with panara link. The model has openable doors, sunroof, hood and tailgate. Instructions in pdf were made in Stud io (my first experience with this software so it took a long time). Link for instructions: https://reb.li/m/93403 Also I created some additional color options with available parts. I hope to add instructions for those and the video with the orignal orange one later.
-
hello hello guys im at the moment also working on a similare crane, a ltm 1050/1055/1060 a mixder of those three. it has one axle less, but im trying to implemte crape steering too the all wheel steering, also im building it as a all axis driven vihicle. problem now is not the switching between the two steering modes, but the axis that connect the transmission to the gear rack thats steering, because there is just to too much play at the end of the system. important to know is that im building this with flying axis and at the end of the transmission i have used a wormgear and a 20 tooth gear so the play build up between the 20 tooth gear and the gearrack at the end of the system. So my question is how to get rid of that play, and im pretty sure there has to be a sulotion because im very certain im not the first person who has build a model with flying axis that are steered
-
 Hello, Almost all of us use Sbricks as just "long range remote control with smooth speed control", right? It take time to know more about Sbrick functions that can be programmed using Profile designer. New possibilities, opened with Sequence and Circuit, was not presented and described well in guides (SBRICK Team should do a detailed guide and how-to manual). So I have to learn them by myslef. Car is just a mule for all functions we planned. So no need to describe design. We did it with my son for robotics contest in his School in January. Functions Independent suspension openable doors, including motorized rear door Rear wheel drive and steering Auto turn lights (+ manual buttons) Auto emergency lights (+ manual button) Auto backward drive light (+ manual button) Daylight and rear lights powered with solar panels All electronics 2x L motor for propulsion Servo motor for steering 2x LED for turn and emergency signals 2x LED for front and rear daylights 1x LED for backward drive signal M motor for trunk door opening WEDO tilt sensor for safe/dangerous drive control 1x LiPo batery 2x Solar panels 1x Smart Brick 1x Smart Brick PLUS Control profile is a mess of buttons. I think I need a real designer to design something nice in designer profile Small buttons are circuits, that are ON on the start, and no need to press them. So that's why I make them small (May be, hiding them is the better design decision) For example, circuits was used to make aut turn light: left or right turn LEDs are on depending on SERVO motor rotation direction. Circuits are like "IF" functions, that can be linked any port of Sbrick, but it is not described in Manual, so I have to expore it by myself. Round sequence buttons work like ON buttons but with programmed timings and power. So I can do blinking lights with described intervals of LED on and pauses between. The same I can do with motors. When driving, you can see that some sequence buttons on the iPad turns ON automatically (I don't press emergency, backward or turn rights at all) Another experiment: solar panels. They work well with LEDs. They even make work Sbrick. But too weak for motors. I saw some moving cars on YT with one solar panel and one motor under bright sun, but I can't name that "CARS" - just some liftarms and wheels with solar panel and M motor. My car is too heavy. Almost all functions can be done only by Sbrick. Sbrick PLUS is only used for connecting WEDO Tilt sensor. Tilt sensor detects "agressive driving": fast acceleration or brakes, crashes, shaking and roll over of course. Then circuit sends command to emergency lights. Another function I planned, but failed: automatic rear door opening detecting hand or leg under the rear bumper (like modern cars do). Unfortunately, I can't set up WEDO distance sensor. It should detect leg and open door only at small range. But everytime it detects surface under the car - it opens the door I also have to do some tricks, for example "all off" circuit, to prevent manual turn off emergency and rear drive light after every auto turning on... I think, this can function can be useful for big supercar scaled models or truck, especially for events. But Sbrick team shoud do a user friendly predesigne profiles for that and do a detailed manual for every function in profile designer. And I am also waiting for iOS support drivers You can turn on english subtitiles in the video. Describing how to programm all that buttons in Designer Profile need a separate video. Thanks.
 -
 Today I like to show you my latest MOC: The Mercedes Zetros 1833 Expedition Truck 4×4. It's my second LEGO Technic Zetros in an approximate scale of 1:13.5. The construction time was actually only three weeks. Then the truck was finished by and large. The extensions and improvements took another 11 months. For the impatient among you, here's the video first: This MOC was originally designed for lightweight construction, best off-road capabilities and adequate speed. Therefore I completely redesigned the chassis and the axles. And because it has to work in forest, desert, arctic and jungle, I designed the chassis and drive as simple as possible. Each wheel of the 4×4 truck is driven by an XL engine. Via a 90° deflection via knob wheels, the drive goes to planetary gear. Thus the highest possible torque is available at the wheel. The steering is done by a servo motor. Two SBrick are used to control the truck. In addition, a Power Functions infrared receiver is installed. The Zetros draws its energy from two large PF battery boxes. The lightweight construction was not quite successful. The Zetros weighs 5.7 kg including batteries. Therefore I had to reinforce the springs several times. Now the long red springs are in front ( a bit softer ). In the back there are four yellow, hard springs as well as two spring-loaded shock absorbers. The shock absorbers were necessary because the body quickly built up during off-road driving. So the truck is very stable and easy to drive. About the functions: At the front of the Zetros there is a cable winch with pulley and hook. The winch is operated via one of the SBricks. In the rear of the fully equipped superstructure there is a garage for an ATV. I control its winch via the PF IR. The ATV is quasi a “MOC in the MOC” and of course fully functional. It has a fake V2 engine and rear axle suspension. For a long time I worked on the retractable awning. This stretches itself. The motor, which is hidden in one of the built-in cabinets, only rolls in and out the fabric. The awning is also controlled via the PF IR. A real highlight is the lighting of the truck. Functioning front and rear lights go without saying. The indicators also work on the left and right as well as on the “warning lights”. There is a floodlight bar on the roof. And because it is equipped with an odd number of single LEDs, there was one left. Well, now the truck even has cabin lighting. For interior design. There is a passage between the driver’s cab and the superstructure, as in the original, which is covered at the top and sides with a flexible rubber bead. In the living area there is a loft bed (above the ATV garage), a small bathroom with a suggested toilet, a suggested kitchen block (which hides the winch for the ATV), a closet (which hides the mechanics for the awning), a table and two storage compartments (one is empty, the other contains the awning shaft). On the roof of the driver’s cabin is a luggage rack with two expedition boxes (what’s inside, I reveal in the Behind-the-MOC video) and three canisters of water and diesel (what else). I hope I haven’t forgotten anything. More photos of the finished Mercedes Zetros 1833 and the Work in Progress of the Zetros can be found on my Flickr channel.
 -
Hi everyone. I show you my project of a fire brigade barracks. The first three renderings date back to March 2016. It took me a few months to recover all the necessary pieces. Over time there have been several changes, including the addition of a courtyard with several other small buildings and a maneuvering castle (the building that use firemen to practice). The original idea was to replicate an existing barracks located near where I live, in fact, soon the project was transformed into something certainly simpler trying to bring together in the same building an office area and a car storage area. Currently I'm working (through stud.io 2) to version 3.0 of the barracks, you see the first renderings in the last two photos in this topic. Version 2.0 was made with the use of a Sbrick, I leave videos demonstrating how it works. And next next step... Fire Station 4.0 powered up by PFX Brick. Fire Brigade by Ario Gaviore, su Flickr Fire Station by Ario Gaviore, su Flickr Fire Station by Ario Gaviore, su Flickr Fire Station 3.0 by Ario Gaviore, su Flickr Fire Station 3.0 by Ario Gaviore, su Flickr
-
 Some month ago, I discovered the Сокол -80M (Сокол = Falcon), a heavy Russian crane with a lifting capacity of 80t on a two stages telescopic boom, thanks to another couple of hour spent on Youtube instead of working. See the video here (starting at 1:38) After some difficult search, I found that two variant exists, the first one is Falcon 80.01 and is mounted on a wagon for railway crash salvage and recovery, the second one is Falcon 80M which is mounted on a self-propelled tracked vehicle equipped with outriggers, able so to be also used in hard off-road environment . It is this version that kept my attention. The Lego Version This MOC is ‘inspired’ by the Сокол-80M more than a real scale reproduction. All the pictures are availavle on FlickR The transporter part is mounted on two track and equipped with deploying outriggers adapted from the 42009 Mark II Mobile crane. I had to modify them in order to avoid clash with the tracks There is 4 functions integrated in the transporter: Left track + Right track with a PF-L motor each Deployment of the outriggers through PF-M Extension of the stabilizers through PF-M These functions are controlled by a SBrick and powered by a single rechargeable battery installed in the cabin. The superstructure supports the main mast which is erected using two linear actuator. Due to the gear reduction (PF-L > short worm gear > 20T > LA) it moves very slowly but it works. I would really love to see one day Linear actuator twice the length of the current ones. Superstructure is installed on a 60t turntable and integrates all the functions required to operate the crane: Rotation of the superstructure through a PF-M Erection of the mast through PF-L Deployment of the telescopic part through PF-M Cable operation through PF-M These 4 functions are also operated through a dedicated SBrick powered by the battery. The only cable passing through the turntable is for the electrical alimentation The transporter and the superstructure are independent and can be separated. The assembly is done by simply clipping the turntable onto the transporter. A video : Good and to improve: Good : It’s like a mobile crane but more badass. Each transporter and superstructure can be controlled independently from the other Could have been done better : The visual aspect of the transporter and the crane cabin are not really perfect. I won’t lie, reproduce real machine at a mid scale is still not my cup of tea. What could be done better: Upscale it. Bigger, more space, more possibility. Thank you for reading
 -
I am continuing to explore the fascinating world of the pipe transportation with a new prototype. You may already have seen it on youtube, I’m a bit late to post here (busy week-end). If you have a good memory, I did a first prototype on track (here) that had some limitation; in particular it couldn’t transport more than one pipe at once. The complete album is available on FlickR Prototype 2. For this second iteration, I started again form a white sheet to try something new : The transporter is now on tire with multiple axle steering for a good maneuverability and good translation speed (more adapted to road). I choose to keep two cranes for the consistency with the first proto. First advantage this allows making them smaller, as each crane support almost half of the weight of the pipe they don’t need to be reinforced and a mini actuator is enough to make them move. Second advantage is that the pipe remains horizontal even if not loaded exactly on its center of gravity. What’s inside ? There is 6 functions in this truck (5RC + 1 manual). Propulsion on axle 3 and 4. Steering on axle 1-2 and 5-6. The cranes : 1- 360 degrees Rotation. 2- 90 degrees Lift. 3- Cable. The truck was built from the center to the extremity, both crane are a copy-paste and are actuated by the same motors placed in the middle of the truck. Advantage: the crane move simultaneously and are always in the same position, drawback: you can’t use only one crane if you want to (I don’t know why you would have to use only one crane but well.) This was a choice at the conception because the goal of this prototype was to test the concept. With an alternative built it would have been possible to upgrade the truck so each crane have its set of motor , and the simultaneous movement is manage through the software (because yes, SBrick allows you to control several port with one command) Last functions are the additional lateral support that are deployed manually. They were added lattely in the building process (when I tried to install a larger pipe that clashed with the cranes), so I did not had enough room left in the truck to install the pneumatic line. Not a big issue in my opinion, I will do better next time. Good and not compare to the first prototype: Good Can transport more than one pipe Can load/unload up to two pipe in total autonomy No real length limitation Better road capabilities Not good Still requires a manual intervention to catch the pipe Range of operation : Cranes are not long enough to load the additional support. The dual crane are still not independent. Some improvements are still possible. So, project to be continued. Thank you for reading Edit: One additional word: in the video you can see a support vehicle. It is a not-so-good mini forklift only used to load the truck, It has been possible by the use of a 3rd Sbrick (both vehicle controlled through the same interface) and 4 M motors. Dedicated video here (yes I was terribly boring when I did the miniature ):
-
 Hey guys, sorry I haven't posted in a while. I've had the clips to make this video for 2 months now, but not enough time to edit. Anyhow, with that said, here's what I have done. I have rebuilt both of the rear axles so they can be driven by 2 L-Motors, and rebuilt the front axle so that it can be steered by a servo, and still be able to fit an engine and have room in the cab for other motors. I also rebuilt the front of the truck since it seemed too sparse to me, but I've left the rest of the truck (besides some of the internals) original. I decided I only wanted to use a single Sbrick, and I had only one port left, since there was already an M-Motor in the model to drive the functions connected to the distribution gearbox, so I built a custom sequential shifter that I could fit in the cab, and access the axles of the changeover catches in the gearbox, and thus shift through the functions sequentially. This is done with one M-Motor. All of the internal mechanics of the gearbox were left stock, besides the elimination of any white 24 tooth clutch gears. I did not change the rest of the model that much, though I did think having an inline-4 seemed kind of lame, so I put in a V8 instead. i will not release any instructions due to the extense of the modifications. Please enjoy the video and photos below, and feel free to leave a reply!
 -
BuWizz or SBrick?
Tarix819 posted a topic in LEGO Technic, Mindstorms, Model Team and Scale Modeling
I'm thinking of getting a Lego device that will give my models more power and allow me to control them outside and from long distance using my smartphone. As far as I am aware the best two options are BuWizz and SBrick, however I am not sure which option is best, as comparisons I have seen have never determined a clear winner. SBrick is way more affordable, more compact and seems to be popular in the Lego Technic community. I only learnt about BuWizz recently, it seems to generate an insane amount of power but it costs over twice as much as an SBrick and is bulkier, plus I already have 6 Battery Boxes and it would be a complete waste not using them. Of course they are both clearly better than the Official Lego PF IR Sensors I am currently using, which are god awful past a 2m range and are useless outside, however I would like to know people's thoughts, opinions and experiences to help me decide which is best value for money before I blow loads of cash on a toy. Currently I am leaning towards SBrick, but from what I've seen online, BuWizz looks like a viable option also. Cheers -
At the beginning of 2018, TLG has released a new series of Lego City sets, including the 60188 Mining Experts Site with a big drilling machine called The Crusher. It’s some sort of a hybrid between a tunnel drilling machine and a bucket wheel excavator. #Makeitbigger I’m not a big fan of re-build/improve official lego set but a take one CITY set and #Makeitbigger in TECHNIC is surprisingly challenging. (A good idea for a contest in my opinion). The Crusher XL’s MOC is not an exact upscale of the 60188’s Crusher, I built it like a “bigger” one, but still at minifig scale, with Bluetooth control through 2 SBricks and some power function elements: - 1x Battery Box - 6x PF-M Motors - 2x PF-L Motors - 5x PF-LEDs - 3x 15cm cable extensions - 1x 50cm cable extension The main differences with the original model: - The tracks are doubled and driven by a PF-M motor each. - It is composed of two parts. The lower part is the vehicle. It is built on a cross structure with track at each side. The 11x11 rack from set 42055 are reused to rigidify the assembly and support the upper superstructure. (LDD on google drive here) - The upper part is the superstructure. It can rotate nearly 300 degrees (the limitation is here to preserve the PF cable) and contains the electrical heart of the machine. The small PF-B battery box is place at the rear to be used as counterweight and completed with two boat weight (73090b);There is 4 motor and the 2 SBricks fitted in this little space to control the mains function. - The cabin is a reuse of the 42055 set. It fits well to this model and defines the minifig scale of the vehicle. The position has been forwarded for the operator to have a better view. - The arm is raised and lowered by cable actuated by a PF-M. A single cable is used between the two winches so it can accommodate the difference of position. - There is no moving counterweight (‘cause it is ugly) - The drilling head can tilt. It is mounted on a turn table and can turn to 360 degrees. The turntable is old and jam a little so the movement is not very smooth. Both drilling and tilting function are powered by a PF-L motor each. The Video : Possible improvements There are some points I initially wanted to include in this MOC but they wouldn’t have fitted in this scale. So I keep them in mind if one day I decide to build a Mk.2 : - 360 degree rotating track instead of a rotating superstructure: the challenge here was to find a means to control each 4 tracks separately (see picture below) - Telescopic arm: why not ? - Material belt conveyor between the dual drilling head like a bucket wheel excavator Thank you for reading :)
-
 Quick question for those who own a SBrick, do you know if a Samsung S5 will work with an SBrick? Considering getting an SBrick, but don't know if I have the correct phone for one. Thanks!
 -
Where are you buying your Sbricks? I ordered from the SBrick site a month ago and haven’t heard a thing.
-
Hi everyone, Finally, I have finished a project which I was building since last September. It is the scale model of the Intrac 2011 snow blower which is/was often used in the swiss alps by the army and other communal parties. It was the aim to create another working snow blower after the success of the snow blower from last winter. The blower is powered by three buggy-motors which are all controlled by a separate Sbrick. Each track is driven by two PF XL motors. The snow blower shoot direction is controlled by two 9-volt micro motors and the height of the snow blower by one PF L motor. As power source I used two Buwizz as battery or a custom lipo battery. After a certain time in the cold I had the replace the Buwizz with the custom lipo battery. Cheers FT
-
Today I present you the Dual-crane Pipe Transporter, a vehicle that came directly out of my mind. I mean, in my remain, I never seen a +real+ vehicle like this one. This kind of vehicle could actually been used on construction site of oilfield for the transport, the tracks allow a low ground pressure and good traction so it is suitable for every environment. The full review with all images are avialble at superk-technic.com/pipetransporter. I based the design of the Transporter on two vehicles from my Idea collection. The lateral reach stacker Meclift ML5016SR (on my to-do list for 2018) and a classical side loading container trainer similar to what has been released in the Mack Anthem 42078 set. The Dual Crane Pipe Transporter is a tracked vehicle equipped with a large flatbed to transport pipe of long loads, a dual articulated crane, 4 outriggers, a sliding cabin for improved view and a counterweight. The Power functions elements used in this MOC: 2 PF-L for propulsion (1 per track) 1 PF-M for the crane main structure w/ linear actuator 1 PF-M for crane articulation w/ mini linear actuator 1 PF-M for outriggers w/ 1 mini-LA per outrigger 1 PF-M for winches 1 battery box used as counterweight Plus 2 SBricks Bluetooth controllers. Thank you for reading.
-
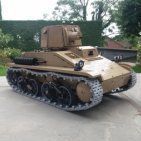
.thumb.gif.ad7c8d88b264ee812194946c07404504.gif) I've been a bit inactive on Eurobricks the past couple of weeks (partly due to making instructions for @Aventador2004's excavator, and making a MOC for a competition), so I thought I'd share a little tank I made to test the gamepad support that was recently added to the SBrick app: (which by the way, is awesome!) I used a 3rd-party Lipo battery to power the SBrick, which was placed between the two L-motors, and connected to the SBrick via a custom adapter cable: (the red thing in the photo below is part of it) It's quite a fun little thing to drive, and is nice and quick too: Some more photos:
I've been a bit inactive on Eurobricks the past couple of weeks (partly due to making instructions for @Aventador2004's excavator, and making a MOC for a competition), so I thought I'd share a little tank I made to test the gamepad support that was recently added to the SBrick app: (which by the way, is awesome!) I used a 3rd-party Lipo battery to power the SBrick, which was placed between the two L-motors, and connected to the SBrick via a custom adapter cable: (the red thing in the photo below is part of it) It's quite a fun little thing to drive, and is nice and quick too: Some more photos: -
Here's a little something I've been working on for a while now, mainly because I just didn't have time to edit the video. Instructions should come out late 2017 to early 2018. The video link is below, and some pictures after that!! Before anyone else asks, I fixed the steering, it was something purely wrong with my configured profiles settings for the Sbrick, but no one could have known that ;) Enjoy!
-
The Cossack is an off-highway bed truck, designed for heavy transportation in very hard environment. It’s the truck It was designed and ordered by ATK, specialized in heavy transportation for oilfield operation, and built by Option Industries, a Canadian manufacturer. Some information and images here (in French) . And video here on youtube and here on facebook. Like the real machine, the MOC is a 6x6 suspended motorized articulated tracked truck. There is 4 power functions piloted through a SBricks Controller: 1 PF-XL motor for the propulsion, no central differential, no reduction 1 PF-M motor for the steering through two mini linear actuators 1 PF-M motor for the main winch (worm gear + 24t) 1 PF-M motor for the secondary winch (worm gear + 8t) Some details: The front axle is suspended thanks to 3 Steering Arm 57515 and the front axle suspension are mounted horizontally. The pivot as composed of a steering ball joint and steering arm. The movement is done through two mini linear actuators powered by a PF-M installed on the main body. The main structure (dark bluish grey) is the spine of the truck. It’s this part that supports the entire load in the truck. The design is not very sophisticated but it is very stiff. All the motors are integrated to this structure. The dual suspended axle is inspired from the Arocs one. Both axle are linked by a mini-turntable allowing free move. There is two winches, the main one at the front of the platform, the secondary winch can be found at the tail. Thank you for reading, A video to finish, and if you want more information about this MOC you can jump here to my website. Best regards,
-
 I've wanted to build another bike MOC for quite some time now, seeing that my Stealth Bike from 2 years ago had plenty of room for improvement. I wanted to make one that drives much faster and remains more stable than my Stealth Bike, and to get as much speed as possible out of the PF system. The idea for a second bike came after getting the 42054 set on discount. I saw the tires as a perfect opportunity for a bike, as their size means that I can make a bike large enough to fit all the electronic components inside. I also found that they are not easily tipped over, which is advantageous for a bike model. To reduce friction, I connected two L motors directly to a single wheel geared 1:1, which was a lot of speed for PF. In fact, I was very surprised that I did not have to use RC Buggy motors (which I don't have) to get such speed. The MOC features a modular build, with the rear wheel/suspension part being attached to the main body which housed the battery box, and the steering mechanism coming off of it. The suspension worked well and had decent range, and is not overly stiff. I used an interesting mechanism for the steering, which involved a servo motor controlling 2 links that steered the front wheel. However, I had to reduce the servo's angle to 45 degrees in the profile designer, as making the full 90 will cause the servo to stall. A small turntable allows the wheel brace (I'm not sure what you call that) to pivot as it steers, and there are handlebars that work. One thing I wasn't so happy with about this MOC is the large turning radius. Because I found large steering angles made the bike tip over easily, I had to make it small, and making U-turns in a reasonable space is nearly impossible. Another thing I didn't like is how steering must be done at low speed to prevent it from tipping over. This was worsened by the fact that it was quite windy the day I filmed it, which made it hard to control. Overall, this is a MOC I'm pretty happy about. I got lots of speed out of using just PF elements, and it did not become sluggish as weight was added on during the build. It was lots of fun driving it around, and remained quite stable without the use of support wheels Video: Photos:
 -
Even before the release of the Lego 42069 set, I’ve always wanted to make a 4x4 vehicle with triangular tracks. Seeing that the season is perfect for vehicles like these (the snow!), I decided it’s finally time I make my dream come true. The build started out with, obviously, making the 4 triangular tracks. Drive is transferred to the tracks via a large sprocket, and two small sprockets form the triangular shape. There are also two small wheels at the bottom that guide the tracks and help reduce slack. The track modules are attached to their axles with a small turntable, which allows it tilt back and forth and also keeps it well attached to prevent it from falling off. The axles are attached to the chassis with 4 suspension arms, 3 links, and 2 6.5L shock absorbers. The entire vehicle is driven by 2 L motors, with 1 per axle. A servo motor at the center of the chassis controls steering, with the front output controlling the front axle and the rear output controlling the rear. The drive/steering setup is similar to that of the 9398. Since there are no mechanical connections between the two driven axles, I added an extra M motor just to drive the V6 piston engine. The fake engine is chain-driven and can be seen by opening the hood, which can be locked in place. The model also includes Lego LEDs that light up the front lights. However, due to the bright sunlight when I filmed it, I could not demonstrate this feature. As for the performance, the model could drive on snow pretty well. The use of tracks over wheels was advantageous in that it has better weight distribution, which reduces stress on the motor. However, since tracks are a lot less grippier than wheels, even a small obstacle means that the tracks will slip, so I had to omit differentials in the drivetrain. The lack of differentials meant that one of the tracks on each axle will be stressed when making a turn, which is why one of the tracks can be seen driving slightly tilted when making a turn. Using rubber inserts, however, may have helped with the tracks slipping, but unfortunately I do not have any at this point. The tracks also feature stoppers on the back that limit their maximum tilt, as the tracks would often tilt too far in its initial tests, especially when overcoming an obstacle.The entire model is powered by a rechargeable battery, which, despite delivering less voltage than the AA battery box, gave the model plenty of power. Overall, I am very satisfied with the result. The model was a success not only in performance but also in aesthetics. In fact, I think this is my best-looking pickup truck model so far. Video: Photos:
-
The SBRICK profile designer documentation is pretty cryptic. Do the experts here at Eurobricks have some advice about using circuits and sequences to: 1. Gate a joystick control so that in one direction the motor only runs at full speed when the slider is moved all the way up (to 1.0), but leave the reverse control variable speed. Application: Flipper control for PKW's TC11 battle bot wheeled scorpion. The flipper fires with any forward motor motion, and often needs precise control when reloading. Gating the forward control will help limit misfiring. 2. Start a sequence from a button controlling a motor that is also controller by a joystick. Application: Automatically fire, and then reload the flipper.