Search the Community
Showing results for tags 'lego technic'.
-
 History For years now I have been following all content related to Lego clocks online. My love for real life clocks, with all their mechanical complexity and beauty, pairs perfectly with the art of Lego. I have even built a few Lego clocks by others over the years, (notably, some from @nico71, @KEvron , and Dillon Sharlet's recent wall clock on YouTube) but most of them did not end up working very reliably aside from KEvron's. It's insane the amount of hours I spent tinkering with their clocks years ago, for good reasons, though. These clocks were great and were a great accomplishment in of themselves, but they were not the most practical. Some you had to balance on the edge of a table and some you had to design your own wooden bracing so they could be held to the wall. Then came along Darrel Aldrich on YouTube with his wall clock designs. His clocks are designed to simply hand on one screw on the wall (using the Lego Art mosaic set hanger piece) and are designed around a few main "frame" pieces which allow you to place various axles to your heart's content. Not only do these frame pieces make it easy to design a relatively strong structure (still not as strong as Lego Technic bricks I don't think, as KEvron commonly used, but enough nonetheless), but they make it easy to place the axles and gears all on one plate, similar to a real clock. It uses a grasshopper escapement, which does not (theoretically) have friction when the pallets work with the escapement, which is good for Lego parts and just a great/interesting mechanism all around. After a few more years of not making any Lego clocks, this spring I finally built Aldrich's most recent automatic wall clock. Now, once again I spent a long time tinkering with the grasshopper escapement he used and ultimately, it was too finicky for me. Plus, at that point I also wanted the clock to be fully manual so that I could sleep knowing there was no electricity in it whatsoever. So two months or so after the first version, I re-designed the clock to his manual version of the wall clock and put in a grasshopper escapement from @Davidz90. David is the ultimate Lego clock wizard. He's made countless clocks and knows every bit about the physics involved in them. In fact, he even wrote a book, "Guide to Lego clocks: Science of measuring time with bricks," which can be found on Amazon. I read his book and asked him (way too many) questions about his various grasshoppers and clock physics. It even got me to start reading more articles and papers on clock physics/history, which I love. Again, a couple months later and (many) more versions tested and re-tested later, I arrived at the current version the clock is in. Intro The clock is meant to be fairly accurate, easy to mount, easy to adjust, and decently-good-looking. It can be within a minute accurate per week (definitely more if you really fine-tune the pendulum length) and runs for around 48 hours on a weight and chain system designed by Aldrich. I eventually want to design a proper box/face for it in the future and add more complications, but for now this is sufficient. Below is the video I recently made of the clock. It is not meant to be an elaborate video, just more of a quick review of Aldrich's and Ziemkiewicz's combined into my own clock. In the video description is a list of great Lego clock topics and YouTube channels worth looking into. I only posted one image to here because it won't let me upload more file sizes Specifications: 100% manual (no electronics), 100% Lego, 100% non-modified parts, only hung by one screw. Pendulum is two seconds and has been a few seconds accurate a day in my week of testing this version (under a minute each week). It runs for around 48 hours on an H-loop chain system (by Aldrich), where the chain is simply pulled up by a chain when needed. Escapement is a grasshopper from Ziemkiewicz. Pendulum is around 240 grams. Weight is around 860 grams. Gear ratio from 24 tooth chain gear to the 40 tooth escapement is 1:75. Honorable Mentions The following people have either helped me build Lego clocks or greatly inspired me to get into the craft (YouTube handles): @darrellaldrich8334 @davidziemkiewicz1350 @KEvronista @DillonSharlet Videos Mainly Used to Make this Clock
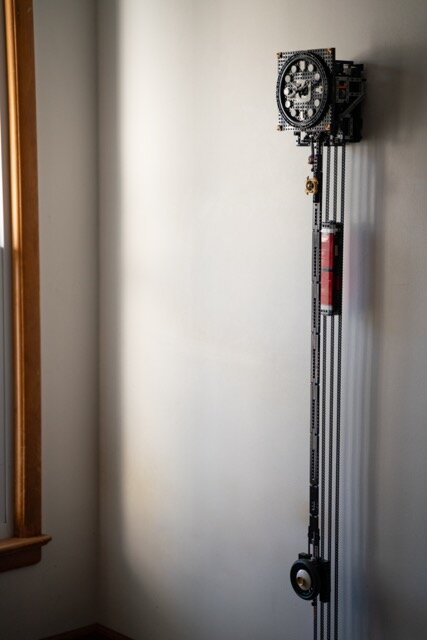
-
 Plymouth Barracuda 1970 Description: -1 Buggy motor -Servo motor for steering and steering wheel -Small power supply -Detailed interior Now on Lego Ideas! https://ideas.lego.com/projects/30f3a1a7-6e1f-422d-9fbb-3dde7a5937e8 All the photos on the link: https://bricksafe.com/pages/Michael217/plymouth-barracuda-1970 Join my group in VK: https://vk.com/legomusclegarage
 -
 Hi Everyone, I have made a video about creating a 7:1 gear ratio mechanism using just 2:1, 3:1 and 5:1 gears. No 28 teeth gears used. Youtube subscriptions appreciated! Kind Regards and keep building, Rob
 -
Hi there, excited to join this forum and to learn more about what others are building around the world. My favourite lego is Lego Technic and I enjoy making my own MOC creations, especially cranes. Hope to meet many people here soon.
-
 Hello there! American all-wheel drive pickup from GMC. The model is built as a continuation of the Chevy K30 Big Dooley published in 2019. Of the main differences - the muzzle of an earlier generation, a shorter base, the design of the frame and bridges was changed. Planetary hubs and CV joints are used in driveshafts from 42099. Drive - for each axle by L motor. Steering - M motor, Power - BuWizz, a canister with gasoline in the back, spare wheel, shovel and a box of lemonade More photos
 -
 Hi! Probably, I will show some upcoming creations from videos on my channel sometime :)
 -
Hi All, For those that like measuring and calculating things...like me...here's a video I made on measuring the efficiency of a Lego Technic MOC crane. Would appreciate any comments or feedback - it's a lot of work (but fun work of course) making a video so I do hope some people out there enjoy this kind of thing. Am always trying to improve my videos - am a newbie at it lol. If you have any video ideas around this theme let me know (unless you're making one yourself already). Even better would be if you could subscribe to my channel - that will encourage me to make more videos! It's hard to get content out there. Please share with your friends if you think they might enjoy it too. Take care, and keep building... Rob PS Don't forget to subscribe!
-
Welcome to my garage LEGO!!! Hello! My name is Michael. I'm a Builder from Russia, I love muscle cars! All three cars produced in 2019) Instagram: https://www.instagram.com/lego_muscle_garage/ Join my group in VK: https://vk.com/legomusclegarage Dodge charger 1970 Description: -XL7.2 motor for drive, 375 Horsepower under the hood! -Servo motor for steering and steering wheel -Small power supply -Detailed interior All photos on the link: https://bricksafe.com/pages/Michael217/dodge-charger-1970 Chevrolet Camaro 1975 Description: -L 5.7 motor for drive, 300 horses!) -Servo motor for steering and steering wheel -Small power supply -Detailed interior All photos on the link: https://bricksafe.com/pages/Michael217/chevrolet-camaro-1975 Ford Mustang 2005 NFS Most Wanted 2005!!! Description: -L 5.4 motor for drive, 500 hell's horses!!! -Servo motor for steering and steering wheel -Small power supply -Detailed interior All photos on the link: https://bricksafe.com/pages/Michael217/ford-mustang-2005 Enjoy your viewing! Rate, comment! Thanks!)
-
 Hi, I would like to present you my last creation - ukrainian truck KrAZ-255. I was inspired by the model which is available in PC game: Spintires. The truck is built in scale 1:23. I tried to implement some key features of real truck, like suspension, drive train, details like engine and easy aplicable additions, which are present in the game. Enjoy :) Some details: - weight: 995g - dimensions LxWxH: 49x15x18 studs (without mirrors and additions) - live axle suspension - separate drive shaft for each axle - 6x6 drive, no diffs (L motor) - steering (M motor) - front and rear lights - working fake V8 engine - openable hood and doors - additions! Video: Instructions: https://rebrickable.com/mocs/MOC-55793/keymaker/kraz-255/#details There are some additions too! All of them are easy to connect or disconnect to swap to another. The first is simple crate: The second addition is prepared to wood transportation: The last one is the most advanced one - the crane. It is also partially remotely controlled. Functions: - rising/lowering two sections of the arm - crane rotation - gripper rotation - gripper closing/opening - extendable and lockable outriggers - openable maintenance section More photos: https://bricksafe.com/pages/keymaker/4.-kraz-255 I hope you like it :)
 -
 Hi everyone, I have many lego technics sets and thousands of lego bricks for making MOCs and MODs. Therefore, I would like to share and introduce my new channel on youtube. I would happy to share and help or ask help from you by touching your interests what I did. Please subscribe and keep watching my videos, I will upload at least one video every week. Many thanks in advance for watching, Keep building and happy bricking!!
 -
Hi, I decided to continue building of MOCs inspired by vehicles available in Spintires. Here is my first clash with rather big scale model - scale 1:15. It is russian tractor Kirovets K700A. For purists, only LEGO parts. Some details: - weight: 1,92kg - dimensions LxWxH: 40x18x22 cm - switchable 2x4/4x4 drive (XL motor) - articulated steering (M motor) - 2 speed gearbox with neutral - working steering wheel - working fake V8 engine - suspension via articulated frame - easy battery case change - openable hood and doors - 2 available channels ready for additions More photos: https://bricksafe.com/pages/keymaker/5.-kirovets-k700a Video:
-
Welcome to my garage LEGO!!! Hello! My name is Michael. I'm a Builder from Russia, I love muscle cars! But this time I have prepared something special! Meet the Chevrolet K10 Silverado!!! Description: - 2 L motor for drive - Servo motor for steering and steering wheel - 1 Small power supply ( Hot swap ) - Counterfeit engine under the hood (connected to motors) - Detailed interior - Doors, hood and trunk open - Swap body -4x4 Instagram: https://www.instagram.com/lego_muscle_garage/ Join my group in VK: https://vk.com/legomusclegarage All photos on the link: https://bricksafe.com/pages/Michael217/chevrolet-k10-silverado-1985 For the first time I used the construction of the chassis separately from the body, that is, the body can be easily removed and any other body can be built on the chassis.
-
Welcome to my garage LEGO!!! Hello! My name is Michael. I'm a Builder from Russia, I love muscle cars! Chevrolet K10 Silverado 1985 Description: - 2 L motor for drive - Servo motor for steering and steering wheel - 1 Small power supply ( Hot swap ) - Counterfeit engine under the hood (connected to motors) - Detailed interior - Doors, hood and trunk open - Swap body -4x4 Instagram: https://www.instagram.com/lego_muscle_garage/ Join my group in VK: https://vk.com/legomusclegarage All photos on the link: https://bricksafe.com/pages/Michael217/chevrolet-k10-silverado-1985-update Trailer: - Platform lift - Working ramps - Retractable front wheel
-
Hi everyone! I want to share my work. It so happened that 2020 with all its cataclysms and difficulties was also not easy in building my own model. I took up the construction almost immediately after TС18, and now, after half a year, the project is completed. The Lamborghini LM002 aka "Lamborghini truck, Rambo Lambo" is an off-road truck manufactured by Lamborghini between 1986 and 1993. The LM002 was an unusual departure for Lamborghini which, at the time, was primarily known for high-performance, hand-built, super/sports cars. The LM002 was not the first of its kind to be built by Lamborghini. Two prototype vehicles, the Cheetah and the LM001, paved the way for LM002. Both vehicles used rear-mounted American power plants and were intended for military use, but were not well received. With the idea of using a front mounted Countach V12 to power the LM001 came the next model, the "LM002", which was the first of the three to see actual production by Lamborghini. pecifications: ·1:8.62 scale ·All wheel drive ·Independent suspension ·V12 piston engine ·Opening doors, hood ·Detailed salon ·Planetary wheel hubs Electrics: ·BuWizz brick – battery and receiver ·4L motors - movement ·Servo motor – steering · iOS/Android smartphone/pad with BuWizz app – Remote control ·It is possible to install LED lights from Lego Building instruction for Lamborghini LM002 you can find here on my blogpage, or on rebrickable
-
Hi, I present my newest creation – tracked Dozer Caterpillar D10T. I decided to go for old technic models style – without panels, frame construction. I like to see working mechanisms, the guts/insides (not sure which word should I use in this sentence, native English guys, please help me out :D) of the model. Here you have some photos, video will be available soon. I hope you like it Details: scale 1:17 length: 40 cm, width: 26 cm, height: 23 cm, weight: 1.65 kg drive – XL motor smooth steering thanks to subtractor – L motor ripper, raising and lowering – M motor ripper tilting - manual blade, raising and lowering – L motor blade tilting - manual tensioners for both tracks individual suspension for non-driven wheels working, fake, chain driven V8 engine openable doors locked tools compartment detailed engine bay and operator cabin Additionally: model in scale of technic figure power source – buwizz can be easily switched for battery box and two IR receivers model can rise itself above the ground with ripper and blade Instructions: https://rebrickable.com/mocs/MOC-59916/keymaker/tracked-dozer-caterpillar-d10t-rc/#details Video of upgraded version: Photos, before upgrade (more you can find here: https://bricksafe.com/pages/keymaker/6.-dozer-caterpillar-d10):
-
Hi, legofans! I have always been interested in American cars 70-80 years. In the list of some of the most unusual, I would place this here! Get acquainted my new creation of 2019 - Lego Chevrolet Silverado K30 Dually Crew Cab (Big Dooley) 4x4 lifted (absolute champion in title length) 1:13 Scale model of 1986 Chevrolet Silverado K30 crew cab dually. All wheel drive on two solid axles and 6 wheels with 68 mm RC4WD tires (copy of BF Goodrich A/T KO1) The modular design (body cabin and chassis are separate elements connected by 7 points) Electrics include: BuWizz, XL motor, M motor and LED lights Specifications: 1:13 Scale All wheel drive 68 mm RC4WD tires (copy of BF Goodrich A/T KO1) Solid Axles The modular design (body cabin and chassis are separate elements connected by 7 points) Electrics: BuWizz brick (or AAA Lego battery box/LiPo unit + IR V2 Reciever/SBrick) – battery and receiver XL motor - movement M motor – steering 2 LED lights iOS/Android smartphone/pad with BuWizz app – Remote control More information and photos you can find on my blog page. Building instruction is available now Video:
-
 Pan Dong presents. New mini truck, they are based on Unimog trucks. 4 wheel steering, this function is the focus of the building. Short wheelbase, portal axles, lightweight body. Two chassis models, like a RC car, one has server motor for steering, the other linear actuator and M motor . But , Both have the problem of turning to the imaginary position. L motor x2 for drive. I hope you'll like it.thankyou for watching. 樂高科技迷你卡車,Unimog 406/427,董攀設計,謝謝觀看! 這次拼裝的重點,在相對較短的軸距,實現四輪轉向,然後輕量化車身結構,模擬RC車的懸架扭動姿態。有兩種底盤模式,一個採用伺服馬達轉向,另一個是小推桿加M馬達。兩個L馬達驅動,RC輪胎。四輪轉向真是靈活很多,攀爬時候的優勢明顯,不過因為前後各採用兩組萬向節傳動,導致有明顯的虛位問題。伺服馬達轉向,效率直接,但是轉向有類似軸效應現象,車頭會左右擺動。小推桿加M馬達的組合,姿態很棒,不過向上攀爬時後橋壓力大,還是建議採用不轉向的後橋,會更加結實可靠。 Unimog 427 Upgrade Version Unimog 406
 -
 Hi! I can't miss the contest about Mars colonization :) My first idea was to create scientific vehicle to gather interesting objects on Mars surface. I take two Xerion tires, two more.. and I've stopped when all 16 Xerion tires were placed on my table. The transmission was very simple but steering system would be very complex. Suddenly I've remembered that I have many sport plans on this summer, and I simply have not enough time to finish this monster. Ok, let's build something smaller :) As far as I know, the first stage of colonization is complete due to this strange machine: Now we can find many roads, tunnels and construction places on Mars. My new model will deliver materials from spaceports to construction places and storages. The first prototype will have 6 wheels and AWD for high performance. Now I'm waiting for nuclear reactor for my vehicle :) To be continued...
 -
 Dear readers, For a new project that started a while back (about a year ago), I was investigating a certain track configuration for a tracked vehicle. It pointed out that I needed a lot of ground clearance from the track wheel, but the track wheel could not be two studs wide: the tracked vehicle is only 15 studs wide and a lots of gears, motors and linkages need to be in between. As you can see, the standard wheel above is two studs wide due to a ring of 1/2 a stud that supports the track. This ring is not always necessary. In fact, the tracks barely even touch this ring under normal driving. A lot of you will recognize the difficulty with this wheel: it protrudes half a stud to both sides. In many designs, the number of horizontal studs is uneven: an M motor, XL motor, frames, differential, everything has an uneven width when measured in studs. This enables a symmetrical design as Lego Technic has no beams with even lengths (only 3, 5, 7, 9 ..). That's why many Technic designs of this day are an uneven number of studs wide. This is in contrary to the olden days, where all Technic components and widths were even. Check for example the old style liftarms, differential, frames, motors and even battery boxes. With this theory lesson over, it is easy to see why this track sprocket introduces a problem: when the wheel is mounted in the uneven Technic system (to get a nice symmetrical design with uneven Technic beams), the wheel size is even! So the wheel can not be connected to a liftarm at the place where the axle connects to the wheel. There needs to be a distance of 1 stud to any supporting liftarm. This is mostly done with a bush or a 3L thick liftarm. This also means that to mount this sprocket very strongly, the minimum width of the structure (when fit in an uneven system) is 5 studs. Then I started thinking: how nice would it be if there would be NO distance to any supporting liftarm? In that case, the sprocket has to be only 1 stud thick and the supporting structure is only 3 studs wide. Also, the support ring has to go. This is an enormous space saver when the maximum width of your vehicle is 15 studs.. I decided to draw the part in Solidworks and print it with my own 3D printer. Out of curiosity, I checked GrabCad to check whether someone got the same idea too. To my amazement, somebody had already tried this part, with the internals to be the 40 teeth gear. This is done with a reason. A standard 3D printer is generally very bad at printing axle holes. If you draw the outline of a standard Lego Technic part (that has a nice axle hole) into your 3D printed part, the part will be connected firmly inside the model(nice) while the axle is inserted into a Technic part, so no troubles with cracking plastic will occur. In short, I printed that part. It didn't work. (See image below). It turned out that every 3D printer is a little different. A tiny offset can cause a diameter difference, which then will cause friction, because the track doesn't fit around. The wheel needs to be perfect to make the solution work. That's why I decided to design my own custom sprocket wheel from scratch. This was my first 'from scratch' attempt. As you can see, the pin and axle holes do not have great quality. A revised 3D design is in the image below. As you can see, there is a large hole in the middle. This hole fits two 4185 pulley wheels (shown right) very tight. This means the vehicle is connected to a nice and round axle hole, while the 3D printed part is also fit very well to the vehicle. The sprocket diameter is not arbitrary as the number of 'lobes' is fixed: there are no half lobes, otherwise the wheel won't work.. That means that for the same tracks, a limited number of wheel diameters exist. As you can see, there is a slight ring in the 1 stud wide sprocket wheel, not all track support is gone. The 3D printed results: I was really happy with the quality of this wheel, the drawbacks from 3D printing don't show up and the wheel is very strong and straight. In the image below, is is visible that the tracks fit very smoothly around without additional friction. It is also visible that the wheel is just as wide as two pulley wheels, so one stud. I was so amazed when the 42095 set was launched. There was my not-published-about part, exactly the same size, in a real Technic model! And now there will be 4 DBG ones in the 42100 Liebherr, which will drop the price. There is one 'slight' drawback though. My 3D printed wheel is only one stud wide, needing only a frame of 3 studs wide to support it. The new 42100 sprocket wheel has the 1/2 stud ring protruding out of it on both sides, taking the drawback of the old wheel onto the new wheel. That's a pity. It could have been so nice. Then comes the question: why would you 3D print parts? That's cheating. And I agree. It is cheating. I never do this in my models. You are allowed to check my YouTube. I even built of a 3D printed way of getting three axles through a Lego Technic turntable but never used the solution as I do like pure models. Then, why am I doing it now? Because currently, I'm using Lego Technic as a strong platform for a scale model that requires 100% of the quality of Lego Technic, but cannot do without adding custom parts. Even the most skilled builder cannot work his way round sprocket wheels that don't exist. That's why I see it as an engineering project, and from that prospect, creating your own parts (when all else fails or doesn't exist!!) does not show lack of skill but broadness of view.. Surprisingly, some other minds thought alike and brought a Lego Technic wheel of the same size on the market. Too bad.. Let's start building and stay thinking!
 -
in this topic i wanns hear about the shortage of Lego motor and your ideas the subject discussion will be based on the Powerfunctions series motor & Powered Up Series motor and the contents are here 1. Size Compared to Old Motor, Powerfunctions & Powered Motors are bigger with planetary gear(to get more torqe However, instead of getting enough torque, sometimes the size of motor is too big and need your idea or opinion about it(like problem with big size or nice experience) 2. Shape(or design) there was an idea(M motor was oval type, and L&XL Motor were difficult to hold conrrecly because of the round shape) the Old lego, on the other hand, close to rectangle write any idea on it please :) 3. Building system(Coupling method) its really nice for me but sometimes the rc car's wheel was disassembled while running because of coherence weakness and hope the coherence of Pin & hole was more stronger. write any idea or your experience on it too please :) 4. specifications Imao the most frustrating part is specification especially torque i saw that many ppl use motor in parallel to get enough torque or just satisfied with just moving even slowly I'd like to hear your opinions. Thank you.
-
Hi I'm L, still mainly play with PF1 motor even PF2 has been released for now With the PF2(new electrical system that broke the old lego paradigm) PF1 motor are no longer likely to come out anymore Imao So I'd like to make compatible motor for the PF1 electric building system myself consider the proper shapes, specifications, and placement of the wires and while im making it, i wanna make it really good and nice to use, over lego motor to acieve it, I want to hear the user's reaction or wish. I look forward to hearing from your idea Question here 1. Which is more important (1) Torque(strength) (2) Speed 2. Size(Size and torques are in semi-parallel relationship) (1) 2x2(Micro motor size) (2) 2x4(S size) (3) PF Series's was fine, just need more torque 3. Shape (1) Round (Like XL Motor) (2) Square(Like Old Lego Motor) (3) Oval(Like M Motor, Flat Bottom Type) 4. Building type (1) Pin & Hole (2) Stud & Tube (3) Axle & Axle Hole 5. the unit of length (1) odd number(etc. 3x5x5) (2) even number(etc. 2x4x4) 6. Power Supply Method (1)PF1 (2)PF2 and last, I'm going to post it on the crowdfunding site if it's a good response after I've made the motor brick prototype. So what if there was a third-party motor with better performance? 1) If the performance is good, it can be purchased. 2) Because it is not Lego, it is not purchased. thanks for your asnwer and have a nice day~ and any critical, basic ideas are always welcome from L
-
 Hey everyone, I just wanted to share my upgraded MOC from TC27 (yes, it's been a while) and show a recent photo day that I felt like taking. I decided to remove the canopy for this shoot and showcase the semi-upgraded version from the base that I had designed. This model utilises a flatbed and a trundle drawer in the back. It is straightforward, and I guess it could fit into traffic if it were big enough for Aussie roads. Let me know if there's room for an Aussie ute in your hearts. I do understand that this is a very international LEGO space, but I love seeing everyone's reactions to how we like our vehicles down under!
 -
Hey everyone, I stripped down my Dodge Demon MOC to the chassis and I want to modify it in a way that will make it look more rugged and potentially even have some RC components added! Do you all have any suggestions that you could please give to support the build?????? Here is a before and after of the chassis as of today: The Changes I have made are the following: - Improved central ground clearance - Components of the chassis have been removed to allow the fitment of bigger tyres - Larger Tires - Some reinforcement of the suspension struts and how they connect to the chassis I have a workbench post on rebrickable with a video! https://rebrickable.com/users/CrazyKreations/workbench/6109/ What should I add or change next?????
-
 another alternative model with the education set 9686 Simply mechanized, the helicopter takes off and starts its circular flight https://pin.it/58GxKJq