Search the Community
Showing results for tags '42043'.
-
 https://rebrickable.com/mocs/MOC-30791/klimax/manitou-telehandler-42043-c-model https://bricksafe.com/pages/klimax/manitou-telehandler Inspired by Manitou mlt telehandler, including color, shape and functionsBuilt only from parts of 42043 Merceder Benz Arocs setKey features: HOG double axle steering Opening engine hood Opening drivers cabin door Tilting and extending arm with tilting option of attachments 6 simple exchangable attachments: Forks Construction bucket Agricultural grab bucket Bale clamp - 3 sizes or versions (all atachments functions are held in place by friction pins and can be built at the same time) Trailer with palletes for buckets See those videos, so you could compare all small details presented on model:https://www.youtube.com/watch?v=Zdtu7zKfezUhttps://www.youtube.com/watch?v=UcLDUUyb1lsAttachments:https://www.manitou.com/en/lp/VPBMxi8AAC0AW-v3Functions, that didn't fit such small model: Crab and single front axle steering Moving steering wheel while steering Arm is located little higher on chasis to allow steering, decentered 0.5 stud to the right All functions manual, no motor or pneumatic 85 pages of generated instructions (A4 landscape orientation) - sample on bricksafe It goes straight to my 42043 c-model alternatives collection I have built or finishing building, see bellow
 -
https://rebrickable.com/mocs/MOC-28810/klimax/caterpillar-m322d-wheel-excavator-42043-c-model https://bricksafe.com/pages/klimax/caterpillar-m322d-wheel-excavator-42043-c-model Wheeled excavator built just from 1 model parts (42043 Mercedes Benz), with many functions FUNCTIONS: unique: 2 functions transfered from base to superstructure through big turntable - steering and engine drive manual functions: HOG steering via beacon light stabilizing legs (2 side on front, 1 working as shovel at back) operated with the same beacon light (not enough power to lift excavator :( ) gear for rotating superstructure working 6piston inline engine driven by rear wheels + openable hood handle to operate function of the attachment (*1 , *2) motorized functions: motorized pneumatic piston battery box working as counterweight pneumatic function: 4 pneumatic pistons raising boom, dipper and attachments attachments: *1 grabber shovel *2 pneumatic hammer *3 big excavator bucket *4 smaller excavator bucket (all of them use smaller pneumatic piston, so it can't be built at the same time) Superstructure bodywork inspired by official lego 42006 except 42043 model, you would need: * 2 loom bands (front stabilizing legs operation) * 4697b pneumatic T-Piece from 42043 spare parts 183 pages of generated instructions (A4 landscape orientation) for base, superstructure with boom, 4 attachments and tubing schema - sample on bricksafe Suited for experienced builder! 3 downsides: * not enough gears for front stabilizing legs operation so not enough power to lift excavator :( * superstructure is heavy due to motor and battery box and is leaning towards left side * boom is heavy, even though it is raised via 2 pneumatic pistons it takes time function color mapping schema orange x motorized pneumatic piston dark blue x supersturcture rotation azure blue x rear wheel engine drive green x operation function of attachment red x base functions operator --------> gray steering --------> pink stabilizing legs
-
https://rebrickable.com/mocs/MOC-26188/klimax/first-responder-42075-alternate-42043-c-model https://bricksafe.com/pages/klimax/first-responder-from-42043 Inspired by official lego 42075 with enhanced functions:* HOG front wheel steering* rear and front suspension* opening hood, doors and back side compartments* flat 4-piston engine connected to rear axle* front winch with hook* rear fire hose* elevated boom with spotlight2 variants:* fire in unavailable area - big water tank* vehicle accident - small water tank + surveillance drone, traffic cones, water pumpExcept parts from 42043 set, you would need string53 pages of generated instructions (A4 landscape orientation) for both versions - sample on bricksafe
-
I have just turned 30 years old! Celebrate with me and get 30% discount on all my instructions, today and tomorrow: Go to my Sellfy Store: https://sellfy.com/m1longer Or to Rebrickable: https://rebrickable.com/users/M_longer/mocs/
-
Part way through the build on this one got to the point where power pack is in so wanted test all was working in movement. Everything is fine apart from the pneumatics they just don’t work have rechecked all connections no kinks etc. One thing when I switch power on there is a short movement but not constant. Should the gig attached to the blue pump constantly move round to create the pressure. Just not sure what the issue is? Can anyone help
-
Inspired by official lego model 8264 Hauler with enhanced functions: * Openable hood with fake 3-piston engine (driven by front wheels) * Independent rear swinging suspension * Articulated chasis with big and small turntables in the centre - HOG controls turning, tilting of the model copies surface it runs on * Bigger manually operable dump bed with automatic closing back side via string * white bodywork, black cabin, gray dump bed There is no motor and battery box (as in original model), I wanted to have all functions operated manually, it gave me place to create exhaust system behind the cabin Except parts from 42043 set, you would need at least 30cm string 74 pages of generated instructions (A4 landscape orientation) details and instructions: https://rebrickable.com/mocs/MOC-23454/klimax/volvo-articulated-truck-42043-mercedes-benz-arocs-3245-c-model-inspired-by-8264-hauler more pictures: https://bricksafe.com/pages/klimax/volvo-articulated-truck-8264-alternate-42043-c-model Model sturdyness tested by 3 years old child :)
-
 Presenting my alternative model of the 42043 Mercedes-Benz Arocs - Tow Truck Features: Opening doors Opening bonnet 4l-engine HOG-steering Dependent suspension Boom raise Boom rotation Boom extension Hoisting Tow raise Tow fold Video: Images: Instruction: https://boosty.to/paave/posts/c1e67484-6739-4c7b-92e6-0aec3de99b91
 -
 Hi, I stored my MB Arocs for about half a year. I rebuilt the B model into the A model, but the pneumatics just won’t work. I looked for any kinks in the hoses, tried the pump, tried the cilinders with nothing attached, and it all works fine. The cilinders are also re-oiled. If I attach the first section of the crane, it works fine. However, if I put the second section on, the cilinder can’t lift the crane. The problem lies just with the first cilinder. I even swapped the cilinder for the second section with the cilinder for the first section, but both cilinders seam too weak for the weight of the crane. I’m not really experienced or anything with this kind of stuff, I just build and play, and if I make MOCs its certainly not with pneumatics. I read several forums but all the solutions given there were the things I already tried. So, has anyone an idea what this might be? Maybe because I stored my Arocs the cilinders caught too much dust? PS. I also thought about adding an air tank, but I don’t know if that solves the problem?
 -
Hello everyone, I have purchased a lego power functions led light on Bricklink, to light up my 42043 MB Arocs. On real life trucks you often see that the rear lights are ‘double’. I modified the rear bumper of the Arocs to create this ‘double’ lights. But, the Lego LED light has only one light bulb for every side, so it will not shine trough two holes of a technic liftarm. Anyone any ideas how to achieve this?
-
Hi everyone, I've finished trying to RC my 42043 and it seems that the PF L motor has issues providing sufficient power to drive the set? I obtained instructions from the creator of this video (https://www.youtube.com/watch?v=BpP_05uxKqs&t=22s&ab_channel=PawełWojnarowski) and also checked PPUNG DADDY's 42043 RC video (https://www.youtube.com/watch?v=O8easq7ueIo&ab_channel=PPUNGDADDY(뿡대디)-LEGOTECHNICRC), both used an L motor with no problems. Here's a video of the issue: https://youtu.be/J8P13WLPzN8. As you can see in the video, the motor loses power after driving for some time, eventually being unable to drive at all. The problem is worsened when I try to drive and steer at the same time, it's almost impossible to drive and turn. I have tried swapping the tyres around, changing batteries, trying a V1 and V2 IR receiver, switching positions of the motor and servo cables, and using a new L motor. But the problem still persists. Here's a photo of the L motor: Could it be because of excess friction introduced in the rear axles during construction? Because I noticed when I lifted up the rear axles, the motor spins the wheels at its standard rpm, BUT only 1 wheel on each axle spins, the other is stationary. Then when the wheels contact the floor, the motor suddenly seems to struggle with driving the thing. Hence I was thinking could it be that I built the differential too "tightly"? Appreciate any help from the technic experts in this forum, thanks in advance!

-
Hello, I am new here, this is my first post, and my english isnt perfect, so sorry for any mistakas ;) I was worked on this project for long time (its still not finished...), and now I can show some pics. Its cabin from Arocs 42043, but all the rest is my design ( I would like to notice, theres some designs, from people on youtube, this forum etc, because if something is good, I dont want to invent it a second time :D ) Soo... TRUCK Cabin has suspension - rubber blocks Drive - 6x4 - XL motor Steering - Ackerman system - Servo motor Suspension - Front - Solid axle on leaf springs (this springs are made by Efferman, you can buy this parts on Shapeways) -Rear - Solid axles on leaf springs and air assist ( system, that minimizes stress, works like tandem-axles, air pistons are connected all together, so if one axle is going up, second axle is going down without pressure change) You can change height of rear axle/rear part of truck, like real one) 2x air connections for trailer 1x connection for trailer engine TRAILER (its not perfect, I want to use power from truck, so theres no battery box etc) Suspension like in truck, but no air assist Detach deck by pins, they are moved by air piston I will rebuild it, because I want make it better. any Q just post it, if You want more pics etc i will try to make it for You. I have no instructions, because I like to build like "sit & build" no programs, projects etc, but, i will try to help, if someone want ;) PHOTOS > https://bricksafe.com/pages/Hubbo/
-
 First if all I totally forgot to post this model here on the forum, guess better late than never Now to explain a bit about the motives behind this model before I go into specific details. Counter on my youtube channel was nearing 10.000 so I wanted to make something trully special. I was not sure what kind of a model I want to make, a sportscar, offroader, construction machine, so the decision came to MAKE ALL AT ONCE. The model would also incoporate ideas from the last decade of Lego technic product to go along with my 10 years on youtube. Starting with the design, the front end is heavily inspired by 42083 and 41999. Notice the front wheels are from 42056. The first motorized function is adjustable front suspension inspired by 8297: The front end can raise by 3 centiemetrs to allow the model to negotiate rough terrain. Continuing towards the cab, which was inspired by 41999, we can pop up the hood to find a green colored 10 cylinder engine inspred by 42030: Cab doors are inspired by the doors from 42069, which open at the angle. Opening the doors you can find a full interrior with two adjustable seats andworking steering wheel: In the center of the cab there is a gearbox which movel lineary to switch between 3+R gears using a special mechanism. This emchanisem translates the sliding action into usable inputs for the gearbox: Going further back, there is a section holding the battery box and, orange lever and utensils on the left side. I will explain the function of the orange lever later. On the opposite, right side there are 2 M motors powering all the motorized functions. Notice the mysterious red lever which is used for switching motorized functions. Notice the pump used to power the pneumatic functions. There are also two electric switches to reverse the two driving M motors. If we continue towards the back, we can see there is a pair of linear actuators used to manipulate the container. The red lever switches power from one of the M motor between the adjustable front suspension and linear actuators. But not only can the linear actuators tilt the container, but they can also pick up and load the entire thing. To switch between tilting or picking up, the orange lever is used to lock the individual segments of the lifting arm. This function is inspired by 8052. The arm can reach out and pick up the container with ease: If we continue and look at the photo of the back side you may notice a PTO output along with a strange mechanism with rubber bands: Same motor that powers adjustable front suspension, linear actuators also powers the PTO output via 24 tooth clutch gear. Notice that the PTO output uses a CV joint in order to slide the axles into it without friction. The rubber band mechanism is used to hold the rear attachment. This was inspired by 8110 and 42054. Here is a sum up the functions of the model so far: 1. Motorized functions Adjustable font suspension Tilting of the container Picking up and lifting of the container Pneumatic compressor and storage provided by two air tanks powered rear PTO 2. Manual functions: 10 cylinder engine powered via rear wheels through a 3+R gearbox 3+R gearbox Steering controlled by steering wheels inside the cab AND the light on the right side of the roof Openable doors Openable hood Adjutstable seats Independent front suspension Solid live axle assembly in the rear - inspired by 42043 Features: Both front axles are at a positive cats angle, allwing the fat Porsche wheels to self-center Due to the immense weight, each rear solid axle is supported by 4 yellow very hard springs The 3+R gearbox is derived from my diagonal gearbox featured in the Dominator TRS Due to its framed design the gearbox provides a very rigid backbone to the model A 5 tubed exhaust seemed appropriate for the 10 cylinder engine I hope this photo helps you understand all the functions and features a bit better. Each color of the model's chassis represents a different module. Next we will look at the rear attachment built for this model. The attachment is multifunctional, combining linear actuators, pneumatics and 4-way switchbox to actuate all the functions: In total the attachemnt features following functions powered by a PTO via 4-way switchbox: Extension of the control arms via small actuators and a lever mechanism Lowering of the control arms via large actuators - inspried by 42009 Rotation of the arm Spooling up a winch which allows the arm to be used as a crane arm - inspired by 8258 Additionally there are 4 pneumatic function powered by the compressor and air stored in the two pneumatic tanks on the truck itself: Raising of the primary arm joint Raising of the secondary arm joint Tilting of the showel - inspired by 8043 Closure of the blue pneumatic claws - inspired by 8110 Some intersting facts about this attachment module: All of the penumatic functions + rope of the winch pass through the turntable. Rotation of the turntable is limited to some 350 degrees to avoid all those tubes and rope tangling up The structure of the arm with diagonal arms is inspired by crane arms Frictionless 8 tooth gears allow the white 16L axles to slide with ease while powering the two large actuators used for support legs The 4-way switchbox is one of my most complex and sense assemblies and it took me 2 days to design with support of LDD. Winch uses a friction pin to keep the rope from unloading when the winch function is off. The blue claw uses rubber bricks for better grip Combining the main model with the atatchment resluts in a model which weighs around 5 kilograms and is over a meter long! Some facts about the design, and build of the model: The whole model took me over 2 months to design and built, biggest challenging being the gearbox, container arm and rear attachment switchbox. A lot of care was placed into keeping all the functions working reliably with a limited power source (M motor) and safely with no gears skipping or breaking. The model uses around 16 universal and 3 CV joints to transfer the power to the suspension lifting mechanism, PTO, both steering sytsems and drive axles. Each rear axle is capable of supporting the whole model's weight, the weak point are the Power Puller tyres which sag quite a lot, especially on the third axle. Thanks to it's stiff gearbox, this model has one of the stiffest central frames I ever built allowing the model to be easily picked up by diagonal front and rear wheel without excessive flex. Gas canisters and first aid from 42069 are featured on this model The hood ornament is a bunny from a Lego Friends set This is my first model to use the white pneumatic air tanks for it's intended purpose. The model is covered with glow in the dark parts close to its edges, so its visible at night - useful when you are wandering around your building area at night A photo of the mashup's total of 8 glow in the dark bionicle claw/eye pieces: You can see the model in action in the following feature video: Finally I would like to thank you for reading through this massive post and for helping me reach 10.000 subscribers.
 -
Hello to all, I am new here and wanted to share my very first creation with you. This is Toyota Land Cruiser FJ70 pick-up. I build it by using bricks from following sets 42000,42030,42042,42043. I took inspiration from RM8 creations but also in the past I was driving this car quite a lot in raw conditions and I have big sentiment related with this Toyota model. Pix and Video are not pro quality as this is my very first approach to build and share LEGO creation so please don't judge me too harshly form this point of view. I hope you will enjoy looking at this model. In the near future I have plan to make simple video how to build it. Under the below links you will find pix and video. https://www.flickr.com/gp/156725712@N06/bP6n4Q Below is video instruction for Lego Technic Toyota Land Cruiser FJ70 - body (part 2). Unfortunately due to file size restriction in my camera, there is missing small part of the video where is shown how to build roof and back side of the body. However this two missing bits are easy to reproduce based on the pix. For those who would like to built this body it can be also good opportunity to put a bit of own invention.
-
So I've recently built model B from scratch (taking everything apart and not using anything from model A) of Lego 42043. And after I finished itI noticed that my pneumatic pump is not working as intended, it stutters and then stops. I though it may be some pipes in crane that is blocked so it cant pump, but no everythings fine, then I rechecked gears and loosened them so they make as little friction as possible yet nothing changed... In model A the pump is going so fast even when its not pumping air to the crane, but in model B (the one I built) it cant even pump for 2 sec when connected to crane. So what im asking is, has anyone gotten this problem where in model B the air pump is not working as intended and is there a fix without rebuilding the whole trailer?
-
 My latest C model: harbor crane from 42043. It features 6 functions, 3 powered and 3 pneumatic. Video: Normally I would write a lot here, but now I write a blog post for my MOCs on my new website: https://legobricksarecool4.wixsite.com/brickbybricktechnic I would appreciate if you visit it! And now, some pictures: Thank you for reading and watching. Once again, please check out my website! BbBT
 -
.
-
My next 42043 C Model! This is gonna be a big one! I will have 3 power functions and 4 pneumatic functions. Power functions will be for the truck, pneumatics for the trailer. Here's what I have so far: In case you're wondering, that's the immediate front of the truck. It is built for the 42043 cab, which I will be using. Seen above is the frontmost car lift. Here's the master gearbox. Some mechanics for the frontmost lift. That's a video of the mechanism for the front lift. Like the other lifts will, this uses variable axes to control the movements. (NOTE: CLICK ON THE VIDEO TO PLAY IT) P.S: This is based on the Eddie Stobart (video of it below): More pictures should be coming soon. Hope you enjoyed, and leave some comments so I can implement them in this MOC. Thanks for your time! BrickbyBrickTechnic
-
Hello everyone! Presenting my new MOC:\ Thanks!
-
Totally inspired by Sariel's Mini Cooper videos, I present 42043: Crawler edition! Features 4x4 drive and steering while retaining the functionality of the cabin. Thanks so much for checking it out! C&C PLEASE! BrickbyBrick
-
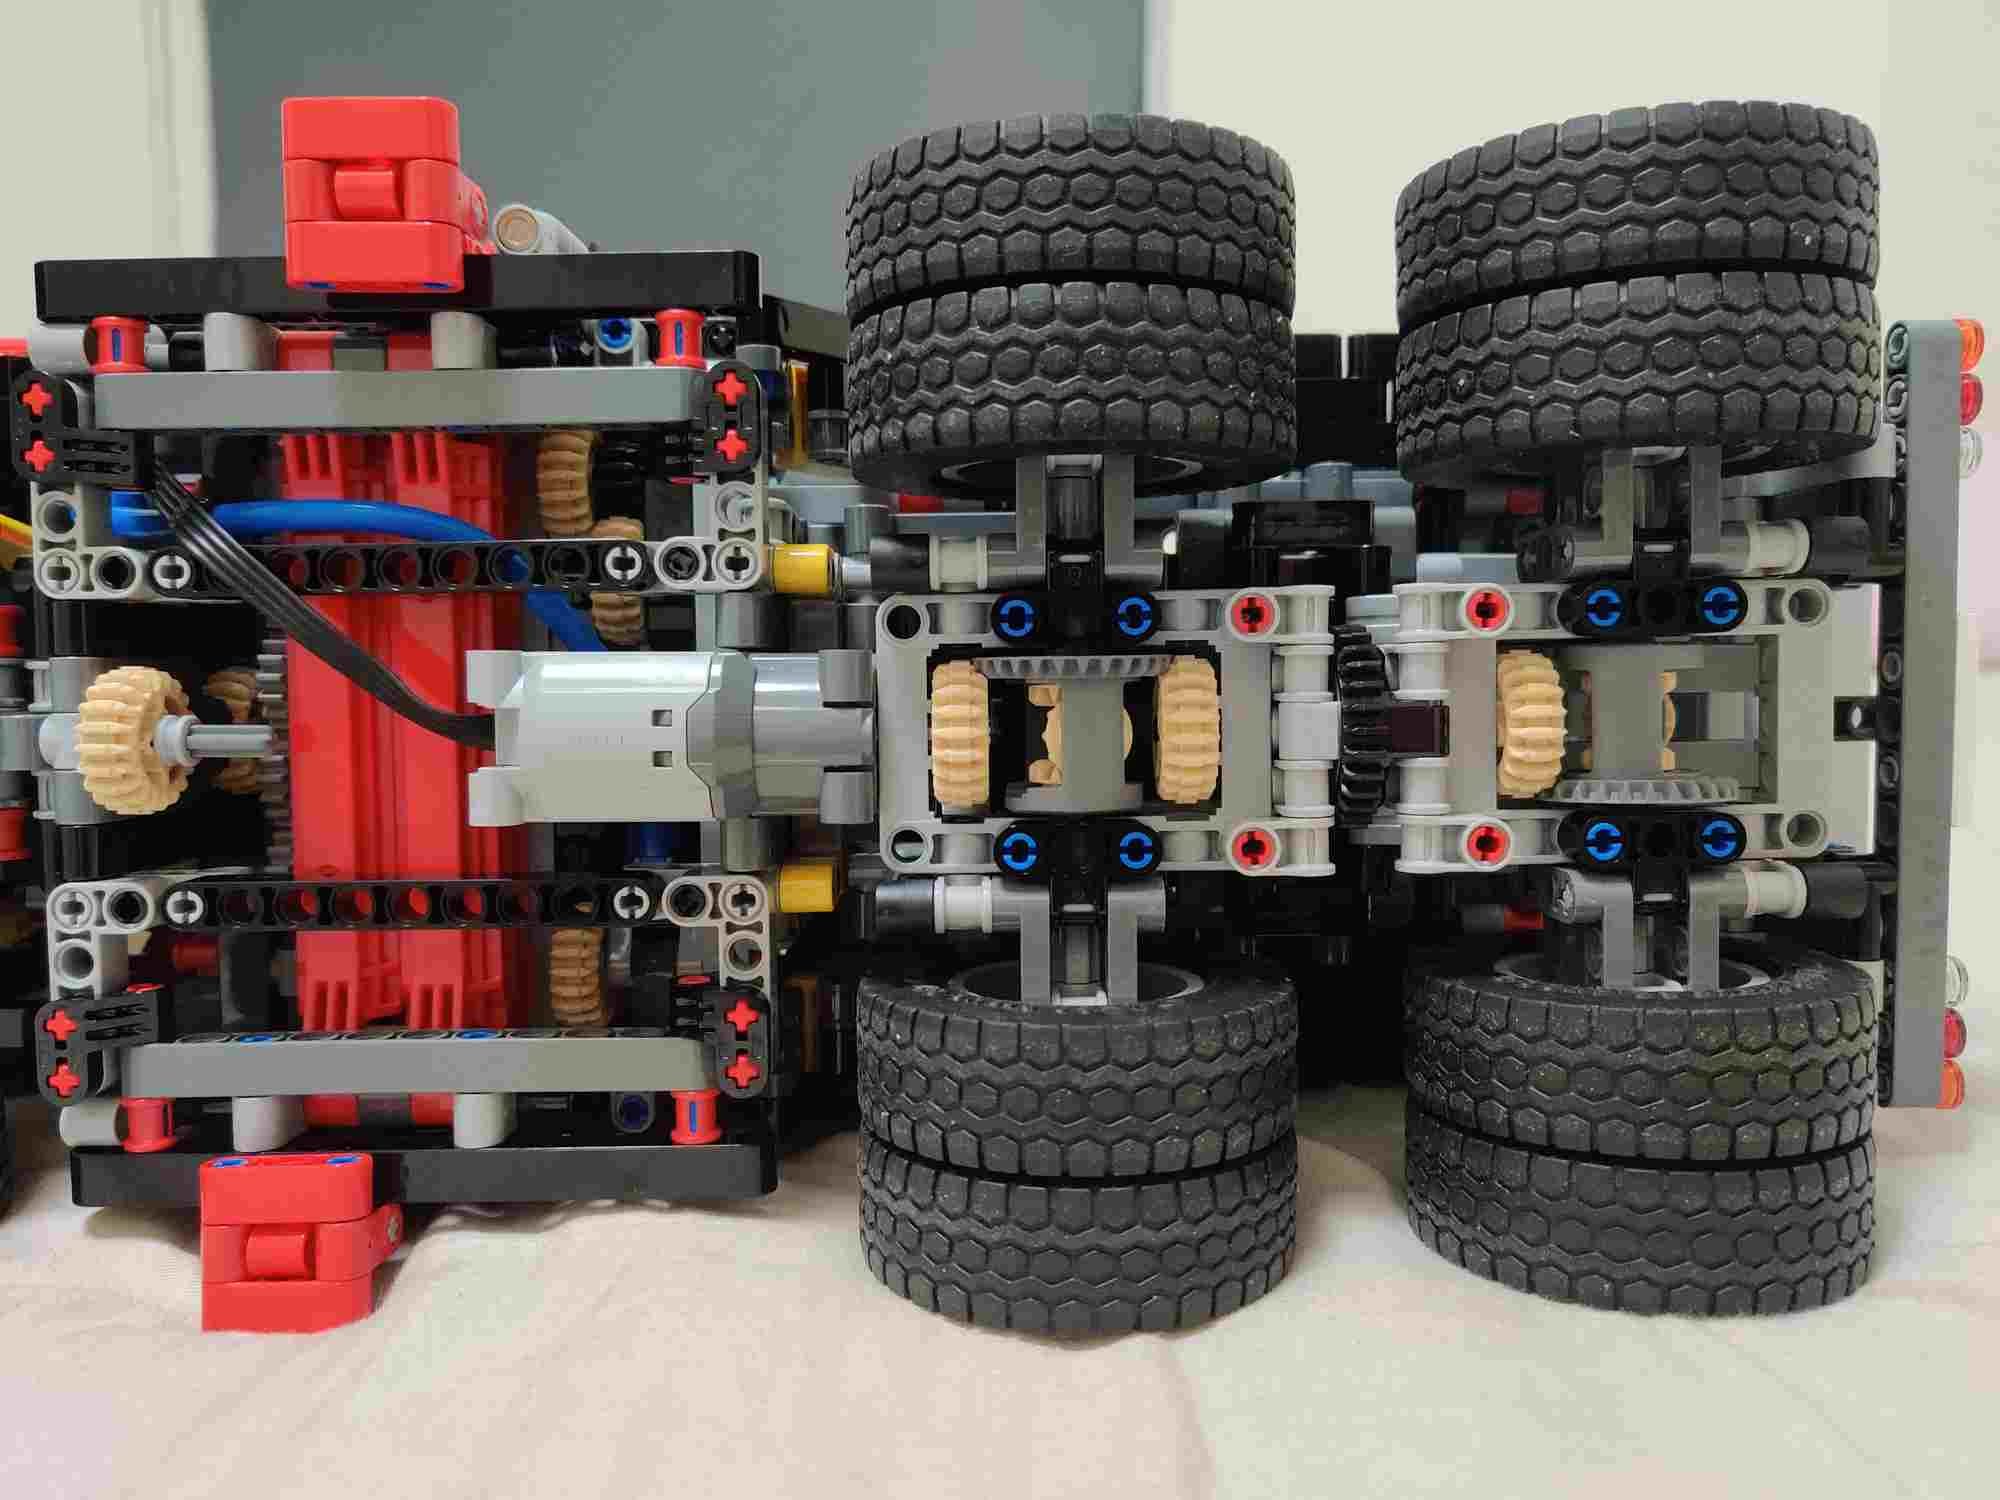
 Hi, this is my C Model for the 42043 - MB Arocs, It's an articulated tractor with a tipping trailer! Tech specs: 1x L Motor 3x Pneumatic cylinders, 2x 11x2 to lift & lower the trailer bed, and a 1x5 cylinder to open & close the trailer flap. 10x Wheels, 8 on the tractor in a dually configuration, & 4 on the trailer. Well, now on to pictures! All pictures & more are available at my BrickLink http://bricksafe.com/pages/XtremeBuilder/c-model-42043---mb-arocs---articulated-tractor--trailer
 -
Not sure which to build: 42043 crawler edition or the "boom" supersonic jet from virgin airlines. Reply with a choice if you can and thanks for the help in advance ? BrickByBrick
-
Presenting my latest MOC: 42043 UDS! Thanks! BrickbyBrick
-
An extremely functional 42043 c model which also looks pretty nice! (Pics under the video) Pics: The functions include: -Suspension -HOG steering -drill elevation and tilting -lower/raise counterweight -outriggers and secondary outriggers -piston engine -opening bonnet -spinning drill To see them working check the video above! Thanks! BrickbyBrick
-
A collection of c-models! These are all c-models that I designed for 42043, 2 of which have instructions (FREE!) and the third's are in the making. Here are the videos (note that the mobile crane was released in august and is not IN ANY WAY inspired by M1Longer's): The pneumatic tubes in this one were wrongly arranged... this is fixed in the instructions. This is why it was not entered for the contest. Thank you! ENJOY!!!! BrickbyBrick
-
Hi, so I got the MB Arocs 42043 in January, and have been loving it! But now I want to make a C model. Previous attempts have failed due to my now apparent lack of skill at making well proportioned frames. But now I want to try one thing, and stick to it, right now I need to figure out what machine to do as a C model. I've decided on a 4 axle (including steering) heavy duty rotator tow truck Ideas were: Pics will be posted sometimes tomorrow.