
brunojj1
-
Posts
1,022 -
Joined
-
Last visited
Content Type
Profiles
Forums
Gallery
Everything posted by brunojj1
-
[MOC] LaFerrari hypercar 1:9
brunojj1 replied to brunojj1's topic in LEGO Technic, Mindstorms, Model Team and Scale Modeling
Thanks for your interest! Sadly my recently added files on brickshelf aren´t beeing moderated for some unknown reason. Maybe it´s time to move to bricksafe very soon. Hopefully the moderators here don´t mind if I "show off" some more. -
[MOC] LaFerrari hypercar 1:9
brunojj1 replied to brunojj1's topic in LEGO Technic, Mindstorms, Model Team and Scale Modeling
I won´t tell you . Countless, far too many ... You mean the mechanism? I don´t know yet if I´ll have the time, give me a few days. I would like to cut the front rims to 2/3 of its width and put on a suitable tire instead, if possible! Unfortunately there aren´t any third party rims / tires out there and I don´t get why. 3D printing opens many options, but not out of rubber. I can´t share too many details of the agreement. But to answer this good question: it doesn´t hurt to disassemble everything after having a model on the shelf while keeping some kind of good pictures / instructions / memories . And then create some "emptiness" and go on for the next project to get some new excitement! Stay hungry! -
[MOC] LaFerrari hypercar 1:9
brunojj1 replied to brunojj1's topic in LEGO Technic, Mindstorms, Model Team and Scale Modeling
Thanks to all for your nice comments, good to hear that you like it! You´re maybe right and it deserves 2 Sbricks. Doesn´t matter, it´s done and should be enough. Now you made me really curious! Which part of the real one you were working on if it´s not a secret? (If a secret, please write me a PM anyway ) Yes, the doors were the most difficult part. I decided to use mini linear actuators because I haven´t seen such mechanism anywhere so far. But the whole construction, settings of pivot points and mechanics made me a lot of headaches. Then engine design is not too difficult. Check out my previous car here http://www.brickshel...ry.cgi?f=559393 and the .lxf file there. Thanks man, it means a lot to me! I´m not sure about your first statement , but thanks anyway! Nobody knows the flaws of the car but me (I won´t tell you ). Using panels instead of meams probably saves some gramms and above all looks much better. That is something I´ve learned from critiques from others. You´re absolutely right about the drivetrain - no major changes compared to the previous model. The focus wasn´t so much on that part this time. Thanks! That´s the meaning of "exclusiveness" . Only some 499 people on the planet are chosen to drive the real one, you can´t have it even if you have a fat wallet ... EDIT: I feel guilty.... -
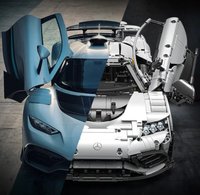
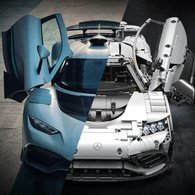
Yes, I did it again. After the first attempt last year of which result wasn´t satisfying me much, there was no intention to build again the LaFerrari very soon. But there was a special customer´s desire who was insisting to do it though, not only to complete his private collection. This car really deserves it. Some supportive kind of sponsorship made the decision easier. The agreement was an exclusively made model for the client, therefore no instructions will be available. If somebody would ask, sorry about that. All the experience from the previous car should flow in, it only should look better. So instead of going for a completely different project, I started from scratch with new blueprints (thanks to Sariel´s model scaler). The model should feature as many interesting functions as possible using the whole range of PF elements. Scaling up to 1:9 would allow better proportions coming closer to the real thing and give enough space to fit all the motors and wires. All the building process was very hard, primarily for one reason: this car and its curvy and fissured shapes are very challenging to replicate. The end result has very little to do with the first model, even if it looks similar at first glance. Features: Dimensions: LxWxH 66 x 27 x 15 studs Weight: 2,5 kg Parts count: estimated 2600, Technic panels count: 72 Powered by 2 rechargeable batteries, connected to 2 x V2 IR receivers Drivetrain: 2 x XL motors + 2 x Lmotors optionally connected manually by clutch Steering: 1 servo motor connected to working steering wheel, working airbrake and diffuser flaps LED lights: 1 pair each for front and rear lights, 4 pairs for upper front lights connected to pole reverser for flash mode, 1 pair for displays in the dashboard Fake engine: self-invented 12 cylinder fake engine (shown in the previous car already), upper red shaft going through can be connected by clutch to pole reverser for flashing effect Doors: operated by remote, 1 M motor and 2 mini linear actuators, screen wiper coupled to a clutch is operated manually as door selector Engine hood: can be opened manually Wheels: 3D-printed and silver painted custom wheel caps, rear rims are large 62x46mm painted black, rear tyres are 68,8x36 + additional width by cutting another one and adding it next to the normal tyre (thanks to Polo-Freak for the idea). Front wheels: normal assembly And here is some food for all the video junkies ;-): Enjoy!
-
Nice car and cool ideas with the decorations around it! Even if the proportions do not match exactly, the car looks spot on! I like the video .
-
Very well done! Especially the lights and the "windows" allowing a close view on the inner part add much to the boat. I wish I had such sort of commissioners too ..
-
Ultra Small Forklift - Muravi
brunojj1 replied to mahjqa's topic in LEGO Technic, Mindstorms, Model Team and Scale Modeling
Thank you for sharing this mindblowing forklift and the entire world you´ve created around it! Perfect technical performance and amazing details everywhere. Just love all the eye candies ! And the video is so neat and undescribably cool - on top of everything. -
This thing is something I was thinking about some while ago. The alternating gear shifter between the 2 parallel gearboxes was the main problem I couldn´t overcome yet. How will you connect both outputs? With a differential? Or will there be a clutch between? I also second the request for some kind of instructions, I´m curious how it works. Hopefully it will provide the kind of heavy duty performance in a big vehicle, yes - let´s say hypercar ! Very well done !
-
Thank you for your feedback! I enjoy your report about having fun outdoors! The unsatisfactory PF signal transmission in daylight is a fun killer though, that´s why it would be better to put in 2 Sbricks and only 2 rechargeable batteries like in Madoca´s Icarus. When you say "this model is the pinnacle of speed for the PF system" - it flatters my ego a bit and next to creating some BMW finally the highest possible performance technically was the main goal. But anyway I think Madoca´s new car is faster which is driven "only" by 4 L motors with its highly reduced drivetrain and beeing much lighter and more compact. I don´t have the opportunity to go for a ride with both cars, maybe some collector like you who owns both of them, will do it - might be a lot of fun !
-
White is the New Red
brunojj1 replied to Blakbird's topic in LEGO Technic, Mindstorms, Model Team and Scale Modeling
The variety of blue panels isn´t too vast but is becoming better now. The only blue cars that I know is the Pagani Huayra from Francesco Hartley and not to forget the Bugatti Veyron from Sheepo which was built almost without panels. So I will try hard for my next MOC in blue color for which I have collected some parts already . -
Sorry for the inconveniences and my "dirty" building style with some pragmatic tecniques going beyond laws of straight geometry ! There might occur a few more during the build ... I hope you enjoy it anyway and the end result will satisfy. For my next MOC if there will be any instructions, I would try to be more careful. Unfortunately my model is disassembled now and I can´t check these issue. Here is a picture with the trunk open:
-
The spacing for the batteries is very tight, but they should fit. At the fender´s double angular beams at the bottom there might be a very little bending apart. But the tail light mounts above (you mean LED mounts?) shouldn´t collide with the batteries if they are installed the right way around. I´m still not sure if the instructions are correct to 100%. Please post the picture.
-
Finally Jaap managed to make high quality stickers for all cars, except for the black BMW Bank version which wasn´t asked by anybody so far. But if there will be enough requests, he can do them as well. They can be ordered here: http://www.jaaptechn...-3d-design.html In between the brickshelf file hasn´t been moderated for some weeks, I don´t know for what reason. Maybe I should reorganize it..
-
[MOC] ICARUS Supercar
brunojj1 replied to Madoca 1977's topic in LEGO Technic, Mindstorms, Model Team and Scale Modeling
Your solutions seem just perfect IMHO, I am struggling with same problems and I want to know how to make better a car with round edges and how to do all the angles with less connectors? You are the "Messi" of supercars ! -
Good to hear that you´d give a try again with building a car. As I see there is an unfinished Enzo in the background... Will it serve for spare parts for antother Italian car now ?
-
[MOC] ICARUS Supercar
brunojj1 replied to Madoca 1977's topic in LEGO Technic, Mindstorms, Model Team and Scale Modeling
Thanks for sharing the building instructions! Hats off! The many wires may make look like a mess, but they are there for purpose. I´d rather say it´s ingeniously complex and incredibly compact design than messy. Maybe some slight colour changes at minor small parts would make it look cleaner. Honestly I guess it would take me years to catch up such efficient building style, if any... Is somebody planning to build it in yellow? This way it would look more like a McLaren, even if the proportions and some details differ too much from that car. -
[WIP] Lancia Stratos 1:8 Scale
brunojj1 replied to JamesJT's topic in LEGO Technic, Mindstorms, Model Team and Scale Modeling
I agree - and the red panels on the sides with green beams underneath looked great! Do you consider to put on stickers? -
No offense, I believe you can do it (if you love that car enough ), it´s definitely worth it! White is a good colour choice, there are plenty of parts now available. Take your time and feel no pressure to anything. I`ll be curiously waiting for your WIP pics.
-
This is exactly what I think – it sounds really much and a bit too noisy to me. There is nothing wrong about dreaming of the "absolutely perfect" supercar MOC designed after some brillant ideas and built by your own hands. Did you ever build a MOC similar this size or even smaller scale? Of course you can put a lot of stuff into such a big model, but I hope you won´t get disappointed after a while realizing things becoming complicated. In between - a nice car you´ve chosen there. But besides a fat wallet and tons of parts you´ll need some skills, experience, a long breath and a lot of patience if you really want to accomplish this project. I have seen some really talented builders making big efforts and achieving tremendous progress with their MOCs without being able to finish them for whatever reasons. I would go the other way around – first build the model, or at least make some promising start and then show the progress here trying to get some inspiring and helping opinions. Anyway good luck with it!
-
[MOC] ICARUS Supercar
brunojj1 replied to Madoca 1977's topic in LEGO Technic, Mindstorms, Model Team and Scale Modeling
I´m working with the same kind of power distribution such as 2 batteries and 2 IR receivers or Sbricks for a simple reason – you get more total power for motors. The more motors you are using, the less power is supplied to each of them simultaniously. It seems to me that Sbrick has a higher current limit and provides more energy to multiple devices than IR receivers, even V2. Another big advantage is the infinitely variable speed regulation and proportional control of the servo. I think in Madoca´s car one Sbrick feeds 2 L motors and the other one also 2 L motors + servo. In the video the car doesn´t seem to slow down at all while steering (servo activated). The whole car is a big achievement regarding the low weight and very clever drivetrain resulting in such high speed! -
[MOC] BMW 328 Hommage
brunojj1 replied to Jeroen Ottens's topic in LEGO Technic, Mindstorms, Model Team and Scale Modeling
Very cool BMW and a unique car from you again ! I´m sorry that I was ignorant till now about the real car, but thanks for making it more popular now. Especially headlights and rear view are spectacular and you have replicated them in a brillant way! I guess you wanted to keep your secret how the sequential gearbox is working ?... The black pin with hole is a real game changer, I should have ordered more of them.. If real "legal" parts are used (rigid hose used here), it cannot be illegal except if they crack and break apart -
[MOC] ICARUS Supercar
brunojj1 replied to Madoca 1977's topic in LEGO Technic, Mindstorms, Model Team and Scale Modeling
Wow, I can´t find any words to describe it! That´s what I´d call a perfect Lego supercar setting benchmarks! The flowing body lines look so beautiful , the drivetrain design is genious and I just can´t believe it how fast it is. Thank you so much for building this, it´s very inspiring! -
[MOC][WIP] Porsche 911
brunojj1 replied to Thirdwigg's topic in LEGO Technic, Mindstorms, Model Team and Scale Modeling
I like the color scheme, the gearbox, deco and curves . The white slopes around the front lights don´t look perfect, but maybe they were the best choice to solve the curvature problem there. An overall round package at this small scale, built in short time ! -
42056 - Porsche Speculation
brunojj1 replied to Jim's topic in LEGO Technic, Mindstorms, Model Team and Scale Modeling
Playing with Lego cars has rather little to do with real life, on the other hand we can build and play with cars we can never have in real life. A supercar has to look as much as possible like a real car, agree, but it´s still a toy to play with. Standing mostly on the shelf and moving it sometimes a few inches back and forth only to see some pistons moving is kind of boring for me. Why shouldn´t it feature mechanics AND some powered functions? Should the approach to realism include a fuel tank and injectors with real fuel burning? A real car has a fuel tank. And electrics. I understand the purists and let them have their opinion but I´d like to see more than suspension - gearbox - piston engine. -
If you´d like to put in Sbrick or two of them, it shouldn´t be too complicated. If using 2 Sbricks and power it by the 2 batteries in the trunk (which would be pretty enough anyway), simply replace the 2 IR receivers at the rear and leave out the third battery. As in my previous example I used the battery on the passenger´s side and left the trunk empty. Remove the shown axle connector and attach the Sbrick this way: