
brunojj1
-
Posts
1,022 -
Joined
-
Last visited
Content Type
Profiles
Forums
Gallery
Everything posted by brunojj1
-
[MOC] Simple Supercar
brunojj1 replied to Lipko's topic in LEGO Technic, Mindstorms, Model Team and Scale Modeling
Congratulations to your greatest hit so far! Your humbleness sounds ridiculous sometimes . “Simple, reliable, realistic, low as possible” – these attributes have been achieved to 100% in this model and you really don´t have to apologize for that! There is nothing simple at all to come to simple solutions, only beginners can´t prize that. You had the guts to revise everything again and again no matter what it costs to get to the final solutions and now it really pays off. More than that – you were plucky enough to go for that fantastic colour scheme - how can black- orange- white- grey-red be mixed together in harmony?? Absolutely nothing to criticize from my side, I just don´t have the right to do so. IMHO the year of supercars has got this one at the end as its best exhibit! -
Instructions and partslist are online at rebrickable and here: http://pixelts.de.tl/BMW-M4-DTM.htm
-
Many thanks for sharing, I like your version very much and I´m happy you enjoy the model! So I´m really looking forward to see a different variation of the car from time to time here! Concerning SBrick, I also hope to make mine run reliably and very soon and then find out a new optimum for the drivetrain. Thanks to motomatt for the research! You can substitute blue 64681 by 11954, but the 62531 panels are an issue which is not easy to bypass. After finishing my current between project, I want to build a full black version. And finally I should consider to buy the chromed wheels too! Partslist: I got a file from Thorsten which is still provisional and incomplete available at my brickshelf.
-
You can extract a partslist into MS Excel out of a LDD file. There must be some LDD tutorials on this website. The partslist will differ from the one in the instructions for some reasons mentionned already. But it could be helpful at least to get an overview about some main parts as panels and beams. I hope you understand that I won´t put any more work into this project. The instructions are in progress, but not on my responsibility.
-
You own some very cool drift car and a really nice showroom! I remember the Жигули very well because it was our family´s first car back then in former SU. You pimped it right!!
-
Did you tear apart your 8070 for that purpose or did you borrow only the wheels from it ? It would be really nice to see it in another colour. Team Schnitzer has a white car with the M stripes on it (Martin Tomczyk) and a black one (Bruno Spengler). So I´m curious if somebody will do it. The big 44350 panels at the front bonnet could be the biggest problem for some colour choice as white. I consider blue as a good option. I don´t know how to transfer LXF into LDraw, but it already has been done by Thorsten who is working on good instructions. No pressure on him, we will be patient till they will be ready.
-
Today I finally managed to put the stickers on the car. Jaap Technic made a great precision job, thanks to him.
-
[MOC] BMW M3 E30
brunojj1 replied to damjan97PL's topic in LEGO Technic, Mindstorms, Model Team and Scale Modeling
Congratulations to your fantastic BMW M3! Get some more flex axles or use pneumatic tubes -
Be welcome and stay for a while ! I will wait patiently till that day when you will bring out a supercar again! The faster gear setting shows clearly the limits of the PF system, you exactly hit the point. There are 2 x V2 receivers feeding 2 XL motors each. The batteries are the problem, then the so called PTC thermistance engages after a minute, the whole car even stops. Maybe with brandnew full loaded batteries you could get the max out of it. And by reducing half of the weight of the car which is impossible. The slower configuration runs very smoothly and I conclude that the optimum would be somewhere between both options. For that purpose I experimented by replacing the differential (20/28) by knob wheels (1/1) which didn´t make a remarkable speed difference, especially the turns are slower then logically. Conclusion: nobody needs to have 4 XL motors to move a 2kg car, 2 of them are enough for some short indoor ride!
-
You have proved again that grey isn´t a boring colour at all . I wonder how those mechanics fit all together into this car and of course I´d like to study this gearbox! What do you think personally - is it a step forward for you when moving to this scale concerning your personal "technical development"? Because I want to do the opposite for my next MOC and go 1:8
-
Time for some updates on the progress. Video is here (forgive me the poor quality, but I´m not good at it): http://www.brickshel...wm4dtmsmall.mp4 LDD is also available now at my brickshelf. As said already, some parts as rim covers or servo motor are missing or have been replaced e.g. the front and back light attachments can not be reproduced like this. If somebody wants to have a provisionnal parts list, it can be done somehow, please don´t ask me. Next week we will have a better corresponding parts list then. Thorsten does a really great job on the instructions (Jim forgive me for advertising him here again ) If somebody wants to build it with pneumatic tubes, I won´t recommend any specific sellers because they are plenty out there on ebay. Here are the exact lengths I have measured: Have fun!
-
Thank you very much for your offer! It can´t be said enough how valuable such kind of work is, especially if somebody does it for free! I wrote you a message on your website contact. It is always a great pleasure to see the "polished" models on your renders, much apreciated! Maybe we should consider to replace the yellow hoses by some flex axles or ribbed hoses as suggested by Polo-freak.
-
I´m happy that our dear EB fellow Polofreak was willing to help me to create a LDD file that will available for free use for everybody. It will be a bit tough to use it as building instructions, but not impossible. I will add explanatory pictures for the build later. We plan to release the LDD file mid or end of next week. And thanks to Zero Bricks too for his assistance! Some parts as rim covers are missing, but all in all I´m quite satisfied with the result. We will check and eliminate as many errors as possible now to make the important partslist. For this purpose I have to disassemble the car next week to check the part counts. It´s good that it still doesn´t have many stickers . In between: these are in the making by a well known talented and (very busy) young Dutchman. He is very creative and professional on this field. You can explore some of his fantastic jobs at www.JaapTechnic.com Tomorrow I´ll start the video production, unfortunately without stickers. After that disassemble the car to make a partslist.
-
Hey Max, let´s say it´s "work in progress" (should I mark it WIP or what...) I got some good professional help with LDD and stickers, but it won´t be done in one week at least. Video I will make only with stickers and not twice. You will enjoy it the more you will wait
-
Small update about the stickers. I like them very much. And really ask myself what if to add some BMW logos and that´s it? Kind of purist approach. Don´t want to make all those small advertising stickers. For the Deutsche Post stickers on the transparent foil I have to get some clear ink spray, otherwise the printed ink spreads into the water ..
-
1:10 16: 6 12: 4 3: 3 6: 2 9:1
-
Stickers: I bought these on ebay. They are designed for RC 1:10 scale and hopefully I won´t ruin them. The seller is kn-fine-art http://www.ebay.de/usr/kn-fine-art?_trksid=p2047675.l2559 Then the Deutsche Post stickers which I decided to try to make by myself. The foil is there, now comes the hard pioneer work… I think I will make the video and work on it next week after being satisfied with the results. In the meanwhile I´m working on the LDD file. Today I will try to finish the chassis at least. The file will be available tomorrow as it is for the moment.
-
I rub my eyes again ... Too much honour for me. Thanks! Today a small update as promised concerning the frontlights.
-
[MOC] Lawn Tractor
brunojj1 replied to damjan97PL's topic in LEGO Technic, Mindstorms, Model Team and Scale Modeling
Very nice and compact! Maybe you can find some green 2x1 tiles and put it on the receiver.. Did you consider to use rotor blades? -
Thanks again! I´m glad the model is pleasing so many! What I wanted - power it by Sbrick and have fun outdoor. Would be very interesting on flat surface. I own 2 of them but my phone android is too new for that application Indoor you can have 2 minutes of fun from time to time, but only at full batteries... I tried yellow beams above the front lights, no chance. It´s your perspecive or your own mind maybe which reminds you transformer robots or birds sometimes . By the way I wasn´t angry any moment while building it, otherwise I couldn´t have done it. And I really don´t wanna make little kids cry when they see it I would give this one away immediately to have a desk next to you ! Don´t give the rim covers away! Thanks especially to you! We all do our best and I´m very curious about your project. I would apreciate a trip to a racetrack like you , but season is over now..
-
Thank you guys very much for your attention and kind comments! You can turn your yellow parts into a crane whenever you want . I didn´t say anything about building instructions, but hopefully somebody will be able to rebuild it out of the LDD which I am still working on. There are some limitations as missing parts, flex axles and the stupid instructions mode. I will post better and detailed pictures of the headlights tomorrow. Using 4 XL motors with 2 x V2 receivers + 2 rechargeable batteries gets you to some limits. The PTC termistance at the batteries engages frome time to time being not able to handle the required torque at the current gear reduction mentionned above. The solution to this is simple: change the easily accessible gears behind the rear axle from 20/12 to 16:16 which unfortunately results in lower speed but then everything runs smoothly. Using 4 instead of 2 XL doesn´t provide so much advanced speed, but interesting to try though. Thank you, Jim! Enough space on the driver´s seat for at least one hamster . I considered the idea with the stickers and ordered the foil. Hopefully it´s worth the effort. Same for the video.
-
BMW M4 DTM is a prototype racecar made by the automobile manufacturer BMW constructed for only use it the DTM championship since 2014. The M4 DTM supersedes the M3 DTM being used since 2012. The other 2 participating manucfacturers in the championship are Audi and Mercedes. The races are rarely to see on TV even in Germany. Often the only option is the official livestreaming of all events at www.sportschau.de. Timo Glock finished 15th in this years season – winning only one race (Oschersleben). I like the “racey” look of the M4 DTM, so I thought this yellow Deutsche Post Wagen would be somehow nice to recreate. I used to own a few BMW in my lifetime – E36 Coupé, E46 Coupé and E46 Touring. They all were sporty and nice looking cars, had reliable motors and were fun to drive (especially RWD in winter in the snow ;-). Having thought about a BMW MOC about a long time now I decided to rip apart some boring construction machinery and build a new car in fresh tasty yellow! Motorize it as heavily as possible with 4 XL motors. The car is suspended as low as possible few mm above the track level and touches the ground if pushed down (like the real car does ;-). And it doesn´t contain any gearbox. Non-Lego-parts: the yellow pneumatic hoses (4mm) came really handy to create some round shapes. I bought some kilometers of it at ebay and enjoyed to experiment by cutting it at any required length. Beeing sturdy it causes some problems bending the rear fender a bit, but doesn´t disturb the look too much, even if the lighter shades of yellow are clearly visible. Data: lenght: 58 studs (46,5 cm) / 61,5 studs (49 cm) with rear spoiler width: rear 25 studs (19,5 cm); front 25 studs (19,5 cm) height: 15 studs (11,7 cm) parts: 1.900 – 2.000 weight: 2,2 kg drivetrain: 4 x XL motors & 2 receivers & 2 rechargeable batteries gear reduction: 3:1/1:1/20:12/20:28 = 3.572:1 (according to sariel´s gear ratio calculator) steering: 1 x servo motor coupled to working steering wheel & 1 receiver and battery, Ackermann geometry other features: rollcage, independent wheel suspension, LED lights (2 pairs in th front, 1 pair in the rear) PDF building instructions here.
-
Ford Tudor Hot Rod 1/10
brunojj1 replied to Bricksonwheels's topic in LEGO Technic, Mindstorms, Model Team and Scale Modeling
Very nice job and great display model! What are those wheels you have used?? -
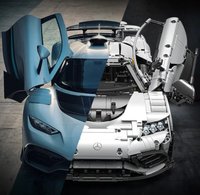
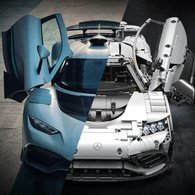
[WIP] Koenigsegg One:1
brunojj1 replied to Pvdb's topic in LEGO Technic, Mindstorms, Model Team and Scale Modeling
Hey Pvdb, I´m a big fan of your previous Koenigsegg (and the McLaren of course). The gearbox you had made back then was incredible and I have no doubt about the new one in progress beeing a very good one. Could you post a pic or file of it as it is? I´m about to learn everything about the existing gearboxes and especially the shifting mechanisms. Thanks in advance! -
Axle Collection Thread
brunojj1 replied to efferman's topic in LEGO Technic, Mindstorms, Model Team and Scale Modeling
Yeah, thanks for sharing this ingenious idea ! I recently was asking myself: How can I get narrower at the rear axle by keeping it suspended at each side? Most 1/10 scale cars are a far out of scale at 25 width. Maybe you´re planning something Hot Wheels style ?...