
brunojj1
-
Posts
1,022 -
Joined
-
Last visited
Content Type
Profiles
Forums
Gallery
Everything posted by brunojj1
-
 Here some practical guidelines & priorities I´m following when it comes to bodywork: Design your chassis first and keep it as compact and low as you can within the calculated dimensions of the finished model. It´s easier to attach bodywork to a rolling chassis, than the other way around. The chassis always can be reworked to fit in some specific areas, but the main functions already should be there. You need some extra space behind the outer shell of the bodywork for the attachment points, especially if you have to work with difficult „crazy angles“. Choose a color with a wide range of parts – particularly panels and (angled) connectors. Use Technic panels wherever you can and avoid beam-stacking. Use the panels´ individual shapes where they fit (the real counterpart) and find the attachment points – ideally 2 of them per panel. Try to cover the bigger areas first with bigger panels and design everything else around them. Curves are crucial for the looks, especially the outer shapes and wheel arches – flex axles are very usefull to replicate them and often they are the only option available. The curved 13x3 panels are helpful too, but you need to work a lot to find the attachment points. It´s tricky to fill gaps around panels – usually you need to make compromises here. Try to keep the scale as far as possible and minimize deviations to 1 stud if possible. If the MOC is supposed to be a replica of something – use blueprints scaled down to the purpose. Try-and-error is part of the game, there is always a better solution if you are not satisfied.
 -
I´m really impressed . Big applause for this fantastic achievement which I consider as a historical milestone you´ve set there !
-
So with the new modifications it all goes into the right direction - most I like the idea with the rake, although it´s a bit too much as it is now. The lowering of the roof was really neccessary . IMO the widening of the rear axle is a crucial change too and worth to mention - how easy was it to do? I´m interested in the doors hinges too.
-
Congratulations, fantastic job you´ve done there ! Did you ever consider to make a Lada Niva on these monster wheels?
-
The transparent parts stay the same as in the full version. The coloured parts have to be added. LDD file here. The transparent parts stay the same as in the full version. The coloured parts have to be added. LDD file here.
-
Happy New Year all together! White Christmas didn´t happen last year as anticipated, but what can we do, there are things in life worse than this. Here we go with the major update – the final release of the RC instructions. Thorsten did a tremendous job on this, but it took some time. The bodywork color shown is WHITE and it looks as good as orange IMO, a matter of taste of couse. So now it can be build in the both mentionned colors or in black from original Lego parts only. Motorization options: as indicated in the original video – 3 alternative options can be built. Unfortunately it wasn´t possible to show all of them in the instructions, but only the full version. The downgrade from the full version is not too complicated and doesn´t require too many additional parts. Considering the overall complexity of the build, you can do the adaptations yourself - if you are able to take on the entire challenge at all! full version (2 x XL + 2 x L motors). Although you can´t expect performance anywhere near usual RC cars, the max motorization works fine and the motors combination engages the differential from both sides with rationalized gear reductions – 3:1 at the XL motors and 5:3 at the L motors, reducton at the differential not counted. Sounds ridiculous, but I´m having fun with the acceleration / braking, displaying & driving it on my 1.5m long table in the living room from time to time. 2 x XL motors: recommended gear reduction 5:3, differential not counted. To fill the gaps where the L motors are missing, supposedly 1x additional 7x5 frame + few other parts are needed to make the bottom stable. A tutorial update with LDD file will be posted within the next few days. 2 x L motors: recommended gear reduction 1:1, differential not counted. To fill the gaps where the XL motors are missing, supposedly 2x additional 7x5 frames + few other parts are needed to make the sides more stable. A tutorial update with LDD file will be posted within the next few days. 2 x Sbricks are required in the model – all 8 channels being used. 1 XL + 1L are sharing one channel on each Sbrick. An individual profile can be made yourself by using this helpfull designer tool. Exhaust: the sufficiently discussed issue with the #6797 part can´t be solved other than by replacement. I´ve asked seven studds if he could make a 3D – printed substitute for this part, but it seems he couldn´t find the time. However, the part remains the same in the instructions. I´ve made 3 brick-built variations of which one can be chosen / modified or a different one can be self-made if the proposed are not apreciated. Just my personal POV - the abcense of one single piece never stops me building anything I want, an inevitable part of the game.
-
Brilliant work again, performed in a very recognizeable style ! Although not being member of Fakeboost, I got the news immediately from a close friend who ordered his exclusive copy already. IMO the posting here on the biggest Technic forum is mandatory. Btw. I´ve heard some builders being accused of posting from 2 accounts, playing ping-pong with themselves and "leading" the discussion into the right direction ... I´m skipping all the 2019 1H sets and presented myself a sealed #42043 Arocs set before it´s becoming too rare and unreasonably expensive. All I can say it was definitely worth it - the best and most complex Technis set I´ve ever experienced .
-
Thank you for sharing too! I love to read feedbacks especially of this sort. Indeed the model was designed as a platform for further developments and modifications. You can simply leave out any function, use the chassis as basis for any other RWD supercar in 1/8 scale and adapt it to your needs. I´m interested to learn more about your version, e.g. how you attached the rear cover. And btw - very nice job on the the exhaust pipes . If you´d like to share pictures here on EB, it´s recommended to upload them somewhere else (bricksafe, flickr, ...) and post direct .jpg links here (max. width 1K). I´d be very interested in your result with the rear lights and then perhaps consider it for myself some day. I wish everybody a wonderfull Merry Christmas too, all Lego Technic fans in China included !
-
Attika´s 8880 tribute model really does justice to the original. Plus it has gullwing doors, central differential lock and most of all I love the independently adjustable suspension !
-
Thank you guys for all that interesting input, I´d really wish one of them could work. At the time I don´t see any big opportunity to experiment more on my car and no urgent necessity to add major changes, but I´d really apreciate to see it accomplished by somebody else - please share the solution here if it´s the case! @key5277 your suggestion looks most promising and theoretically could be adapted to the 12V Buwizz somehow, if not to the 9V PF system as well. Where can one purchase that? To those still anticipating instructions for the RC version: I´m sorry, but I still can´t announce any release date, it´s still in progress. Seems like this wish for Christmas will not be fulfilled...
-
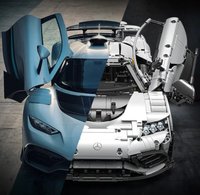
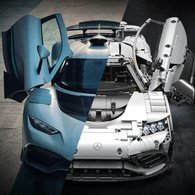
@jeffmcclain: The bowed 13x3 panels in black color appeared first in the #42070 All Terrain Tow Truck. The change of the top on the "AMG" version indeed is possible since then (not the "Silberpfeil" livery) and I´m about to rebuild my own car to make it equal to its twin brother. To avoid further questions: the instructions and the stickers on the roof will not be updated though.
-
42096 Porsche 911 RSR
brunojj1 replied to Ngoc Nguyen's topic in LEGO Technic, Mindstorms, Model Team and Scale Modeling
Of course, joking aside - it wasn´t meant disrespectul regarding Uwe. It´s not only about saving costs, but to acquire new target audience according to the marketing policy of the employer. I´ve made my peace with his Porsche 911 GT3 RS, owning myself 2x sets and bought another one as Christmas present for my dear brother. Bought the 42077 Rallye car as well for my 9y old son who was able to assemble it almost entirely on his own and recommended it to another known mother & child who asked me how easy it would be for a kid to build one of my models . -
I´ve been exploring the same idea, but couldn´t find anything suitable. Then I even considered and bought these fiber optics cables #x165 featured in official Lego sets: Unfortunately the cable is too thin to hold its shape and doesn´t work effectively with Lego LEDs combined with red and/or orange trans clear plates. To make it glow how it´s designed to be, you would need this element : It was impossible to install it somewhere in the corner & make it work as desired...
-
42096 Porsche 911 RSR
brunojj1 replied to Ngoc Nguyen's topic in LEGO Technic, Mindstorms, Model Team and Scale Modeling
Or it ends up being the same designer who saved costs and time to develop something outstanding innovative of new kind. No gearbox because it would mean taking the risk and messing it up with the gear sequence .. Limited range of parts for advanced suspension setup sounds like a cheap excuse to me - just look at some MOC designs introduced like a decade ago. -
I´ve been thinking a lot about this issue as well. Unfortunately I found no possibility to make it happen. The only expert who comes into my mind who has the potential to solve an issue like this perfectly is @Sariel IMHO ... It means a lot to me to make you happy, especially given the fact you are patiently waiting for original Lego parts . You can start with the chassis already - a long way to go, especially considering the level of difficulty, if this is your first MOC to accomplish. Enjoy it and take you time for the adjustments to make everything work smoothly . You don´t need to host pictures at EB, just upload them somewhere else and post direct .jpg links (max. 1K wide).
-
Thanks for making this car popular and known to us! Superb color scheme, I love the yellow & black combo + the stickers suit very well! Innovative door mechanism and as always - fantastic front and rear lights! But as usually, I´m not so happy about the side view and especially the wheel arches. Anyway, you have accomplished something you were striving for a long time and that´s most important .
-
Just my personal opinion - it doesn´t hurt anybody to pay for instructions - the worth justifies itself. E.g. my current model is considered too expensive by few people, but nobody forces them to buy. The vast majority doesn´t complain. On the other hand a few years ago I´ve made the experience that people don´t honour enough if instructions are for free, then it has (almost) no value for them and they even don´t say "thank you". Certainly 1000 people downloaded and only 1 of them expressed how gratefull he was. As I said, it´s very honorable from you and I would like to express that not only in words, but by building your model and take some pictures of it next to the original 8880, before taking it apart few months later.
-
@Attika & @1963maniac : Bravo, wonderfull work ! Thanks for sharing the instructions FOR FREE for which you deserve double honour! Believe it or not, I´ve just started to sort parts for this one because I want it to stand on my shelf next to the good old (yellowed ) 8880 and feed some nostalgic emotions! I know it would mean some work to do, but would you mind to put it on rebrickable.com? It definitely deserves to be there! And you might want to start a race against https://rebrickable.com/mocs/MOC-20022/hitchhiker/supercar-8880-reloaded/#comments which is not bad too, but by far not as good as yours .
-
Technic General Discussion
brunojj1 replied to Jim's topic in LEGO Technic, Mindstorms, Model Team and Scale Modeling
Sounds good . So should we speculate about a bis scale supercar for 2H already or is it probably the next UCS model for 2020? Where do you get this information from? -
Really impressive ! The guys from the Model Scale Forum will freak out, I think it belongs there for sure.
-
The assembly proposed by @imvanya consists of the mentionned mudguard part #28326 combined with this 4x1 plate (#92593): https://www.bricklink.com/v2/catalog/catalogitem.page?id=97760#T=S&C=85&O={"color":85,"iconly":0} I personally didn´t try this composition, but would apreciate to see in a version from somebody .
-
Thank you for your feedback, enjoy it! I´m full aware of what´s going on, that´s why I made the video. I can´t help it otherways, overcome it already and don´t care anymore about it. So there is no need to report anything, it´s a fight against windmills.
-
Yeah, we have all to HURRY UP! , until the rumors spread out and they will have to create another shop.. 3 days make a short life for a business, but for them worth to invest a few minutes to upload the stuff...
-
Thanks man, it means a lot to me! Quality is some undefined standard nowadays, depends what to compare. However, I can´t say I´m there where I want to be - so I need some more patience . Thanks for sharing ! Here some more entertainment for you guys - my personal review of the knock-off version from darkland. Beware of changing the sides! PLEASE RESPECT THE EB GUIDELINES AND DON´T DISCUSS IT HERE!
-
42096 Porsche 911 RSR
brunojj1 replied to Ngoc Nguyen's topic in LEGO Technic, Mindstorms, Model Team and Scale Modeling
Come on, how difficult is it to make that, considering there is no paddle shifting mechanism within the steering column like in the 42056? Is it pure laziness or cost saving or what??