
PorkyMonster
-
Posts
183 -
Joined
-
Last visited
Content Type
Profiles
Forums
Gallery
Everything posted by PorkyMonster
-
 I seriously don't get your point because IMO less travel does not translate to stiffer suspension... unless you pre-compressed the shocks, which doesn't look like the case in your pictures. But even if you DID pre-compress the shocks, I think one shock per wheel for a 1:8 model will still be quite a challenge... u gotta build really light
 -
I will gear it down appropriately, rather than force limiting my servo... nothing good will happen to stalled motors...
-
After seeing the comments by @arshiaIQ and @stevenhalim, I've decided to do a quick test - not directly with HH (there'll be too tough for me... ), but rather building a new quick-n-dirty chassis using the same gearbox and fit it with the larger 94.3mm wheel and drive it with 2 L motors and 2 battery boxes. And I happened to have done exactly what @Didumos69 suggested regarding the change over catches. With a weight of 1.3 kg, I piled on top the HH - so total weight becomes about 3.2 kg, and the only issue I found was some gear slippage (I can't pin-point exactly where though... could be the differentials at the axles) during acceleration and stopping with 3rd (lesser) and 4th gears (more). I suspect that slippage can be solved by using the clutch gear somewhere early in the drive train... will try that out later on. So I think the gear box is fine, even with wide gear difference and more than 3 kg. Edit: Just tested with a 24-tooth clutch gear inserted between the motors and gearbox, and gear slippages during acceleration disappeared. For lower gears, torque and speed not affected... but for 3rd and 4th gear, acceleration slowed, and it takes longer to reach top speed - this is quite realistic, because in real car, the driver usually starts at lower gear, then advance towards higher gear as the car picks up speed.
-
Yea... chunky but not hard... i think they can grip well... Those writings are just H and I repeating throughout, quite meaningless I would say... perhaps just for decoration...
-
I couldn't resist huge wheels and tires, so I bought these (130mm (dia) x 56mm (thickness)) and was hoping to be able to put them to good use: While figuring out how best to adapt to Lego, I realised that their rims' dimension happened to be 61mm (dia) x 50mm (thickness), which is EXTREMELY close to 23800!! Looks like I'll be buying 23800 pretty soon . So, in case any of you guys want to get these tires, they're available here (~$7). Or, if you can read chinese, this (~$2.7) site sells them at even more ridiculous price!! They come with foam inserts, and weighs 133 gram (without rim).
-
For XL motor in a model this size (shouldn't be heavy the way it looks), you can consider gearing up... Also, have you tried to power each XL motor by separate battery box? Such that one of your battery box will also power the M motor... I suspect this will give you even better performance. To me, a live axle simply means the axle is 'live' - it moves wholesale along with suspension... challenge is in making the move smooth and nimble - your shocks should be able to compress along the arc of compression - not very clear from the video though... you can also work on the part where your chassis connects to your rear axle - while it allows up/down movement now, it appears to prevent any rotation so that your rear axle can flex for better agility? As for driven/suspended front axles, you can check out this thread - contains all kinds of axles.
-
That'll be about 1 battery box per 2-3 L motors - will still perform better than 1 L motor... but I would go for 1 L motor per battery box, but that's me .
-
Both @MattL600 and myself have recently seen better performance when separate batteries (i.e. standard Lego's 9v box) were used to power separate motors - fyi, in case you have any doubt that the added weight won't be worthwhile .
-
[MOC] RC Lego Dakar Truck
PorkyMonster replied to MattL600's topic in LEGO Technic, Mindstorms, Model Team and Scale Modeling
Coincidentally, while trying out PF for the first time recently, I discovered too that having more battery boxes (as in each for separate motors) does improve on the motors' performance - equivalent to saying that the increased performance more than outweigh any potential downside of added weight. Wonder why not many people do that here... -
New Lego trophy truck
PorkyMonster replied to LEGO ADAM's topic in LEGO Technic, Mindstorms, Model Team and Scale Modeling
Doing so actually increased the unsprung weight - will impact speed, at the same time gives false impression that your suspension works... (and btw, the drop test at the start of your video did not proof that your suspension really worked ). But then, hey! your truck looks nice! -
Torque question
PorkyMonster replied to tomek9210's topic in LEGO Technic, Mindstorms, Model Team and Scale Modeling
Yes, geared differently, opposing sides of the same differential will end up with different rpm and torque. However, I suspect that this difference only exist when one of the sides cannot overcome the road friction. So when both sides managed to overcome road friction and the car moves in a straight line, the differential will balance them out and, in the course of doing so, incur lots of overhead (of course, we all know that. That's also what my experiment tried to confirm.). Agreed. This is also apparent when I lift up one axle and hitting the controller (effectively freezing the axle on the ground) - the difference in feeling of the initial torque (1) when axle with gear down is lifted, compared to (2) when axle with gear up is lifted. Shows that there is (a) friction within the differential which caused a delay in its ability to channel all torque to the lifted axle, and that there is also (b) torque difference due to the asymmetrical gearing. You're right. And indeed, PF and buggy motors won't be powerful enough for anybody to see any difference in performance between with and without realistic torque vectoring mechanism. IMO, such mechanism must not impact on the vehicle's normal, straight line, performance... so a simple Lego differential, geared differently at different outputs (as shown in my experiment), won't serve the purpose. We'll probably have to step into the realm of electronics to override some of the default behaviors of an open differential to truly model vehicles with such feature realistically. As shown in both @PKW and my little experiment, there won't be slippage when all wheels are able to overcome contact friction with the road, because the central differential balanced out all rpm differences. However, my experiment also showed that there will be overall performance (both speed and torque) impact when traveling straight on flat surface. Too bad Madoca did not compare the performance of that pickup with one without the gearing down at the rear hubs... -
Torque question
PorkyMonster replied to tomek9210's topic in LEGO Technic, Mindstorms, Model Team and Scale Modeling
Out of curiosity, I've built a simple model just to compare the difference in performance between same gearing ratio between front and rear axles, and different gearing ratio. What I've observed is that not only does the center differential work harder (that's a given, since all of us here agree with that), the resulting performance of the vehicle is worse-off than if both axles are geared the same way - which means, before 35 seconds, while the model can overcome the hump, it does so more strenuously compared to after 35 seconds. The construct is rather brute-force - just to test the idea. Here's the underbelly picture: Here's the video that compares the difference (before 35 seconds - different gearing ratio, and after 35 seconds - same ratio): So I think it is not worth the trouble to use different gearing ratio for front and rear axles... both speed and torque suffers for the whole vehicle. -
Torque question
PorkyMonster replied to tomek9210's topic in LEGO Technic, Mindstorms, Model Team and Scale Modeling
Seriously, differentials are meant to kick in only when neccessary - e.g. when turning, when encountering different road traction, etc. and not ALL-THE-TIME... So when the front and rear axles are driven at different speed (as opposed to same speed but different torque), they are forced to rotate at the same speed since they belong to the same vehicle, and the little gears within the center differential will end up working ALL-THE-TIME, which is very bad especially for Lego, because heat will build up, and with heat, plastic will soften, and torque + soft plastic is BAD... -
Very slight... the inner wheel... but perhaps due to the whole model's weight of 1.9kg, the friction resulting from that is hardly noticeable when pushed along.
-
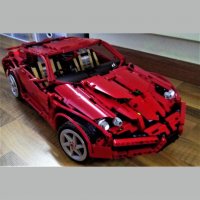
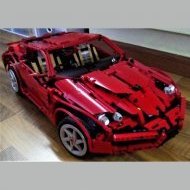
I don't have black 5.5 axles, but I'm quite ok with the DBG ones though - perhaps if you look at the model as a whole it isn't that bad (more photos below )? Agree that the Porsche rims/tyres offer better turning pivot, and things like caster and camber can probably be included, KPI can be ignored (with good pivot I can forgo KPI), but... BUT... the turning angle is too limited... but things will be different if I do a 4-wheel steered model... That's right. I'm also quite tempted to drop it from, say, 1 meter and see what happens... but nah... LOL And now, more photos!!! (and I thought my ferrari was quite SHORT and FAT... ) Certain parts and colors differ from the original (i.e. red did not become white entirely), mainly because I don't have those parts in white, or even enough pieces of certain shapes. Other than that, I've also deliberately changed this to this (for the front lights and the liftarm behind the grill), for ease of fitting.
-
I'm done! and guess what? I think this is the best angle to view the car: Ok ok, this isn't too bad either
-
Torque question
PorkyMonster replied to tomek9210's topic in LEGO Technic, Mindstorms, Model Team and Scale Modeling
Well, when I did my AWD I made a mistake by gearing my front and rear axles differently, and I ended up destroying my center differential... so I guess that answered your question . -
Have you tried this? The more you slant them, the softer they get, with built-in air damping. I've also tried using springs on axle alone, with a half-bush inserted at either end to absorb some bouncing energy. So if you're using stock Lego shocks, you can also add an axle with a half-bush, parallel to it - something like this:
-
1. Assuming you're ONLY using Lego's own RC motor, then you'll need 3rd party transmitter and receiver, ESC, and RC servo. 2. The connections between all 3rd party components are very standardised, so there should be no problem (and when the supplied connectors don't match, simply cut and do your own connection - red to red, black to black). as to connection between the ESC and Lego's RC motor, same thing - you'll just need to connect two (usually black and red) cables from the ESC to your motor yourself. 3. ESC is separate from receiver. ESC will connect to 3 things - the battery, the receiver and the motor. Receiver will connect to the servo and esc. 4. I've used Radiolink transmittor/receiver, towerpro servo, and brandless china-made esc - all are entry-level components that, very cheap. Note: when shopping for transmittor/receiver, you need to look out for the number of channels supported - most support 2 channels (i.e. motor and servo), but if you want to remote control lights, you'll need at least 3 channels.
-
That is my intent for now... and yes, I'm aware that the towball is half-a stud higher now, but it seemed there is no effect on toe when compressed, so I'm leaving it as that for the time being, until I get the body ready to see what other adjustments are necessary, and whether I need to buy the Porsche wheels at the end .
-
Alright, here's something to whet ur appetite Can see the rigidity of the flat awd chassis in this picture: Here's the front - right-handed drive, and it'll be white (hint of that from the bumper):
-
After a quick nap, I decided to replace the 12t half-bevel gear with another... appeared that the one I used earlier had a small crack and fits much more loosely to the 3L axle than desired. As for the return-mechanism, I was just paranoid that this might give way . But I guess the chance is small. There was one more point about the instructions which I forgot to mention earlier - wonder if steps 113 and 119 can go after step 122... because with the current sequence, I had to remove one of the 2x4 liftarm in order to do 122, then put it back. I'll have to play a bit more with the shifting mechanism before making any further comments though - off hand now, I only felt it'd be ideal if less force is needed to shift it - as of now, I need to hold on the chassis before shifting, is that normal? Sure, will take some pictures after I've done the body .
-
Just finished part 1 Spent 16 hours... Now I need to Zzz Zzzz before doing part 2 . Been a very eye-opening experience building this model... many parts were form locked properly in place, making the end result virtually indestructible, which also means it could be a major headache if there is ever a need to dismantle it. But two parts caught my attention though - (1) the two rubber-banded ends of the gear-switching mechanism - they're in-symmetrical and I don't quite like the way the ends bend when extended, and (2) the UL that attaches to the 12t half-bevel gear might pull the 3L axle out. Instruction wise, no step missing, but a number of them require cross-referencing the lxf file (e.g. steps 8 and 100), and most of them require intense staring at the screen to figure out where to put in the new pieces (but of course, nobody told me to use a 10-inch screen ), due to the viewing angle and colour. However these are rather minor issues compared to the effort put in to create the instructions in the first place! PS. I'll build a white, extremely limited edition RIGHT-HAND DRIVE version... LOL
-
It'll be GREAT if someone can create a DRIVEN front axle with virtual pivot point and independent suspension.