
PorkyMonster
-
Posts
183 -
Joined
-
Last visited
Content Type
Profiles
Forums
Gallery
Everything posted by PorkyMonster
-
 Thanks . I made sure that when i lift up the model mid-section, its front and rear won't sag... otherwise handling might suffer. You're right, I 3D printed and mount my servo like this . For the U-joint, I used to think that they are weak too... but now I realized that the key is proper bracing to prevent side-way movements due to vibration. So I made use of this structure to hold it securely in place (note that this structure also prevents the CV joint from falling out of the differential). (replace the red part with https://www.bricklink.com/v2/catalog/catalogitem.page?P=15100#T=S&O={} as I couldn't find that in LDD...) I always end up building huge models after factoring in all the steering geometries. Ok, I admit that I 'wasted' 1 extra stud each side... haha, but will be interesting to see if there is a way to factor in all such geometries within a smaller model . As to look, I think beauty is in the eye of the beholder... and I'll still be tweaking its 'skin' here and there over time to either make it more rigid and/or more aesthetically pleasing...
 -
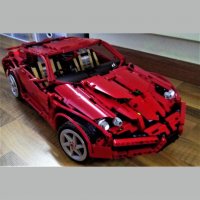
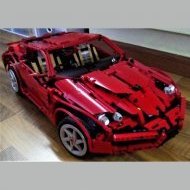
Inspired by Lego's Ferrari 599 and Enzo models, I've created something 'beefier' . Main characteristics: Measurements - 50 cm (L), 25 cm (W) and 15 cm (H). Weighs 2.5 kg. All wheel drive (AWD) with 3 open differentials. Full independent suspension. Steering - KPI, Caster, Progressive Camber, sharp steering up to 40 degrees. Towerpro MG995 Servo. Powered by a brushless 4370KV motor at 9 volts . For fun and laughter .
-
I do have a different solution than your half bushing. But I'll leave that for other occasions as I don't want to deviate too far from your main topic...
-
That struck a chord with me! When I started (which wasn't long ago anyway, haha) I used rack/pinion with gear downs of 20/12 or 24/8, and more often than not, with weight added to the model, gears slipped and alignment was gone with the wind... and because I wanted to brace the gears properly in the first place, they ended up at locations rather inaccessible and I had to tear down quite a large portion just to fix that.
-
I've recently built a model that uses CV-joint only at the differential-end, while using the good-old universal joint at the hub-end. Granted, won't be able to use Lego's hubs, but using custom hub + U-joint would allow for KPI, camber and steering angle of about 40-45 degrees - much more playable be it manual or motorized, IMHO.
-
Coincidentally, I've done something similar recently when I built my AWD Quad Bike: What I noticed is that RC rims have at least two hole sizes (perhaps for 1:10 and 1:8 models) - standard ones (mostly 1:10) come with a 12mm hex and smaller hole, while larger ones come with 17mm hex and larger holes that can allow technic axle to pass through easily. So, using the 17mm variant, I found that I could fit a 16-tooth technic gear snugly. Not able to turn smoothly (thus serving its purpose), but can be improved by adding a thin sheet of plastic before shoving the gear into the 17mm hex depression. This is what I meant: With that gear in place, no further modification is needed to any lego parts or the rim itself
-
Non Lego RC Motors
PorkyMonster replied to yoraish's topic in LEGO Technic, Mindstorms, Model Team and Scale Modeling
[Deleted] Sorry, didn't notice the date... -
Personally, while I've only just begun to build with LEGO (less than a year), I've come to realise that instructions are not that useful - you'll likely end up discovering that you need to buy more parts, when in the first place you can do the same thing with parts you already have. Moreover, with just a bit of googling I can now find almost every possible solution to any problem at hand, for free!
-
Rate My Suspension
PorkyMonster replied to Alasdair Ryan's topic in LEGO Technic, Mindstorms, Model Team and Scale Modeling
Nice little design, but I think there's a need to refine further for camber to be reasonably useful, unless I've missed something... Just to share my view (I'm no expert in all these, btw), my assumption has always been that if real cars need these stuff, then it'll make sense for models to have them - ON ONE CONDITION though : whether we want our model to travel in the same speed and road conditions (to scale, of course). In other words, u'r right if there is no plan to drive the models at realistic speeds and roads . Unless, as what Didumos69 said - the purpose is to 'model' these aspects for the sake of 'modeling'. -
Rate My Suspension
PorkyMonster replied to Alasdair Ryan's topic in LEGO Technic, Mindstorms, Model Team and Scale Modeling
I think the 1x7 bent liftarms shouldn't be used here as it'll mess up all geometry... how about trying with straights or right-angled ones? -
DW86
PorkyMonster replied to Driftworks's topic in LEGO Technic, Mindstorms, Model Team and Scale Modeling
I'm currently learning to use LDD, and nearly fainted when i see that your chassis consist of such a complex web of axles and joints :laugh: Do you use LDD in any stage of your model creation? -
Sure. (lxf file download) All yellow half-bushes can be replaced with bearings - u'll need to use multiple bearings so that their combined thickness roughly equals the half-bushes. Also note that the housing in my case is for motor size of 540. And the gearing down ratio in my case is 3 x 1.7 = 5.1. U'll have to change the structure if you want to gear down to other ratio - I'm sure you know what to do .
-
[MOC][WIP] Steppenwolf
PorkyMonster replied to Didumos69's topic in LEGO Technic, Mindstorms, Model Team and Scale Modeling
Only today, while playing around with the LDD application and exploring its features, I came across a directory that contains a "AWD Platform.lxf" file. Opened it up, and thought its content looks awesome and familiar... exactly like something I saw earlier in this forum. So I came into this forum and started searching and here I am - apparently I saw your thread before, but as I was looking for something else at that time, I didn't read through your posts in detail. I must say that 'awesome' might not be enough to describe your work here . If you have no objection, I plan to replicate this chassis, as I think it'll really help me get started in seriously designing and building stuffs with LEGO Technic!! -
So this is my front axle with servo housing attached... Any servo that looks like the following will fit into the housing (note that the silver adapter on top comes separately). Here's the ugly part: I stuffed cardboards all around between the servo and the housing to secure it in place . And it is simple to just attach (with screws) the silver adapter to the blue thin 1x5 liftarm. If you're interested in the details, feel free to check this out http://bricksafe.com/files/PorkyMonster/rc-racetrophy-truck/RC%20Truck%20Front%20Axle.lxf Both the yellow and white shocks are there just for show, because I couldn't find the air shock (this), which I'm using, in LDD. I've also left out how the entire structure is attached to the chassis as a 'tilted subframe' in order to create a caster angle... as that might not be interesting and this is also my first attempt at using LDD. Notice that I'm using parallel steering link. This greatly reduced bump steer and play... especially for heavy models. Also, if there is only one link located toward the center of the model, the inner wheel tends to get 'locked up' when reversing and turning at the same time - something I noticed when I have caster... perhaps weight is also a contributing factor. I also noticed unnecessary toe out with only one link, and that can pose a problem driving forward. Downside with parallel links is that I cannot incorporate ackerman angle. The red thin 3x3 liftarms are there to prevent the lower wishbone and both steering links from popping out during impact. And the 3 wedge belt wheels attached to each rim simply attaches the rims tighter to the axles - and I no longer have wheels falling off ever since . There is no camber, since I'm not planning to drive and steer my model at extreme speed (I always practice good driving - slow down before turns ). Yup, this is all I have regarding my front axle .
-
I guess, regardless of weight, so long as the immediate output from the motor is geared down to around 4000, parts won't melt... what remains is to make sure the shafts, gears, etc. downstream are built to be strong (primarily, avoid using long axles, standard CV joint and standard Universal joint if possible), properly braced and lubricated to prevent high torque from breaking them (because, after gearing down a brushless motor, its torque is already much much higher than any PF motors... and a light car meeting obstruction can also result in extreme current draw and torque that will break parts). Coincidentally, I'm also planning for my next build - also a road/rally car that is lower and wider, I'll use 3rd-party rims and wheels (because LEGO ones are too small proportionally for cars of this size)... again, it probably won't be lightweight, and I plan to make it an AWD with CVT :devil: :laugh: . Shall also have good steering angle, caster, progressive camber and kpi.
-
IMO, LEGO can handle ALL kinds of motor ... the key is in how much and how we gear it down, the power we supply it with, and how we drive our models. For brushless, while I've tried with 9.6v nimh (and survived... with lots of crashes... haha), I've yet to try with max power (11.1v lipo) and drive with max 'punch' for my motor... but even if that works, there'll still be ever faster or stronger motors out there. The motor I use is a 540, 3300KV motor. For brushless motors using the KV ratings, every volt u supply will increase its rpm by the KV value - so when I supplied 7.2v, my motor will rotate 3300x7.2 = 23760 rpm. Assuming 90% efficiency, that'll be roughly 21384 rpm. As I've also read somewhere that LEGO parts can only withstand 4000 rpm before it starts to melt, I decided to gear it down 5 times with bearings in place, to reduce rpm to about 4277 rpm before it reaches the cardan and differential and so on. I gear down even further at the differential (by 2.3) and at rear wheel portal (by 1.7) for good torque suitable for my truck's weight and wheel size. (btw, a 1:1 at the wheel portal worked too for my configuration, just that I preferred greater torque to overcome bigger obstacles ). Just for fun, I've created another video that shows more driving around compared to the earlier one
-
Nice! When I mount my servo I didn't think of this, and didn't have 3L axles with stud at that time either. But this looks less bulky than my method. Maybe I'll use this method in my next build .
-
Of course - these are the casualties: Axles and beams were twisted or melted due to friction and heat, gears slipped so badly that their teeth became blunt, and other gears/knobwheels and universal joints broke under insurmountable torque. But that was back then when I just started... when I had no prior experience... Then I began to incorporate bearings and grease, like these and The bearings (MR85 - 5mm internal, 8mm external and 2.5mm thickness - and 3 of them will fit into 1 stud space) are absolutely necessary near the motor - where gearing down is done... I'll elaborate on this in my later posts on gearing down the motor. As for the grease, I've applied it to mainly to the gears to reduce noise and eliminate breakages. sounds like u've worked your motor too hard... have u tried gearing it down further? I use Eneloop Nimh batteries instead of Lipo that most hobby-grade RCs use, primarily because I'm not familiar with Lipo, and also because I did not aim to create a super fast truck to compete with them, so I don't see the need to have that kind of 'exposive' power that Lipo supplies... and even with eneloop, I've only used 6s2p (i.e. ~7.2v), which is only 60% of the maximum voltage and current that the motor can take, and I'm already quite happy with its performance. (fyi, I DID hook up with 8s4p (~9.6v) earlier on, just for fun... and it was so fast (despite the additional weight) that I kept losing control and crashing into walls and furnitures :tongue: so I won't dare use Lipo :laugh: .) Regardless, I think brushless is the way to go, because it is definitely more energy efficient and requires no maintenance (unlike brushed motor where the brushes are subject to wear and tear).
-
Glad u like it But I'm probably riding on an 'unfair advantage' here - because of the motor I used, I'm able to be less concerned with weight and size and thus am able to create something really sturdy and robust... But I see at least one downside - I tend to just use whatever pieces I have and 'wrap on' for the purpose of reinforcement, rather than choosing the best piece for every specific job for a more elegant design.
-
Hey Guys, In this thread I'll introduce my race/trophy truck It features caster, kpi, long-travel suspension (front independent, rear fixed-axle) with damping, RWD, manually functional LED lights, hood, doors, extendable door steps, and moon-roof. Rather sizeable, at 4kg, and 65 (L) x 31 (W) x 30 (H) studs in dimension. Weight distribution is 50:50. And here's how it looks underneath... There was no modification to LEGO pieces, and no 3D printed parts were used. However, I've opted to use 3rd party components (mainly the electronics) because where I live, TLG does not deliver. There is a local shop selling LEGO stuff, but is often poorly stocked when it comes to Technic/PF components. While I do realise that these won't integrate readily with LEGO Technic pieces, and wiring will be messy, I was willing to give it a shot because they offer better performance and configurability. I started off wanting to include a gearbox (at least semi-auto if possible), camber and ackermann, full independent suspension, 4WD, etc. But as you'll see in due course, I encountered challenges either directly or indirectly due to my use of 3rd party components . I will provide more details about these later on. For now, suffice to say that there is some sort of a dilemma here - With LEGO PF, I can probably incorporate all these features, but I'll end up with something that drives like a tortoise (which defeats the purpose of having these features in the first place). However, with 3rd party electronics, I'm able to drive much faster, but that also resulted in the need to build a stronger model to withstand occasional crashes, and stronger drive-train to handle greater torque, and all these bits and pieces add to the resulting weight and size (don't forget that I need additional pieces to act as 'bracing' for the 3rd party electronics too). More details later on... For now, I've prepared a short video: In subsequent posts (assuming that there is sufficient interests), I will describe the challenges that I've encountered, and how they contributed to my current design decisions. Roughly, I'm thinking of elaborating on these areas: - Steering Axle/Hub Design (including how I incorporated a 3rd party servo) - Drive-train Design (why and how I gear down the brushless motor way before the wheel portals) - Suspension Design (why do i use this part, among other things) - Any other areas that you guys want to know more about...
-
Cool! this looks really fun i like the teeth!! Totally agree with u about keeping the rear live axle light (without motor) for suspension to work better... but center of mass shouldn't be that front-biased, no?
-
this is huge... but i'm totally impressed!
-
I guess... we'll get there (am just afraid that the lego purists will shoot me down fast and furious :cry_sad: :grin: )
-
Technic General Discussion
PorkyMonster replied to Jim's topic in LEGO Technic, Mindstorms, Model Team and Scale Modeling
I think... still a loooooooooooooooooooong way to go. The best I could do so far is (@ 40% speed due to a problem with the transmitter): ,and some would consider it cheating because i used 3rd party parts -
is the brand Decool?