

Lucio Switch
-
Posts
396 -
Joined
-
Last visited
Content Type
Profiles
Forums
Gallery
Everything posted by Lucio Switch
-
 The "jedi build" is very funny, anyway I think that it could be just a bit more complicated , I think that is really hard to do that with a fixed camera view and, above all, I finished it some week ago...I want to enjoy it for a while before dismantling!! That's would be another problem...but I think not yours!!
 -
From a legal point of view, I don't think that we can really do something! All in all, from a certain point of view, selling instructions based on a system where you do not own the rights it may not be so different! Without arguing about what own the rights of what could mean. From a moral point of view, well, I believe that he should cite the author of the MOC, and above all, write that his is a derived version, not the original. Maybe not everyone thinks like me, but my pick-up is...a bit ugly ... and I think it is also one of the most similar to the original version! Anyway Internet gives us the opportunity to make ourselves known everywhere and also to earn some money in a "easy" way, but, on the other side, we have to accept that it's also easy to clash with these things.
-
Well, it isn't a problem of money, it is just a matter of time and space! As I said before, I'm changing the house, and this will reduce my activities with Lego for the next 2-3 months. If I had the time to do the step-by-step pics, I would have the time to do the LDraw files. In addition it should occupy a desk for a while because I have to leave somewhere all the subgroups to study the sequences ... and it doesn't seem a great idea in the middle of a move! I'll think about during the summer holidays, after having placed into my new house, but I don't know, it will be an enormous job! Currently is more no than yes!
-
Chassis
Lucio Switch replied to jorgeopesi's topic in LEGO Technic, Mindstorms, Model Team and Scale Modeling
I'm a moron...now I see the transmission shaft!! sorry!! -
thank you !! Well, since the instructions are not scheduled, if I were you, I would go ahead with your project! :classic:
-
Chassis
Lucio Switch replied to jorgeopesi's topic in LEGO Technic, Mindstorms, Model Team and Scale Modeling
This chassis is really promising!! It's RWD so an RWD car I presume (or an FWD if you invert it). Or can it be AWD? -
LMPI prototype
Lucio Switch replied to steph77's topic in LEGO Technic, Mindstorms, Model Team and Scale Modeling
I like the whole car, but the engine area...wow!!! -
Nissan Hardbody 4x4 [WIP]
Lucio Switch replied to piterx's topic in LEGO Technic, Mindstorms, Model Team and Scale Modeling
It's how you do the mechanics that impresses me!! Small, few parts, but really functional!! -
Nissan Hardbody 4x4 [WIP]
Lucio Switch replied to piterx's topic in LEGO Technic, Mindstorms, Model Team and Scale Modeling
It's pretty cool!! -
Unfortunately, for now, there aren't plans to do them! Thanks!! I'm almost sure to have a pic of the mechanism (the prototype) somewhere. If I'll find, I'll post the pic!! Thanks!! I thinked somethink similar, but I'm not shure about the result...it's even true that if you don't try you can't know!! Thanks!! I don't know how much it could cost if it were an official set, but, If you will buy all the parts, I think that $1000 are not enough for half of it. Thanks!! I agree with you, and from my point of view it's not the only thing of which I'm not completely satisfied. But I haven't found a better! The problem i that 2 motors are already inside the arm and I cant go through them with axles. All the solutions that came to my mind lead to a bigger dimension of the arm that will appear...bulky! Thanks!! Expecially for the effort, but the problem wolud be find the time to do the pics....the outside could be easy, but for documet the inside.....Now I'm about to move house, and therefore I will have very little time. When I am settled I will think about, but I don't promise anything!
-
[MOC] LMP1 car
Lucio Switch replied to bj51's topic in LEGO Technic, Mindstorms, Model Team and Scale Modeling
Really well done!! -
First of all thanks to everybody! I did not expect all this nice compliments!! Thank you very much!! I uploaded the video at this link (I also added in the first post): This should reply some of your questions....... for the other.... More or less 23 red, 20 gray and 4 black It's far from cheap, but I did not spend a lot of money. I bought some LEDs and some trans blue parts, everything else was already in my boxes (and came from the Tractor Truck). I haven't a single technic set on the shelf. I had to hurry up!! I have to quit Lego for some months (or at least reduce drastically the activity) due to the fact that I am about to move house!! Thanks for put it in the Frontpage!! I really appreciate!! About the pics....I have to learn a couple of things from you....I have to buy a gray background!! I have not checked, but about 1.5 minutes for tank.....3 minutes in total :laugh: A perfect summary!!
-
Thanks!! It has the most rigid chassis that I ever built. The water tanks contain only 0.5 liters of water, so, filled or not, it doesn't make really a difference. However it bends just a little bit if 3/4 of it is cantilevered.
-
Thanks guy!! I would have liked to be able to expose it at the Expo in Pinerolo!!
-
I haven't found a good way to display how it works in details. I've built in this way for two reason: 1- I wanted the water to pass in less possible components (such as valves), in facts it only flows in pipes. 2- The pneumatic valve discharge the pressure in air...so, if the water pass into it, the MOC would have seemed a dog doing his needs. However the pressure is not very high (the pipes are connected in a standard way), so it can propel a jet of water about half a metre away.
-
Yes it is. Or better the company was named Iveco-Magirus, but with the reorganization of CNH now it's simply Magirus...or at least it's what I understand.
-
Thanks!! I just have to edit the last minute of the video...and then upload on youtube. I think I can finish to edit it this evening and, if everything goes right, tomorrow morning I will upload it. At work it takes me 15 minutes to do the same thing that at home occupies me 6 hours. Thanks!! Well, I haven't a garden, but I can refill with beer and try to hit my mouth when I'm on my couch!!
-
[MOC] Bitmap Display
Lucio Switch replied to AncientJames's topic in LEGO Technic, Mindstorms, Model Team and Scale Modeling
Something that is not often seen!! Really clever and funny!! -
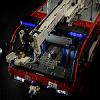
Hi folks!! I'm here to present my new MOC. It's a Airport Crash Tender, a specialized fire engine designed for use in aircraft rescue and firefighting at aerodromes. The scale is about 1:14. Lego Technic Airport Crash Tender by Lucio Switch, on Flickr It was inspired by the Magirus Super Dragon X8, but I haven't created an exact copy of it (especially in the front). It's 8 wheels drive, moved by 4XL Motors connected to the wheels via a driveline, it has a differential per axle. The 1st and the 2nd are steering axles via 2 PF Servo motors (one for each axle), with different turning radius. The suspensions system consists in 4 live axles, with an anti-roll bar for each of them to avoid the lie down on one side (like the Unimog). I added another "arm" on the 3th and 4th axles for reduce side movements. For reproduce the right wheelbases, I built this Moc with a unusual configuration. The 1st and the 4th axles are rotated. Practically the ball joints through which passes the drive shaft, for the 2nd and the 3rd axles, are directed to the center of the vehicle, on the contrary the ball joints of the 1st and the 4th are directed to the outside of it. In addition this configuration gives a positive caster angle to the 1st axle. The Hydro-pneumatic system consists in a L pump without the spring that sends pressurized air to 2 "lungs" (one per side). Downstream of them there is a pneumatic valve (moved by a PF M Motor) that sends the air alternatively to the 2 water tanks (also these one per side for balancing). One tank is for the main water cannon an the other is for the bumper water cannon. The MOC has an elevated extinguishing arm moved by 2 L motors. The nozzle can move up and down and can rotate via 2 PF M Motor. Even the bumper cannon could move up and down via 1 PF M Motor. The lightening system consist in 2 PF Led in the front and 1 in the back for the headlights. The emergency lights consist in 10 PF Led connected to 2 PF switch (5+5). Those are actioned by a PF M Motor that give the flashing effects. I used 5 non Lego parts. The 4 tanks (for air and for water) and an SBrick. Other non technical features are: - Openable sliding doors (manually) that allow access to detailed interiors of the cab. It has 4 seats, the areas around the driver's seat and the firefighting system controller's seat are detailed...using a bit of fantasy, especially for the firefighting area. - The 2 hatches between the 2nd and the 3th axle can be open and give visibility about the water level. - Also the complete side walls, placed above the hatches just mentioned, may be opened to access and refill the water tanks. - Above the 3rd axle there are 2 hatches on the sides and 1 on the roof for access to the battery packs. - 5 openable grids are placed on the engine compartment in the back. 2 are on the sides, 2 in the back and one on the roof. Those grids give access to the detailed engines compartment. There are placed 2 6-inline engines (like in the Superdragon X8). Using a differential they run with the pneumatic pump and/or with the drive motors. More or less like done by Sheepo on his Peterbilt (I think). In addition there are exhausts pipes with silencers and turbochargers, air filters with some pipes and radiators on the top. Even here I used a bit of fantasy, it was hard to find specific informations. - Hook ladder on the roof, extendable manually. Technical description: Length: 126 studs (100,8 cm) Width: 27 studs (21,6 cm) (without mirrors) Height: 37 studs (29,6 cm) (without antennas) Weight: 7,8Kg dry, 8,3Kg with filled water tanks PF Elements 4 XL Motors for driving. 2 Servo Motors for steering. 3 L Motors, 2 for elevate the extinguishing arm and 1 for the pump. 5 M Motors, 2 for rotate and for move up and down the nozzle on the elevated extinguishing arm, 1 for move up and down the nozzle on the bumper, 1 for the pneumatic valve and 1 for the emergency lights. 3 Switch, 1 for invert one Servo motor (in the steering system) and 2 for the emergency lights. 13 Led, 2 in the front 1 in the back 4 in the front emergency lights, 4 in the rear emergency lights and 2 on the front bumper. 2 Li-Po battery for drive and steering. 1 Battery pack for all the other functions. 5 IR receivers, 2 for drive and steering, 3 for move the water cannon and for control the pneumatic valve. 1 SBrick (not really a PF elements but...) for headlights, emergency lights and pump. Several (I don't remember the number) extension cables. Something like 4 by 20cm and 4 by 50cm. For more, and bigger pics take a look here: https://www.flickr.c...57651656013979/ A video will be added soon...in 24h if I'm lucky. I hope you enjoy! Lego Technic Airport Crash Tender by Lucio Switch, on Flickr Lego Technic Airport Crash Tender by Lucio Switch, on Flickr Lego Technic Airport Crash Tender by Lucio Switch, on Flickr Lego Technic Airport Crash Tender by Lucio Switch, on Flickr Lego Technic Airport Crash Tender by Lucio Switch, on Flickr Lego Technic Airport Crash Tender by Lucio Switch, on Flickr Lego Technic Airport Crash Tender by Lucio Switch, on Flickr Lego Technic Airport Crash Tender by Lucio Switch, on Flickr Lego Technic Airport Crash Tender by Lucio Switch, on Flickr Lego Technic Airport Crash Tender by Lucio Switch, on Flickr Lego Technic Airport Crash Tender by Lucio Switch, on Flickr
-
WIP AMG G500 4x4²
Lucio Switch replied to Zerobricks's topic in LEGO Technic, Mindstorms, Model Team and Scale Modeling
The performances are stunning!! Great job!! :thumbup: -
It's really interesting! :thumbup: Can it be used in heavy-duty applications?
-
RC Hamster
Lucio Switch replied to Sariel's topic in LEGO Technic, Mindstorms, Model Team and Scale Modeling
You are crazy man!! Thanks for the laughs!! :thumbup: -
I've just uploaded a video of it with SBricks!
-
Graet MOC! It makes me want to build the yellow Mercedes SSKL of Lupin the 3rd.
-
I can NOT why my truck is no more built. Nice to hear this!