Search the Community
Showing results for tags 'trains'.
-
With the possibility of at least three Trains-related sets through the BL Designer Program, I figured it deserved its own discussion thread! 2024 is shaping up to be a good year for ever-patient Trains fans. LEGO Bricklink Designer Program | Old Train Engine Shed Set number: NA Designation: Old Engine Train Shed Theme: Bricklink Designer Program - Series 1 Number of parts: 2,331 Minifigures: 6 Crowd Funding Start Date: February 7th, 2024 RRP: $229.99 US Fan-designer: Mind the Brick/Maria Kalaoglou 3,000 pre-orders required, 30,000 maximum produced. Limit of two per household. Update: FUNDED! Image: Official LEGO render Bricklink page: https://www.bricklink.com/v3/designer-program/series-1/224/Old-Train-Engine-Shed --- LEGO Bricklink Designer Program | Logging Railway Set number: NA Designation: Logging Railway Theme: Bricklink Designer Program - Series 2 Number of parts: 2,706 Minifigures: 3 Crowd Funding Start Date: June 2024 RRP: $209.99 Fan-designer: ties25 Note: Designed with motorization in mind 3,000 pre-orders required, 20,000 maximum produced. Limit of two per household. Image: Official LEGO Render Bricklink page: https://www.bricklink.com/v3/designer-program/series-2/642/Logging-Railway --- LEGO Bricklink Designer Program | Brick Cross Train Station Set number: NA Designation: Brick Cross Train Station Theme: Bricklink Designer Program - Series 2 Number of parts: 3,034 Minifigures: 8 Crowd Funding Start Date: June 2024 RRP: $279.99 Fan-designer: brickster 3,000 pre-orders required, 20,000 maximum produced. Limit of two per household. Image: Official LEGO Render Bricklink page: https://www.bricklink.com/v3/designer-program/series-2/728/Brick-Cross-Train-Station --- LEGO Bricklink Designer Program | Wild West Train Set number: 910044 Designation: Wild West Train Theme: Bricklink Designer Program - Series 4 Number of parts: 3,192 (was 2,760) Minifigures: 12 (was 6) Crowd Funding Start Date: February 4th 2025 RRP: $279.99 Fan-designer: llucky 3,000 pre-orders required, 30,000 maximum produced. Limit of two per household. Bricklink page: https://www.bricklink.com/v3/designer-program/series-4/1184/Wild-West-Train --- Series 5, Series 6 and Series 7 contain no accepted Trains-related sets. --- Series 8 will include "Brick Railroad Locomotive" an ATSF style locomotive. Bricklink page: https://www.bricklink.com/v3/designer-program/series-8/2739/Brick-Railroad-Locomotive Series 9 will include the "Woodbrick Freight Depot" a design from returning Trains designer Mind the Brick/Maria Kalaoglou. Bricklink page: https://www.bricklink.com/v3/designer-program/series-9/3131/WOODBRICK-FREIGHT-DEPOT
-
I had a whole stack of broken 12v light bricks where the bulb had gone. In particular they don't last that long when set in lamp posts. Sick of buying more so needed a way of replacing the bulb with a longer lasting LED. The first difficultly was finding the right LED with a built in resistor so they can run straight off the 12v power supply. I hadn't found 3mm white/clear LEDs before, just coloured ones, but found a supplier here for what I needed. These should also work fine for 9v. Then the other tricky bit was to open up the light brick without breaking it. This wasn't as difficult as I first thought, so here is the guide - no soldering and no glue! The tools used (almost common household items!) excluding the light brick and LED are : 1. A micro-screwdriver. 2. A bent curtain hook. 3. Some sharp nail scissors. https://savourous-eulah-autohypnotically.ngrok-free.dev/bulb/photo1.jpg Step 1. Using the screwdriver scrape off the plastic tab that helps hold into place the inner part of the light brick : https://savourous-eulah-autohypnotically.ngrok-free.dev/bulb/photo2.jpg Step 2. Using the holes for the plug as an anchor lever out the inner part of the light brick with the sharp end of the bent curtain hook until you can get under it : https://savourous-eulah-autohypnotically.ngrok-free.dev/bulb/photo3.jpg Step 3. If the inner part is still not loose rotate the other end of the curtain hook in the space made at the bottom : https://savourous-eulah-autohypnotically.ngrok-free.dev/bulb/photo4.jpg Step 4. Take out the inner part : https://savourous-eulah-autohypnotically.ngrok-free.dev/bulb/photo5.jpg Step 5. Use the micro srewdriver to remove the old bulb and contacts until the inner part is clear : https://savourous-eulah-autohypnotically.ngrok-free.dev/bulb/photo6.jpg Step 6. Throw away the old bulb and wiring and Insert the LED : https://savourous-eulah-autohypnotically.ngrok-free.dev/bulb/photo7.jpg Step 7. Bend the LED wires around the light brick making sure the LED is centred : https://savourous-eulah-autohypnotically.ngrok-free.dev/bulb/photo8.jpg Step 8. With the screwdriver continue to bend the LED wires into the plug contact holes : https://savourous-eulah-autohypnotically.ngrok-free.dev/bulb/photo9.jpg Step 9. Re-insert the metal contacts. This may take some force, but it will be this additional friction which means the removal of the plastic tab earlier doesn't matter : https://savourous-eulah-autohypnotically.ngrok-free.dev/bulb/photo10.jpg Step 10. Trim off the excess LED wires with the scissors : https://savourous-eulah-autohypnotically.ngrok-free.dev/bulb/photo11.jpg Step 11. Re-join the central part of the light brick with the cover (remember which way is up!) : https://savourous-eulah-autohypnotically.ngrok-free.dev/bulb/photo12.jpg Complete! Remember as it's an LED it won't work plugged in either way to the power supply, but that doesn't bother me in the slightest as you just turn the plug around / swap the pins if it doesn't work For train lights where the power will be reversed when you reverse the train I can recommend Janco's light bricks which are superb
-
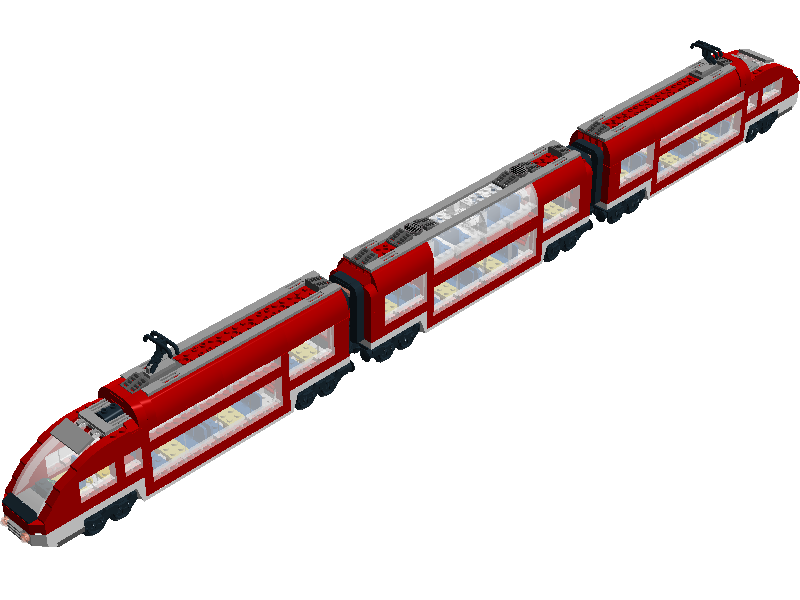
Hi everyone, I present to you my second version of the Renfe S-130 like Ferro-Friki did some time ago. I wanted to remake this train that I made first in 2018 with not the best result so I now made this version in 7 studs. LEGO Renfe S-130 DEF [MOC] by Imanol, en Flickr The set is heavily detailed even in the rear of the power cars and end cars LEGO Renfe S-130 Testeros Interiores [MOC] by Imanol, en Flickr I have made a reduced train set of only 7 cars instead of the 11 that has in real life but it has one of each of the different cars that form the real train with detailed interiors. First the "Preferente" end and "Preferente" LEGO Renfe S-130 Lateral Extremo Preferente [MOC] by Imanol, en Flickr LEGO Renfe S-130 Lateral Preferente [MOC] by Imanol, en Flickr The interiors of "Preferente" cars LEGO Renfe S-130 Interior Preferente [MOC] by Imanol, en Flickr The "Preferente" adapted car and it´s interior LEGO Renfe S-130 Lateral Preferente PMR [MOC] by Imanol, en Flickr LEGO Renfe S-130 Interior Preferente PMR [MOC] by Imanol, en Flickr The cafe car and it´s interior LEGO Renfe S-130 Lateral Cafeteria [MOC] by Imanol, en Flickr LEGO Renfe S-130 Interior cafeteria [MOC] by Imanol, en Flickr And the Turista cars which are the same as preferente but with 2+2 seating arrangement LEGO Renfe S-130 Lateral Remolques Turista [MOC] by Imanol, en Flickr LEGO Renfe S-130 Lateral Remolques Turista [MOC] by Imanol, en Flickr And now that I presented it I want to ask for help to build it as it will be my first lego train in real life. The car coupling mechanism that I have installed is only for aesthetical purposes and will not work in real life. Another problem is that i have seen many models in which all of the rear of the locomotive or power car pivots and I don´t know if it could be necesary to do in this case. Lastly I want to know how to motorize it, being so long I would suppose I would need the two power cars to provide power but I don´t know. Anyway, I hope you enjoy this project as much as I enjoyed designing it
-
My ideas for fit powered up battery box to this set:
-
Hello all, My name is Jacek and I am co-creator (with my friend) of custom Lego City Trains tracks, crossings and crossovers. Some time ago I purchased a 3d printer and shortly after it sparked an idea. Would it be possible to print some custom tracks that are not available from Lego or the production stopped some time ago (like the famous 7996 double crossover)? It turned out that it's possible, although requires some considerable amount of work and developing new skills. The results seem very promising - to the point that other AFOLs started asking me to print the parts for them. If you are curious, here's a short video showcasing some of the pars: https://www.youtube.com/watch?v=wVN2rIGip40 I'm very interested in hearing your thoughts - is this something you would use in your layout? And more generally - do you think that custom designed parts are a good addition in the Lego builds and layouts? Perhaps in Technic builds? I know that some fans of Lego don't tolerate parts that don't have the Lego trademark on them - I'm ok with that of course. I hope that I'm not breaking the rules of this forum regarding self-promotion. I'm mainly interested in discussing the ideas, the needs that can't be satisfied by the original Lego parts and that could use some 3d printing help :) With regards, Jacek
-
Dear Lego Fans, While at work, my colleges and I were talking about how awesome it would be to connect our work desks with a cargo train to haul post-it notes, candy and office utilities around our office. I offered to bring my old Lego train set and we set it up during our lunch break. It has really relighted my love for Lego trains! I got my first Lego set around 1999/2000 with the blue and white Lego Railway Express (Set 4561). Being a kid at that time, I could not afford much Lego. I got a few track-packs and switches and intersections. I also bought a Santa Fe engine and one of the cars with it. I've stopped playing with lego all together roundabout 2006/2007 when the first RC train sets were released and 9V systems were retired. It's been 10 years since I last got my train set out and now being an adult with money on my hands, I really feel like getting back into the Lego trains that I so dearly loved as a child. I'm now faced with a few problems since the 9V system is no longer available. For one I know very little to nothing about the new train sets. I'm wondering wether it's worth buying a new train set or not, which train set to get, or just lurk around eBay to see if someone might want to sell their old 9V system. I'm thinking of building a new, larger layout in my basement once I bring home my train set from the office. As far as I know, all the rolling stock will work fine on the new rails and the new trains run fine on the 9V track. so to conclude, here's a list of questions I have: - Are there any train sets out right now that I should get? - Are there any train sets coming out in the near future that are worth waiting for? - Should I not care about the new train systems at all and check eBay frequently for old 9V sets? If anyone is interested, I will post some pictures of our little office-cargo-train thank you in advance!
-
This is for discussion of train storage systems (or lack thereof if you are unlucky). I'll start with my storage / transport solution: If anyone has wondered how I get my trains to and fro all over the place, here is my secret: cardboard paper boxes. Fourteen (14) of them from all different places and companies. I tried asking for the empty ones at the Office Max / Office Depot stores (They are all owned by the Staples company now, believe it or not!) but they can't sell or give them away due to some corporate policy. I had been getting them from my dad's work, and more recently, different offices I have been to / worked at. They are them cut-down by Xacto knife and hot glued back together with opening lid and section dividers, which allows for me to store trains a number of different combinations. Most of the passenger cars are 24 studs long, with 1 studs of overhang over each coupler. However, the Spirit of Legoredo is an older 28 stud long design, and most steam locos are longer than 30 studs. Nevertheless, I have maximized space whenever possible. Below you will see several variations on these boxes, and maybe they will help you with your train storage problems. Forgotten GS-6 Daylight 4-8-4 and Meramec river Runner passenger train Alco FA / FB (not shown) and Spirit of Legoredo passenger train Generic six car freight train (not shown - on display on my layout) Mikado 2-8-2 steam freight loco and EMD E-unit cab + booster units American 4-4-0 and early passenger train Now how do YOU store or transport your trains?!?
-
hi i would like to do a swiss train moc as my first moc where can you get the essential pieces for train
-
My first try at building a wooden gondola. I'll build a few more versions before I go into production for my layout.
-
Unit Train Indexer use to position the cars in a Rotary Dump. Unit Train Indexer (Car Positioner) by Terry Akuna, on Flickr Indexer_Video by Terry Akuna, on Flickr
-
Video from the yearly model railroad exhibition in the danish city of Helsingør earlier this month. The LEGO contribution was done by our new (and smallish) train club, Togklodsen. Unfortunately I couldn’t participate but a lot of my trains did A rather spectacular crash occurs around the 12 minute mark
-
 What would you like to see me do to my Casey Jr. project to encourage more supporters? What can I change, and where can I do better? https://ideas.lego.com/projects/8b153541-1956-42b7-bfec-a8f31755bc7e
 -
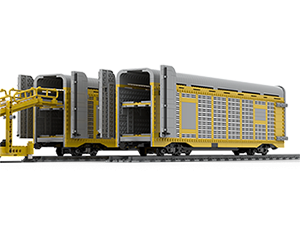
Functional Ramp and Autorack which can fit up to 6 Speed Champion cars. 65x10 Studs. Autorack_And_Ramp_06 by Terry Akuna, on FlickrAutorack_And_Ramp_01 by Terry Akuna, on Flickr
-
Hello, I always wanted to have a LEGO train as a kid and in (I think) 2008 I bought 7897 passenger train. But because I always wanted cargo train and as I have nicer looking 60051 I decided to rebuild 7897. I tried few times to find any inspiration as the 7897 has specific train base (6x30) but I started to believe that nobody wanted to "play" with it and couldn't find any MOCs. So I tried to create some kind of clone of BNSF loco, but let me say that it is the beginning I hope :) Anyway I am sharing my progress so far and would love to see your creations/modifications to either my creature or your own with 7897 train base. Pls, feel free to download LDD file and modify it. https://www.dropbox.com/s/ryrniph1evketqi/my train white no trainbase.lxf?dl=0 Looking fwd to see your MOCs
-
Hi everyone, I recently was holding my Horizon express train and noticed something. The cars (so not the engine) were very light, even so if I didn't know better, would think there weren't a lot of pieces involved. I had the 2006 High speed passenger train 7897 and noticed also that the car was very, very light. Same with the other two recent passenger trains, and the passenger car from the Emerald Night. On the other hand, as a kid a friend of mine had some cars of the Santa Fe Super Chief, and they were kinda heavy (in my memory that is) compared to my own 7897. Looking up the instructions of some of the older trains I also noticed it almost seems more pieces were involved. I'm kinda sad by this, since I think the cars of a train are just as important as the main engine of it. So my question is, does anyone who owns several trains of several eras also notice the difference in wheigt between the passenger cars? And what does that mean for you?
-
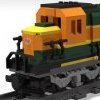
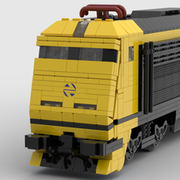
This is my DIY LED lights on a budget. White 5mm LEDs are 2 cents each and resistors are 4 cents each on eBay. A large spool of wire-wrap wire costs around $5-7. Do-It-Yourself LEGO LED Light by dr_spock_888, on Flickr I tapped into the 9V and GND lines of the IR Receiver for power. Note this will void your warranty. Do so at your own risk. I fed the wires through the pin holes on the receiver. No drilling or cutting needed. I sandwiched the LED between two Technic 1x2 bricks. The 5mm sized LEDs fit right in the Technic hole. I decided to try wire-wrapping instead of soldering. It might be easier to disassemble later on. The LED turns on when the battery pack is turned on. It makes a good reminder to turn off the battery pack when done playing. Little Yellow Locomotive by dr_spock_888, on Flickr The hard part was calculating what size resistor to use to limit the current to the LED. Too much current will blow the LED. Tools used were small Philip head (+) screwdriver, wire cutter & stripper, soldering iron, wire-wrap tool, and tweezers. Plus a multimeter to verify polarity.
-
Its time to start thinking about Brickworld Chicago 2018 is only 4 months away. What topics would most interest you for the Train Round Table? Here are just a few possibilities... or suggest one - Third Party tracks options for wide curves, turnouts, metal rails (Like BrickTracks, 4D Bricks, ME Models, etc) ? - The new Lego Power Functions 2.0 standard ? - Third Party power options (like PFX Brick, S-Brick, etc) ? - Building Narrow Gauge ( using either narrow gauge or new Roller Coaster track ) ? - Rechargeable battery options (alternatives to the Lego LIPO battery) - BMW
-
PLS I DON'T KNOW HOW TO PUT THE LXF.FILE HELP ME! anyway, this is basically a modified version of the lego 7938 Go check my LDD video about the wagon
-
 One of the policies within Sioux.NET on Track, is to change a build every three years. In other words, when a build has been part of a Lego World demo for three years, it should be replaced by a new one. For example, loading the train was first done by the container crane, now it is done by the delta crane. The same applies for the train: the first years, we controlled the train by an NXT, now it is controlled by an EV3. For the new layout, I am thinking of replacing the train by a monorail (and thus renaming the group to "Sioux.NET on Monotrack" ;-). I always use Youtube as inspiration. To see how others solved the typical problems you run into when building something. But I haven't seen a Lego Mindstorms monorail yet. The Lego Technic monorail created by "Osi" (click here for an example) is most nearby for what I have in mind, but it is not using Mindstorms inside. In other words, I will have to use my own imagination. What a pity ;-) I started with creating the track. This was my first attempt: Although it looks good (I was aiming at an open, industrial look), the curve is not smooth enough for a train: So, I made a second attempt: That looks much better. It was not easy to get the curve smooth AND find a brick with the right distance. This is how I managed to get this curve: A simple train (only proof of concept until now), runs easy through the curve: The next days I will continue building a motorized train (proto). Let me know what you think so far Merry Christmas! Regards, Hans
 -
 Hello, I bought some blue era remote points in rough shape, that need to be opened and repaired. Has anyone attempted this before? Is there any tips or tricks I should know about? Also, I do not own an original transformer, so I will be using a generic power supply for these. Will 12v DC work, or do I need higher voltage? Thanks, Unfinished_Projects
 -
I built this for my "Midiopolis" topic over in the Town forum, but I decided to mention it here as well. The wheels are part number 38799 which at the moment is only made in white and is decorated for use as a tea cup saucer for a Harry Potter minifig. Midiscale BR Class 08 Shunter Midiscale BNSF 2099 Locomotive Midiscale Small Oil Tanker Midiscale Chicago Metra Cheers.
-
Hello, I'm creating this write-up to share my experience buying and operating a set of old 12v track in the US. I had been wanting some 12v track and motors since I was in middle school (and I'm in college right now, so yes my tastes in Lego have always been old and expensive haha) but hadn't found the right lot until about a week ago. I managed to score the following lot on ebay for a good price: It is a decent amount of stuff, but some key things are missing: motor (the blue one in picture is 4.5v and doesn't work), transformer, and the piece for connecting to the track. My goal was to have an operating train for as cheaply as possible. Hopefully these ideas can help someone else out who wants to make use of older track without spending a fortune. FOR PURISTS: I handled all of these missing components in an unorthodox way that includes modification of vintage parts, so consider yourself warned Motor: Instead of buying original 12v motors, which are only available for crazy amounts of money on bricklink, I chose to use @bricks n bolts method of picking up track power and using it to drive PF motors (https://www.eurobricks.com/forum/index.php?/forums/topic/63535-mod-7745-to-use-the-pf-motor-still-on-12v-track/ I know it was a little while ago, but thank you @bricks n bolts for sharing! ) The process of cutting down the pins was pretty straightforward. I used a dremel with a cutoff wheel to make the initial cut and a sanding wheel to finish things up. If anyone attempts to do this, try to keep the pin cool, as I melted the plastic a bit on one of my pick-ups. I also ended up cutting off the curved section of one pick-up, to accommodate for the magnet assembly. Connecting to track: To connect to the track, I simply soldered some wire to the little tabs on the bottom of the rail. The correct part for connecting to these blue rails isn't that expensive on bricklink...if you don't factor in overseas shipping. Transformer: Since I live in the US, using an original transformer would require a converter (I had no luck finding the 110v version on bricklink or ebay). I originally thought of using a model train transformer of some kind, but wasn't sure so I asked here on the train tech. @dr_spock suggested a cheap DC motor controller and a generic 12v DC wall adapter (Thanks! ). This ended up working perfectly, and was quite cheap. Only downside is no reverse, but I'm ok with that for how much I spent. Final Result: With everything together I swapped out one of the motors on my Powered Boxcar (https://www.eurobricks.com/forum/index.php?/forums/topic/169681-moc-powered-boxcar-power-functions/) with the completed pick-up bogie and turned on the speed controller. It worked perfectly! I now have a functioning 12v loop that powers my newer trains! I do however have to watch out that I don't over-power the PF stuff. I suppose I could have used a 9v power adapter, but I'm leaving room for a 7740 that I hope will join my collection if I find a good deal ^These last 2 are videos, you just have to click on them There's a few more pictures of this project here if interested: https://flic.kr/s/aHskR5KZX3 Thanks for looking! Unfinished_Projects
-
Hello, I have 4.5v train motor (https://www.bricklink.com/v2/catalog/catalogitem.page?P=bb07pb01&name=Electric, Motor 4.5V Type A 12 x 4 x 4 with 4.5V stamped on front&category=[Electric, Motor]#T=C) that needs wheels. I have access to a 3D printer and 3D modeling software/knowledge. My question is, does anyone have dimensions for "wheel2a" ?(https://www.bricklink.com/v2/catalog/catalogitem.page?P=wheel2a&name=Train Wheel Spoked for Motor&category=[Wheel]#T=C) I would like to try to make something that goes into this motor and gives it a technic axle, or just recreate the wheel (either all plastic, or using purchased metal rod). Unfinished_Projects
-
Here is my 2016 layout, with most of the items already built, but some still remain to be purchased. Here is a complete list of what's on my tables, not including trains or automobiles because they can be rotated on or off the layout very easily. All of this sits on three very carefully arranged 30 inch by 72 inch tables. Now for the reality check: This is the current state of my trains and town layout. I don't have any other space for things on the table, as below the tables and in the closet is full of Lego bins, either color sorted in slide-out drawers, former model chunks in bins, or put together in customized paper boxes. Here we see the entire layout and compared to the nice chart I posted earlier, it's bit of a mess. The water models area has a police station and Cloud Cuckoo Land in it, and the left hand town area next to the station has my clock radio and assorted stuff for models not yet built. The rail yard is mostly put together, with my streamlined 4-8-2 steamer and diesel PA / PB units getting ready for their day of work. The steam loco is arriving at the coaling / water towers to refuel while the ALCO units are going to be switched onto the mainline to pull it's assigned express train. (The train is not on the table to save space and keep it from getting too dusty.) The town is mostly there, with the streetcars rounding the curves onto and off the main street. The sections only needs two 90 degree (X) crossings to be finished. Now you may be thinking it's really bad, but it is a lot better than it was, and still has a ways to go. It's all about baby steps toward the larger goal of having my dream layout, something I have always wanted since seeing my Dad's layout when I was 5 or 6. For those wondering, here's my ideal layout's items.... most of them I have already, but a half-dozen or so I don't own yet. This layout contains the following track sections: 3 - Right switches 3 - Left switches 62 - Straight segments 46 - Curved segments 2 - 90 degree rail crossing (still needed) 1 - Double rail crossover This layout contains the following train facilities: - Truss bridge - Ironwood Train station -Trolley Stop (still needed) - Water and coal refueling stations - Double stall train shed This layout contains the town buildings: - Sinister Victorian Mansion - Stone Bank - Western Saloon - Thunder's office - Town Hall (still needed) - Military Surplus store - Tudor style House - Model Rocket store - Tavern - Train club meeting house - Railway Headquarters (still needed) This layout contains the following miscellaneous other items: - Tramp steam ship - Lighthouse - Car ferry - Leisure vessel (still needed) - Rural Cabin Comments and feedback would be really appreciated!
-
 Hello everybody Does anyone here have the book 'Getting Started with LEGO Trains' by Jacob Mckee from 2003? If so, Would they be able to post a PDF of the instructions and parts list for the reefer boxcar? I've seen pictures of it and would love to build one myself but paying $60 for the book is a no go. Also, if the other instructions were posted this thread could be a good reference for anyone else who would like to build the other models from the book. Thanks in advance


.thumb.jpg.2433326db10f4abc8b62808c9f079544.jpg)