Search the Community
Showing results for tags 'pirate'.
-
INTRODUCTION There's always room for you If you wanna be my friend We are, we are on the cruise! We are! It's been around since 1997 but this year is the first time Lego has delved into the world of One Piece. Beginning as a serialized manga before production began on the anime, Netflix picked up the long-running show in 2023 to produce a live action version. Season 2 of the live action adaptation airs next year in 2026. That made 2025 the perfect time for Lego to team up and create the first wave of One Piece sets. This is my 5th and final review of this theme. You can read my review of the Going Merry, the Windmill Village Hut, Buggy's Circus Tent and Battle at Arlong Park respectively. Chronologically, this set covers the 5th an 6th episodes of the 8 episode season 1. But what would One Piece be without a crazy amount of back-story episodes! So let's go back in time before the battle at Arlong Park and see what makes the Baratie so special. SET INFORMATION Number: 75640 Title: The Baratie Floating Restaurant Theme: One Piece Released: 2025 Part Count: 3402 Box Dimensions: 52 x 47.5 x 12 cm Weight: 4680g Set Price (RRP): £269.99/$329.99/€299.99 Price per Part: 7.9p/9.7c/8.8c Links: Brickset, Bricklink THE BOX AND WHAT'S INSIDE The box is massive as benefits a set of this size. Meant to be more of an Icons style display piece, the box forgoes the colorful background and opts for a classy black instead. Inside the box no space there is no empty space. It is jam packed with bricks. We get 2 packages for the instruction books and stickers. And we get 2 sticker sheets. The stickers are used sparingly, but for a set this size I wish we had gotten prints instead. THE BUILD Unfortunately, first impressions on this build are not the best. The build starts with the fish's mouth at the front of the ship. And just a couple bags in the unsightly injection points are plentiful. But perhaps even more jarring is the color variance of the 1x4 modified plates. Most have the standard hue, but a few are more peachy. Can you spot the 3 off-colored pieces here? The unsightly injection mold points continue all through the set. It's barely noticeable on some pieces, but on colors like reddish brown it's an awful eyesore. Those flaws aside, the build was fantastic from start to finish. The front of the mouth is built up with a wide variety of pieces to give it both a rounded shape and secure connection points. Shaping for the fish head is achieved by using newer curved pieces. Other curves are made using a new, shorter version of a classic curved brick. The tan is what's in the set, the grey is what existed before. The end result is a very close replica of the front of the Baratie. Moving on to the rest of the floating restaurant we build the grand staircase allowing guests to descend to the dinning area. This is done by stacking 1x5 technic plates, 1x4 rounded plates, and tiles and wedge plates. The result looks excellent. Put together, the sections start to take on the shape of the Baratie. To get the shape of the ship, large panels are built for the right and left sides and then attached using clips. This is a common technique in sets these days, but the way the Baratie uses the curved bricks to get a perfectly flush connection is impressive. The left panel is connected using this unique method. And the right panel is connected using clips. Only half-way through the bags but already the set is too big for my light-box! Next I have to show an oddity I've never noticed in Lego pieces before. As I was finishing the right panel I noticed an odd gap between these brown L-tiles. So I did some testing. The top row are the tiles included in the Baratie set. The bottom four rows are pieces from my collection. You can see that the black and gray have no noticeable gap. However, even my older browns have a little more of a gap. Rotate the pieces and the gap disappears from the newer brown L-tiles. So I put the tiles back, rotated this time and you can see that a new gap is there. And here's back at the original state. These are very odd variances in piece sizes. Has anyone else had this problem? Rounding off my list of complaints, here are some more injection mold marks extra noticeable on the pearl gold pieces. And here are 2 of the stickers used to make a lantern. My fingerprints mar the overall affect and I question if it was really necessary to use stickers at all for this part. The lanterns hang belong the railing and above the main door. The back of the model is doll-house style with lots of space to place figures. The curved seats allow 3 minifigures to be seated comfortably. The orange seats are built on turn tables and can therefore move though they aren't intended to. The kitchen is well furnished with food and equipment, though it's very tight and hard to place minifigures. Getting Luffy into his Chore-Boy position at the sink took many tries! Leading out of the kitchen is a back door. If you're a starving pirate this is where you enter so that Sanji can feed you. Zeff's office has a transponder snail and some other pirate paraphernalia. Inside the cabinet is a pearly pink jar. If this is a reference to something I don't know what! The upper levels house treasure. This has nothing to do with the show, live action or anime. But it's a nice way to fill the space. The top part can come off to allow access underneath, but it's not really needed. In front of the main door is a weathered platform to recreate Mihawk and Zoro's fight. I like the weathered look, but having those gaps filled with plates would have been better. It's hard to pose more than a couple figures on the platform since the gaps in the tiles don't allow the figures to pivot at all. The splat gear turns to two round jumper plates allowing to figures to sword fight each other. This is a brilliant idea. However, with the sword in Zoro's mouth and the size of Mihawk's blade, Yoru, it means if you fight with them their blades are always knocking against the mermaid statues. The platform should have been at least 1 stud longer. Speaking of swords. Mihawk's blade is an amazing new element. It has a stud on one side of the handle to allow it to stick to the neck bracket on Mihawk for easy carrying. And Zoro's third blade, which he holds with his moth is also a new element. It can be held by a hand, but the plastic is soft and mine got damaged by putting in a hand. I really wish they would have made a neck-bracket with a clip to hold any sword. But I guess the sword wouldn't have been as close to Zoro's mouth then. Much like the Going Merry, the Baratie tries to use forced perspective to get both a display model and a playset in one. However, where the Going Merry does it well, the Baratie fails in many aspects. The front of the Going Merry is mostly minifigure scale and moving back it becomes more and more micro. The Baratie jumps between two scales more sporadically. The micro door between the fish's mouth and the main door is micro scale, but it's a jarring contrast between the two minifigure scale parts. The outside balcony in front of the ship's sign are minifigure scale, but the sign itself is micro scale. It's tricky to balance the scales like that and the Baratie doesn't quite make it. Put the Going Merry up next to the Baratie and the scale doesn't work either. The Baratie should be much bigger in size comparison. The sections that are minifigure scale are great, it's the micro scale that doesn't seem to fit. THE MINIFIGURES There are a total of 10 charaters included in this set. First off we have the main crew of the Straw-Hat Pirates. Zoro, Nami, Luffy, Usopp and Sanji. They all have alternate faces and pieces created specifically for One Piece. They other five are Zeff, the owner of the Baratie; Garp, a navy Vice Admiral and Luff's grandpa; Helmeppo and Kody, Navy cadets; and Mihawk, one of the 7 warlords. All fit the context of the Baratie episodes well. I'm glad we got some Navy members. Though I wish they would have left off the Cadet badge from the two cadets. We can't re-create some of Luffy's battles against the navy yet! Missing from the line up is Patisserie Patty. His inclusion would have made the line-up perfect. Zeff uses a new beard piece and in a new color. It's called Ochre on Bricklink. Here you can see how it compares to some other Lego yellow hair colors. Some have been unhappy with the choice of a cowboy hat for Mihawk. So I tried switch it out for the musketeer one. The feather looks really good, but the hat isn't quite right. It also doesn't allow for his sword to attach behind as the brim rests too low. What Mihawk needs is a cowboy hat with a feather hole, but that would have been a new mold. Of the two, I think the cowboy hat is a good choice. I also changed Garp's hair as the spiked hair didn't seem to represent him well. If Lego made the piece I used in light gray it would have been perfect. Here's the modified Mihawk in his coffin shaped boat. Holding his sword he looks impressive, but a little too much like Barabossa for my taste. OVERALL As far as being the largest set in this wave I think the Baratie could have done a little better with the Straw Hat crew. Across all 5 sets we get 5 different versions of Luffy. The Baratie version is on the right. He's only technically exclusive due to the specific match up of hat and face print. But if you've bought the other sets you already have this Luffy. I like that they gave him his classic red vest, but an option would have been to have a different outfit for the Baratie or at least a unique face print. Zoro gets a total of 3 versions. The Baratie version on the right again is exactly the same as the Buggy set. Another missed opportunity to include something special. Nami gets 4 versions. The only unique version is from the Arlong Park set. Again, I love that they focused on her classic outfit. But the Baratie was a chance to include something new. Usopp gets 3 versions with the Baratie version the same as the Going Merry, just without the slingshot. Sanji gets the short end of the stick with only 2 versions. And here, the Baratie gives us a unique outfit that's totally in character and a great addition. I would have loved a face print with hearts for eyes though. The chase gimmick for the One Piece sets are the Wanted Posters. The Baratie comes with 5 random 2x3 tiles. I got 2 Gold Rogers, 2 Kuros, and 1 Don Krieg. Across all 5 sets I got 2 Kuros, 4 Buggys, 2 Don Kriegs, 2 Alvidas, 2 Arlongs, and 2 Gold Rogers. That means I'm still missing Luffy and Mihawk. Almost 600 euros worth of sets and I still don't have a full set. I appreciate the idea of chasing after the posters. But I think Lego needs to do a better job. Either ensure each set has 0 duplicates giving someone better odds at getting a full set or they need to include all 8 in the Baratie. SCORE How do I rate this set? DESIGN 8 This is a decent display piece and playset. Though it succeeds better as a playset. It tries to balance scales and doesn't quite reach the mark. BUILDING EXPERIENCE 10 This was thoroughly fun to build. There are many great techniques and it never felt repetitive. FEATURES 9 There are so many places to put figures, there are a great number of treasures scattered around the ship, and a huge selection of food and food prep pieces. That gives you a lot of ways to display the set. There is also the great fighting feature though the platform needs to be just a little bigger. If there was better space to place minifgures and a larger platform this would be a 10. PLAYABILITY 10 The Baratie really shines when it comes to play. Storytelling is easy. And sword fights are fun if you use shorter swords. PARTS 9 There is a great variety of pieces in this set. The color choice is okay, but the constant switching from red to brown doesn't quite do it for me. I don't know what they could have changed, but I feel like some of the colors should have been different. VALUE FOR MONEY 9 You get a great number of parts for the price. However, I feel like we needed at least one member of the Baratie's staff to help Sanji and Zeff. Even if you had to trade out Helmeppo to get him. Also, the distribution of the Wanted Posters needed to be better. FINAL SCORE: 9 As the flagship set of the first One Piece wave the Baratie had a lot to live up to. And it gets close. It's a great model with fantastic techniques. The figure selection, while not unique enough for this set, is decent. If you're a fan of One Piece I would say this set is worth getting. It's already been on sale on Amazon so you might get lucky and find a good deal for Christmas. However, if you're looking for the best bang-for-your-buck the Going Merry is a far better choice. Both sets have the full Straw Hat crew. And the extra figures in the Baratie are nice, but little things like the wrong hair for Garp and the "Cadet" printed on Helmeppo and Koby's uniforms lower the overall appeal. And now, to wrap up our story. Luffy and his crew discovered an island and now face it's lone inhabitant... Hey, you're interrupting our meal! I am the spirit of Gol D. Roger! Who disturbs my rest? You're not Roger, just who are you? Alright, you got me. I just like my privacy and that usually scares people off. Geez, don't scare us like that! Yeah, it's not very nice of you. Trust me, you don't want to mess with our captain. And why's that? I'm going to become King of the Pirates! Har har har! I wish you luck boy. May you have better luck finding Gol D. Roger's treasure than I have of looking like him! And so Luffy and his crew sailed off to find the One Piece!
-
This is a collaboration between me and @Legostone . We present: The Inferno! Soon after 71391 Bowser Airship was released, I collected enough medium nougat coloured hull pieces to build a ship. Initially my intention was to build a replica of the famous Inferno, as seen in the move The Goonies. However, upon closer inspection of the reference material, we eventually decided to deviate and add some more interesting features. David came over to my place for a Ship Building Weekend, we had done one of those before, resulting in the creation of the Revenant. This is what we started from, on a Friday evening: (I typically collect potential useful parts in the hull of a WIP ship, that's just my process ) And this is what we had at the end of the weekend. Needless to say, we had been quite productive. One might even call this speed-building. From there on I continued on my own to finish this beauty. Though we continued to discuss solutions via whatsapp. I had never built a ship with a sprit topmast before, for a more classic galleon rig. It's more tricky than a modern bowsprit, meant for jibs, but I think it works. Some things we didn't like about the Goonies' Inferno are: the not so glorious stern (we wanted galleries!), the odd position of the main mast and the lack of fire power (Our ship now runs a compliment of 18 12-pounder guns on a dedicated gun deck and we left some room on the upper deck for additional 3 pounder guns, though I've only placed two near the capstan. The colour scheme is one I am very happy with, On top of the medium nougat hull sit the walls, which are made out of (old) dark grey. It more brownish tone, compared to the newer Bluish Grey, works great on a "wooden" ship. David and I had collected just enough rust-coloured gunport flaps, before Bricklink decided that Rust is not an official colour . To be fair it's not that different from regular red but still, regular red might have been too bright to play nice with the rest of this particular colour palette. Above the main gun deck, we have a splendid marriage of dark orange and dark red, continuing all the way up to the beakhead. On top of the stern medium nougat makes a return. I find that the reuse of the hull colour elsewhere on the ship often works well to bring some balance in the colour scheme. Pearl gold serves as decorations, ornamenting the prow and stern. I've taken some pictures before I added the sails, as it is often easier to see more of the ship itself that way. The deck is made entirely of dark tan. I personally find that reddish brown is easily overused so I've tried to limit it for little details on deck only. I had these printed tiles from the Snow White set, which goes well on the binnacle. Concerning the helm, a ship like this really isn't supposed to have a steering wheel. A whipstaff would have been more appropriate There is no interior, on a fully rigged ship it doesn't make much sense investing time in details into an interior that can never be accessed anyway. I'm very happy with these grates, I had these built already for another ship but it just felt right to use them on this one. (It's going to hurt collecting more reddish brown fences, they're quite expensive ) I think medium nougat would work well for the masts, instead of the current tan. Unfortunately I only considered that when the standing rigging had already been applied. Captain William B. Pordobel, can't forget about him. And that concludes our business, let me know if you like it. David and I are already discussing a new ship to build on another ship-building weekend .
-
INTRODUCTION Through it all, through all the troubled times Through the heartache, and through the pain Know that I will be there to stand by you Just like I know you'll stand by me!... For those unfamiliar with the long running Manga and Anime, One Piece is the story of Monkey D. Luffy and his dream to become king of the pirates. Through the world of One Piece there are many other pirates looking to achieve the same goal or carve out their own slice or territory. Luffy fights many of these foes through the series, one of them being Arlong. Acting as the season finale for the first season, Luffy and his crew face off against the Arlong Pirates. This is my 4th review of this theme. You can read my review of the Going Merry, the Windmill Village Hut, and Buggy's Circus Tent respectively. Is this set a good representation of the season finale or can you skip it? Let's find out! SET INFORMATION Number: 75638 Title: Battle At Arlong Park Theme: One Piece Released: 2025 Part Count: 926 Box Dimensions: 38 x 26 x 6.75 cm Weight: 1008g Set Price (RRP): £74.99/$79.99/€79.99 Price per Part: 8.1p/8.6c/8.6c Links: Brickset, Bricklink THE BOX AND WHAT'S INSIDE On the front of the box we get to see Luffy's Gum-Gum-Pistol move in action. The back shows off the play features including the tower collapsing. In addition to the bags there are 3 instructions books, a large sticker sheet and Luffy's torso. THE BUILD First off I'll start with the side builds. I chose not to apply the stickers. And without them everything looks really plain. There is a small carnival game, a bar with the transponder snail, a throne for Arlong, and a tree for Usopp to hide behind. Overall these are nothing special. They look like their counterparts from the live action show, but they don't really add much to the set. In contrast the main building uses some great techniques to build a structure that is both sturdy and breakable. The bottom side panels use technic beams with pins to create a sandwhich. These are then attached with axles to the base so they can easily fall over. A part of the roof is attached to the white bars using inverted tiles with holes from the Unikitty CMF. The rest of the tower is built designed to allow the right and left halves to split. I did apply the shark mouth and flag stickers as those can be reused for other MOCs easily. Folding down the shark mouth peak you can use Luffy (or your figures) to push the middle of the tower causing it to fall apart. The end result is very satisfying. It's a great recreation of the epic battle moment between Luffy and Arlong. The chunks of the building stay together nicely even when exploded over and over again. And the whole tower is easy to put back together. You can see from this photo that the sections are held together in part by clips resting inside click hinges. That plus the jumper plate connections provides a sturdy enough hold that the parts don't fall apart when moving the tower. I wouldn't go shaking it, and the whole thing wobbles when moved. But overall I am very impressed in the structural integrity of a collapsible building. True to the story, you can chain Nami up inside and force her to work for Arlong. Trying to get Luffy to fit inside is another issue. I love the option to have the long arms to re-create his stretching ability. But is does pose problems when trying to actually do things with the minifigure. You can see here that I had a hard time getting him to stand straight due to the oversized appendages. Adding a stand with a place for his arm to connect you can see the fronts of each minifigure. Nami and Usopp get unique outfits for this set. I particularly like the green hat for Usopp as opposed to his pink one in the other 2 sets he shows up in. It's more faithful to the anime. I was disappointed to see the shark fin molded onto Arlong's hair. It's faithful to the source material, but it ruins the usability of this piece. I would have rather they printed the fin on his back instead. The alternate prints are good, especially Nami's crying face and Chu's blow-fish mouth. Except for Luffy all figures have arm printing on 1 arm. The Arlong tattoo looks really good. To finish off the review we end with a feast... or at least we would if there were any food elements! All the other One Piece sets have at least some food. Arlong is skimping on the catering budget it looks like. We do, however, get the gorgeous transponder snail. A hilarious method of communication that mimics telephones in real life, just with snails... I guess you just have to watch the show. We do get a bowl and some hot-sauce. But that's not going to satisfy Luffy. On to the next island! OVERALL This set has a fantastic main building with a cool destruction feature. It comes with a good group of minifigures and I'm glad at least 1 Arlong pirate got included. Chu was a good choice as he and Usopp face off in the episode and his design looks good. The side builds, while faithful to the show, detract from the set. They don't add anything essential. I wish the parts had been allocated to the main building allowing it to be even bigger or removed allowing the price to be lower. The ability to re-create Luffy and Nami's interactions during the Arlong arc may be the best part of the set as it's an emotional scene that really sets the bar high in character development. SCORE How do I rate this set? DESIGN 7 It's hard to rate the design because the main tower is designed incredibly well. But the side builds should have been skipped. BUILDING EXPERIENCE 8 It was really fun building the tower, but the side builds were more like after thoughts. FEATURES 7 At risk of sounding like a broken record, just see the above two comments! PLAYABILITY 8 The collapsing tower is fantastic. The ability to recreate scenes from the Arlong episodes is great. But the side builds are a major let-down. PARTS 9 There are a lot of parts that will make castle and Asian scene builders happy. It's a good selection of parts and makes a good set or parts pack. VALUE FOR MONEY 9 There are a lot of small parts that inflate the piece count. But even with that this set is a decent value. It has a good selection of minifigures too. FINAL SCORE: 8 Getting Luffy with long arms is going to be one of the biggest reasons people get this set. But you also get unique versions of Nami and Usopp as well as two good figures in Arlong and Chu. In addition the main building really adds value to the set. It's just the side builds that let you down. Last time we left Luffy and his crew on a strange island... Wow Zoro, you really are bad at directions. I still don't get how you ended up locking yourself in that prison cell. Hey just drop it okay! Do you feel like someone is watching us? Hey, some creep just showed up! Don't worry Nami swan, I'll protect you! Tune in next time to find out what happens next!
-
INTRODUCTION Through it all Through all the troubled times Through the heartache And through the pain Know that I will be there To stand by you Just like I know you'll stand by me... Airing on television for the first time back in 1999 One Piece has been around for a very long time. In 2023 Netflix aired the first season of a live-action version which covered the East Blue arc. If you've watched One Piece for any length of time you'll know that flashbacks are a common story telling tool for the series, sometimes using flashbacks within the flashback! So, true to form, I started my reviews of the One Piece sets with a review of the Going Merry and now we're going to flashback and look at the Windmill Village Hut. So is this set just another filler episode you can skip, or is it essential viewing? Let's find out! SET INFORMATION Number: 75636 Title: Windmill Village Hut Theme: One Piece Released: 2025 Part Count: 299 Box Dimensions: 26 x 19 x 6 cm Weight: 442g Set Price (RRP): £24.99/$29.99/€29.99 Price per Part: 8.4p/10.0c/10.0c Links: Brickset, Bricklink THE BOX AND WHAT'S INSIDE The front of the box shows the windmill village where our "hut" (really it's a bar, but Lego can't market that) gets its name from. The back of the box shows that the side of the hut can hold your Wanted Posters from this line of sets. Inside we get 3 bags, a loose boat, and a sticker sheet. This happened with a few of my One Piece sets, but inside one of the paper bags was a smaller parts bag in plastic. I guess Lego still has some plastic to use up! THE BUILD The build process is simply split across the 3 bags. Our first bag gives us the base of the bar and a nice plank walkway. We also get Red-Haired Shanks equipped with a simple pirate cutlass. Our second bag adds pillars and drinks for the bar as well as giving us the Makino the owner of Partys Bar. You can see the name of the bar is a sticker as is the woodwork on the cross beam. And of course bag 3 finishes off the build and gives us young Luffy. Partys Bar is a full enclosed building in the cartoon anime, but the live action opted for an open-aired style island bar. The set captures the essence of the live-action set even if much of the nautical themed decorations are missing. The build looks great from the front, but it also looks good from the back. The notice board for the Wanted Posters works really well and is a great addition for fans of this line who buy the set. Lifting the roof off gives better access for posing figures in the bar. I don't know when Lego changed the mold for the boat oar, but it's probably been like this for awhile. But it's my first time realizing you can fit a feather or other accessory in the oar if you want. The connection felt a little snug, so I don't know if it's a legal connection. I also don't know why someone would want to use it, but there you go. For being the smallest set it the wave it's a great treat to get 3 unique figures. Flash-back, or young Luffy wears a simple shirt that is accurate to the show and could be used in many other city scenes. And Makino and Shanks' torsos are extremely versatile. I was surprised the Lego decided to give us a Shanks figure. He doesn't play a large role in the live action series, but has a lot of significance to Luffy's overall story if you're familiar with the manga. So it's a treat to get him in Lego form. I think I would have preferred one of Shanks' crew over Makino. But I can understand why they included her as she's easy to make with existing pieces, only requiring some new prints, and it gives you someone to run the bar. The back printing is what you would expect, but it's the reverse faces that really stand out. Luffy's crying face is perfect for the stories set during his time in the Windmill Village. And Shanks' fighting face looks good too. Luffy's hair piece is new for this line and it shows up in a couple One Piece sets. Shanks has both a hairpiece and hat molded with hair. The injection mold marks are obvious on all 3, but on Shanks' hair piece it is very unsightly. More about that later. Shanks and Makino's hair pieces are re-colors. We also get the famous Straw Hat as it's own piece so that Shanks can gift it to Luffy. It looks odd being used as a normal hat and looks far better hanging on Luffy's back, as in the Arlong Park set, or being held. I'm waiting for someone to use this piece for a Madeline MOC. THE UGLY I mentioned the injection mold point sorely visible on Shanks' hair. Unsightly injection mold points have become increasingly a problem for Lego. It didn't always used to be this bad. And since Lego has a motto of "Only the best is good enough" I want to hold them to account. Certainly colors reveal this mold spot worse that others. You can see them very clearly on all the reddish-brown parts. Another odd mark, and a new one for me, were the rings around the raised stud of the 1x1 reddish-brown bricks. But injection mold points aren't the only problem. My larger dark tan plates had mushed corners. The plastic is now too soft and easily gets damaged. Here you can see the same damaged corner as well as more injection mold points. One of the worst cases is with the clips. These mold spots are so bad the clips can't sit flush against other bricks. All of these flaws are unfortunately becoming the norm for Lego. I will be reaching out to Lego customer service to share my concerns as I have done with many other sets I've bought over the past few years. I encourage you to do the same if you find flaws. Lego won't change their practices unless we hold them to account. OVERALL Lego sets in general have quality issues right now. That aside, this set fills the slot of smallest set of the line in a great way. It's a nice little location set with good details. It has 3 unique figures plus a fun feature for displaying your Wanted Posters. It's great as a parts pack, for pirate fans, and for One Piece fans. SCORE How do I rate this set? DESIGN 9 It's a good design. Simple, but effective. It relies too much on stickers, but it's close to perfect. BUILDING EXPERIENCE 9 For a small set I don't expect much from the build experience. This set does a good job of being fun to build even if nothing overly wowed me. FEATURES 10 For a small set it has decent features. The roof lifting off for easy access inside and the Wanted Poster board are good features for a $30 set. PLAYABILITY 10 The main play factor here is story-telling. And for a small set it does a fantastic job of providing lots of ways to do that. Telling stories around the bar, Shanks giving Luffy the Straw Hat, and even just sailing in the boat are a decent number of play options in a set this small. PARTS 10 This set has a great selection of parts. It's very versatile if you want to use it for other themes (Brock arguing with Venom anyone?). VALUE FOR MONEY 10 It hits the golden PPP and has 3 unique figures. You can't get much better than that for a licensed set. It's worth full price if you can get replacement parts for any damaged pieces that will almost inevitably some with the set. FINAL SCORE: 10 Just like with the Going Merry this set gets a full 10-out-of-10 from me. But what's this, there's more! Wow Luffy, that's a great story. I didn't know Shanks meant so much to you. Yeah, Shanks is pretty cool. I'm glad we spent 15 episodes covering that backstory. What's an episode? You know, I'm not sure. It just sounded right to say. Hey, where's Zoro? Don't tell me he got lost again! Oh no, what if this island is haunted!?! Tune in next time to find out what happens next!
-
It seems I have a tendency of spending 10 years to finish my vessels ... Better late than never though. The Raven is the delayed result of a building challenge where the objective was to build a good-looking boat using the old small prefab hull type. I had a previous attempt at this but I didn't quite like it. You'd think a small sloop would be rather easy, it really is a challenge in less-is-more, doing my best not to overdo it. A special thanks goes to @Legostone, for designing the small entrance hatch to the cabin. The Raven next to the Spectre: I hope you like it! I'm considering starting up a comic series again, it would take a lot of preparation though.
-
Fortuna is back! - Completely rebuilt for Series 6 of the Bricklink Designer Program! Better, stronger, more detailed, more sophisticated, more polished! Fortuna is a fast sailing frigate designed as a Privateer. As a true frigate, Fortuna is equipped with 20 cannons and 2 swivel guns. With your help, Fortuna can become a limited release set! Please vote for her on BrickLink once voting opens: https://www.bricklink.com/v3/designer-program/series-6/2056/Privateer-Frigate-Fortuna Please have a look at the video to see the working capstan in action: I am honored to present this lovely frigate on the Eurobricks Pirate MOC Forum first. After all, my journey into Lego sailing ships started on this very forum back in 2009! Please do take a moment to vote for Fortuna on Bricklink once voting opens: https://www.bricklink.com/v3/designer-program/series-6/2056/Privateer-Frigate-Fortuna
-
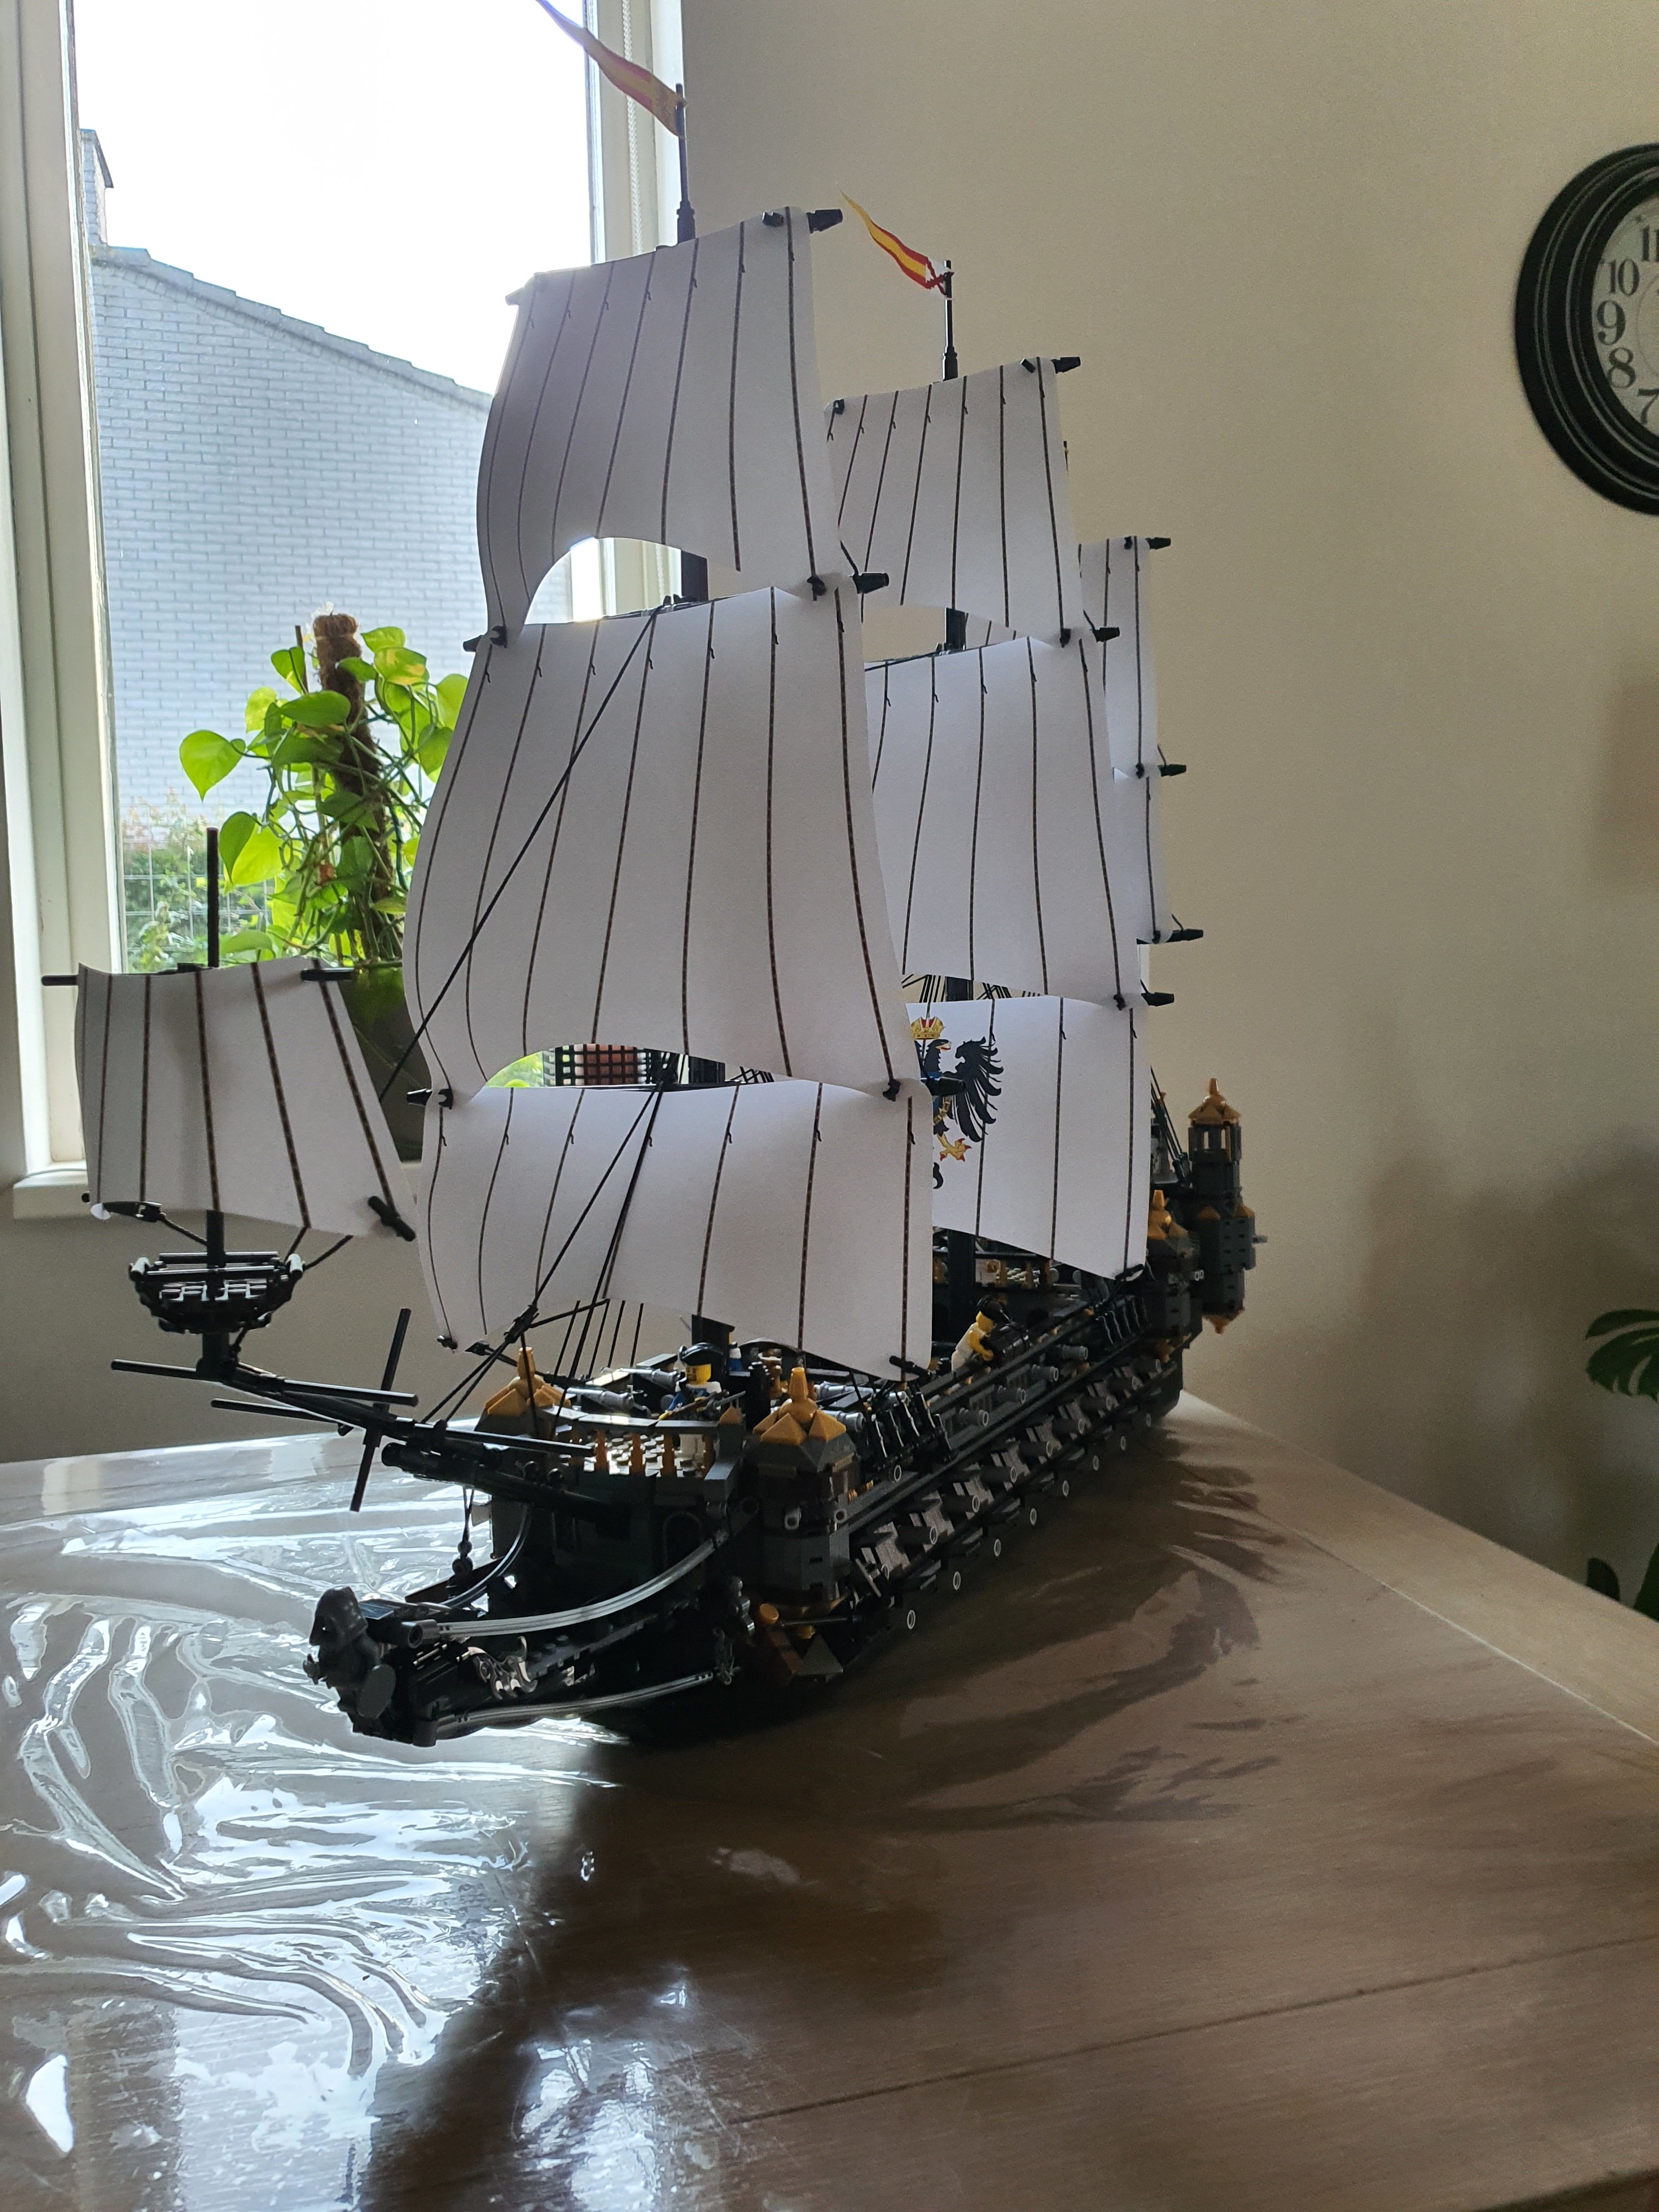
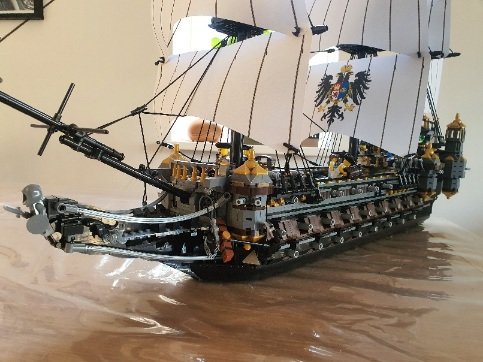
After spending more than 2 years investing both time and money into his businesses and properties in Queenston, Killian yearned for adventure, the very essence that had drawn him to Queenston. With both his ships The Parvus and The Delphinus Orca acquired for the coast guard by Mayor Edward Scarver, he embarked on the construction of a new vessel, Pandora. As he gazes back at what he has accomplished, memories of Queenston linger, but the shifting winds now directs his ambitions to the vast sea ahead. _____________________________________________________________________________________________________ Worked on it for a while with the rigging taking half of the time and also beeing busy last year. I took most of the inspiration is from this ship modell. I had to make all the ropes and rigging in Blender before exporting them as parts to Studio. The ship was created with the idea of building it with real bricks. I and @Justsomebrix have already started the construction.
-
Escape from the Imperial Trading Post On just another day in the Caribbean Steve, the Merchant, arrived at the Imperial Trading Post on his trusty Cutter sailing for profit and adventure. Soon after disembarking his vessel, Blue Coats of the Imperial Soldiers raided the Imperial Guard’s Trading Post. In the Chaos of the attack his ship was seized by the enemy. Wishing to avoid becoming a prisoner of the attacking Blue Coats, and with no other means of escape, Steve decided to accompany a few members of Captain Red Beard’s crew, as they scaled the cliffs down to a waiting Dingy bound for the Skull’s Eye Schooner. Raid on the Imperial Trading Post by Nicholas Goodman, on Flickr Raid on the Imperial Trading Post by Nicholas Goodman, on Flickr Raid on the Imperial Trading Post by Nicholas Goodman, on Flickr Raid on the Imperial Trading Post by Nicholas Goodman, on Flickr Raid on the Imperial Trading Post by Nicholas Goodman, on Flickr Raid on the Imperial Trading Post by Nicholas Goodman, on Flickr Raid on the Imperial Trading Post by Nicholas Goodman, on Flickr Raid on the Imperial Trading Post by Nicholas Goodman, on Flickr Raid on the Imperial Trading Post by Nicholas Goodman, on Flickr Raid on the Imperial Trading Post by Nicholas Goodman, on Flickr Raid on the Imperial Trading Post by Nicholas Goodman, on Flickr
-
PlunderCats are on the move, PlunderCats are loose! The PlunderCats are a band of ferocious feline pirates lead by the fearsome Captain Fluffybeard. Their hideout is located in the middle of the Catribbean on Cat Skull Island and is essentially a big cat tree. Their ship is basically just a box with sails since the cats are usually more interested in the crate that the pirate ship parts arrive in than the actual ship itself. They don't get very far with it, though, since they tend to claw up the sails much like they do with drapes. The island used to be inhabited by Mouselanders until the PlunderCats hunted them and drove them away. The only remainder of their culture is a statue on the beach. And yes, that is a cat turd next to it. After all, what is a beach but a giant litter box. The PlunderCats are always on the run from the Imperial Armada, but recently they managed to capture their arch enemy, the scurvy dog Admiral Barkington, and are holding him hostage. They imprisoned him in a kennel on their island with a dog bowl with a delicious bone just out of reach. The admiral is not happy about his situation. Inside their cat tree house, they have a table with a treasure map and various chests and barrels. Captain Fluffybeard also likes to keep a parrot here, in case he wants a snack to play with. Outside the hut, some of the PlunderCats ladies have gotten into a swashbuckling, literal cat fight. One of them is standing on the bridge that connects the cat tree with the guard tower by the kennel prison which is armed with a hairball cannon. On the roof of the hut, one of the cats dove head-first into a barrel of catnip right after knocking over a carton milk because, well, he's a cat. There is also a crane here which when not used to lift up supplies to the cat tree, it's used to dangle cat toys from it. On one of the platforms, two very popular cat musicians, keyboard piano cat and bongo cat, are playing shanties to entertain the other PlunderCats. Let's hope they don't catch a cold up here and go viral. Up on Cat Skull Mountain inside the giant cat head is a cave where the PlunderCats keep their most prized treasure: the Golden Cheezburger. A cat skeleton is here to remind potential thieves that no one can haz it but them. From the giant skull, a waterfall runs down to the river below, making it look like a cat barfing onto a carpet. Here is a closer at Captain Fluffybeard and his fearsome crew. I hope you like my entry for the pi-RATS & BUG-aneers contest on Bricknerd. Plunder, plunder, PlunderCats yo-HO! Play me out, Bongo Cat!
-
It's been a long time coming, but i finally present my first ship moc, the Andromache. Equipped with a set of 7 sails and a broadside of nine 18 pounder cannons, the Andromache’s speed and maneuverability coupled with her firepower, makes her a dangerous opponent even for bigger ships. However in order to obtain such a high firepower while maintaining it's speed, compromises were made : The ship has very little cargo space which affects both her range and crew size. But that is of no concern to Scarver, as her main purpose will be to serve as escort or to hunt down enemy ships around Corrington Settlements. While sailing to Spudkirk the Andromache fell upon some rather unlucky Lotii raiders ---------- I'm very pleased with how the ship came out, it's based on the french Cutter "Le Cerf" from 1779. A special thanks @kurigan for pushing me in the right direction while building the ship She will be licenced as a Class 4.
-
Hello everyone! There was an idea for draw one of the favorite minifigure. We choose classic 18th century portrait style for Captain RedBeard minifigure. Because it corresponds with its period of time. Portrait leads the traditional way of composition - 3/4 on the dark background with canonical pet - red parrot. We hope it will be interesting not only for lego fans but also for art admirers, like homage to traditional painting. And timelapse video of drawing process:
-
The Dionaea This is the new ship for my character in Lego Pirate RPG “Pavillon Noir” ☠️ ~ ~ ~ "We were sailing north towards the great lighthouse of the Empire. To land discreetly, we took the risk of going through the reefs. Sails furled, we were making slow progress. Two soldiers captured in Nouvelle-Nantes were to guide us through the rocky peaks leading to the coast."
-
As a young child, I remember turning the lego shark upside-down and seeing the stud connections. Try as I might, I could never effectively employ the shark. Almost 30 years later, I may have reached the pinnacle of my abilities. I present (what I hope to be) the 90s equivalent of the Bathtub Stunt Bike 60333-1, my 2023 MINI BUILD ENTRY: The Shark Cart. The bar clip doubles as a kickstand Ironhook is the only option for characters: he needs some damage (presumably from the shark), and Redbeard is too "buttoned up" for a shark chariot. Play features: kickstand, shark, and the 2x2 round bottom tiles make it slide very smoothly. Beyond that, I'm considering what a Broadside or Kahuka cart might entail. Flickr Link
-
This is mine and a friends collaboration at a local LEGO convention. (Pirate themed of course) Let me know what you think!
-
 Hello again everyone, This time I present 6 models from Season 3 of The Mandalorian! Let’s get straight into it shall we? GAUNTLET FIGHTER/TRANSPORT The Kom'rk-class fighter/transport, also known as Kom'rk Class fighter transport or the Gauntlet starfighter, was a type of starfighter and troop transport used by the Mandalorians and seen first in the Clone Wars animated series. This model initially started off being planned as a mod of the old official polybag of this set but turned in to a complete rebuild. Most of the parts have been used but a lot more have been added. The cockpit section and rotating mechanism completely replaced. That newish technic brick with the 1 x 2 plate attached was perfect for the attachment of the wings. I have also tried to make the colour scheme the same on the top and bottom of the wings, something the polybag didn’t do. I also like how the bar for the front cannons on the “Bar 1L with 1 x 1 Round Plate” pieces sit in the plate notches of the 1x2 wedge pieces on the front of the cockpit section. I have kept the classic white and dark blue colour scheme used in the animated series. I really like this model. Displayed with Bo-Katan. FANG-CLASS STARFIGHTER The Fang fighter was custom-built for starfighter combat, and the vessel's narrow attack profile and pivot wing technology could be used to achieve unmatched agility. This fighter again was first seen in an animated series but this time Rebels. I was disappointed we did not see enough of this fighter in The Mandalorian to tell whether they were still using the pivot wing which allowed the cockpit to spin much like the B-Wing but with the cockpit in the middle of the space frame and not on the outside. The official LEGO model of this also does not spin but I don’t think that really tells us anything as the designer was probably just given stills from which to base the model. My little model however does spin! It spins simply on an axle piece through 2 technic bricks on the body and can be turned by using the main engine assembly as a wheel. The curved slopes for the cockpit fit quite snuggly to the 2x4 wedge plates on the body so there is only a small gap. The new 2 x 6 wedge plates are perfect for the front fangs which are finished off by 1x2 wedges. Another thing wrong with the LEGO model is the position of the cannons which should be at the front. I have of course fixed that too on my little model. I have also used the same colour scheme as my Gauntlet rather than white and dark grey the LEGO set uses. Displayed with a Mandalorian Warrior. CUMULUS-CLASS CORSAIR The Cumulus Class Corsair was a type of corsair ship used by the Pirate King Gorian Shard (who we will come on to later). This model ended up being a little bit bigger than I would normally like to build but I really wanted to use those Modified 4 x 4 with 3 x 3 Curved Cutout pieces for the shape of the wings. The shape also needed the 2x6 wedge plates for the front section so before doing anything else the model was 14 studs long. I have used various inverted slopes to get the shape of the hull, switching between light grey and dark blue for the stripey colour scheme which is mirrored as much as possible on the top of the model. There is quite a nice little trick near the front where the two different types of 1x1-1x2 brackets are top and tailed (twice) and attached to the hull in the hole of the 1 x 2 dark blue technic brick right at the front. This allowed the 1x1 tiles and cheese slopes to be attached and create a smoother transition of the slopes on the hull. The stud notches on the 33 degree slopes also double as the recessed cannon emplacements (by accident). The engines were a bit of a problem as the two clusters needed to have 3 engines. It did not look right with 2 so I had to settle for using/stacking the light attachment plates and the bulb pieces as using a 3 plate long configuration of round tiles, for example, would have been too high and looked out of place. It is quite a nice-looking model and think I have got most of the features – there is even a flight deck with Snub Fighters (guess the next model!). It is displayed with a custom Gorian Shard minifigure. If only the yeti/bigfoot head came in green (no new mold required LEGO just recolour this one and you can give us a Gorian Shard figure!), or the Hagrid hair piece or any suitable hair pieces for that matter. In the end I got inspiration from my son’s now defunct Hidden Side sets and used the yellowish green hairpiece from those sets. The gold jacket is atlantean armour and the sash is just made from coloured paper! PIRATE SNUB FIGHTER The Pirate Snub Fighter was a type of snub-fighter that was used by pirates during the New Republic Era. A squadron of these was kept on Gorian Shard’s corsair. This was quite a simple build. I really wanted to use those inverted slopes for the front of the ship as they have stud holes on the back which makes them easy to attach to the hull. I also wanted to use those trans-black slope pieces for the cockpit after I noticed them on one of my old Ferrari sets and thought they were perfect for the job. There is a little trick with the wings at the back as they are angled just by using 2 1x6 plates and they are positioned against cheese slopes to get a consistent angle each side for those who are a bit OCD. I could have built a smaller model than this, but it is by no means huge, and a smaller model would have had much less detail. I also think the pictures make this model look bigger than it actually is. Displayed with an official Snub Fighter Pilot minifigure. QUARREN FREIGHTER A Quarren freighter was operated around 9 ABY by Shuggoth. This ship came under attack by Mandalorian Axe Woves' privateer fleet. This was not a tricky build, but I wanted to get as many of the ‘antennas/spikes’ into the model as possible. The colour scheme of the model was also determined by part availability. It’s a shame the Bar 1L with Angled Hollow Stud pieces do not come in brown (yet?) so the nearest colour I could use for the antennas was medium nougat. They are ‘fine’ but would look better if the model was all the same colour. The trickiest part of this was to try and keep the organic feel in LEGO that all MonCal/Quarren ships have. The build is basically just a stack of round plates with a wedge piece on top. The fin at the bottom is just attached to the main hull with jumper plates. The model does the job and is recognizable at the scale. Displayed with a custom Quarren Officer. MODIFIED N-1 STARFIGHTER This was originally built a while ago for Book Of Boba Fett but as it is a major ship in Series 3, I have added it here too for completeness. As we know a modified N-1 starfighter was owned by Din Djarin following the destruction of the Razor Crest (grrrrrrr!). Djarin and the mechanic Peli Motto worked together to build the N-1 starfighter as a replacement. When I first thought about a model for this I thought just changing the colour scheme of one of the official Naboo N-1 polybags would do the trick, but once I did that, I realised I wanted more detail. The model grew from wanting to use the plate with two handles for the guns at the front but to do this the wings needed to be upside down (as the handles are offset slightly below the plate) and so an idea was born. The front is inverted using brackets attached to a technic brick with 2 holes which also allows the body to incorporate the third engine at the rear. Flipping the wings at the front also allows the “turbo” to be added in front of the cockpit in the stud hole in the bottom of a 2 x 2 tile with 2 studs. The tail is attached using one of those 1x1 round plates with a bar. Overall, this was quite a tricky little build with a lot of parts interacting to keep the size and shape this small. A few flat silver and gold pieces are also added for detail and contrast. Displayed with Peli Motto, because you know, Mando is on my Razor Crest display. Let me know what you think. Jon Full Bricksafe gallery can be found here: https://bricksafe.com/pages/obijon
 -
Treasure of the Spanish Plate Fleet, 1716 On July 31st, 1715 one of the wealthiest Treasure Fleets in history wrecked off the coast of Florida. Millions of Spanish coins, jewels, and other valuables littered the shallows. After months of Spanish recovery efforts a small fortune remained lightly guarded on the beach, open to anyone daring enough to steal it. In early 1716, a small group of pirates lead by Henry Jennings, Sam Bellamy, and Benjamin Hornigold raided the small Spanish garrison and made off with a haul equivalent to 10 years of wages for only a single nights 'work'. The wealth of this raid and the inspiration it provided for would-be pirates across the New World, kicked off the final stages of the Golden Age of Piracy. Treasure of the Spanish Plate Fleet, 1716 by Nicholas Goodman, on Flickr Treasure of the Spanish Plate Fleet, 1716 by Nicholas Goodman, on Flickr Treasure of the Spanish Plate Fleet, 1716 by Nicholas Goodman, on Flickr Treasure of the Spanish Plate Fleet, 1716 by Nicholas Goodman, on Flickr Treasure of the Spanish Plate Fleet, 1716 by Nicholas Goodman, on Flickr
-
The Sacking of Portobelo, July 1668 On the 11th of July 1668, Henry Morgan, the greatest buccaneer Admiral in history, took a force of several hundred privateers to raid one of the largest settlements on the Spanish Main, Portobelo. At this time, Portobelo was a vital cog in the imperial operation that pulled unimaginable wealth out of the Americas destined for Spain. After successfully sacking the town, Captain Morgan and his men remained for roughly a month. During their stay they successfully repelled a Spanish attempt to retake the settlement and eventually forced the payment of 100,000 pesos for the return of the town. Although not explicitly allowed by Morgan’s Letter of Marque, those back in England cheered the Welshman’s daring raid, leading to several more attempts like it during Morgan’s long and successful privateering career. The Sacking of Portobelo by Nicholas Goodman, on Flickr The Sacking of Portobelo by Nicholas Goodman, on Flickr The Sacking of Portobelo by Nicholas Goodman, on Flickr The Sacking of Portobello by Nicholas Goodman, on Flickr The Sacking of Portobelo by Nicholas Goodman, on Flickr The Sacking of Portobelo by Nicholas Goodman, on Flickr
-
Hi everyone It has been a while since I posted something in here but I want to share my version of the Silent Mary I found on YB created by Moc my Bricks. I've added approximately 2500 extra bricks on his build to make the ship more realistic and more detailed. This is the first big ship I've made and here are the mayor things I've added or changed: * I've added an extra lower gundeck * The wide of the rear is increased by 2 studs to add 6 rear guns * The weapon on the backside is changed, I've tried to make the 2 lions holding the shield. * There's a galley below the upper gundeck * All guns have been redesigned to make them more realistic * There are 2 triple barrel guns hidden on the front of the ship * The captain quarters is having a full interior now and there is a secret storage below his desk. * The main deck is drastically changed, it's having chairs to the lower and stearing deck and a few other items changed. In the link you see all photos I've made and I hope you guys like it and if you have any other ideas to improve it even better please let me know. Link to my Bricksafe page: https://bricksafe.com/pages/Raymember/silent-mary-moc

-
This is my reimagining of the Classic Pirates set 6265 Sabre Island. 6265 Sabre Island Reimagined by Nicholas Goodman, on Flickr 6265 Sabre Island Reimagined by Nicholas Goodman, on Flickr
-
 The Imperial Watchtower is up to Version Four, on 28th June 2021. Imperial Watch Tower Version Four by R Y, on Flickr Imperial Watch Tower Version Four by R Y, on Flickr After building my Grand Castle MOD by deconstructing the second Medieval Castle, I was left with the rocky green base from the gatehouse, a staircase and a bottom of a battlement, plus some wall sections and what seems like a lot of spare pieces at the time. Instead taking those apart and sorting them out, I thought why not build something instead. From building four towers, and studying the instructions of B Model, I decided to use that experience and knowledge to build an Imperial watchtower, overlooking an waterway or the sea. MOC Imperial Watchtower 31120 by R Y, on Flickr I used the 8x16 brick yellow plate as the base, the dark azure plates surround it to create the coast and two olive green half circle plates for grass lands. I know that each level will be six bricks. I have three 4x8 dark tan plates to build as the cliff top, a 2x4 dark tan plate will be the base of the staircase also connecting the 4x8 half round olive green plate to the 8x16 tan plate. Using this knowledge I can gauge how far to build the cliff base from the edge of the plate, ten studs long, I still don’t know if I have enough pieces, I used inverted slopes where possible, placing the flat face on the outside. The two reddish brown 1x5x4 arch pieces are sitting on a combination 1x4 light bluish gray arches and 1x4 2 studs plates, and 1x6 dark blue tiles completes the steps. MOC Imperial Watchtower 31120 by R Y, on Flickr The tower is built like the original LEGO model, 6x6 studs side by side. I had six dark bluish grey panels left, they made up the walls with other bricks bordered by 1x1 round bricks. A black door frame was removed from the yellow wooden keep to make the entrance. I also have four 1x2x2 castle windows left as I removed them from my Grand Castle MOD, I needed black lattice diamond pane for the yellow keep. I was still short on dark bluish gray bricks so I needed to have more opening. I designed a bow window recess to free up a wall of dark bluish gray bricks, using reddish brown round corner windows and light bluish gray round corner macaronis, sitting on two inverted slopes, a dark blue slope and corner slopes for the roof. I really like the bow window recess as it provides a 180 degree view out to the sea. I managed to build up a two floor tower, again using inverted slopes to make up the numbers. I used the beautiful gargoyle design from LEGO model B, two are facing out to the sea, acting not only as elongated water sprouts directing water into the sea, they protect the tower from evil spirits. I introduced a bit of colour using the SNOT yellow wattle and daub panels sitting on two inverted brackets, I put one blue and one white 1x1 tooth plate to act as coat of arms on the yellow door sign. This made the tower ground floor one stud taller than the six bricks height of others. I didn’t initially use the dark tan 6x6 plates as the tower is enclosed, but realised they are required to provide structural rigidity to the body of the tower. MOC Imperial Watchtower 31120 by R Y, on Flickr MOC Imperial Watchtower 31120 by R Y, on Flickr That was my first watchtower attempt after many rebuilds, moving the light and dark bluish gray pieces around so at least the opposite walls on each level has the same colour and brick patterns. MOC Imperial Watchtower 31120 by R Y, on Flickr The next day, my mate was asking me about the Grand Castle MOD that I posted here, are the walls of the yellow wattle and daub building facing the great tower blocked off with bricks, or was it open access? I said it was open access on the first floor, closed on the second floor; then it dawned on me I can remove the two panels on the second floor, and possibly build up a third level. However, I still don’t have enough gray pieces. I know I have sacrificed the trebuchet design many times already, what is one more time… well, I had to take it apart completely this time. The counterweight provided the gray pieces, the frame provided five reddish brown tiles to swap out the dark blue ones on the staircase, two reddish brown 1x4 bricks were swapped into the roof of the keep for two dark bluish gray ones to go into the Imperial watchtower, four 1x1x5 solid studs and one 6x6 plate became the core of the roof. Two reddish brown arches went to the ground floor wooden columns to match the arches from first and second floor inside the yellow keep. Two 1x12 bricks are used on the cliff top to free up more grey bricks. As the tower got higher, I had to increase the height of the corner buttresses to balance it; they went from two bricks high, to three, and finally four, 2x2 corner bricks are used as I do not have enough 2x2 bricks. I moved the tower one stud inside the cliff, due to the round corner window piece broke up the line of light bluish gray edge, which is visually displeasing and break in weight transfer. Moving the whole tower in by one stud allows me to continue the edge from top down to bottom, with the brown window frame siting on the outside of the 1x1 round bricks, they are linked by two 1x2 round plates. One extra stud of space allowed me to create a nicer dark blue roof with a plate of yellow underneath. I had to take another black door frame from the yellow keep, on the second floor facing the tower, to support the back buttresses. I tend to hold the tower on the buttresses; as the bow window recess, built with 2x2 round corner bricks, is no longer in between the 2x2 bricks, the force of my finger grip would push in the buttresses and nearly collapsed the whole towel; the door frame solved this issue, a simple but very effective fix. The big 1x4x3 window with two pearl gold pane are used to provide the big opening on the third floor, I was literally on the last usable small gray pieces when it was built, the stepped pattern of dark and light bluish gray bricks is for looks and also due to the lack of bricks. MOC Imperial Watchtower 31120 by R Y, on Flickr Imperial Watchtower by R Y, on Flickr I wanted a pavilion roof originally, but do not have any 3x3 corner pieces left, so made to do with a dark blue gable roof. I was also short of a 1x2 yellow brick for the gable ends, so had to take one from the keep roof, replaced it with a yellow technic holed brick, hidden away from view. Dark blue 3x2 slopes stacked on top of each other with a 2x4 brick inside for support completed the roof with one flag on each gable. So here it is, after many rebuilds, my Imperial Watchtower made from the spare pieces of my Grand Castle MOD of 2 x 31120 Medieval Castle. Please share your thoughts on comments! MOC Imperial Watchtower 31120 by R Y, on Flickr MOC Imperial Watchtower 31120 by R Y, on Flickr MOC Imperial Watchtower 31120 by R Y, on Flickr MOC Imperial Watchtower 31120 by R Y, on Flickr MOC Imperial Watchtower 31120 by R Y, on Flickr
 -
She's done. It took a bit more time than I thought. I was a bit slow to get back to her after she missed out on BDP approval. But the new design is significantly better. Back angle. Much cleaner. Forgive the missing parts/mismatched colors. Here's the cloth conversion proof. Th square sail is unfortunately a custom (reasoning is below). The good news is that it is the same dimensions as the square sail from the Eldorado cutter. This means with some recoloring and a little crafting, you can easily convert it to a merchant or imperial vessel. Just about everything that bothered me about the build has been fixed except the following: 1) The brickbuilt gaff sail's connection has some stress and is likely illegal. To me, the simplicity of the design and the angle of the gaff are more important than a little stress on a technic 4 axle. 2) To get the sexy front hull curve without gaps on the outside, I needed to use jumper plates. so there's a little half step offset on the wall behind the ladders. There's probably a way of using some technic technique, but whatever, it's behind muskets, ladders, rigging, and similar color parts, nobody cares. 3) The front cannon has a stud that attaches into a round tile with technic hole. Illegal. 4) I wanted to get the part to lot ratio of 3:1. Couldn't get there. The double build and specialized ship parts killed the dream. Overall price is shockingly good. If you cut the dragon plume, muskets, swords, and make the cannon/swivel black you can hit 10 cents per part before shipping. 5) The curved up aft section. I love them, but it's a stupid number of plates and the bottom part (brown wedge and black wedge plate keel) doesn't attach well to the top part of the section (one 2x3 plate). Thankfully the rest of the attachment holds it into place. The build is solid. A kid could play with it. The back might get lose with rough play, but I'm not worried about a kid picking it up. You can pick the build up by the mast and it holds. but I wish it was more satisfying. 6) Some parts of the instructions need callouts instead of individual pages. Moving them, moved other things. I'm so tired of instructions. I left them in. 7) My original goal was to use a renegade runner style sail plan with no custom pieces, only the fore/aft sails from the Barracuda. There may not be a good way given how small they cut the gaff sail. The gaff is either comically low compared to the fore or ridiculously high compared to the stern. To make matters worse, the zip hoses TLC uses for rigging now are almost too long for this ship. Without a square sail, the rigging is way too high. This forced my hand, there needs to be a custom sail. Perhaps the saddest part is that the OG plan was to do a fore/aft for the sloop, then lengthen the hull and add a square sail for a bluecoat version. Now they'll look too similar. There you have it. She's done. More photos here. Instructions can be found on my rebrickable Thanks for your support! Let me know what you think!
-
After I finished version 2 a few years ago, I saved up the time and money to start on V3 of my Port Royal. I expanded the pirate area with new display cases. So I started demolishing the old buildings and expanding. New extension of the exhibition space and the old port. I haven't transferred the new buildings to the showroom yet. A lot of greenery has been added, I've paid more attention to the details on the buildings and changed the roofs. I still have a lot of work left to do on the details, and then the port is finished. And then I'm moving on to the fortress. The plan is to expand it to 3 32 x32 and raise the height of the walls a lot ;) New buildings ;)
-
Hey hey! First time posting over in the pirate's forum, as I'm usually over posting in historic themes. This was a quick 2 day build that I did recently for a gift exchange with some friends. C&C welcome. :) To Jesus Christ my Lord and Savior be the glory!
-
Alright. So the Scalawag Sloop has not gotten picked up for the BDP series. I'm working on what's likely to be my last Scalawag-based attempt. I'm going to have two ships: pirate and bluecoat this time. Here's my frame for the smaller of the two. What do you guys think? What does it need? Major questions: Does the ship need a different set of colors? If so, what do you suggest? (Please remember that there are limited options for the large wedge piece color) Also, it will be paired with a Bluecoat ship which is larger. Bluecoat sails are striped (either blue or dark blue, I'll post that one when it's closer to being finished). Does it need a higher stern castle? (If so, what do you propose? What colors?) The deck is about 4 plates lower than the sides right now What details need to be added? Does it need an anchor? More guns? A rudder? Stickers? What kind of rigging? Right now, I'm not sure I can fit rat lines, but there might be a rope going from mast to stern. Anything else? Pics below.
-
 The court day finally came, the infamous pirate Harrison Torn was conducted to the Hotel de Ville of Lavalette, then brought to a small room. He looked around and asked "where's the jury, where's the audience?" "There's no jury, no audience, only me and monsieur l'inquisiteur." Replied the judge in a cold, monotonous voice, then he added "shall we proceed, monsieur l'inquisiteur?" The man behind the small desk said "Your honour, the man you see here is accused of piracy, he was caught in the act by one of our fleet, I hereby ask a fast and severe punishment." "Very well, the evidence against him was overwhelming, send this man to the gallows." "But...I...I protest" stammered Harrison Torn. The inquisitor intervened, aloud, "the culprit said he's filled with remorse and he has no objection to the sentence." The judge nodded "Right. Next!" The execution and funeral of Harrison Torn was a lovely affair. Lavalette had recently built a new gallows just up the coast (actually a converted smugglers crane). The pirate himself gave a moving last speech, something along the lines of "It's not bloody fair..." Tragically, most of it was lost to the noise of the wind. Death of a pirate by Ross Fisher, on Flickr Harrison Torn's body hung there for a week or so as a warning to other pirates, before it was cut down by a small group of locals, who preferred their rum without import tax. This has been a collaboration between myself and @Bodi. Let it be a lesson to anyone else considering piracy in Oleonaise waters.