

Wurger49
-
Posts
398 -
Joined
-
Last visited
2 Followers

About Wurger49

- Birthday May 10
Recent Profile Visitors
19,541 profile views




-
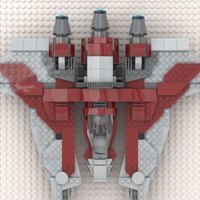
 My love for the Colonial Viper continues. The powerful triple engined starfighter, with its long nose and distinctive three pointed silhouette, is one of my all time favourite sci-fi fighters. This time, I've recreated it using the LEGO 75432 V-19 Torrent Starfighter as the donor set. The 3x3 recessed round bricks worked perfectly as the engine cooling intakes, while the technic ball joints provide enough friction to support the Viper's signature anhedral wings. Since the engines are built using the same principle as the V-19's, both wings can still fold upward, making the model much easier to store. The inverted slopes behind the cockpit helped eliminate almost all visible gaps where the engines meet the fuselage. The 2x4 sloped cutout bricks turned out to be ideal for the centre cooling intake, although they are only available in black rather than white. To make this less noticeable, I surrounded them with dark red plates and black slopes so the colour blends naturally into the design. Because the set only includes a single 2x2 bracket with side studs, the vertical fin had to be plate built, leaving one side clean while the other unfortunately exposes anti studs. The long nose is constructed by layering plates. Around the cockpit, the combination of studded bricks, brackets, and the horizontal clip used to secure the windscreen creates a weak point at the front of the cockpit. It is sturdy enough for normal handling, but I wouldn't recommend picking the model up by the nose then swinging it around from there. The engines section, on the other hand, is extremely solid and is the ideal place to hold the model for swooshing. The inverted curved bricks also create a comfortable grip for your fingers during play. There are enough Technic bricks and pins left over to build a display stand with two different viewing angles. While it displays the model well, the six stud connection isn't strong enough to support enthusiastic swooshing while mounted. Although this isn't a Star Wars starfighter, I think the Colonial Viper will still be a favourite within our community. Many of us grew up watching Battlestar Galactica, and even for those who didn't, it's simply one of the coolest starfighters ever designed. So say we all! Instructions are on Rebrickable and OpenStuds: https://reb.li/m/271382
 -
June 2026 brings us another LEGO Creator 3-in-1 pirate ship, five years after 31109 first arrived. I felt almost obliged to combine two copies into a larger and more impressive version of the official design. The long, prominent beakhead immediately inspired me to build a 16th century galleon, while the black, gold and brown colour scheme perfectly suits a sailing ship of that era. One of the first design decisions was whether to merge the two gun deck sections into one continuous deck without a break in the middle. Everything was going well, with the four gun ports evenly spaced, until I needed to cover the deck with the 8×8 grille plates. The cannon positions meant the two 8×8 plates had to sit side by side, forcing the main mast to be attached directly to the plate. However, the main mast carries the large square sails and therefore needs to be firmly secured to the hull and supported by rigging. Doing so would make the gun deck beneath difficult to access during play. In the end, I returned to LEGO's original approach with two separate removable deck sections, although I added black panels that also serve as steps. I also filled the gap between the beakhead and the railing for a wholesome appearance. The forward 8×8 grille plate simply rests on light bluish gray tiles, while the front wall of the aftercastle and its deck are built as a removable assembly using another 8×8 grille plate as the base. This allows access to the cannons below. The captain's cabin side walls still open outward, revealing a more fully furnished interior than the official model. Both the forecastle and aftercastle have been lengthened so they appear lower and sleeker in proportion to the overall length of the ship. I replaced the triangular jib on the bowsprit with a furled square sail and added a lateen rigged mizzenmast to complete the classic three masted galleon silhouette. I kept the two Jolly Roger sails from the original sets and built a large square mainsail for display. Builders can also choose to use the furled mainsail instead if they prefer easier access to the gun deck. Using the official alternate build as inspiration, I also created a small pirate sloop from the remaining pieces, adding touches of red to better match the pirate theme. Although sloops became common in the 17th century, it makes a fun companion vessel for the larger galleon. I hope Fortune's Revenge captures the spirit of the classic LEGO Pirates theme while giving the new 31387 pirate ship the larger, more imposing presence it deserves. By combining two sets, I was able to create a display model with improved proportions, a more authentic galleon silhouette, enhanced play features, and a companion vessel to complete the scene. Instructions are on Rebrickable and OpenStuds: https://reb.li/m/269856
-
the night back drop really helped! 100%!! Thank you for the support! thank you!
-
Thank you! That was actually one of the reasons I chose the night setting. It helps disguise the missing mountainside while giving the whole scene a more atmospheric feel. Glad you liked the trees too!
-
The LEGO Icons 10367 Minas Tirith is a magnificent model and the largest set in the Lord of the Rings collection. I loved how it combined minifigure scale with microscale to create this towering city, but unfortunately it was simply too large for my humble home. While studying the New York Skyline set, the white curved slopes surrounding the backdrop caught my eye and inspired me to create a true microscale version of the White City. The first challenge was redesigning the base into an elongated hexagonal footprint before mounting the curved slopes on brackets to form the city's imposing outer walls, with the Great Gate as the centrepiece. A mixture of non-white elements forms the dramatic central rock spur that projects through the heart of the city. The tall 1 x 1 x 5 bricks, originally used as skyscrapers, proved perfect for constructing the towering inner core of Minas Tirith. With the rocky core complete, the city was built outwards on staggered platforms to recreate its iconic terraced appearance. I incorporated a variety of architectural details throughout the walls, including towers with different roof designs, decorative columns, domed buildings, and fortified gateways to capture the intricate character of Gondor's capital. At the summit sits the Citadel and the Court of the Fountain, where trans-clear quarter round tiles recreate the fountain. The grille elements from the Empire State Building are cleverly repurposed as the façades of both the Hall of Kings and the Tower of Ecthelion, making excellent use of the donor set's architecture. The distinctive black backdrop from the original skyline has been transformed into a dramatic night sky, complete with a crescent moon and the Seven Stars of Gondor. The backdrop is crowned by a semicircular crest, framing the White City and creating a striking contrast against its bright stone walls. Dark bluish grey elements represent the sparse trees and foliage surrounding the city. One of my favourite details is using ice cream scoops to depict the White Tree of Gondor. One final story made me smile. My young son has never seen Peter Jackson's Lord of the Rings trilogy, yet when he saw the model he immediately pointed to the Court of the Fountain and declared, "That's the perfect place for throwing bad people off the cliff to be zapped by the twin Tesla coils!" I had to laugh... perhaps he was imagining a very different version of Minas Tirith! Instructions are on Rebrickable and OpenStuds: https://reb.li/m/265114
-
Thank you! Alt builds are fun and challenging. Thank you! Very insightful!
-
The community was really excited to get a Ken Block minifigure along with the custom built performance car. There are stickers all over the Hoonicorn, and my first thought was, "To hell with them. Another black car, another Batmobile." My Hoonicorn Batmobile took heavy inspiration from the Batmobile from Batman: The Animated Series (BTAS). The BTAS Batmobile is defined by its long bonnet, low roofline, distinctive rear fins and sleek Art Deco inspired styling that gives it a timeless, almost gothic presence. I wanted to capture some of those characteristics while retaining the pearl gold accents from the Hoonicorn, much like the military inspired details seen on the Tumbler. The LEGO model's 10 stud wide, blocky proportions worked surprisingly well in portraying the armoured look of the vehicle. I incorporated the pearl gold elements wherever possible. Pearl gold bar clips form the grille between the headlights, while round plates with vertical bars became turbo intakes. The cabin was moved rearward to create a longer bonnet and more aggressive profile. However, after finishing the first version, I suddenly realised a critical flaw: Batman's pointed cowl could not fit inside the cockpit because it is taller than Ken Block's cap. A redesign quickly followed to address that very important issue. The spoiler elements were repurposed as part of the rear fins, which are constructed using a combination of wedge plates, brackets and slopes. Those batwings are essential to any Batmobile design. At the rear, I retained the Mustang's signature red taillights and twin pairs of exhausts, helping preserve some of the Hoonicorn's DNA while transforming it into a Batmobile. In the end, the result is part Hoonicorn, part Batmobile, and probably something Bruce Wayne would secretly keep in a second garage. Instructions are on Rebrickable and OpenStuds: https://reb.li/m/265013
-
The biggest LOTR set, Minas Tirith, is dropping in June 2026. While wandering through a LEGO store and doing some pre-orders, I spotted the 40814 Baby Elephant in the Sky. The alternate build designer in me immediately noticed the abundance of white and gray pieces and wondered if they could be turned into a snowy statue scene. One of the most iconic landmarks in The Lord of the Rings is the Argonath, the Pillars of Kings. These enormous statues stand on either side of the River Anduin. In Tolkien's novels they depict Isildur and Anárion, sons of Elendil, but in Peter Jackson's film adaptation the statues were changed, with Elendil shown holding a sword while Isildur stands opposite. The scene of the Fellowship rowing down the Anduin and passing between the towering kings left a lasting impression on audiences, including me, so I decided to base my model on the movie version. I began by designing two distinct helmets. Isildur's helmet features four feathered crests, while Elendil's has two. Both were achieved using 45 degree slopes. Half round tiles became cheek guards, and quarter round tiles formed Elendil's beard. As an added bonus, both heads can spin a full 360 degrees if you ever get bored. The bodies use a mixture of traditional building techniques and SNOT construction to attach curved elements that create the statues' armour, robes, and draped garments. The plentiful white pieces were blended throughout to give the appearance of snow and ice. I also designed a sword and axe to accompany the two kings. The white curved slopes stack together to form the snow covered mountainsides on which the statues stand. These flow down into medium azure elements representing the icy waters of the Anduin below. This was my first attempt at designing BrickHeadz style figures, and I'm really happy with how they turned out. They fit surprisingly well alongside my Witch-King helmet build and other LOTR display pieces, including the upcoming Minas Tirith set. Instructions are on Rebrickable and OpenStuds: https://reb.li/m/264291
-
Earlier this year while shopping for girls birthday presents at Costco, I spotted the LEGO 31175 Unicorn Castle discounted by 30% and picked up a few copies to keep aside for future gifts. Months later they were still sitting untouched in the toy pile, and with only a limited number of suitable Star Wars sets available for rebuilding, I decided to crack open all 3 boxes and see if I could turn them into one much grander fantasy castle. The Unicorn Castle is one tower with two turrets on top of a gatehouse, with a standalone tower connected via a cloud bridge, all built in a soft pastel fairytale palette. I built all three copies first before dismantling them and combining the best techniques and elements into a single display model. I especially enjoyed the clever bracket work used on the yellow tower and the way the half cones clipped together to form corbels beneath the turrets. Those ideas carried over into my own design, with the focus placed heavily on vertical presence and silhouette. Curved rainbow staircases rise from three sides into a much larger cloud supported gatehouse, while symmetrical cloud bridges connect to taller lavender towers to create a pyramid style profile. Since there were very few wall pieces available, many of the gaps were filled using white brick built clouds, which ended up becoming an important visual feature of the build. A large blue roof with azure tiling caps the central arch structure supporting the main tower, flanked by green and pink turrets with colourful domed spires. I even used two spare gold lattice window panes included in the sets to complete the triple window sections. The model is built in sections and sturdy enough to be lifted and moved around by the rear arch structure. “Yew, that’s girl stuff!” was my son’s first reaction while I was building it. By the time I finished the digital model, he was already playing with the leftover pieces and Pegasuses, though I had to warn him not to modify daddy’s castle until after the photos and videos were done. Now there is a giant colourful castle floating in the clouds sitting proudly on display and getting plenty of love from the whole family. Instructions are on Rebrickable and OpenStuds: https://reb.li/m/263530
-
Great Scott… we landed on Coruscant! Marty and Doc have upgraded their iconic time machine into a futuristic DeLorean Airspeeder for cruising the busy skylanes of the Galactic City. Built from the parts of LEGO Speed Champions 77256, this alternate build reimagines the classic 80s sports car as a sleek Star Wars style repulsor craft. The front trunk section has been shortened while the repulsor engines are repositioned to the rear, creating a more streamlined airspeeder profile that still retains the unmistakable blocky DeLorean silhouette. An added oversized rear spoiler gives the vehicle a more aggressive futuristic appearance while preserving the spirit of the original design. Since wheels are obsolete in the Star Wars universe, two of the original wheel elements have been repurposed into engine thrusters powering the craft through the skies of Coruscant. Designed with both display and playability in mind, the airspeeder comfortably seats both Marty McFly and Doc Brown inside the cockpit. The sturdy construction and compact size also make it perfect for swooshing around, whether recreating high speed chases through Coruscant traffic lanes or jumping to hyperspace at 88 MPH. Instructions are on Rebrickable and OpenStuds: https://reb.li/m/260507
-
One of my earliest LEGO designs was a small MOD on the Tumbler back in 2021. Fast forward to 2026, my son builds the LEGO City EV Supercar and suddenly, with the three new Batmobiles released in March, it felt like the right time to finally take on the 1989 Batmobile. Convincing him to let me take apart his car was not easy, but the deal was simple. He gets to keep the Batmobile. Fair trade for a long, sleek black supercar with wings. I started with the signature pointed nose and central jet turbine intake, using a wheel arch and wheel element to capture the look. The front bumper and headlights took a few iterations, and I ended up going back to a more traditional plate based build instead of SNOT for a stronger connection. The bodywork is constructed on a brick-built chassis, layered with curved slopes to form the smooth, flowing lines that rise toward the rear batwings. The wings themselves use a combination of curved elements and 1x1 tooth plates to replicate the scalloped edges seen on the source material. The windscreen fits surprisingly well. The rear roof section opens so Batman can slot in easily, with his cowl sitting just under the roof. Inside, Bruce Wayne gets full luxury treatment with red upholstery and detailed side panels around the steering wheel. Despite the shaping techniques used throughout, the model maintains solid structural integrity similar to a Speed Champions scale vehicle, and it can be rolled smoothly across flat surfaces. This build represents my take on the 1989 Batmobile, balancing accuracy, part efficiency, and playability within a compact scale. Instructions are on Rebrickable and OpenStuds: https://reb.li/m/261470
-
Thank you, no problems with height inside the cockpit with the windscreen reversed.
-
Time for another Gunship! This time in the New Republic colorways. The Low Altitude Assault Transport/infantry gunship was a military repulsorcraft. Besides serving as an infantry transport, it was also used to provide air to ground support like the Mi-24 Hind and UH-60 Black Hawk. I reversed the orientation of the X-Wing windscreen so the cockpit can easily fit two pilots, a similar look to the AH-1 Cobra's plexiglass canopy. The gunship was operated by both a pilot and gunner, who were seated in a stepped tandem arrangement in which the commander was placed in the rear seat while the gunner occupied the forward position. The cargo bay can stand 4 troopers and dark cheese grater slopes are used for the engine thrusters. Due to the lack of plates, I couldn't cover the sides of gunship above the ramp. This gunship packs a punch. There are two nose mounted laser cannons with a massive missile launcher on each wing, the missile launcher design is more integrated to the wings of the gunship compared to the old Republic era version. This combined with the angular windscreen can be seen as the New Republic's effort to standardise their fleet across the different galaxies. The stud plates and stud bricks holds up the side wedge panels securely, the top panel with the anhedral wings is held up by a brick column in the central of the ship and the technic and plate column at the rear of the ship. The anhedral wings with their missile launchers are connected to two pin holder plates each. This is a very solid model for swooshing around. You can pick it from the front side panels and swoosh it around holding the cargo bay floor or the 2 front side panels. Do not try to pick up from the wings. Can it gunship? It sure can! This gunship is another cool model of my ever expanding Gunship alternate builds from different sets. it’d be a fantastic addition to any LEGO Star Wars collection! Instructions are on Rebrickable and OpenStuds: https://reb.li/m/260873
-
fair points, an alternate build can only use what's inside the box.
-
After designing more than 100 Star Wars alternate builds, it felt long overdue to finally take on a Snowspeeder. With the 75460 X-Wing as the parts base, this build was all about capturing the iconic wedge-shaped profile while making smart use of the available inventory. The Snowspeeder’s silhouette is defined by its low, aggressive wedge, so the design process started with the wings. I developed a hinge-based structure using Technic pins to achieve the correct angles, layering two 6x12 wedge plates to form the main surfaces. Sloped wedges shape the wing tips, helping to refine the profile and avoid a blocky look. From there, I worked on integrating the laser cannons. The cannon mounts are raised slightly, allowing 2x2 round bricks to connect onto a long yellow axle running above the wings. A blue technic axle connector secures the long bar element that forms the cannon barrels, creating a sturdy but clean solution that holds up well during handling. The front section focuses on the glacis and cockpit. The nose is built using a 4x4 curved slope mounted onto pin-hole bricks at a subtle angle, giving the speeder its characteristic sloped front. Instead of the traditional canopy, I had to use the X-Wing windscreen which gave the speeder a sleeker, more modern appearance. To maintain the two-seat configuration, a second cockpit was built into the design using a mech chest plate, allowing space for both pilot and gunner with independently opening canopies. A hinge cylinder at the back represents the harpoon launcher, a small but important detail from the Battle of Hoth. Playability and durability were key considerations throughout the build. The internal structure is solid so the model can be picked up easily from the rear core without flexing, making it ideal for swooshing and display alike. Both cockpits are easily accessible, and the overall build is solid enough for handling. To finish things off, the model includes an angled display stand built using hinge landing gear elements. This allows the Advanced Snowspeeder to be displayed in a dynamic flight pose, showcasing the wedge profile. This alternate build is designed to balance looks and stability, while offering a fresh take on a classic vehicle using the 75460 X-Wing parts inventory. Whether for display or play, it’s a compact but highly characterful addition to any collection. Instructions are on Rebrickable and OpenStuds. https://reb.li/m/260207