Search the Community
Showing results for tags 'Moc'.
-
 Hello everyone, let’s me introduce my latest MOC: All terrain with 12 WD Liebherr LTM 1350 6.1. Mobile Crane informations: Weight: only mobile crane: 9480g + 1550g Speed:11cm/s Width:18cm / 23 studs Length:92cm heigh:28cm Tire:81.6mm (LEGO Wheels with Third party Tires) Crane MAX Heigh:195cm Crane MAX Capacity: from 300g to 2000g (Macbook Pro retina 15”) Crane MAX Extend: 125 studs Driving:4 X XL Motor::960N.cm Steering:2 L Motor ::972N.cm XXL Linear Actuator:1XL Motor::960N.cm (MAX Extend 27 studs) Turntable:1 L Motor :1152N.cm Extend Boom: 1 X XL Motor::960N.cm Lifting:2X XL Motor::400N.cm Which part is difficult do? the one of big problem how to create a strong power Linear Actuator for my super heavy 3KG boom? before I start my crane project, I had wanna to use third party company’s pneumatic, although it has extend 19 studs but it failed, it cannot made crane up. When I want to give up then chat with my friend, and he inspired a new idea how to create a LEGO XXL Actuator only using 1 XL motor. I really happy I can done a big big crane. let’s see the movie… … https://www.facebook.com/shineYucorner/videos or
 -
 Hello Guys :) Being working on a MAN GTS 6x6 Truck. Here´s the LDD Im having a few Problems with the last axle tho. It is powered through the 2nd axle. I think it will be very weak. Do you guys have some Solutions how the last axle can be as powerful as the 2nd? Without doing big Upgrades on that what i have done till now?
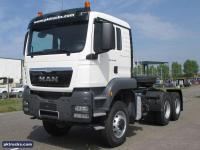
-

[MOC] the wonderful world of upper floor modular walls
TranscendingBrick posted a topic in LEGO Town
Hello, this is my first topic and I would like to share the most recent project of mine: building upper floor street facing walls of modular buildings. With each build, I experiment with a technique for wall building and see how it turns out, allowing me to practice modular type building skills and plan our future builds. The first wall is the one that was pictured in my introduction. My main goal was to build a wall using jumper plates with groves stacked on top of each other and slightly off set by the jumper stud and see how it would turn out in replicating bricks. The second wall I built to try to get a sturdy wall that incorporates upside down, sideways, and right side up building and can be incorperated into a large modular. -
Edit: Content removed
-
Hey guys today I've built a custom model of the MH-6 Little Bird Helicopeter. Here's the video on YouTube hope you will enjoy it!! Please support me!Like the video and SUBSCRIBE TO my CHANNEL . In this CHANNEL I'll post videos about Military veichles and minifigs!!Greatings Matteo
-
1
-
Vespa P200 Review Model and instructions by The Arvo Brothers Ramon and Amador (The Arvo Brothers) are at it again and the end result is amazing! After the releases of two instruction books, one on the supperb Kaneda's Bike (I'm still sourcing out the parts) and another on a massive Alien sculpure, they now turn to a non-sci-fi theme and reveal a new model with instructions on how to build it: Piaggio's Vespa P200. Though not the most beautiful of Piaggio's Vespas, their ubiquity in the 80s and 90s make these bikes to be a pop-culture icon (you can read more about the P200 here) for anyone who was a child on those decades. For those unfamiliar with the bike, this is what Ramon and Amador were aiming for: The instructions: If you have already purchased any of Arvo Brother's prior books, then you can know what to expect: a very professional and stylized edition What differs on this Vespa (digital) book is no reference on the history behind the build, which are so engrossing on their two other publications (Alien and Kaneda's bike). Nevertheless, we are awarded with a 152 page, image rich, pdf, covering the 158 steps to assemble the 688 pieces that make the model up. Instructions are crystal clear as we've come to be accustumed with these Builders. The Arvo Brothers pasted a sample on their Facebook profile, which I'll use to depict the instruction style. The isometric perspective is quite handy in depicting the build steps and no confusion ever arises (probably aided by reduced color pallete of this build, comprise of black, white, dark and light gray pieces). Alongside with the construction steps of the main build, Ramon and Amador also include alternative construction steps, as a way to avoid harder to get parts (namelly, a) 4866 windscreen in white; b) 32439b technic disk; and c) 18653 brick arch inverted in white). These alternatives are nice, however the model looks better in its original form (as is to be expected). The Vespa P200 model is one suited for color swaps, however the pieces in use do not allow for a direct translation of the model into other colors (how I want an orange one). My only complaint relates to the parts list, as the creators stick to a generic "Light Gray" "Dark Gray" differentiation, not taking into consideration the "Light Bluish Gray"/"Light Gray" distinction (as well as the "Dark Bluish Gray"/"Dark Gray" specificities. This is just a minor nuissance in correctly selecting the parts you "already have"/"need to order" so you can complete the build. The Build: As mentioned above, instruction steps are clear and follow a very modular logic, almost seeming we are building a kit bike (or a real bike for that matter): . Tyres; . Body frame; . Left and right side panels; . Handlebar; The tyres: If you are familiar with past works of the Arvo Brothers, than you know official tire availability is no hurdle to their creative skills, and it so happens in this Vespa model: You'll be amazed to know that what you see are two 56x28 ZR Street tires bent out shape by 10 wide disks. Although hard to pull through, this building technic provides the wheel size needed to compliment the accurateness of the whole build. The body frame: As expected, this part covers most of the build and is where all the other segments will be placed. You can already see some of the iconic elements of this bike One can already see the distinctive hallmarks of the P200 just on this segment of the build, namely the inner arches, the seat and, especially, the curved front guard. Lovely is the inclusion of the grip detail on the floor of the bike, so accurate depicting the original model. The side panels: The side panels of the Vespas, along side the front guard, are the trademarks of these bikes, giving them a rounded (to the extreme in the 60's models) shape, a shape hard to translate in lego bricks. These side panels hold, on the right, the engine bay and, on the left, the spare tire, duly encased. The right panel (engine bay) The left panel (tyre bay) Both panels, from the front and from behind. As you can see, Ramon and Amador pulled the shapes quite accurately. The handlebar: Another distinctive element of the Vespa's are their large front lights and curved encasing. Although simple in appearance, the steps into making the curves and angles of the handlebar are amazing, leading to a very accurate representation: Fully assembled model: As it frequently happens, the full model is much more than the mere addition of its parts: My photo skills fail me in correctly showcasing this model's beauty, but you can refer to Arvo's own (rendered) showcase here. The handlebar is an hassle to correctly place as it suffers from the "Wall-e" syndrome, always rotating to unwanted angles. Nevertheless, I would still note the most amazing details on this build: The curved inner arches (can't stop admiring them) The curved front guard. The right side panel (engine bay) Final assessment: Pro's: . clear and stylized instructions; . less costly than the other hard covered instructions books by the Arvo Brothers; . no impossible to obtain pieces; . overall moc cost to range from 150 € to 200 € (maybe less if only used parts are purchased); . beautyful model; Con's: . would love a hard cover book (both to get further insight on the model and to place it alongside Kaneda and Alien books); . color selection could be improved in the parts list; . handle bar is somewhat loose (might be my construction skills); . limited functions (if what you want is not a display piece); Overall: . A not to be missed edition. For further details, visit the Arvo Brothers webpage here.
-
Sadly, my LEGO collection is neither the cleanest, nor the most organized, so some pieces may not be of preferable quality. And, due to shaky hands, I am not the greatest photographer.
-
Hi last post i did wasnt going well but 17 downloads ..... really i think i could reach moree but anyway check out my moc I did on LDD..... THE SIEGE OF LOTHAL As kanan jarrus seeks out for hope as the JEDI ORDER was previously destrotyed by the imperial. The imperial forces land on the planet of lothal of the out reaches of space. kanan jarrus and sabine should be taking out the local patrol to seek what the the new forces that rule galaxy after the successful mission of ORDER 66. The imperial Force have took the local village to scavenge out more jedi to hunt. kanan jarrus tries to distract the local patrol but he ends up striking his light saber and defend his self from the imperial forces.... J_C_LOTHAL_rebels_(MOC).lxf
-
Hello once again! I have made a moc of the Nexo Knights Lava Golem Infernox. Here you go. A Minifig can ride on top using a simple stud connection, and everything is articulated. Leg design is based of Jay's Lightning Mech. Back view, showing the clip that connects him to Jestro's Evil Mobile. And finally, an action shot with a scurrier. C&C much appreciated!
-
 Hey All, I've been working hard on my first big LEGO project, where do you all think I should show it off ? Here's the vid : https://www.youtube.com/channel/UCJ06Ns_hEe6JQaobQUnmDMw?view_as=public Flickr: https://www.flickr.com/gp/133518136@N08/XeN223 Thanks!!
 -
Hello everyone I recently finished up a smaller build, a scene depicting 2 people trick-or-treating. Anything you do or don't like? Feel free to let me know! I am always looking to improve my building skills and techniques. Thank you, Pat.
-
 Well this is my third MOC. It's approximately a 1977 HZ Sandman panel van. It was the 70's in Australia, so lairy graphics and goodies style fonts were standard. Two kinds of people bought sandman's. Tradie's and surfers. Surfers loved them because you could fit surfboards in the back, without needing roofracks. The other think you could fit easily in the back was a mattress. More than a few Australian children of the 70's and 80's were conceived in the back of a sandman. The real ones look like this: My lego one has the following features: Opening doors, bonnet, tailgate and rear window. Live axle rear suspension Front independent suspension Steering wheel and TOG (tailpipe of god) steering 4 + R gearbox V8 engine (thanks jorgeopesi) Lairy graphics Removable body So the lego one looks like this: 2015-08-23 12.14.28 by Russell Murphy, on Flickr 2015-08-23 12.16.36 by Russell Murphy, on Flickr 2015-08-23 12.17.05 by Russell Murphy, on Flickr 2015-08-23 12.18.32 by Russell Murphy, on Flickr 2015-08-23 12.15.58 by Russell Murphy, on Flickr And you can see more on my Flickr: Keen to see what everyone thinks.
 -
This one began with the dress design, and was under construction for three months or so; it was going to be a basic standing figure, but I went for something different and adjusted it for a horizontal posing on some blankets or cushions. More photos and talk on on my newly revamped blog Cyclopic Bricks.
-
I made a 4 armed skull guy. I know I am kind of late to the skull MOC party. He's pretty big and has two gearboxes. Here are the pictures. I hope you like it!
-
Here is something I knocked up after making a rough version of The Pipeline from The Flash and realised Grodd had no prison. Also Batman has a rough Kryptonite spear.
-
Location: Above Forring aboard the R-ABBIT Agent G: The door opened up into a shaft! It felt like I was falling forever, all while the walls around changed from the familiar cold metal to dark wood. C&C appreciated!
-
Hello all! I'm here to show you my latest Moc: A recreation of the cover of Batman: The Long Halloween #6. This was slightly inspired by Captain Nemo's Batman Returns poster. Comments and criticism apreciated!
-
Hi all, just a bit of fiddling with this and that. My son wanted to have a trike-like vehicle and so I started building. Hope you'll like it. Seems uploading fails every time atm... sorry. More pics on https://flic.kr/s/aHskhrQiRT
-
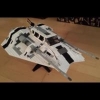
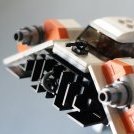
Greetings to all, Finally, after the course of almost 3 months of designing in LDD, I have finished my original creation of the beloved T-47 Airspeeder—but what we all know and commonly refer to as Snowspeeder, from the epic battle of Hoth featured in "Empire Strikes Back." Prior to building this airspeeder, I loved The Empire and everything concerning it, yet I despised the Rebels and everything about them. Well recently before the snowspeeder, I have been building a minifigure-scale AT-AT walker and numerous things related drew on me—especially the snowspeeder. I began to find the snowspeeder quite fascinating, and the idea to have one accompany my walker. Now the rest was made history in the course of about 3 months. Proceeding to photos Upon the level of detail, yet on a small scale, one would consider this a scaled down version of the 10129 UCS Snowspeeder model for minifigures. Like so it would be appropriate to design a display stand, for a "in flight" position. The bottom is nothing less of a swooshy-esque Now proceeding to various details of the ship: Here is the inside of the cockpit Unlike others, I decided to forgo a detailed interior. My priorities were to design the body with structural integrity, and readily accessibility for placing and displacing minifigures—even to having them sit on tiles instead of plates, because we all know how frustrating it is to pull minifigures off of studs by their headgear. Besides the smooth uniform slope of the repulsor units or either the laser housing, one of the most unique details are the grille detail on the repulsor units. Prior to designing, I have not seen this detail properly represented, but with exception to Lego's UCS Snowspeeder. I am appreciative I was able to achieve this because they look absolutely attractive. As well of something that is other times overlooked is the barrel diameter for the lasers. I believe any were to make their original T-47, the barrel diameter for the lasers should be according to. There is simply nothing else better than the use of technic pins for this aspect of the aircraft. As you have notice, besides the new Speed Champions windscreen, I have implemented Larry Lars' nose design into my work. I originally used the decorated wedge brick used on Lego's former Snowspeeder products, but later on in the design it work as desired. But what I always find remarkable about the plated nose is how readily easy it was to implement without sacrificing any details on the wings. Also I used Lars' most recent heat sink design, yet I made changes to it for implementation into my snowspeeder. Not only that, I as well replace that hinge plate he used for the plug detail on his with a modified tile with clip—for added accuracy of detail. Thrusters. What I believe is also critical to be represented, is the smooth, uniform, transition from the end of the wings to the boarder of the canopy. Simply the way this aspect must be, but mission accomplish here. Onwards to the structure of the build: The minifigures Luke & Dak True, Luke & Dak did not operate a snowspeeder with orange markings, but who ever cared about this with the original snowspeeder back in 1999 and its reboot in 2003? Unique 20 facts about this: I have fidelity for details and for them to be accurately represented as possible in my models Yes, I am perhaps a model maker, yet I aim to utilize Lego in unprecedented ways to incarnate the quintessence of that which I am modeling after I have only implement Lars' design for the nose and heat sink the rest of this model genuinely original The model is quite modular—can be separated in three pieces: body and wings The body is structurally sound—comprised of mostly plates which are overly interlocked to each other It would take such a crash to obliterate the body This model consist of 486 Lego elements The dimensions of the model from the wides and longest points (excluding the laser tips) are 20 x 23 studs Only three parts are unproperly connected according to Lego's system There is no black elements featured in the model (excluding the display stand) The heat sink and the grille pattern of the repulsor units are featured in old dark grey—a stylistic preference to highlight these aspects of the model in a respect to have being weathered down by heat The thrusters uses a dark grey antenna—a rare color unreleased before The harpoon gun was redesigned 7 times before settling on the current version (which makes 8) Despite some elements in older colors, the oldest part is the sunroof set for the canopy The display stand consist of 30 Lego elements While displayed, the snowspeeder is locked fixed onto the stand by the four fingers clutching the rib-esque section underneath While attached the snowspeeder will not wobble and could even be handled upside down (though that is not recommended) Placed on horizontal surfaces, the display would not topple unless intended force is applied There is 176 white elements, 151 light blueish gray elements, and 136 dark blueish gray elements A LDD file is available and is free as for now *FILES REMOVED*
-
Hi, everyone! Although it is not done yet, I still want to show you guy my K-18. . . . The images are big, please wait... I will upload the complete model to Lego Ideas before the end of August, I hope. This is the incomplete gun that will be used by the battle armor. Or I will make another one. Ok! That's all. Please support me later! Thanks!
-
This is my first post here, so Greetings everyone! I have been salivating on the Mocs I have seen here for years. Had trouble getting LDD to work for 3(!!!) years. One day I was playing a game when the unused LDD popped up from nowhere and it runs fine ever since I have seen some fantastic X-Wings but not much love for the E-Wing, so I gave it shot. This is my first ever LDD Moc and probably my 4th in total, so all input is welcome. I still have trouble getting LDD to do what I want sometimes. About my E-Wing: I love both the old blocky and the more recent E-wing designs on the internet, so I tried to go somewhere down the middle road. I understand if design purists don't like my approach. My primary goal was to build a display (UCS?) model, but when I finished the external design, I wanted working internals as well for playability and swooshability. Something UCS models don't allow... After adding all the internals I had to redesign the whole exterior again, to make it strong enough. I tried to design my E-wing with the available parts that I have at home, so that was a huge limiting factor for both the parts and the color scheme. I'm sure I could improve the model if I plan to bricklink the missing parts. Features: -Functional landing gears -Storage compartment (Rear) -Generator compartment (Mid section) .2 generators can be pulled out of the craft -Droid compartment (Mid section). Droid can be pulled out of the craft after elevating the whole turret assembly -Rotateable and elevable turret (Above droid compartment) -Wings can be level for landing mode or dropped for flight mode -Internal Torpedo storage for 6 Proton torpedoes (Behind the pilot) -Reallstic cockpit design -Realistic thruster design with build in LED lighting powered by 2032 Battery for when the Star Wars fan friend come over for a beer Features that I had to drop because I was unable to solve it: -Joystick for the pilot -Loading arm for the proton torpedoes Future plans. I want to build the model as it stands now and keep improving it as new ideas, building techniques and part become available in the future. I would like to use everything I learned here to make my own X-Wing
-
ALBUM: https://www.flickr.c...157656038589404 20150902_155411 by Etel Enzos, en Flickr 20150902_164410 by Etel Enzos, en Flickr 20150903_172623 by Etel Enzos, en Flickr 20150902_164229 by Etel Enzos, en Flickr ALBUM: https://www.flickr.c...157656038589404
-
Hello Lego Technic friends. I'm only 1 year with us and would like to introduce to me a few creations. Here my first self-made and its improvement six months later. Unfortunately, there are no instructions for the version 1, version 2 but it is planned. version 1 version 2 Both models are fully remote controlled Here a model, the TE009 Classic Car, inspired by CYPR21's Bugatti. This is also remotely controlled and the instructions is almost ready . Here are two pictures of rendering instructions Here is my penultimate project. A fullRc version of CROWKILLERS Lamborghini Gallardo with fully enclosed bodywork. Video:
-
Hello, finally, there is a playground in my City - a Slide, see-saw, a small carousel and a sandbox, of course. And there is a lot of green all arould the place: If you like, images you can find right here. Have a sunny day Andres