
Daedalus304
-
Posts
441 -
Joined
-
Last visited
Content Type
Profiles
Forums
Gallery
Everything posted by Daedalus304
-
 When I was young I saw all sorts of wonderful sets in LEGO magazine that I knew I wanted... but were too exspensive for me to ever get. So I would do the next best thing, and reverse engineer the builds as best as I could from what I had. And it was a lot of fun, there is a challenge to it that following the instructions didn't bring. Even later when I could get the set, I still tried to build it on my own first. And it didn`t spoil the sets at all, actually I had more fun. I got to see how close I got with my attempt, but even more fun was that I finally had that X-wing or Chrome Crusher and it was new, it had the right parts and colours and minifigs, and I had my other parts back again. All that to say, it`s a ton of fun and I think it`s really cool to see people doing it.
 -
I found them to be very handy on pistons, actually, as they're about 5L and have a stop on the end. I used them in this way on my 4-4-0 design, and while the engine has been almost entirely rebuilt the track pins have never been under consideration for replacement.
-
Oh hey, I would just love to have those Bionicle masks if they're still available... and if I'm allowed to be really greedy, some of the Insectoid legs too? Parts from two of my three favorite themes from over a decade ago!
-
Oh yes, that is exactly what I thought you did, and it is just as clever as it seemed. It seems like a great way to minimize your pilot truck's swing out, and having your drivers rotate behind it like that is great. Good job!
-
I have long been a fan of the T1, and your version of it is very good and certainly nice to see! One thing that stuck out to me in particular was the way you articulated the leading truck and the front engine... if you did what I think you did, that is an absolutely brilliant solution. Bravo!
-
REVIEW: 7150 TIE Fighter and Y-Wing
Daedalus304 replied to ZeldaTheSwordsman's topic in LEGO Star Wars
It is actually a completely different design from the ground up, it uses the same cockpit and pylons as the 2002(?)TIE fighter set, with new wings and the rear half saucer. -
Thanks much, everyone! :) Most of my locos I build about to 1/48, but because the drivers on 2926 are a whopping 80 inches across there is no wheel that really fits that... so 2926 is done closer to 1/52. This page has a lot of useful information on a wide variety of Northerns, and the site in general is great: http://www.steamlocomotive.com/northern/?page=atsf As for the buggy motor idea... I don't think I could hide it in an engine, but a large tender probably! The speed though.... good lord... Also, I think I'd probably have to modify the battery box for the right power output. It certainly would be fun to see someone try! I agree - as much fun as it is watching my steam engines roar across the track at high speed I'll usually prefer to let them move slow enough to appreciate the motion. Children at shows and conventions, however, do not seem to share this point of view!!
-
Thanks for your comments about the detailing everyone! I really wanted to go the extra mile with the details on this engine, so it's nice to hear that I didn't overdo it to the point of them being inappreciable. Thanks! The tender truck's sides do a great job of hiding the fact that the wheels behind them are wrong, but it is the one detail I've got on here that I made a conscious decision to do wrong. If I could someday figure out how to lathe some BBB Medium drivers to accept traction bands, I could fix it rather speedily.But ah well, I'm going to just enjoy it as is for now. It's funny enough you should mention the cylinders, as I just made a comment on my Flickr stream about them earlier. I really feel that a locomotive's cylinders are very representative of an engine's power, and especially with 2926 as they're simply enormous. It was really difficult to strike the right balance with the design I wanted to use, and the locomotive's ability to take points and curves. There was a temptation to slim them down to 3 studs long, but it just lost so much of it's proportions and feeling of power that I decided to try my best to keep the cylinders proper sized. I am really glad to hear your kind words regarding them, as they were one of the parts I ended up putting the most thought and redesign into to get them to work properly and to give the right aesthetics and make 2926 feel like the powerhouse she is. I will very soon try to get a couple more pictures videos showing off her features a little better, lights/running/smoke and so on. Even with such a long wheelbase the XL Drivers don't cause much drag in the turns and 2926 takes them rather well for such a large engine. I just got a very large amount of straight track, so I need to get my house unpacked enough to set some up and hope my wife doesn't mind tiptoeing! As for that pulling strength, good lord 70 cars? I guess it's time to either find stronger cars or have the first several hard-coupled... but either way I do go, it's most definitely time to build more rolling stock! I do also really appreciate the slower running speed for much the same reason, and while I do wish she was a little faster I definitely don't want it to be too fast to see the rods in motion. Watching a steamer's running gear is one of my favorite parts, so I always am happy to have an engine that can be thoroughly enjoyed.
-
Thanks everyone, I'm glad to hear you like it! Well, regardless of how well you think I've done you should still try one yourself! It's a lot of fun, and there are many good techniques for the same thing. I would love to see another 2900 locomotive - don't let 2926 keep you away! As far as the XL motors, honestly, it's more powerful than is currently practical. In all my test runs, I have not been able to stack enough cars behind it for it to slow down whatsoever. In fact, with too many cars the magnets between the tender and the train cars will give up; the engine doesn't even speed up at all and just keeps pace as if it hadn't noticed any weight was there in the first place! If I could find a good design for gearing the engine up for a little more speed, I most certainly would as it has power in spades!
-
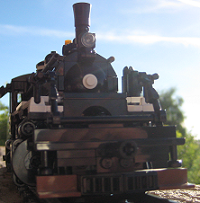
Hello all! I have returned yet again with a new engine complete, this time a rather large 4-8-4 Northern! #2926 was one of 30 of the P2900 class of steam locomotives built between 1943 and 1944, during WWII. The 2900's design was a modified version of the 3700 class of Northern, built using thicker heavier metals as necessitated by the war time metal rationing. Together with its loaded tender, one of if not the largest ever built, the locomotive came in at a whopping 974,850 lbs. Despite this heavy weight, it's 80 inch drivers and full set of roller bearings meant this locomotive could run very quickly. Anecdotal evidence from the crew says that the fastest these engines ever run was up to 110 MPH, much faster than the 90 it was designed to do. The advanced designs of the running gear though suggest that, if it had been at all allowed, the engine should have been able to sustain speeds up to or higher than 120 MPH. Unfortunately, #2926 was taken out of active service in December of 1953, and three years later donated as a display piece to Coronado Park in Albuquerque, New Mexico, where it languished in the harsh elements. In 1999, however, it was bought for $1 by the New Mexico Steam Locomotive & Railroad Historical Society, who have been working ever since on restoring it back to running condition! My model of #2926 is no small engine herself! Weighing in at nearly five pounds and 94 studs long, she easily dwarves the rest of my steam roster. #2926 is powered by a pair of XL motors in the tender which, while not doing any real justice to the speed of the locomotive, provide an insane amount of power properly fitting the locomotive. #2926 is also equipped with some PF lights, one of which illuminates the cab and the other feeds into the LEGO fiber optic cable used to assemble the headlight and smokebox door. This method helped make sure all the light from the LEGO LED made it to the end of the headlight, and the flexibility also let me route it through the boiler around a smoke generator I've installed (yet sadly haven't had opportunity to get a video of). This side has a lot of my favorite details, including the rope for the whistle and the speedometer wheel resting against the rear driver. As you can see, #2926 also sports some functional valve gear that is both slim and functional thanks to Zephyr's great drive rods. This locomotive has an absolutely massive tender, as you can see here it is very nearly both the height and length of the engine. This tender sports two 4-axle trucks capable of holding the 464,700 lbs. of water and fuel that #2926 brought with it. My LEGO version contains two XL motors for it's power. The night before I left to bring it to a show, however, my 4-axle truck design at the last minute proved not to be up to the strength of the motors after several weeks of running. This of course led to quite a panic as I tried to find a suitable temporary replacement. It now has a much stronger motor bogie, albeit with only 3 axles per truck. This is on my list of things to resolve in the future! And here's a short video of it running at the Phoenix Comic Convention! https://flic.kr/p/nD2ix1 More pictures of #2926 can be found on my flickr account here: https://www.flickr.c...57635578498856/ Hopefully soon I will be able to take a video of it running with its smoke generator working! Thanks for looking, I hope you've enjoyed looking at this locomotive as much as I've enjoyed building it over this last year!
-
I am surprised I'm the first to comment, as this is really cool! Very interesting type of model and pulled off well, I like how you did the piston arms on the crane itself.
-
Oh excellent, thanks!!
-
Not sure if this is the right place to ask, but here`s a question: Are the rails going to be marked in any way that makes it easy to tell what radius they belong to? How will I know an 88 inner rail from a 72 outer at just a quick glance?
-
I've had maybe 2 sets that were missing a single part, and I haven't really had any notable colour problems aside from some reddish brown bricks having slightly varying shades - which I actually appreciate, personally. It's more than evened out for me, though, as the modular pet shop I bought at LEGOLAND California a year or so back had an extra bag of parts for the top of the townhouse. No bags or pieces missing, just.... a whole extra bag of parts. I wouldn't mind their Quality Control missing that a couple more times!
-
What is The Best 9v Train to Start With?
Daedalus304 replied to Wolfcraft's topic in LEGO Train Tech
I agree, this is actually the set I was going to post. It may not be as iconic as the super chief or as visually slick as the metroliner, but it is a great set with a ton of really good features and very well designed. This was the first 9v set I picked up, and only about a year ago at that, and it blew me away. The other upside is that this set isn't quite as subjected to the massive price gouging of the Super Chief or the BNSF- as nice as they are, they are not worth $200+ for just the engine. -
That's a fantastic looking engine you've got there, LT12V! Another great piece! I will say, though, that I'm a bit surprised (And somewhat saddened!) to see how much speed you lose in the turns and the amount of cars it can pull, given the number of motors you have. I have an engine with the same wheels and a single M-Motor that can pull quite a bit without rubber bands - so I just know you can coax more power out of your Triplex. The first thing I have to ask is, have you tried running it without the traction bands on the wheels? The triplex should be big enough to create more than enough tractive effort on it's own, and I remember Tony Sava having a similar problem with his Emerald Garret when he had traction bands on all the tires. Given the high amounts of genius articulations I've seen from you, the bands are my first thought.
-
From the TGV up to my three fat old ladies steam Part II
Daedalus304 replied to ust60's topic in LEGO Train Tech
I notice your middle drivers are connected to the rods with a black friction pin... Try replacing those with the light grey frictionless pins, it may help your power. -
Couple webstore questions for fellow train folks?
Daedalus304 replied to v6TransAM's topic in LEGO Train Tech
Yeah, someone in another section of the forum recently found a deal similar to this and it ended up being a scam, he got the item but it was apparent from the invoice that it was bought with a stolen card. I hope this isn't the case here, but do pay close attention when the item arrives and see if anything seems out of the ordinary. Let us know how it turns out for you. EDIT: Doing a little more investigation doesn't offer anything promising. At the bottom of the page they have links to two business rating websites, one link brings up a message that the store has been deleted from their site and the other has several reviews, many of which are of people who did indeed get their orders a bit late; but there is a comment or two saying that they highly suspect it's a dropship scammer buying things off amazon with a stolen card. The fact that the oldest review is from February I think is a good indication that this site has not been up long - and these people clearly have experience setting these sites up. Very shady. Personally, I'd stay away. -
As I've posted in many other custom track threads... I would love to get some larger curves. I will be excited to see where this goes! In the poll I voted for 88 stud radius, but actually thinking about it (and seeing greenmtvince's post) made me realize that 72 probably would be fine as well, if not better. To answer your questions, though: 1) I know for my personal layout I'm wanting, I want larger curves than the standard lego track without going too large. I feel that 72-88 really is the sweet spot between the personal and club layout. I personally don't know how interested I would be in a 56r curve as I think it would be a little too close to the current radius. Passenger cars and locomotives alike can both easily be far too long or fast for the current 40r, and 56r may still be a little tight for some. 2) I think I answered this with #1, really, but here's a bit more. Right now for my track layout I tend to like to do a curve-straight alternating for the curves as it feels like a good size; the real fallback to it is that it still uses the same tight curve pieces. 72-88 would let me have that ideal radius without having the somewhat unsightly alternating curves. In addition, I think the more shallow curve angle would look much better with the alternating method which lets us have still larger radii without looking as strange as the LEGO curve. This could serve both the larger clubs and clubs that may still be starting out. 3) I know many people would like to have the tracks parallel curves, but I think with the larger radii curves the parallelessness (is... is that a word?) will be less noticeable. For me, personally, if I'm going to be spending this amount of money on a custom curve I would rather it be a significant enough difference to justify not simply dealing with the slightly tighter curve. Please note, I am not complaining about the prices, they seem quite reasonable, I simply feel that I would be more happy spending that money for something more different than I already have. 4) At first I didn't think I'd want to deal with a 9v tax, but I actually did end up voting for the 9v track for two reasons. One, I don't want to rob the 9v people of something all train fans want; and two, I myself do like the look of metal rails better. Those considered, I wouldn't mind the extra charge too much. As far as the at-home-install of the metal sheathing, I think that's a great idea so long as the track doesn't suffer either in looks or smoothness of running without it. If you get that perfect balance, that's probably the way to go! At the very least, make sure that the plastic track can stand alone as a competent track system. 9v has been the real killer for the other rail projects, so if something unfortunate comes to light down the road, at least the plastic track can live on. That way you haven't wasted a mold, and at least some train fans get their curves. I am really excited to see how this track project turns out, and really hoping beyond hope that it works out! I'm looking forward to purchasing your track!
-
Awesome, I am super excited for this. I have been disappointed that all the other custom track methods basically died at the hands of 9v functionality not being great; a real shame for all of us who have embraced PF and would have enjoyed it either way. My big question is, how does it compare cost wise? I would love to do some custom trackwork for a permanent back-yard railway, but there`s no way I`d leave proper LEGO track out there. Your solution seems to be one with a lot of possibilities.
-
Southern Pacific 'Daylight' 4460 (version 2)
Daedalus304 replied to Murdoch17's topic in LEGO Train Tech
While normally I would back up a suggestion of this sort, JD Davis heavily copied Tony Sava's Daylight for the LDD file Murdoch downloaded and altered. I think there is a line here somewhere that should be observed before people go selling instructions for a modification of someone else's model - especially one that the original builder themselves is likely to sell. -
I actually really like the looks of both the blue diesel and the new passenger engine, although on the passenger engine's nose does look a little... odd at first. I think it's because the inside is just such a plain white. I know full well that this could be the first time an AFOL has ever written the words "I wish they'd put some stickers there", but... I kind of wish they'd put some stickers in there for some controls or anything to break up the endless white. That, or perhaps make the windshield "glass" the same dark trans as the rest of the windows on the train. Perhaps that detail will change once it's no longer a preliminary photo? That said, I still do really like them both; and I would like more blue locomotive power on my tracks anyways! The station looks really cool, too, and I see it has some more triangle supports on the sides. If those aren't being used for anything too important, it shouldn't be too much trouble at all to use them and a couple extra bricks to flip that awning sideways for a little more "proper" coverage of the station. I didn't really care for the last train station, but this one feels a little more substantial and it seems easy enough to mod out any minor complaints I may have.
-
Yes, actually, there's a couple very simple things. First off, if you flip a flanged EN driver (Part #85557) backwards it is the exact size of a Flangeless XL. And, a 40-tooth gear (Part #3649) is almost the same exact size as a Flanged XL driver. They won't really look pretty together, but after you make sure your detailing fits around the 40-tooth gear you can change it out for another backwards EN Driver. I did something very similar with the digital design of my newest, still WIP steam engine, and it doesn't look half bad. http://www.flickr.com/photos/90900478@N08/11560551096/
-
Question regarding Power Functions Motors
Daedalus304 replied to Paperballpark's topic in LEGO Train Tech
I think it mostly comes down to how many cars you want it to pull, but personally I would use an XL motor either way as it`s significantly stronger and doesnt require any rebuilding or a lot of mod work. The train motor works, but you willwant to remove the gears from the engine and need to understand your pulling power is going to be limited to just a couple cars. -
Emerald Night train - how to make it run smootly?
Daedalus304 replied to Steph 104th's topic in LEGO Train Tech
There are going to be a lot... no I'm sorry, a LOT of suggestions you'll find for ways to improve the running of your Emerald Night... But the first two, and most important things to check, are these: 1. Make sure your drivers are quartered properly. The instructions have an image showing one side with the technic pins holes at "12 o clock" and the wheels on the other side at "3 o clock". This is inarguably the most important, yet easiest detail to miss. 2. Double check all the Technic bits, and make sure everything is lined up properly and there's no loose bricks or overly tight axles. There are other tips and methods out there to get a better running engine, but these should get you on the right track. Aside from some problems with uneven terrain, all of my Emerald Night engines have run admirably. Power Functions as a system is a little more complicated than 9v was, but it is a very well put together system and I highly doubt ANY of your running issues are due to PF not being up to par.