
Daedalus304
-
Posts
441 -
Joined
-
Last visited
Content Type
Profiles
Forums
Gallery
Everything posted by Daedalus304
-
Okay, I've finally found the time to put this together: This isn't exactly how it was done, but it's a decent enough approximation. The upper half directly on the frame with the motor has been how I've had the motors situated for several years now and it's never had a problem, so it's sturdy and reliable. 2926 has this set up for both trucks, so even though my tender is enormous it is quite full. When it came time for Version 3, I felt like I still had more raw torque than I was using. In fact, thanks to the LEGO coupling magnets being a little weak, it was more torque than I could make use of. The 2900s were very quick engines, so I played around with trading some of the wasted strength for speed. This has worked pretty dang well so far. One other thing to note is that the train wheels on the geared axles have aftermarket O-rings on them replacing the stock LEGO traction tires. These are necessary for this as they provide enough clearance for the bottom plates on the chassis, and the unpowered center wheels are lifted enough out of the rail that they won't bind in turns. Thank you! I spent a lot of time watching reviews of Lionel and MTH O-gauge models and did my best to try to match what details I could. I think that's helped me a lot. Thanks!
-
I haven't had to use glue yet, but I've sure been tempted a couple times before. Perhaps in the future I'll try to 3D print a LEGO compatible stack to insert a smoke unit in. As for your "off-topic" section.... I think you're correct, and I think I had a misunderstanding. I'm not very familiar with the LGB system and didn't know that was the reason some were 1:32 and some were 1:22.5. You're definitely more knowledgeable on that subject than I am. Thank you for teaching me!
-
They're pretty large, but I'm not sure quite large enough for a Spinner! At least, not at 1/48th. 2926's drivers were 80 inches across, or about 6 1/3 feet. As best as I remember the 4-2-2 engine's giant drivers were around 8 or 9 feet! Perhaps an XXXL would do the trick. Also, thanks! Steam locomotive motion has always really mesmerized me. Thank you very much! I'm glad I explained things alright, I always get worried I'm not doing so good at that. You know, though, I remember now when I was running v2 of 2926 at a train show last November, there was one of the model railroader guys who'd been looking at it for a while, asking questions, and after a few minutes he asked how much it had cost - I told him, and he looked at it, shook his head, and said "Not worth it" and walked away. I was lost for words at the time, but it kind of amuses me now. I certainly haven't had him in mind as I've built the new version, but I can't help but wonder if this version would change his mind. Of course! I hope you get to try some out! Ah, well, yes, technically I suppose that's true, but I'm not really worried about that. Even in O-gauge and other traditional model model railroading, the track gauge will often be too wide for the locomotives running on it (If I remember correctly, O-gauge track is actually a couple millimeters too wide for 1/48, and there are plenty of 1/35th engines for LGB track which should be 1/22.5). The other thing of course, is that with the size of this locomotive, building it any larger would have brought some tremendous difficulties. For example, XXL drivers wouldn't be near big enough for 1/38th, and I have serious doubts a loco of this size at 1/38th would be able to survive Lego's tight, tight curves and switches. I'm very glad to hear you like it despite this scale problem! As for the wheels, well, they've been a lot sturdier than I'd ever have expected. When I first got them, the axle holes were quite tight and it was difficult to put the axles in. I pressed down very hard on these wheels to try and get them in to little avail, and I can't say the wheels seem to have suffered at all for it. It was surely several times as much pressure as the wheels would get under any normal use, and on their weakest approach (From the flat side, not the rim like they're intended). I think it's very safe to say that there are no concerns about the robust-ness of these wheels, I don't see these ever breaking from even rough usage. As for the issue of getting the axles to fit, I learned - don't force them in. It's best to carefully scrape out the axle hole with a sharp hobby knife until the axle goes in.
-
Wow, thank you so much, I feel very honored by your words. The things you say you've seen in the video, elegance, strength, pride, to me those are the words that define a steam engine. And it's always fascinated me to watch them, the way they move and work - and I really wanted to try and capture that elegance in the motion. It's really hard to get it in a medium like LEGO, and it's really easy to make it still look crude... to be honest, it's a relief to hear that it seems to have mostly worked! And of course, again, I couldn't have ever gotten to this point on my own. The community is awesome, both the people who create these custom items and the people who've used those items in inspiring ways. Thank you very much, again. Thank you both! Oh, well then, let me show you this wonderful little Shapeways Page! Shupp's got tons of driver/wheel designs up there that you buy straight from Shapeways. They're very sturdy and definitely feel up to the job. The spacing of the wheels is 7 holes total, so you have 1 with an axle, 5 empty holes, and then another axle. So for just axles you'd need a 1x8 technic brick. Thank you!! Haha, I feel the same way every single time I see one of your MOCs. I don't know if I've been able to stuff in half the detail on here that you get on your locomotives. Thank you very much for your kind words. So the Seuthe #5... is definitely bulky. Back when I built the original model, I - purists, look away - may have drilled out the centers of two 2x2 Round Bricks and one hole in a 2x8 technic plate, and fit the Seuthe through that. To keep in supported in place, underneath the Seuthe #5 I ran the wires through a 2x4 Technic Plate and built a support for it out of bricks. That keeps it pretty securely in place. So for v3, I just kept that how it was and brought it over. 3 modified parts didn't seem too bad, all things considered. For the electronics side of it, I used a half a PF Extension cord and wired it into the C1/C2 lines with a resistor to get the voltage correct. I have to give out a very thankful shout-out to Philohome for all the extensive documentation of the PF system that made this possible for someone as electrically ignorant as I am. Hi! I'm afraid I'm not sure what you mean about the scale not being the 1:38? It is 1:48th scale, within a 1-plate margin anyways. The 3D printed drivers generally are pretty black looking, but their texture is a lot rougher than LEGO is due to the 3D printing. Indoors, it's not a big difference - but out in the bright sunlight, you can see, the rough surface catches a lot more light. The wheels on the real 2926 are a bit more of a "gray-black" than the black of the engine, so, I'm content for now with the way it looks on the model. I haven't had an opportunity yet to run the battery through a full, timed cycle since I modified the gearing and got all the lights added in, but generally I've gotten 3.5-4 hours I think off the box. I don't expect it'll change much. I don't have any pictures of the motor assembly, but if I can find 15 minutes to dink around in LDD I can recreate the assembly and show you. I'll try to get to that soon. Thank you! At first when I was still working on the model and it was all torn apart, I'd look back at pictures of the original one and think "What have I done?!", but now that it's finished and I see them side-by-side, I agree, the first one doesn't come close. I'm very glad I tore it apart As for the wheels on your Big Boy, well, that's not really a problem now is it? Except maybe for your budget. If you ever do that, I'd love to see it. Thank you very much!!
-
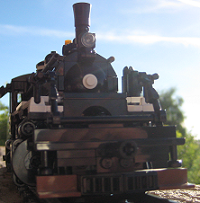
Hello! Today I'd like to share my newest LEGO locomotive - AT&SF's #2926. Some of you who have been here for a while may remember that I have posted a build of this locomotive before, 4 and a half years ago. Since February, I've been completely re-designing and updating the model from the ground up, and I'm really excited to have finally completed it. A quick history - #2926 was one of the last group of steam passenger locomotives built for AT&SF in 1944. The 2900 class of Locomotives were the heaviest of the 4-8-4s built in the United States, weighing in at just shy of 1 Million pounds when fully loaded with water and oil, and they were also among the largest Northerns ever built as well. In the 9 years it was originally in service, #2926 logged over 1 million miles of both Passenger and Fast Freight service. In 1956, #2926 was donated to the city of Albuquerque, NM and it was placed on static exhibit in Coronado Park. In 1999, the New Mexico Steam Locomotive and Railroad Historic Society purchased #2926 from the city for $1, and began putting into motion a full restoration of the engine with the intention of having it running again. This restoration is now very nearly completed and the engine is expected to be back in service next year. Anybody who is interested in the restoration can check out their website, http://www.nmslrhs.org/, and I heartily recommend going through their 15-year photo history showing the progress. My model of #2926 has a lot of really cool features and interesting building techniques I'd like to show and explain, but first I'll just do a quick overview. #2926 is powered by 2 XL Motors in the tender, each geared up 40:24 for some extra speed. In my testing the last 5 years, 2 XL motors has had more torque than I could make use of - so even with sacrificing some of that strength for speed, this engine is still incredibly strong. I've used some 3D printed XXL Boxpok Drivers designed by Shupp, as well as Benn Coifman's rods. The decals were made for me by OKBrickworks, who do some fantastic work - including something especially cool that you'll see in some other pictures. This engine is also fully lit using a total of 9 of Brickstuff's LEDs, and with some help from my dad I've also got a smoke unit installed (A Seuthe #5). The engine+tender are just shy of 100 studs in length. I've designed it primarily with r56+ in mind for "ideal" running, but it will take an R40 curve. The experience is not dissimilar to this video, but it will make it. Luckily for me, a friend owns a 1/48th TruScale model of a 2900 locomotive, and the real #2926's restoration site is only a half hour away. Between the two, I was blessed to have probably the best reference material I could have asked for, and it really pushed me to try to build the most accurate, nearly-perfectly 1/48th scaled Lego Locomotive I could. The first thing that's probably caught your attention is the safety tread on all the walkways. This was a custom design I had the guys at OKBrickworks make for me, and I think they did a great job. I spent a lot of time this year watching video reviews of O-Gauge models on Youtube, and one of the things that caught my eye was the pattern of the safety tread on the walkways. To me, it helps break up the endless, shiny blackness and give some more definition and detail. This is also my first time using the technique of 1x1 Tile with Clips to hold on the running boards. In the past when I'd tried it the clips were always too mushy, or brittle, and the tiles were always held in at a bit of a slant I couldn't stand. Then, this revision of the clip piece came to my attention. It suffers none of the issues I'd had with the tiles-in-clips methods I'd had before, so I definitely recommend using that version of the clip. In addition to the OKBrickworks decals, I've also used a little yellow vinyl inside the headlight to keep it shining bright (The black plastic was absorbing a lot of the light), and some black vinyl on the tops of the Light Gray slopes to keep the boiler jacket black and avoid a "collar" at the front. Moving back along the top of the engine, there's a lot to see here that isn't so obvious from other views. Both the Bell and Whistle have each their own ropes running along back into the cab, and you can easily see the size and shape of the sand dome. The interesting apparatus you see around the funnel is a special device 2926 was equipped with that adjusted the height of the stack - raising and lowering it depending on available clearance and, on open lines, letting them fine-tune the amount of draft. This view also highlights what I feel is one of the defining details of my model of 2926 - just like the real engine, the boiler enlarges towards the middle. Here, you can clearly see the diameter is wider behind the sand dome than it is in front of it. The sides of the boiler expand by an entire plate on each side, and I've done everything I could to keep this expansion smooth and seamless and avoid the 'stepped' feeling. This made the build a lot more complex than usual, and the Sand Dome became a very interesting component to have to build as it had to fully fill a very unconventional gap. Lining it up just right between everything, and then also attaching the number boards, took a lot of weird approaches. For example, if you noticed the 1/2 plate gaps on the front and back of the dome and are curious how they've been filled in - you may be surprised to learn that I used this tail rudder. Moving further back you can see the Steam Dome and the pop-off valves, the dynamo, and all the pipework. Of note here is that the last 8 studs along the sides of the boiler also gently slope inwards, this time a half a plate between the cab and the front of the firebox. The top of this area has some of the 'stepped' look I tried to avoid, but I couldn't find a way around it that fit everything I wanted and needed. My cab roof has the hatches and their rails, though non-functional. I realize that there's been a really lovely advancement in cab roofs made over the last year, that I first noticed on Cale Leiphart's amazing Blue Comet Locomotive. I've considered a few times trying to reverse engineer that technique, but for a variety of reasons (Structural/hatches/time) I've decided to stick with my now-antiquated design. The running gear has also been significantly altered from my old version, with more complete valve gear and more accurate motion than I'd had before. These XXL Boxpoks look fantastic, and I really appreciated that there were multiple sizes of counterweight available so I could go just that extra little inch of detail. One thing to make note of is that the drivers are not rigidly attached to the locomotive - The engine pivots off a technic pin over the 2nd axle, and in the back pivots off the trailing truck. This means that there is a very narrow and carefully adjusted seam between the drivers and the boiler to allow enough freedom of motion for the chassis to rotate enough to navigate R40 curves - a very, very tricky balance. I've got a video of the wheels and gear in motion, here: Now, for those of you who are remembering when I said this engine was powered by 2 XL motors in the tender, and finding the above a little contradictory - I build a special stand for #2926 that has an M-Motor in the base. There are some supports between the drivers that hold the locomotive just barely off the rails, and an geared axle from the stand powered by the M-Motor interfaces with a gear on the 2nd set of drivers. This lets me run the locomotive's motion while on otherwise static display, which is super fun. Moving on, here you can see the rear of the engine and again, there's a lot going on. The sides of the firebox slope inwards as on the real locomotive, from 9-wide at the bottom to about 7 by time it meets with the boiler. Once again inspired by O-Gauge locomotive reviews, #2926 is equipped with a drop plate to bridge the gap between the engine and the tender. Thanks to the tightness of even R56 curves, I had an issue with the drop plate colliding with the tender through S-bends and causing some trouble. To rectify that, the drop plate has been put on a bar and can slide left and right so that it won't cause any issues when the tender needs to push it a little. The springs are sadly a bit of an eyesore, but for now necessary - they keep the drop plate perfectly centered when it's not being moved. I needed an incredibly soft and gentle spring to keep this from causing trouble, and unfortunately out of all the springs I've found and tried so far these were the only ones soft enough. So, yes, they are too big in diameter for now, but they'll do until I find the perfect spring. Also in this photo you can see some wires sticking out of the cab. These are for the smoke unit and the lights, that I'll be showing more of later. Now, not many of my photos of the tender turned out super well, so hopefully you'll be able to bear with me with what I did get. The biggest point of interest on the tender is the detail put into the shaping and positioning of the Fuel Bunker. On the real #2926's tender, the fuel bunker has a small but noticeable gap between it and the tender walls. It also sits a couple inches lower than the tender walls and the water tank section. It took a very long time to get it figured out, but as you can see, there is indeed a noticeable gap between the fuel bunker and the walls of the tender, and the top of the bunker is inset a half a plate lower. To the rear of the bunker, you'll also see that the Wall Panel Corners wrap around the back of the bunker too, to prevent a rather unsightly gap that would've been there had the wall panels just run right up to the curved bricks. This all meant that securing this bunker top was a nightmare - a half a plate lower, a half a plate more forwards, and it's an 8-wide section of paneling in a 9-wide tender build. Somehow in the end it all worked out, and the top of the bunker is securely attached, by studs no less. One section of the panel isn't attached, and that's the access hatch for the battery, that's held in place by friction. Using the thin tail-end of the modern orange brick separator, it's easily removed and I can turn the battery on and off and charge it as needed. It really, really amuses me that the charge port of the battery is almost perfectly underneath the hatch for pouring in more oil. On the far left, you can see that weird old hinged bar sitting there. That's there as an approximation of the tool the crew would use to open the oil/water hatches. It's a bit large to scale, but it's fun to have and the Minifigs pose well with it. The back of the tender does have the prototypical lettering, but the bulkiness of the ladder obscures it a bit. For those curious, the text above reads: 7170 G.O.S-858 24500 G.W Which is, 24,500 gallons of water and 7,170 gallons of oil. From everything I've been able to find online, #2926's tender may actually have been the largest tender ever constructed. If you check through the restoration photos of #2926 at the website I linked earlier, they actually have pictures of people climbing around inside the water tank scrubbing out scale - and also some pictures of a crane lifting out the fuel bunker. It's really, really cool to see. Okay, now the home stretch. I've got some fun features to show off: When I said this engine was fully lit, I meant it. The headlight and the marker lights are lit, but also you may notice the number boards are lit up as well. I'll go more into those soon. The firebox also has an LED inside of it, which lights up the cab and, with the help of a little aluminum foil lining my firebox (Because, again, the black plastic just soaked up all the light), you can see the locomotive also features an ash pan glow. The tender also features a reversing light that only lights up when the engine is driving in reverse, as you can see in this video: Okay, now on to the number boards. Okay, so, the number boards. These were made using White 2/3 Slopes ("Cheese slopes") with Brickstuff lights inside them. Because of the variations in LEGO's white and different densities of plastics, it was actually a little bit harder than I expected to find 4 white slopes with the matching transparencies. The number faces themselves are on a transparent vinyl, printed black with the numbers left as unprinted "blank spots". The LED lights up the the white slopes just enough that the light shines through the numbers, but none of the black vinyl. I had really hoped that it would turn out this way, but until I got my decals from OK Brickworks and applied them and the vinyl there was no way to know for sure - but I think they turned out really nicely. The last picture I'd like to show here is this, a comparison between my original #2926 from 2014 and the 2018 version: Back when I build the original model, I'd hoped that some day XXL drivers would be available. Shupp's 3D printed XXL drivers were more than I could have hoped for, and thus kicked off the "2926 v3 Project" back in February. When I started, I'd really only thought that I would make some minor adjustments to my then-current v2, which was basically v1 with some slightly better details and the chassis was reworked to no longer be rigid. v2's wheelbase articulation was the same as v3's is now. At first, I'd really just planned to elongate the boiler to make room for the larger drivers. But, then I got ambitious. A friend had a 1/48th TruScale model that he let me use as a reference, and the restoration of the real 2926 had finally reached a point where the locomotive was mostly intact and no longer strewn about the site. I saw an opportunity to fix all the details and shapes that were wrong before, and I leaped upon it. Realizing how close in size my model was to the 1/48th O-scale model only fueled the madness, really, and that was the point where I went for the huge goal of the expanding boiler. It wasn't a simple update anymore - I had a whole new build. 9 months later, I think it's finally done. There's a few things I'd like to add in the future, but for now, I'm satisfied with it, and I hope you all enjoy it. If you would like to see more pictures of my model of #2926, you can take a look at the Flickr album. If you're really keen to take a stroll down memory lane, here's the album for my original model. as well as the original Eurobricks topic. I add these because I find it fascinating to look at the old version and think, when I first built that, it was the best build I could achieve. 4 years has made a huge difference, and not just in my personal ability, but also the amazing support that the Lego Train community has built for itself. Custom rods, 3D printed drivers, amazing custom stickers, Lego-compatible lighting options - all of these wonderful things enrich our hobby. I'm really excited to see what the next 4 years brings. Thank you for your time!
-

Unauthorized selling of instructions for MOCs
Daedalus304 replied to Sven J's topic in LEGO Train Tech
There are a couple ways. Taking screenshots manually every few parts additions, there is a program called Blueprint that you can find in the LDD Forum, or you can just generate LDD's "Instructions" and sell off that garbled mess. Almost always, these poachers just sell you the LDD file and call that "Instructions". From the one video I've seen from this particular offender, I'm strongly inclined to believe it's either the LDD Generated instructions or just a raw LXF file that he was selling. -
Unauthorized selling of instructions for MOCs
Daedalus304 replied to Sven J's topic in LEGO Train Tech
Sure. The majority of the content was stolen work. If he feels like his own work is strong enough and valuable enough to gain that many subscribers on his own merit he should be able to build it back up again - but with how muddy the waters get in things like this, detaching from the shady poaching that's defined the channel is probably best for everybody in the long run. Youtube fans aren't going to lose interest in the subject matter just because one video maker has left, they'll just go find someone else who offers comparable content - and with any luck they'll find someone who runs their channel with integrity and doesn't poach. I think that's also best for everybody. Interesting there was an open call for LXF files to be submitted and no mention of "By the way, I'm going to try to sell your work and keep all the proceeds for myself". -
Unauthorized selling of instructions for MOCs
Daedalus304 replied to Sven J's topic in LEGO Train Tech
If these "Instructions" are on the same level of quality as every other MOC Poacher out there who steals other people's work, it's probably literally just the LXF file. On top of the ridiculousness of charging money for somebody else's free work, I can't even begin agree that simply redistributing another person's free LXF file constitutes enough work to skim off a full 50% of whatever is being charged. If the MOC Poacher actually had the skill to put time and effort into making REAL instructions I could see an argument for wanting a portion of the proceeds, but even THAT should only be done with explicit permission. It's not a generational thing. Thieves and scoundrels of all sort have been doing this since long before any modern country existed. As long as there are hard-working, talented people to make things, there are poachers and opportunists there to swipe the credit and take the money on their behalf. I remember not too long ago some guy came here posting one of Zephyr's fantastic EMD units as his own, also selling it and literally dozens of other poached MOCs from members of EB as well as Brickshelf and MOC Pages. My recommendation is that if you see your own, or somebody else's, work being blatantly poached and monetized, bring it to the attention of the mods/admins. -
LDD 4.3.11 Update Discussion
Daedalus304 replied to ImAChangedMan's topic in Digital LEGO: Tools, Techniques, and Projects
It looks like a couple parts from the upcoming Power Functions 2.0 snuck in there, the new LPF 2.0 Medium Motor and a part just called "Front Housing", which is particularly intriguing to me since it doesn't itself seem to have a motor. Could it be a housing for a new Power Functions Small Motor??? -
Sorry to bump an old thread, but I've got some great news that's really mostly only of interest to the people who've been dealing with this somewhat niche issue: It looks like the newest LDD Update 4.3.11 has finally resolved the issues with the GTX10XX Series graphics cards - My GTX 1070 SC card can now properly render even my largest files with the outlines turned on without any issues.
-
What trains could be rereleased if Lego goes the Legends route?
Daedalus304 replied to Doom2099's topic in LEGO Train Tech
I think it was on the right track but just one step short. If they were to do a Chief again, have the set include 1 Locomotive and 2-3 cars, but have instructions and parts for a B-Unit and instructions/parts for 3 variations of each car. That way you have one $120-$150 set that has one loco and three cars, and high value for duplicate purchases, since each purchase would yield unique additions. -
I really love this idea and would be totally down for these if the price isn't prohibitive. I've looked into trying out Kadee O-Scale couplers which are about $7-$8 I think, which is right about the most I could see paying for these. Certainly would not mind if they turned out cheaper than that, though. Two thoughts I have regarding the design - 1. Instead of using magnets to line the couplers up, is there any way you could fit some sort of centering spring instead? That seems like it would be a simpler and possibly more reliable option. The auto-coupling wouldn't line up the best on sharp turns I'd wager, but that doesn't seem like too big of an issue and I wouldn't care at all. 2. Thinking a little bit ahead, it might be cool to put some sort of very small hole through the pawl release. With a hole there, someone could theoretically loop a bit of string through it and have it connected to a tiny motor inside the engine for a hands-off uncoupling without needing some sort of mechanism in the track bed. Or, perhaps, offer an option for a slightly more expensive pawl release that's magnetized. In that case, we could hide magnets in the yard track bed and it could release when the coupler is stopped over the magnet, like the way the Kadee option works.
-
If you are running four motors off one battery and one receiver, you haven't got enough power to go around. Go down to just two motors, or get another Battery Box/Receiver. For your locomotives, I would check your wheels and rods to make sure they can spin freely. I've seen a lot of people who have built Tony's trains using the black Friction Pins for their drive rods, and that will absolutely devour your power. If your wheels won't free spin for a few rotations you have things too tight.
-
Incredible model, absolutely amazing level of detail. All your models have been great, but it seems like you've managed to outdo yourself here!
-
Thanks! I plan on having one eventually, but at the moment my layout is little more than a flat loop. My plans are to first get the main loop established and once that's the size I'd like it, I'm going to see about adding in a small branch line for the logging stuff. Depending on what's available as far as crossovers and switches go, I'm planning to have the branch line cross through with the main line and use some of that rail for a short distance, going from outside the loop to the inside. Thank you!
-
Thank you! The answer is pretty mundane. I didn't have enough curves slopes for both sets of pistons and keep forgetting that it doesn't have them and I need to order more. Thanks! The chassis detailing is a big part of the reason I went for these locomotives specifically - the saddle tank is so high and tall that I could hide the battery in there and not have to sacrifice any detailing. I'm glad to hear others enjoy those details as much as I do!
-
Announcing OcTRAINber, the first contest by Brick Model Railroader!
Daedalus304 replied to raised's topic in LEGO Train Tech
I hear you! Having only a month sure does bring a quick pace to the whole thing. It's very nice to be done with it! I certainly don't envy the judges. A lot of great entries have come in and I don't know if I could choose between them! -
I've had this pair of locomotives built for a while, but they had a rather long wait for their drive rods and then another for the stickers, and then again after that I needed to get them photographed. The real Coos Bay #10 and #11 were both originally in the line for restoration, and #11 is actually currently being restored. #10, however, has had a much more unfortunate tale - sold between a few different railroads with the intent of eventual restoration, but along the way more and more parts were lost until finally it was no longer considered a reasonable cost. Sadly, the real #10 has been scrapped. I came across the Coos engines on a search online for some engines to work in my eventual layout's yard. I wanted a short, nimble tank engine with a wheelbase less than 2 track segments long, and I wanted ideally a large saddle tank so I could fit all my PF in there and still have a high level of detail. During my search I found the Coos Bay #11, and then learned about #10 as well, and they fit the bill perfectly. Even better, they were locos of logging heritage - which means they match up pretty well with my mallets. Each one is powered by a single M-motor hidden in the firebox. Their individual strength is modest, but definitely sufficient for the yard work they're intended for. They also double head nicely, and have a surprisingly decent amount of strength together. Having a pair of locomotives like this, built for a purpose, makes my railway plans feel just a bit more real. A couple more pictures of them can be found in their Flickr Album. I've got a train show coming up in a couple weeks and hope to be able to get some good footage of them running the yard! Many thanks to Andy Mollman for the excellent stickers and to Zephyr for the fantastic-as-always drive rods!
-
If this is meant to be cheating, I'm afraid you've done a poor job of it - the point of cheating is supposed to be to make things easier for yourself!! I can't speak for the judges, but as a fellow competitor I can definitely say that you've done something really cool that I think really meets the spirit of the competition. This is one of, if not THE, best 4-wide builds I've seen. Best of luck to you!
-
[MOC] Flexible Articulated Mallet with Bellows-Type Connection
Daedalus304 replied to Daedalus304's topic in LEGO Train Tech
Thanks, guys! It certainly is a crazy prototype. Here's the basics of it: The engine frames are actually built upside-down, and the boiler is attached to each engine by the 4x4 turntables over the 2nd and 3rd driver. If you disregard the red sections, basically what I have is two very close pivots under the boiler for the engine frames. These wheelsets can pivot freely as needed to negotiate turns, and this is not hindered or limited by the gearing (In practical application, that is. Off the rails there is indeed a point where the boiler will reach it's flexible limit and the wheelsets won't pivot any further - though that requires a lot tighter a turn than R40). The gearing is connected solidly to these engines, though, so when they rotate underneath the boiler it actuates their respective half of the flexing mechanism. Also, since the bend mechanism works in two halves like this - S-curves aren't a problem. Getting this system smoothed out to take out all the backlash in the gears, keep everything lined up at all times, and most importantly making sure that the resistance in the Bellows mechanism didn't prohibit the drivers from getting the motion they needed to prevent derailing - that was the trick, and I'm really happy with how well this final product works. If I couldn't have gotten this mechanism right, I wouldn't have built the locomotive at all. A lot of much more complicated systems were trialed and thrown out for various failures before I found a spare one of the Bionicle gear levers in a corner of my desk and upon closer inspection I realized that the teeth on the gear were lined up perfectly for a straight connection - which is a luxury not many other gears had. For a long time I had been working with "1 x 7 with Gear 9 Tooth Double Bevel Ends", but the teeth don't line up nicely at all with that and to get the angles straightened out took too many gears; which introduced too much backlash and so forth. I thought about those, and I think those would work even better than the hose segment I'm using - I just didn't have and couldn't find any in the right size. I'm definitely going to keep an eye out, though - this does work, but more efficiency is always great. :D -
"There's a prototype for everything" I've heard that said several times in the LEGO train community since I started building, and the longer I go the more I see the truth in it. Long boilers with crazy overhang is a problem we often run into pretty quickly in the LEGO world, but it was a problem for real-world engines as well. One solution, attemped by Baldwin in 1910, was to make the boiler of the locomotive itself flexible - using a flexible metal bellows in the middle. Of course, they weren't so crazy as to actually put boiling hot water through these flexible bellows - the boiler itself ended just before this segment. Instead, all the hot gases used for the superheater, a water reheater, a water preheater, and more were stuffed in there. It's really an amazing idea, and I'd suggest you read up on it more here: History of the Flexible Articulated Mallet I've had this locomotive on my "To Build" list for a while, but never really did anything with it. I knew two things for certain, though - A) I was going to build it with a boiler that would flex in curves and only in the curves, and B) I'd never be so damn foolish as to try to get this monstrosity to go through R40, and would instead take advantage of the wide radius turns. Enter OcTRAINber. This engine would easily be long enough to look silly through turns, and would be really fun to try to speed-build. I was set. And then, the rules came out. Must be over 70+ studs for a permanently coupled pair - it's 85 studs over the coupler, so - Check. Needs a video of a swoosh through R40 curves - Che... oh no. The first two weeks of October were taken up trying to make this work. A reliable, flexible boiler mechanism that could make it through an R40 curve without derailing or experiencing too much friction, and a mechanism to keep the boiler bending ONLY in turns was an absolute must. 2 weeks and one incredibly lucky part discovery gave me a great solution for everything - except the bellows themselves. I tried just about every LEGO tire I could find that was the right size, but none of them could compress right and in the end I had to find a non-LEGO solution. A 3-studs long section of some Shop Vac hose became my Bellows, and I truly believe that this was the only possible solution. Either way, I was out of time. It was also a great opportunity to try out a few new build ideas - the platform for the headlamp, a new way of building the bell, and some chassis-mounted roller bearings to help the extremely off-balance boiler pivot and turn smooth and easy. Whatever the outcome, this was great fun to build despite the stress. Having a full half of the contest time burnt up just trying to get the concept ironed out certainly provided some amount of worry, but in the end I've got a unique, interesting mechanism that is a whole lot of fun. I am definitely going to continue working on this engine. Just, maybe a little break first. There are a few differences in my model from the "real thing", primarily the positioning of the bellows. The real engine had these just over the rear driver of the front engine, but because of the way the engine needed to be articulated and because of the precision needed with the boiler-flexing mechanism I had to move it back a few studs. I've slightly re-positioned a few of the other details to try to help balance this out aesthetically. This is the outside of the boiler in an R40 curve, where the pipes need to both hinge and telescope smoothly to let the boiler bend: And here is the inside of the boiler in an R40 curve, showing how tight it needs to be able to pinch in: Because the pivot points are so close together - the 2nd and 3rd drivers, the back half of the locomotive has a lot of hanging weight. This is supported by a couple roller bearings just in front of the firebox, above the last driver. There are a lot more pictures in my Flickr Album, if you'd like to see more. Soon, hopefully, I will find a good way to show the mechanism inside the boiler that controls the flexing. But, of course, pictures aren't quite the same as the real deal - the SWOOSH!!
-
BrickTracks: different curves, PF/9V compatible
Daedalus304 replied to JopieK's topic in LEGO Train Tech
It's super awesome to see how these are coming along, they look great! Also, I'm very happy to see that the rail profile matches very closely (If not precisely) to the one LEGO uses. One of my small handful of problems with my ME curves is that the base of the rail is so tall that my BBB-driver locos ride on their flanges instead of the actual 'tire', which isn't super great for traction on my driver-powered locos. These don't look like they're going to have that problem! -
TRAIN TECH Help, General Questions & Talk to the Staff
Daedalus304 replied to WesternOutlaw's topic in LEGO Train Tech
Oh right, I knew I was forgetting something. I've added a couple links and short write-ups in my last post just to keep the 3rd party stuff all together. Now that I've gone through all of this stuff it's actually amazing just how many 3rd party options there are now for us train guys. What a time to come into the hobby! -
TRAIN TECH Help, General Questions & Talk to the Staff
Daedalus304 replied to WesternOutlaw's topic in LEGO Train Tech
For signals and such it's probably cheaper and simpler to run your own LEDs to the lights whether you use 9v or PF. The only LEGO train system that really had good support for signals was the 12v system. For 3rd party track, right now there are a couple that each have different types of products at the moment but they all seem to be working towards supplying a larger variety. ME Models (Injection Molded) has 4 larger turn Radii that they offer 4DBrix (3D Printed) has some modular switches coming out very soon, narrow gauge track, some switch motorization options, and some stuff for signals BrickTracks (Currently 3D Printed, plans for future Injection Molding) has larger radius turns, larger radius switches, and more. I've only got some of the ME Models stuff, and the wider radius turns are really nice to have. It comes in individual parts like the old 4.5v and 12v rail systems which brings a few tricky things into the mix regarding rail stability, but just a little glue on the rail tie/connector or a good sturdy ballasting will keep them in line. I'm very interested in 4DBrix's upcoming modular switches as well as the BrickTracks switches, so I think it's likely you'll probably find opportunities for all of them. Also, not track related - if you're going to be building steam engines I would heartily recommend you check out Big Ben Bricks. He sells high quality, injection molded steam engine drivers in more sizes than LEGO offers. If those sizes or styles still aren't enough for you and you're okay with spending a bit more, Shupp has a ton of other 3D Printed drivers you can order off of Shapeways. I haven't tried these myself but they look gorgeous. And last but far from least, hunt down Zephyr1934 and take a look at his fantastic custom drive rods. EDIT: Oh, and as Duq has reminded me, third party PF controllers as well: SBrick - Bluetooth Receiver, pretty much a straight up replacement for the standard IR receiver with 4 ports instead of 2 and a little extra power to the motors, though still limited by the LEGO battery box output BuWizz - Bluetooth Receiver/Rechargeable Battery Box combo, a higher power battery box than what LEGO offers with more capacity as well, with the bluetooth receiver built in. 4 ports like the S-brick, and the same dimensions as LEGO's AAA or Rechargeable Battery box except one brick shorter. PFx Brick - New controller coming soon that can use either IR or Bluetooth. Has support for a wide variety of accessories including lights and speakers. Also, since it was made with Trains definitely in mind it has a lot of neat motor control options for starting and slowing with more realistic speed curves. I haven't tried any of these yet, but BuWizz is the one I'm the most excited for due to the extra power and much smaller amount of required space. The price is pretty high, but it's basically the same as a LEGO rechargeable battery + an SBrick so it's not unreasonable. The PFx bricks modular add-ons are definitely going to give it a good boost in the variety department, too. -
TRAIN TECH Help, General Questions & Talk to the Staff
Daedalus304 replied to WesternOutlaw's topic in LEGO Train Tech
I'm going to throw in some more information, since I feel like PF trains are really being undersold here. I'm going to headline with an extraordinary claim here and say that as a whole, Power Functions is without a doubt the key to all around more realistic and more powerful locomotives. I make this claim for several reasons: Variety of motorization choices, better power, finer speed control, more operation options on your lines, wider variety of track configurations, and better railyard options. Seriously, in all of these Power Functions wins just about hands down, and I'll tell you why: 1. Power Functions has 4 different motor types to choose from, the PF train motor being a more powerful equivalent to the one and only 9v motor option. These different motors have different rotational speeds and torques to choose from, and the M, L, and XL motors can all easily be geared up or down to help get the perfect Power/Speed ratio you need. The 9v motor's power and speed are both tied to the track voltage, so if you want your locomotive to travel slower you're taking a proportional hit to your power as well. The way the PF electronics work, you get much more power at lower speeds and you can specifically build slow, lumbering powerhouses that can pull ridiculous amounts of weight. Also, because the limited choice of 9v motor, many steam locomotives classes are off the table unless you either build a powered car or forego using proper drivers with moving rods. A 9v 0-8-0T that moves under it's own power with rods is not going to happen. 2. Having each engine under their own power means you can have multiple engines on the same line that don't have to be doing the same thing. If all you are wanting is a simple loop or two and are fine with that, then 9v is okay. But if you want two trains to share the same loop for any amount of time with a 9v setup, then they need to be headed the same direction at the same speed. If you have, for example, a branch line that shares a short run with the main line before branching off again, perhaps into a yard, it can be very tricky to make sure that your engines are okay to be synced up or that you're not going to cause an electrical short. Again, if you're just looking for something simple like a loop or only want to run one engine at any given time then this is very nearly a non-issue; but multi-engine operations on more complex layouts are PF's stompin' grounds. 3. Most of the time the biggest points awarded to 9v over PF are these: It's easier to use 9v because the PF electronics are bulky, and changing out batteries is annoying. These are both true. But, IMO, the advantages start and end there and they are not the achilles heel for PF that they are made out to be. There are many good examples to be found of incredibly compact and amazing looking steam and diesel engines built with Power Functions. It is more difficult, but the challenge is well worth the effort. Not every engine can be built realistically with PF, but 9v is even more limited due to the single style of motor. As for the batteries, I have found that even my most power-hungry engines can get nearly 4 hours of life off a set of batteries. You can invest in some rechargeable AAA batteries, or if you don't want to partially disassemble your locomotive then the PF Rechargeable Battery Box is great. It's expensive, yes, but 9v Train motors are very expensive and are only going to get worse, so IMO it's a fairly close race price/value wise. If you are just starting out, the amount of money you're going to spend buying old 9v motors plus the incredibly expensive 9v track is going to far, far out-pace the cost of the initial PF investment. 4. Third-Party options are right now another thing PF has going for it. Custom track is starting to make a (relatively) large boom in the LEGO train community. Wider radius turns and switches are showing up all over, and all-plastic has the double-whammy advantage of wider variety and significantly lower costs. The only 3rd party manufacturer I know of who has 9v product right now is ME Models, and their metal track requires special adapters to connect to the LEGO stuff. The 9v options will expand down the road, of course, but they will always be more expensive. Also in the PF Playground you will find S-Brick and BuWizz, bluetooth controller alternatives to LEGO's Infra-Red Offerings. These are both more expensive than the default PF equipment, but they offer even more options and opportunity for realistic, powerful control. And, if you are down for making the trade-off for price vs compactfullness (Note: not a real word), The BuWizz is both a super-powered rechargeable battery AND receiver together in one unit, a whole brick shorter than the PF battery box. This should be relatively easy to hide in almost any train out there, even 6-wide diesels with 4-wide hoods can probably hide this thing behind the fuel tank. Power Functions isn't always the easiest, but it is incredibly rewarding. I understand that it's not for everyone, and these forums are filled with die-hard 9v fans who have their reasons for sticking with it. My intent here was to offer a wider perspective on the seldom-mentioned strengths of Power Functions. In the end it all comes down to what your goals and intentions are, and if none of the strengths of PF are worth the extra effort to you and 9v sounds like it's what you want, by all means do go the 9v route. I've made a lot of extraordinary claims above, so before I go I'm going to leave a few links to some Power Functions locomotives. Small PF Steamers: Bricknerd's 2-4-0t Prussian Steamer Jayhurst's Vulcan Iron Works 0-4-0T Medium-Sized Steamer: Cale's CNJ 4-6-4 Large Steamers: Shupp's Erie Triplex Video Tony Sava's Hudson & Shupp's Triplex My Santa Fe 4-8-4 There are plenty of great 9v engines out there as well, of course, and I heartily recommend checking out Carl Greatrix, Swoofty, and Steinkopf for a good variety of 9v stuff. Either way you go, welcome to the LEGO train community and I wish you the best of building and happy tracks ahead! :D