
Daedalus304
-
Posts
441 -
Joined
-
Last visited
Content Type
Profiles
Forums
Gallery
Everything posted by Daedalus304
-
Haha! Well, hopefully you managed to survive long enough, because it's more or less done! http://www.brickshelf.com/gallery/Daedalus304/Trainystuff/7-wide_emerald_tender.lxf I put in the PF receiver and a stand-in battery box just to help demonstrate how it would fit. I tried to use as many pieces off the standard tender as I could and not bring in too many extras, but in the end the design should be flexible for your needs. This design allows you to fit the whole PF ordeal in one decently sized tender. It's the same width as the EN cabin, so it should fit in just perfectly. You might actually be able to squeeze a wire for your PF lights over the top of the firebox (Or mod the design a little to make it work), but either way there is room in the tender for you to run the wires for that between the battery box and tender walls; I really wanted this to be versatile for you. Obviously you can build/mod my design however you want to, though; or just ask if you want any help. The only thing I think needs added is coal greebles on top of the battery box, but this LXF was meant to be a bit simpler than that. You have plenty of room though so go nuts! I hope this is what you were looking for!!
-
Ah, the great thing about that is that the Emerald Night actually really is more of a 7-wide loco, bordering on 8. The cab itself 7 studs wide, which means that a 7-stud wide tender would actually fit perfectly. I'll do my best to keep the parts number down for you, too.
-
Actually, that tender is 6 studs longer and a brick taller. There is enough wiggle room in there that you could probably fit everything in there with only 4 studs extra length, but I strongly suggest you make it taller so it looks nicer. If you want I can play around in LDD and make a shorter 7-wide version of my tender, that should work perfectly.
-
That's a great looking engine, Annie! The red really works well and those two-tone drivers are fantastic. Looking forward to more pictures as you post them!!
-
Hello! The Emerald Night is a fantastic engine isn't it? It was the set that brought me into my LEGO steam era. Powering LEGO steam engines has quite a few options. For you, just running with 1+2 coaches will work alright with the PF train motor. The only problem with that is the size of the tender: IMO it's a little too small for just having a battery box! It should be easy enough to rebuild it larger to fit all the PF components. If you go the powered tender route, then I would strongly suggest you keep all the PF equipment in there if you can. I can't say for sure at the moment, but I don't think the wires will go through the cab easily if you keep the firebox. Also, you do want to remove the rubber bands and gears. Rubber bands can be great if you are powering the drivers and need more traction, but if you are pushing the engine the bands are going to cause a lot of friction and slowdown in corners. I personally went the XL motor route, and I've never regretted it. It's simple and you can still fit the engineer in the cab behind it. The engine is incredibly powerful compared to a Train Motor, and can push or pull several cars without effort. The one problem the EN has with powered drivers is that it's finicky with slopes, but there's ways to work with that. EDIT: Here's a link to my 8-wide emerald night mod. The tender for this is large enough to hold all the PF components, just to help if you want to go that route. http://www.eurobricks.com/forum/index.php?showtopic=68947
-
Hello Takanuinuva! That's a very intimidating looking ghost train you've got there, with a lot of clever design choices. I don't know about parts availability, but design-wise there's a couple things that will hinder it's ability to run. I absolutely love those bone-shaped side rods (Ingenious idea, really), but unfortunately those ball parts are wider than 1 stud and are going to have serious collisions with both your wheels and drive rods. The second big thing is your engine's wheelbase, unfortunately thanks to LEGO track's tight curves you can't get away with that many wheels on a rigid frame. There are a lot of different ways you can articulate it that shouldn't change the aesthetics much at all, though. Can't wait to see this whenever you get it built and running!
-
 Great build! I don't know that I've seen a MOC before that used both studless technic AND system elements together so elegantly - and the fact that I had to do a double take once I got to the reference pictures even further compliments your eye for detail. Outstanding
 -
I'm actually quite excited for this set. I really like the look of the engine itself, and the fact that it comes with so many train parts and track is wonderful as well. I know a lot of people couldn't care less for curved track, but it's something I'm desperately in need of. I'll definitely be picking up 2+ copies of this (Especially if I can find them on sale...), depending on what the price is. But really, cowcatcher, drivers, wheels, couplers, and tracks? If this set's under $100 then that's totally fantastic. :D And I like the set design more than I did with the Toy Story Train, too.
-
Building Emerald Night. Is correct what I did?
Daedalus304 replied to robt's topic in LEGO Train Tech
The gold plate is used to help make it easier to thread it onto the axle. If you have the engine sitting flat on the table (as the instructions assume you do when they have you build the two temporary supports), then that round plate positions the technic brick at just the right height that you don't need to prop it or support it when you're putting. :P )the axle in. I've actually found this design to work quite well in keeping the gear on the axle, and wondered myself why they didn't put on a half bushing as weell until I tried to add one - its actually rather tricky to put in there and it doesn't end up adding much of any extra robustity (that's a MOW - my own word :P ) to the gear set. -
TRAIN TECH Help, General Questions & Talk to the Staff
Daedalus304 replied to WesternOutlaw's topic in LEGO Train Tech
It took me a minute to realize what was wrong but I think I know - your driverods are locking up because you're using a technic liftarm. Since your middle wheel is on a half-stud offset it won't line up with the holes on the liftarm. That doesn't mean there's no options, though. The easiest (and imo best) option is to get some custom drive rods from Zephyr. You can also try using some custom-length flew cable rods (the most difficult option). However, the easiest purist option would be to not connect your driverod to the center wheels. It would be easy to throw some gears in there to make sure the center wheels still spin in synch, though. -
Did a little more checking just to verify, and it turns out I was mistaken. 2002's 7152 is an exact re-release of 7150, but 2004's 7262 is the set with the re-designed TIE Advanced. That means their original Y-wing design was used 3 different times over a course of 5 years, without change. And people thought our current snowspeeder situation was bad.
-
The re-released Y-wing/TIE set is actually quite different from the original release. The Y-wing is exactly the same except for the new greys, however the TIE Advance in that set is an entirely different build using the modular style of the regular TIE Fighter cockpit. Funny that a re-release would be 50% new material, but I actually like the new tie design far better.
-
TRAIN TECH Help, General Questions & Talk to the Staff
Daedalus304 replied to WesternOutlaw's topic in LEGO Train Tech
Hey! I put together a somewhat comprehensive LXF file for you, using some stand-in BBB medium wheels. Turns out the technic pulleys are right about spot on with the real BBB wheels! Just to be on the safe side, I included two methods of spacing them close together with different offset styles, and I also included a couple basic structures that I tested with real bricks and real BBB Med Drivers to make sure they work. Building in 6 wide is going to leave you with a rather high looking running board, but as the wheels are also exactly 1 brick thick you can build outside them if you so wish. I also included two other structures highlighting the odd build clearances needed with one version of the wheel offset. I hope you find this file helpful! As you can see, to fit them in the 8-stud wheelbase you need to have your center axle offset from the other two, because of the flanged drivers. Flanged drivers are tricky, but easier to build with when they are on an offset (Offset axles are in green bricks, red bricks are not) because you can build more tightly around them. My Baldwin Mallet engine uses this form of spacing, but it worked well because that engine has no running board the there is some tight piston spacing. For your tank engine I'd suggest you use the 9-stud wheelbase (The top one). This makes your flanged drivers on "friendly" spacings which are easier to deal with and build around - as so: With just a mild amount of recolouring you should be able to use the frames from the LXF on your actual engine, as these substitute wheels are extremely close to the real BBB drivers in physical dimensions. I hope this was the information you were looking for, if I missed anything helpful please let me know. -
TRAIN TECH Help, General Questions & Talk to the Staff
Daedalus304 replied to WesternOutlaw's topic in LEGO Train Tech
The wheels you linked to are the same size as BBB's small driver. My baldwin 2-6-6-2 uses the medium drivers, and I designed it using entirely LDD. The flangeless/blind medium BBB drivers are almost exactly the same diameter as the Technic Pulley, the one with a cross axle hole the the center surrounded by 6 round holes. For the flanged wheels, I used the same pulley but added the traction band onto it. That's still a wee bit too small, but if you allow a half-studs worth of room around the pulley you should be good. Just think: 3 studs clearance for flangless, 4 studs clearance for flanged, and you should be safe. :) EDIT: if you are willing to wait until the weekend I can throw together and LDD file with the axles spaced as you need them. It does require a half stud offset for the connecting rods, so be sure to get some from Zephyr for a fantastic look and reliable running. As someone who has experimented with just about every option for this wheelbase, there is no substitute for those custom rods!!! -
Just got some of Zephyr's side rods in for my Mallet, and boy are they nice! The somewhat grainy finish really isn't too noticeable, and ol' #12 runs great with them. The rods feel sturdy and connect well, and though it takes a little extra effort to get them onto the technic pins they manage to spin really freely without being loose enough to come off. If anyone was looking for ANOTHER recommendation, let me throw mine in the pile. I like the look of them much better than that of technic liftarms or the old flex rods I used - Thanks Benn!
-
I am sorry for being off topic, but I have been dreaming of the ability to create my own custom LDD Palette for a while (And even posted such)! I took a quick look through some other threads and can't find anything, can please you tell me how this is done? (A PM works fine, to avoid highjacking this thread further).
-
Well, I think I've decided the white trim on the wheels was a good choice! My next loco (Also a black-with-white-trim baldwin steamer) also has white rims - I guess I'm going to get the BBB drivers for that one too. I won't put an ounce of paint on any actual LEGO parts, but with custom parts I don't have the same reserve! I actually have a powered baggage coach built to fit the design of the Emerald Night coaches, which I used to run my engines at the Phoenix Comicon. I have considered trying it out with this engine, although I have been wary since I'm not sure how well it would work with all the articulated wheelsets it'd be pushing. Worth giving it a shot though! Thanks for that link, too. I had no idea that #12 (Or should I say 6?) had been through so much - and I would never have guessed it used to be a tank engine! I may just have to build a tank engine version of it now! Perhaps that would be able to fit a motor in the engine? Thank you! I have to say it makes me a bit proud to hear that from you as I always have the same reaction to your trains - and your wonderful BR steamers have been very inspiring to me. Your most recent engine has pushed me to set the bar really high on my next engine - especially in the functionality department. You will probably end up seeing a familiar M-Motor arrangement, though... I'm sorry to hear you've been unwell! It will be nice to see how your locos are coming along when you get around to it, and I'm happy to hear you've enjoyed seeing mine. That little Alco Mallet is really neat looking, kinda feels tiny from the picture. It may be fun to try and build one!
-
Thank you!! I still consider myself as being going through a learning experience as far as train building goes - and this engine taught me a lot. Powering my engines has been a rough spot so far, but this one preforms alright when powered. (Though I would rather not have to mod the tender to change it back and forth). The real one is currently a stationary exhibit, although from my understanding a few years ago both it and another engine up in Flagstaff used to run and give rides. Until, apparently, someone fell off or got hurt and they were doomed to be scrapped until a gentleman bought and donated the pair of them. Or so the curator told me!!
-
Hello everyone! Brickshelf still hasn't moderated the photos - but I created a Flickr and they can all be found there. Or, more precisely, here: As well, I've updated the first post with a few more of the pictures from the gallery and I also put in a picture of the prototype. The lighting on some of my pics is a little lackluster so I may try again soon. Oh my god! That "Bigger Boy" seems like it would be a veritable nightmare - between all the wheelsets, rods, articulations, not to mention how to motorise it... I'll leave that for the more ambitious experts. EDIT: It seems to have inserted a picture window, anyone know how to make that just a link?
-
A triplex?! It's possible that someday I will, especially if I find one in one of my engine hunts as I travel, but for the moment the thought of that many wheelsets is a little daunting! I too wish you could get white-rim wheels from BBB, especially as I'm finding that most of the Baldwin locomotives I've been finding have white accented wheels. I wouldn't normally go the painting route, but this engine felt like it needed it; and since the wheels are custom parts anyways I decided I may as well! I can't take the credit for the painting though - my mother-in-law did it for me! I actually have also customized those BBB medium drivers in one other fashion, in an attempt to help get those drive rods to work better. But that mod.... is a secret. Thank you very much! The white added so much to the character of the prototype that I simply had to include it! Thank you! I think unfortunately I managed to avoid posting most of the shots of the undercarriage work - which is a shame given how much time I spent down there. Getting it to work in the curves was honestly 2 parts hard work to 3 parts good luck, as after I got the articulation worked out a lot of other things just fell into place without any fiddling. The fact that the walkway on the front of the boiler clears those swinging steps in front was a delightful surprise! Thank you! I did a lot of research on mallet engines upon starting my project, they are really nifty engines. I'm glad you like it.
-
I really love this engine, most notably the pistons and how you used the XL motor. (A trick I may just end up stealing in the future!!) The fact that you've got such a large system for shunting and decoupling is amazing, too. Great work!
-
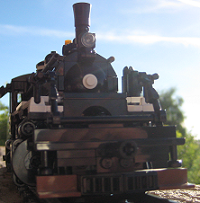
Indexed by Moderator Well, today's post has been a long time coming. I started the design work way back in February, and it's been a lot of revision and waiting for parts and money since then. I wanted to post this back in May I think, and I'm sure glad I waited. I saw this engine first on a trip up to Flagstaff, AZ at the Pioneer Museum and I fell in love. I will post only a few pictures of it here, I went sort of on a photo spree today trying to make sure I captured adequate photos of all the detailing. The only non-lego parts are the BBB Medium drivers, and the only modified parts are the 2.5 stud flex cables for the drive rods. The rest of the engine is all LEGO. A picture of the prototype (Courtesy of AirandSpace.com, found by google search!): It can negotiate all the curves I've put it through with only a bit of slowdown. The best picture of it turning is here: http://www.brickshel...ve/img_0898.jpg, but it is too large to post on EB. It was tricky with the tender to get all the right shapes and gaps, and although it's a tad too tall I am very pleased with how it turned out. I run the tender hard-linked with the engine, and the clearance is perfect. The cab floor extends just over the front platform of the tender without ever swinging into it! I have to give a lot of thanks to Toastie for the help and advice on creating the custom-length flex rods, I can't explain how difficult it was to try and trim those things just right! You can check out the whole gallery. when moderated, here: http://www.brickshel...ry.cgi?f=517797 Getting this engine to run reliably has been a real challenge, in large part thanks to the number of wheels and the fact that the center driver of each set is offset a stud. This made the Flex System my only workable option (Before Zephyr's rods, which are on their way! ). The tender is a little bit too large, but it was an exaggeration well worth it to me since I can fit a battery box and IR receiver in it; and I can change out the bogies on the tender and the trailing truck on the engine itself and motorise it. It doesnt look as nice, so I prefer unpowered. It's been a real love-hate relationship with it as I've worked the last several months, but I finally have found myself happy enough to share with you. :) I don't really know what more to say about it, if anyone has questions or wants more detail photos please feel free to ask! Oh, and please do check out that gallery when moderated! There are many more photos there to see, including larger versions of this topic's top photo and a few others. I sincerely hope you enjoy looking at my engine!
-
TRAIN TECH Help, General Questions & Talk to the Staff
Daedalus304 replied to WesternOutlaw's topic in LEGO Train Tech
That depends on which wheels you're putting in the motor. I've done a lot of testing with large drivers on the PF Train motor and it reaches it's torque limit very quickly, and keeping it there causes it to heat up and switch off. With the small wheels its a good motor, but you have to remember that putting on the large ones essentially gears it up - you're trading strength for speed. My GWR 5700 engine originally ran with the pfm/large driver setup and I tried it with my 4-4-0 as well, and both cases it was better to put the motor in a powered coach and push the engine. -
Very nice buildings, and good use of those brick-bricks! It looks very good overall, though I think personally I would have used green baseplates. Those flower stems and other assorted plants really do a lot to bring some liveliness to the scene, I've been planning starting a shed project of my own soon, but have been puzzling over how to do the doors. I think it's safe to say I've found the inspiration I needed - or more likely a good idea to steal.
-
MOC: R Class Single Fairlie (WIP)
Daedalus304 replied to Locomotive Annie's topic in LEGO Train Tech
Nice Fairlie, Annie! It's coming along looking rather nicely - it's really interesting to see just how many slightly different versions of the prototype there are, too. I agree too about smokestacks being very important parts of a loco's shape, and they certainly can be a bit of a challenge. With a couple of the posts in here about having trouble getting upside-down cones I thought I'd share a couple of the solutions I tend to use - very simple ones too! For the third one I wanted to highlight the 1x1 round stud, because that cone won't connect without it. The Technic part's probably a bit tall for your Fairlie and the first method may not be right for you either, but I thought perhaps they'd be handy references for the future.