
Daedalus304
-
Posts
441 -
Joined
-
Last visited
Content Type
Profiles
Forums
Gallery
Everything posted by Daedalus304
-
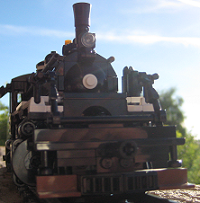
Hello all! I'm back again with another new steam engine to share with you. Some of you may remember my earlier Mallet locomotive I posted here long ago. For those who haven't, check it out here. My new engine is strikingly similar to this old model - and for good reason too. As it turns out, #12 was originally built as a Tank engine for Hammond Lumer company and ran as a tank engine for a majority of its working life. Along the way, it was sold and traded railroads a couple times before eventually winding up at the Southwest Lumber Mills. At that point, it was still a tank engine, but it pulled around a large tank car holding extra water. This tank car was eventually replaced with a tender, and not too long after that the tanks and fuel bunker were removed. But for a short span of it's life, it apparently ran with the full tank set and a water tender; and it is at that point that I have rendered the engine now. I ad two big reasons for wanting to build this - the first and foremost was that I've grown very fond of this engine and really, really wanted to model in its tank engine days. Building it as a tank engine gave me the room I needed to hide away an L motor and a PF receiver, but a battery box required a tender or a permanent car. When I discovered that the engine briefly ran as a Tank+Tender, my problem was solved. The tender contains a battery box and the IR receiver, and thanks to the extra room in the engine I was able to fit in an extra L Motor. Two L-Motors, geared down and powering Medium Drivers, provide a LOT of power. Some may say excessive. This is great for me, as in my future model railway I'm wanting to have a logging branch line that requires a somewhat steep grade. This engine has both the power and the agility to make it through steep hills, tight turns, and tight turns on steep hills. One of the L-Motors is mounted sideways in the boiler, providing critical structural support. The 3-wide nature of it worked perfectly for the cheese wedge boiler, and the large tanks hide it well. The other motor was a simpler affair, though figure out how to rout the drive shaft through the firebox turned out a little difficult as that 3-stud long section carries a good amount of the engine's overall stiffness, so care had to be taken to avoid the engine having any bend that would cause friction on the drive line. The boiler's got enough clearance over the front engine that it can handle steep grade changes. In practice, I will of course ease into the grade a little more gracefully, but however it happens #12 will take it. I've so far tested it on a grade of 1 brick per track section, which it can take with cars on speed setting 1. I have yet to test anything steeper, but with the power this engine's demonstrated I'm sure it will handle more without complaint. The power did highlight a problem though. BBB drivers, for all their great qualities, are very short on traction. This engine had more power than it could use. There was, for many reasons, no way I was considering lathing grooves into the drivers, so instead I purchased some stuff called Bullfrog Snot. The Snot creates great grippy tires and was relatively simple to use, though application had a bit of a learning curve. 3 of the 4 flanged powered drivers now have these Bullfrog Snot tires, and #12's power is put to good use. The tires are great, it never slips and they don't muck up the track. You can see a few more pictures of this engine on my Flickr page. I'm hoping to get a couple videos up within the next day or two, and when I get the chance I still need to get a photo of both models together. It's been really fun modelling the same engine at two periods in its life, and a part of me is very tempted to go try and build a third version of this engine from when it was green and silver. But... well, I'll save that sort of madness for the future. UPDATE EDIT: Here are a few videos of it running now! 2 #12s by Chris Stone, on Flickr 2-6-6-2t running demonstration by Chris Stone, on Flickr 2-6-6-2t Grade test by Chris Stone, on Flickr
-
That engine is coming along great! You've got a really nice looking building style with these two - can't wait to see them finished!
-
Very very nice stuff there! It's really cool seeing your displays grow and evolve over the years and reach this point, where now you have two separate layouts of great detail and quality to show. Very cool. One small complaint about that video, though: It's way too short! 2 minutes doesn't feel like nearly enough when there's so much good stuff to take in, and having the trains actively running by makes it all that much more alive. I'll take what I can get, though.
-
There is plenty of 9v track out there in 'bluish grey', what makes it so hard to believe?
-
They're from the Toy Story Western Train Chase set: http://www.bricklink.com/catalogItem.asp?S=7597-1
-
I put a Seuthe #5 smoke generator in my model of #2926: I have it hooked up to one of LEGO's rechargeable battery boxes hidden in the boiler. I spliced half of a short PF extension cable to the Seuthe generator's wires so it'll connect to the PF system, with a resistor along the way to keep the voltage low enough. Fitting it in is a bit tricky. I'd originally designed it in such a way that I didn't have to modify any parts, but the smoke wouldn't come out since the vapor couldn't make it up the cross axle holes of two 2x2 round bricks... but since I'd already dropped a bunch of money on the electronics, I gave in and hollowed them out to get the generator high enough to steam freely. It smokes decently, but not as smooth as Rebelego's. I should probably ask him for some pointers.
-
Ah, the problem is that your pivot point is too far forward. With your front driver axle being blind, and then your lead bogie pivot being a few studs ahead of that, it creates the rather extreme angle you've come across. I would replace those technic T-beams with something that lets you mount your pistons from a higher vantage point (Keep them at the same height, just put the attachment higher to free up some room) so that you can move your pivot point to as close to that lead axle as possible.
-
The UCS Imperial Shuttle and UCS Millenium Falcon are also both correctly scaled to minifigs... but they're also both rather spendy now! Edit: Ah, didn`t see you only wanted new and recent sets. That'll save your wallet well!
-
Very cool crane there, LT12V! I really like the way you built the frame on the arm and I like your solution for the windows better than the grill tiles. The problem now is that after your montage of all those neat cranes... now I'm starting to feel like maybe I need a crane too!
-
Who knew that the Constitution engine could be modified into such a colorful christmas train? A very neat cross between the constitution and the old holiday train. I do like the train cars with the trees and presents, very festive.
-

Failed Model: Semi-Accidental Fusion of 6w and 7w
Daedalus304 replied to Phoxtane's topic in LEGO Train Tech
I had thought about suggesting using technic bricks to make the battery box a part of the frame, much like you ended up doing, but I found myself wondering "but how on earth will he change the batteries without tearing the thing asunder?". But it almost looks like your side panels can come off easily so you might have that solved already! I don't envy anyone trying to hide a AA box- I pretty much just stick to the Rechargeable one now. It's spendy, but it caters well to my laziness. Looking forward to seeing more progress!! -
What Is The Best Method For Building A Lego Model Railway
Daedalus304 replied to jamesed_1971's topic in LEGO Train Tech
I think both have their merits, it really is more up to what you're wanting out of it. An all LEGO layout is going to be much more expensive and labor intensive, but IMO they are much more interesting to see when they're well done. I'm planning on turning my garage into a room dedicated to a big personal layout, and I know right now that it's going to be incredibly expensive. In my case, I'm alright with that as I'm planning on it being a very long term project. I'll start with the tables and track, then move on to basic scenery and then spend a lot of time refining it. Since I can't afford much at a time it will probably take many years to finish, but I'm looking to it as a long term hobby. If you don't want to spend a lot of money all up front and aren't looking for a long term project, well, then it's really a matter of what you want. Traditional model railway techniques will end up overall a lot faster and cheaper, so you could have your layout done sooner and spend that money on rolling stock instead. -
That's actually exactly what I did when I built a class of engine based on the very picture you posted! http://www.eurobricks.com/forum/index.php?showtopic=96781&hl= It's a good technique and looks and runs well. Having the spokes on your visible wheels looks really nice, especially in the designs which let light through them as you can see it when the wheels are spinning. As for covering the back wheels, it does make your locomotive a little wider. Looking at the frame/springs on the rear axle of the Flying Scotsman, the default wheelsets actually may be best as they've got similar details on them and don't go out to 8 wide like custom sides would.
-
That engine from Wardlws is about 31/32 plates from the bottom of the wheels to the top, or about 10 bricks tall; about the same size as yours. What's making your engine's body look too tall is the wheels. On Wardlws' engine, because the wheel flanges are shiny and metal those are what catch your eye. So the wheels look like they're about 3 studs or so in diameter, which is proper for this scale. On your engine, because you've got the black PF wheels, your eye won't focus on the flange and will instead focus on the wheel itself. The wheels only have a 2 stud diameter, which is only 66% the size they should be. Try looking at Wardlws' model and focus on just the black centers of the wheels - they look too small now, don't they? What you could to to put it back into proportion is try putting some BBB medium drivers on it and custom build your own bogie sides. The BBB drivers should still work alright on that train motor, although you won't have as much traction without the rubber bands. Once you get the handrails and any number stickers on there, that should help with the proportions as well.
-
Maybe it`s a Tracor©-Brand Tractor Beam and TLG`s just hitting a new level of accuracy?
-
I need Lego shavings for project, but how?
Daedalus304 replied to Cloveapple's topic in Minifig Customisation Workshop
A Blendtec Blender? I dunno, given what it does to those iPhones I think all his LEGO would end up as a fine powder! -
I've got one loco I don't run too often with the drivers 13 apart, and that really is the limit of what will work before it jumps switches. 12 should be ok, but will have some friction. I'm going to have to recommend against putting large drivers on a pf train motor, though. It will be very, very fast but you won't have any pulling power at all. In my experience it could pull one EN coach and a caboose, and just that would trip the thermal switch after about five to ten minutes. Great looking engine, by the way. Can't wait to see more progress on it, especialy onceyou brick build it.
-
Oh, well once it was all on the carpet it stayed together really well, it was snapping the segments together that they would come apart. But again, it was only really the r56 that did that. But I really do want to stress that it's not a big deal - i couldnt be happier with my rails and the options that they provide, especially looking forward to my upcoming model railway project. And I know I will be buying more!
-
I`ve set up loops of r56, r72, and r88 on my carpet unballasted to run them around. High speeds and low speeds, differing lengths of train. The track all runs really well, and at r72 higher the trains can go full speed without derailing, even running one with four pf train motors. The track stays together ok, though the big weakpoint is the rails to the end connection sleepers. I had a very difficult time getting the r56 sections together as the rails would pop off pretty easily. That said, once I got it all down and hooked up it didnt come apart at all from running the trains. I think that problem would be a non issue with ballast, and it would also probably have been easier to put together on a flat surface. The rest of the sleepers stay on the bottom just fine on their own, and I didnt have any connection problems at all on the r88. If the r56 gives me too much trouble I might cragle the end parts on there. Those really feel like minor complaints, though, because the engines run so nicely on them and it all looks very good. This is definitely the custom track option I`ve been waiting for.
-
Hm, the age range and the addition of the word `novelty` have me wondering if it`s just a polybag.
-
PF's got a few more pros, though - namely the ability to have reverse loops without worrying about power shortages (Yes there are ways to get this with 9V - but not easy ones), which also opens up much more complicated track layouts. You can have multiple locomotives share track while still being able to control them independently, and while it is harder to make a fully self contained PF shunter you can have vastly superior aesthetics with it due to multiple driver sizes and the ability to have running gear. It may be a matter of preference, but personally I'd rather have an engine that looks proper from the drivers up than have a good looking engine on the wrong wheel base (such as a Class 08 shunter having only 4 tiny 9v motor wheels), even if I had to have a permanently coupled car behind it for the battery.
-
With SBrick being around $60 US each vs the IR Receiver`s $15 pricetag, I`m not sure how it is meant to be an answer to a price limit problem.
-
Super Mega Steam Power Train Builder-- LEGO(R) IDEAS(tm)
Daedalus304 replied to James Mathis's topic in LEGO Train Tech
Hello James! I first must start by saying that I really love this idea - ever since Cuusoo started I've had the thought of trying to start a spiritual successor project to the hobby train, but I didn't really have the experience to pull off a good parts list. I'm really liking what I'm seeing here so far, and I too have a few thoughts on the project - Firstly, I think there is something more to be said about the colour. The wheel colours are liable to be hit or miss pretty much everywhere - many, many train builders model after those great BR steamers with the black finish and the great red wheels - so certainly this is a very attractive choice, especially given the rarity of those colours. However, I know for me personally I am not liable to be building much of anything with big red drivers. There simply aren't many local prototypes that I could model after that they'd work for, so from a parts pack perspective it's got a ton of the parts I'd want... in the wrong colour. Again, though, this is the kind of thing that changes depending on nationalities and tastes, and it's probably split pretty even. I'm not sure what the solution to the problem would be except perhaps to suggest that the set could come with some of each colour of wheel - 8 small wheels and 6 drivers of each black and red. Just a thought. Second, Ideas projects have a very hard time getting the full 10,000 votes unless they've got a ton of popularity from a license (MineCraft, Shawn of the Dead, BttF), and so not having that advantage is going to require more than just an amazing model to overcome, especially in the Trains niche. It may be a good idea also to get some strong support from the AFOL train community to help spur more interest. The hobby train was a great concept, especially since it had so many models from different builders and regions. They didn't all match up, but it was pretty apparent that it was a very flexible set. Obviously that had it's own logistical problems, such as the fact that only one of the advertised models had instructions, but I think there are ways around that. What you've got here right now is a good, solid modular model system that is a great focal point. My suggestion on that front, then, would be to make a custom LDD parts selection (The guys in the LDD section of the forum know how to do this), this would allow people who use that theme to make sure they are building strictly with the parts that will be included in the set. There are a lot of talented train builders in the community, If you can find some other builders who would be willing to play with the set parts digitally and make their own models using strictly the parts from the sets, you could start getting ever more exposure through them. The other builder's models don't have to be a focal point of the Ideas page as what you've got already is very strong and solid - but it would sure add a lot of good depth; and I think if you can get the guys in the AFOL community excited about the versatility and opportunities to build even more detailed and advanced models, you'd be able to bring in even more support. This would bring all the benefits and next to none of the risk of what happened with the Hobby Train - the main builds of the set are already very versatile and attractive, so with just the simple base set you have a very coherent theme and models. That avoids both the HT's thematic mishmash and the fact that only 1 out of the 30 advertised models could be box, but you could have the LDD alternate models to bring that great depth and variety that was so awesome about the set. Yes, those models would still have the same trappings of being digital files only, but your set isn't going to suffer for it as it's really the desert of the set. Furthermore, if you got, just for example, someone like Carl Greatrix or Cale Leiphart to come up with an alt design or two, it's probably a safe bet there'd be people supporting the project just for a chance to build one of their models. Heck, maybe even have a couple designs that showcase what could be done with multiple copies of the set - if I know I'm liable to buy two or three anyways, it sure would be cool to see there was an LDD file out there somewhere for a Mallet Loco I could build with just the set parts. Those thoughts aside, though, this is already a fantastic set idea and I'm definitely supporting it - and I will definitely buy more than one if when it makes it. Good luck! -
Yes, here is his picture with a couple arrows drawn on it: Setting the switches like this WILL have the train cross every single section of track. It's a big track plan, and it's fun to watch. If you have the train start from either straightaway going left, it will eventually end up right back where it started. If you have it travel to the right, it will still cross every section of track but will not face the way it started.
-
I don't know if it`s what you`re looking for, but on the track design Robert posted, if you have both the left OR both the right switches flipped to turn then your train will on its own travel across all the track and end up back at its starting position. It is one of my favorite setups for its simplicity and variety.