
Daedalus304
-
Posts
441 -
Joined
-
Last visited
Content Type
Profiles
Forums
Gallery
Everything posted by Daedalus304
-
 Thought I'd give it a try, crashes for me too. "Not responding" then just an instant close. How peculiar.
 -
LEGO Star Wars 2012 Pictures and Rumors
Daedalus304 replied to XimenaPaulina's topic in LEGO Star Wars
I can almost imagine them using it in a UCS Slave-I to auto-orient the wings. That would be much cooler than the free-swivel method the SYSTEM sets are using. -
LEGO Star Wars 2012 Pictures and Rumors
Daedalus304 replied to XimenaPaulina's topic in LEGO Star Wars
I'm not sure why $50 seems like the popular price guess for this new TIE fighter. (Very nice set, by the way). It seems a little absurd to think that they'd price it $20 higher than the very recent TIE Advance. $30 or $40 seems like a much better price for it, IMO. -
Small LDD contest - [FINAL RESULTS]
Daedalus304 replied to Calabar's topic in Digital LEGO: Tools, Techniques, and Projects
This is a really neat contest, Calabar! It was quite difficult to come up with a model that I thought looked good and used all the parts. Here it is, inspired by the video game series "F-Zero": Hypersonic Hornet A high-speed hovering race craft. Streamlined and with big engines for maximum speed! This is the view you'd generally see if it were in an F-zero game. And finally, the LXF Hope you all like it! Edited with the creation name, I'd forgot to include it -
Can I power my train with the parts that I've got?
Daedalus304 replied to L@go's topic in LEGO Train Tech
The best way I know of is to use LEGO's polarity switch on just one of the motors. You can find it here on S@H. Just use it to set one of the motors in reverse. -
Yes indeed! Stargate is one of my favorite TV shows ever. I have made a couple Stargate MOCs as well, but only posted one. Which is your favorite series?
-
I downloaded the LXF from the link to check if perhaps something was wrong with it, but it opens and runs in LDD just fine for me. Perhaps Superkalle or one of the other Digital Designer geniuses could be of more help, perhaps something is wrong with your LDD? I can't say that he has, actually. I didn't see his 5700 until shortly after he posted his A4 Mallard in this very forum, and during the entire design process I specifically tried to avoid looking for other 5700 MOCs - part of the fun of designing is trying to find my own solution. I do believe I saw the steering wheel in the top of the palm trunk on another MOC a while back, but I don't remember where it was. That said, Bricktrix's 5700 is a beautiful engine and I see he did find solutions to things that had me stumped. There's no doubt in my mind he's better at this than I!
-
My train collection still feels a little small, but it is growing! I have: 2 - Emerald Night. First LEGO train I've bought, and shortly after picked up a second. I modded the second engine slightly to take off the smoke deflectors, as well as a few other minor changes. Have been wanting to try combining the sets into an 8-wide Emerald but haven't found time. 1 - Maersk Train. And boy do I love it. I don't have any dedicated PF equipment for it yet but would love to pick up some, as well as another Maersk or two. 1 - 7938 Passenger Train. Mainly picked it up for the PF and curved track. But it's pretty spiffy. 1 - MOC GWR 5700. First train moc as an AFOL, and although it's probably a little proud to say, it's currently my favorite of my engines. :) 2 - Toy Story Train. Got them on clearance at WalMart, rebuilt the cars into larger, 8-wides for my 5700 and ended up with a plethora of extra train parts from it. Still undecided what to do with the engines, but I'm definitely going to find a use for those red Large drivers. So the total comes to 7 trains! (If you count the TS Train that is).
-
Thanks! For the Pneumatic tube I just bought a length 11 tube I think, and trimmed it smaller. It was hard to be able to bring myself to modify a part in that manner... but I did it anyways! After that I just had to find a metal wire that fit through it. Glad you like it! It would certainly be interesting to me to see other versions of this engine, there are always so many neat ideas out there. I'm glad to hear you think gold wire works so well! I wasn't too sure how well a non-lego element would be recieved, especially since it's so prominent. It took quite a bit of tweaking and tinkering to get it to a shape that I felt worked, and to be honest I'm glad I did. None of the other LEGO tubes or wires really seemed to work right, and this wire wasn't even three dollars! LXF file has been added! I'm curious to see what it is you have planned! Thanks LT! I'm definitely going to keep brickin', it's too fun to stop.
-
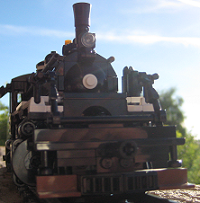
Hello all! Today I'm proud to present to you my finally finished, finally photographed MOC of a GWR 5700 Pannier Tank Engine. I'm not much one for openers or words, so here's straight to the pictures! Also: Please excuse the dust! It is hard for me to keep things from getting dusty in AZ. A good deal of the time building this engine was spent trying to get the proportions and iconic shapes captured well, and I think this picture captures most of those. There are four steps on the face of the engine that I would like to point out, since I have had a very difficult time getting good photographs of them. The cutout shape of the forward cab was one of the more important shapes of the engine to me, and I think I managed to pull it off. The big downside was of course having the windows placed slightly "wrong", but I can live with that. The "LRTS" stickers are from the 10194 Emerald Night, although I did have to trim the tops of them off with a scalpel. The black bits of tubing are pneumatic tubes, and the gold railing is just some gold aluminum wiring I picked up at the store. (The only non-LEGO element.) Unfortunately the wiring of the headlamps obscures the gap below the boiler, but the gap would be difficult to see and I decided that for general viewing the working lights would probably be more fun. Because of the wheelbase, the front coupler isn't really all that functional. With a wider turn radius of course I could change that, but for now this is how it is. I have been considering buying an old-style magnetic coupler and builder a more accurate bumper, but I need to get more spending money before doing that. Love the PF system, although the cables out the rear make it a bit unsightly for photos. The longer cord is for the PF Train Motor and the shorter cord is the lights. When building the SNOT around the back I was at first concerned about the anti-studs being unsightly, but they ended up looking and being placed like the bolts on the back of the real engine. So hoorah for that! There's quite a few studs in there that I would rather be smooth, but given the placement of the motor, and other key elements it just wasn't practical to eliminate them. The wire from the light elements took quite a bit to incorporate, and although I strongly wish they could be much better hidden the internals kind of forbid it. Those jerks! I thought it would be sort of fun to show these two pictures side by side. I did manage to add some detail to the cab, but greebling (especially engine controls) isn't yet a strong suit. The door to the firebox does open, however there is nothing but bricks and support structure behind it. A couple more deeplinked pictures: Here is the gallery of larger pictures, with a couple more "fun" ones. (Once Moderated) Viola!! The buffers and drive rods will probably go a bit of revision in the future (Probably during the construction of my next engine), but for now I'm happy enough with it to call it done. I do wish I could have added the bar running along the base of the wheels but I couldn't find anything that seemed like a workable solution. Very soon I will update this post with the most recent LXF file for those interested. Here's the LXF! Tah-dah! LXF Notes - The purple parts are substitutes. The large group in the front of the engines is a replacement for the PF Train Motor, and the purple 2 x 2 x 1 brick between the rear wheels is for the lights. Both the motor and lights power cords go through the tunnel that comes out the rear bumper. :) I hope you enjoy looking at my engine, and I hope all my rambling hasn't put anyone off!
-
Hello all! I've been working on a train MOC lately and seem to have come to a part that can't be solved simply with bricks. The biggest issue of the two is actually a LACK of friction. My engine runs fairly well until the axles in the flanged drivers start to slide out and block the coupling rods. I'm using the Large Drivers from the Emerald Night. The most obvious solution is of course glue, but to be perfectly honest I am very much against gluing my LEGO and especially in this case. What do you other train fans use to help keep the wheels/drivers in place? (To be more specific, my temporary layout has entirely left turns right now and the axles are sliding out the right side of the engine. The wheels themselves are staying in the right place but the axles are sliding out; switching out the axle doesn't seem to change anything) Second issue is the usual, too much friction. The axles and coupling pins are grinding (Which seems to be pretty normal, looking around) and making some dust which is probably only making it worse. I've been watching another thread where different lubrication ideas are being discussed, but I'm not sure if there has been any conclusion yet. Also! Any other pointers or suggestions regarding friction and the optimization thereof are welcome as well! Thanks and good day to you all!
-
Problems with LDD
Daedalus304 replied to IsaacSka's topic in Digital LEGO: Tools, Techniques, and Projects
Perhaps you could try turning off "High Quality Rendering in the Brick Pallete", and see if that helps any. -
Thanks to both of you for the advice. I did send him a message and that seems to have got things moving. Most of my parts got here (oddly enough I was sent extras of several of them), but he forgot to ship some train buffers until a day or so later. All in all I guess it's worked out though. Overall though, Bricklink is much simpler to work with that I'd originally thought. I am going to have to be careful so I don't end up spending all my money there! Thanks again for the help.
-
Hello! I'd like to ask some advice from you members who are more familiar with Bricklink. I just submitted my first few orders a week ago. One of the sellers did not reply with an invoice and so three days later I messaged them and asked about it, and I got the invoice shortly after with a message saying that they would pull and ship the order as soon as they received payment. I sent the payment immediately, and now four days later I still haven't heard a peep (Although paypal said they accepted the money). I'm not sure if I should send them another message or not, because I don't want to be a pest. However it's going significantly slower than my other orders and looking through their feedback I've found many complaints about having to wait two or more weeks for an order (I'm moving in two weeks or so and can't really afford to wait that long). It's likely just me being a overly cautious because I'm new to this, but how long is acceptable to wait, and would it be too pesty of me to send another reminder?
-
disk brakes
Daedalus304 replied to SNIPE's topic in LEGO Technic, Mindstorms, Model Team and Scale Modeling
Another option is to look through the Extended Mode of Lego Digital Designer - that can help you become familiar with a very large number of parts, and you can play around with them to see if they fit or look how you'd like. Here's how you can activate Extended Mode Whatever you end up doing, here's hoping you can find a piece that suits your needs! -
Posting to report the very safe and sound arrival of three Maersk minifigs in Arizona! Boy these guys didn't waste any time! Many thanks again to CopMike for hosting this raffle. :)
-
Great looking speeder, KielDaMan! The new thin body of the second version looks very nice (I thought the first version was pretty cool as well). One thing I am curious about, how would that front air scoop look with an 8-tooth gear inside it instead of a 1 x 1 cylinder? I'm not sure if there's even any way to get it in there, but the thought popped to mind when I saw the reference picture.
-
I myself was planning to try and pick it up tomorrow from the LEGO store at the AZ Chandler Mall... now I'm not so confident that it will even be there! :O Here's hoping they still have one!
-
I really liked MetroiD's post, but this part in particular stood out to me as the easiest way to describe "how much accuracy I demand". (Bolding added for additional emphasis) When I build a model based off something real (Or a "fake" model like a Star Wars ship), generally, yeah, I want it to look as "accurate" as I can manage. But I think that there's three things that play into that, which MetroiD listed as two things. Scaling, dimensions, and detail are all different but very much needed. LEGO doesn't tend to allow all three of these. There's tons of cases where there's a perfect, obvious solution to all of them, and there's just as many if not more where the "solution" is a creatively unorthodox method. Whether to sacrifice scaling, dimensions, or detail is always up to the MOC'er, and what they believe looks best. And for me personally, which one of those I choose to sacrifice changes from case to case. An easy example to point out (thanks to the start of this thread) is KDM's BARC speeder. While the skis on the side may be a tad big (out of "scale"), I think that they do a great job conveying "detail" as well as "dimensions". They're quite easily recognizable as what they are meant to be, and the "scale" isn't so out of proportion that it looks unsightly. One of the suggestions I saw regarding the MOC was to replace the skis with 1x2 plates. While it may fix the "scale", to some degree, I don't believe that the perfectly rectangular shape very well convey the detail or dimensions; and above all else, it probably wouldn't look as good. In the end? I don't think there's any approach that's the definitive -best-. There's a lot to be said for people's personal taste and I'm sure everyone puts different importance on the various aspects. And even though I can be a bit of a stickler for accuracy in my own MOCs (My own My Own Creations....?), I don't think there's any problem with people building things the way they please. And if it ends up looking/being "inaccurate" but visually stunning and amazingly engineered...? I say, more power to you. The day we strive to constrain the limits of our creativity is the day we start down the road to kill it. Have fun with what you do. :) EDIT: On the note of KDM's BARC MOC, I'm definitely going to comment. Just thought I'd wait and see the new/updated version first. :)
-
Wow! I can hardly believe it! This raffle has been a ton of fun, and even though my entry was a little bit on the simpler side several of the containers posted were simply inspiring. I can hardly wait to see what sort of magnificent things get built when the next raffle rolls around!
-
I received extra wheels with both my copies of the Emerald Night. I'm fairly sure by this point that it's the standard, though I don't know why BrickLink doesn't have them listed...
-
The Rock Raider's Chief Engineer Sparks does a last minute check before the train arrives to make sure their new drill bits are properly secured...
-
Hello all. Most of my MOC's are built or designed in LDD and so I figured I would start a topic and highlight all of my MOCs, with LXF, for easy reference. I sort of tend to go all over, thematically, and I think being able to post an LDD creation in the LDD forum as well will better help me get feedback as far as the digital part of the process goes. In my initial post I'm going to have a single picture, a link to the topic, and a link for the LXF for each MOC. This way whenever I want to show a new MOC in the LDD forum I don't end up with a lot of topic clutter. I hope this is alright! First off is my brand new MOC. GWR 5700 "Pannier Tank Engine" Train Tech Topic LXF File LXF File (Modified, no substituted parts) Split Engine "Sparrow" - Experimental Plane LEGO Sci-Fi Topic Picture: LXF File Large Transport Truck (Rock Raiders MOC) Action Themes Topic LXF: Missing, I'll find it soon.
-
Thanks for the kind words. I would love to see any pictures if you do decide to build it, I haven't yet got the parts to realize a physical version so that would be really neat. As for bulking up the EM, I may just give that a go if I think the engines look too funny together. You can unlock the Palm Trunk (As well as hundreds of other parts) by following the directions in this thread.. They're all in a special theme called "Universe Mode".
-
Thank you! I'd love to see a six-wide rendition (And perhaps I'll try one myself!). Thanks! I don't yet have any sort of instructions, but very soon I will have the LXF available and that should make it quite easy to reverse engineer. If/when I actually get the parts to build it for real I'll make sure to take pictures along the way for instructions. I think the scale between this and the Emerald Night is definitely a bit off... but hopefully it won't look too weird. To be honest, I'm not at all sure how I could scale this down to a 7 wide. Not to say it's impossible, simply beyond my capability. Thanks for your kind words! Also, I've resized and replaced the two pictures that got removed. I didn't realize they were still so big!