
Graydingo
-
Posts
207 -
Joined
-
Last visited
Content Type
Profiles
Forums
Gallery
Everything posted by Graydingo
-
[TC6] '66 Chevy C-10 Kustom
Graydingo replied to Graydingo's topic in LEGO Technic, Mindstorms, Model Team and Scale Modeling
^you are correct sir! -
[TC6] Fire truck
Graydingo replied to super-jaschka's topic in LEGO Technic, Mindstorms, Model Team and Scale Modeling
Can't go wrong with red and white. Good looking truck. Vid doesn't validate for me on YouTube fyi -
Again compactness with all that functionality is truly inspiring! Well done.
-
[TC6] Arctic Equalizer
Graydingo replied to KirTech LAB's topic in LEGO Technic, Mindstorms, Model Team and Scale Modeling
Love this! It's totally unique and I especially appreciate the pneumatic setup! -
[MOC] Icon Bronco
Graydingo replied to BigCatBoy's topic in LEGO Technic, Mindstorms, Model Team and Scale Modeling
I ran across this when I was going to build a bronco. But I wanted to do a 76. This one is probably my all time favorite MOC. It's a work of art. -
[WIP] Ultimate 42009
Graydingo replied to grum64's topic in LEGO Technic, Mindstorms, Model Team and Scale Modeling
I'm excited to see your updates. I built the ultimate 42009 last year and it's a fantastic and massive project. I think I found 2 mistakes in the instructions but I can't login to Flickr atm. I posted pictures in the ultimate 42009 thread. Super rewarding build! -
[TS6] Concrete Truck Mk II
Graydingo replied to jono rocky's topic in LEGO Technic, Mindstorms, Model Team and Scale Modeling
Cab is looking amazing! Power through! -
[TC6] '66 Chevy C-10 Kustom
Graydingo replied to Graydingo's topic in LEGO Technic, Mindstorms, Model Team and Scale Modeling
Thought you all might enjoy the video... https://vimeo.com/119411637 -
11. '66 Chevy C-10 Custom Function Summary: 4 motor functions: 1. Two L motors working together via gearbox to drive the rear wheels. 2. M motor for steering with gear reduced steering wheel. 3. M motor for Air ride pump. 4. M motor for Air ride Up/Down Switch. Other: LED Headlights Manual: Doors, hood, tailgate and removable tonnuea cover Video: Discussion Topic
-
[TC6] '66 Chevy C-10 Kustom
Graydingo replied to Graydingo's topic in LEGO Technic, Mindstorms, Model Team and Scale Modeling
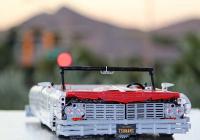
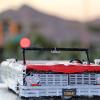
Well, I found out I'll be busy the next few days. So I decided to finish up the project tonight. I wont be able to fine tune some of the last few things I built, such as the hood and the cab, but they turned out pretty cool despite the time crunch. The '66 has: 2 L motors for one drive function 1 M motor for steering 1 M motor for air pump 1 M motor for ride height (air switch) Manual features include: Doors open. Tailgate opens Hood opens. Also the steering wheel turns with the front steering. I would estimate about 3k parts. Next time I build something small! reworked the tailgate Christine? Thanks again for everyone's support. -
amazing!
-
[TC6] '66 Chevy C-10 Kustom
Graydingo replied to Graydingo's topic in LEGO Technic, Mindstorms, Model Team and Scale Modeling
Back with some additional build log. I hope you don't mind the updates. It's tiresome when someone bumps their own topic a lot. I apologize for that. The front end was my big project over the last few days. I tried a lot of fenders and that sort of organically led to designing the hood, which I wont put a picture up of -it needs another draft. It's a huge chunk and very important to the overall look of the beast. Even still, with my prototype hood and front fenders I decided to get the grill and front end structurally sound. I was facing the redesign of the front air ride system and if you remember, I wanted to wedge the fake v8 in. Well I definitely gave it the old college try, but sorry, no V8. It's just too tight and with the overall weight of the MOC you have to keep the cylinders near the axle. and with the limited space inside and around the wheels, there simply was no room for the v8. I tried one sort of wedged under the v8, with a arm that raised the other axle, then I tried both like an X in front. it worked but the steering became compromised. Here's one in with the v8 Those wide tires are tough to work around. I like the height, but in a perfect world, they would be 1/2 as wide. Especially since they are artificially narrow to account for the body to slide over the top. Long story short, I pulled the v8 out, and cried, then went about shoring up the front end so that it was mechanically sound. I reasoned that the point of my moc is the air ride. Steering and drive is after that, then looks. Here's the frame of the grill. I love these box pieces. When they can be worked in, they are excellent building points. I added the LED lights to these front lamps. They wont really be practical unless I got an S-brick. Be nice to turn them on and off separately. For now they are tied into the drive function because of a lack of extenders to the battery box at the far end of the MOC. This is the 2nd draft of the grill and 3rd of the bumper. Pretty happy with it. what do you think? The hood comprises a large chunk of the top and the real truck has a fairly skinny grill. Now....I'm off to show that hood (bonnet? ) who's boss! Wish me luck. -
Cool moc! Agree with a blade cover suggestion. At least an outline so we can still see it in action.
-
Fantastic engineering. That's a lot of worm gears.
-
[TC6] Hot Rod Wrecker [WIP]
Graydingo replied to Lipko's topic in LEGO Technic, Mindstorms, Model Team and Scale Modeling
Love the details Lipko! I really liked how you mounted the L motors too. Looks like a fun ride. -
[TC6] '66 Chevy C-10 Kustom
Graydingo replied to Graydingo's topic in LEGO Technic, Mindstorms, Model Team and Scale Modeling
Back with some more updates. I received my two new 45mm? air cylinders to to replace the mini's on the front that just weren't lifting the weight. Before I could commit to tearing the front end apart, I had already started on the tailgate and back bumper. This is the current rendition. The bumper works for me, but I think the tailgate needs some more massaging. Definitely a challenge to tie in those crazy panels. I was pretty happy with my taillight setup. It's a 3L yellow beam with the small gray half pins to hold the lights on. It was a great challenge to mount them because once the pins are in, there's nothing left to mount to... until you think a little bit deeper and thus the amazing thing is revealed that we all love about lego: There's always another way. Another solution. Another, better? way. Tailgate down for battery box access: I also reworked the tonneau cover. It was too wide before, so I narrowed it and added proper mounting gear. It drops onto hooks behind the cap and rests on pegs at the back. Quick pop on and off. Onto the front end> I ripped off the small cylinders and rough mounted the two big ones. The power was too much and it created the problem of the front end raising quickly first (lighter) and then the backend catching up. I sort of want the whole thing to go up at once. So I tried a single cylinder: It just looked dumb and didn't give me enough height. Here's my new prototype. It's not quite there, for two reasons. 1. No room for the mock V8 2. It's a sloppy pile of bantha fodder. But on the bright side, it worked pretty nicely as for ride height. The V8 HAS to go back in. Which means, these cylinders will drop down one stud at the bottom, and ...maybe tilt in toward the frame at the top? Something... They may also have to moved forward a few studs, which I don't really want to do, but...comon...the V8! You can't have a hood that opens only to have no motor! Lastly, The whole steering setup was bugging me. I have an m motor on a worm gear. The gear ratio was bananas, so I engineered a gear reduction on the motor side. Now my steering is much quicker. (the rod is just to hold the air lines back while I work.) Then I flipped 'er around and fixed the steering wheel ratio. It now turns realistically with the steering. Also the steering wheel is in a much more realistic spot. Unless, of course you are posting to a board titled Eurobricks. Then I guess it's completely on the wrong side of the car Next up, hood lovin'. -
I've used the gear page a dozen times already. You rock Sariel!
-
So awesome! What a unique choice. Love the wing folding mechanism -very smooth. TC6 just keeps surprising doesn't it?
-
[MOC] Weird Motorbike
Graydingo replied to Chapachuk's topic in LEGO Technic, Mindstorms, Model Team and Scale Modeling
It's awesome! Choppers rock. -
'65 Shelby Mustang
Graydingo replied to Rolic's topic in LEGO Technic, Mindstorms, Model Team and Scale Modeling
Well done sir. -
[TC6] '66 Chevy C-10 Kustom
Graydingo replied to Graydingo's topic in LEGO Technic, Mindstorms, Model Team and Scale Modeling
Thanks Tommy. its RWD only. The picture above is from a failed setup. The final has much better angle and runs to the cab that drives the rear wheels. It has to go to the center because of the long trailing arms for the rear end. ill upload a pic of the bottom soon and you can see what I mean. Here's the bottom so far. Along with my "buddy" that helps me with hard to get to spots. Here's the universal angle for Tommy Not bad. It holds up so far for testing. And here's my morning rear bumper project. -
[TC6] '66 Chevy C-10 Kustom
Graydingo replied to Graydingo's topic in LEGO Technic, Mindstorms, Model Team and Scale Modeling
Thanks Leocorno! I've been following the Lambo thread too. A supercar is in my build future for sure. The Hurrican is great and could almost be a c model as I think you primarily used the loader as a donor am I right? -
[TC6] '66 Chevy C-10 Kustom
Graydingo replied to Graydingo's topic in LEGO Technic, Mindstorms, Model Team and Scale Modeling
Two steps backward and two step forward since my last update. I was unhappy with the performance so I decided to rip the guts out and try a transmission with more torque. here's my 'new' transmission (not really a transmission, just the dual motor drive setup. It's a tricky setup requiring the smaller drive gears to be mounted .5 stud off. Which means the axle is now .5 longer (i reinforced it in the center with the red piece) Which means a motor wont direct mount to it properly. So I had to build this complicated offset rig. Then everything that mounts on and around it was more difficult to mount. And here it is partially installed. It ended up being too much torque and would wreak havoc on my transfer case. Gears would pop out and the angle on the drive shaft was fully stupid. So ...ripped it all out and went back to my old 4 prong gear drive. The backlash is actually helpful in this setup to help absorb some of the weight when the vehicle stops. Many hours later, I have a completely new internal guts setup. This is probably my 5th or 6th full build on the inside. It's definitely the cleanest and most functional yet. I've learned a lot during the build and next time I'll start with the right motors. Got the bed mounted properly and reworked the interior to be cleaner. Pretty happy with that. Next up is the front fenders. Rough mockup below. -
[TC6] '66 Chevy C-10 Kustom
Graydingo replied to Graydingo's topic in LEGO Technic, Mindstorms, Model Team and Scale Modeling
This is..surprising too. Maybe my cylinders are bad. The one off the unimog crane actually had trouble opening the claw. The other is off the green 24-7 tow truck. I'll have to test them out. -
Watch out for fake lego. Every once in a while they slip in to some bricklink orders. edit: hmm upside down. oh well you get the idea.