
Graydingo
-
Posts
207 -
Joined
-
Last visited
Content Type
Profiles
Forums
Gallery
Everything posted by Graydingo
-
 Finished and made a video. https://www.youtube.com/watch?v=FqyijkJwvC4
 -
[MOC] Custom 4x4 Pick.up
Graydingo replied to Lucio Switch's topic in LEGO Technic, Mindstorms, Model Team and Scale Modeling
Really nice! Great design. -
What you can't see, you drive over. Or you hang your head out the window. LOL Definitely in the rat rod / road warrior realm
-
ha. yes definitely not for the purists. Exhaust tips were a bit much.
-
working on the body. Engine shaker sort of failed. I may omit the motor for the engine altogether and just put a hand of god setup to spin it. Orange parts from crawler and unimog.
-
Amazing work as usual Sariel!
-
Yep, The Unimog had to be devoured for all those black parts. So that's the rear axle that it's crawling over.
-
Thanks! yep going for form over function which is arguably the opposite ideology of a post apocalyptic society. Surprisingly, it crawls just as well as the original model (a bit better since I changed out the gear ratio in the portal hubs) so far. It does kind of spur the imagination and I've been to enough car shows to know that there is always someone out there who goes way way over the top! :-) To do list: 1. Motor motor and Ir mounted. 2. gear box for 'shaker' 3. flip up mid century Australian truck body. 4. winch, turret, and possibly a place to put poor hostages on the front!
-
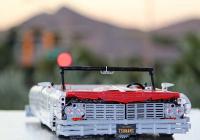
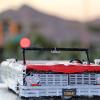
Having some fun with my 9398 and doing some mostly cosmetic mods. I saw the 'why black?' thread so I thought it might be appropriate to post my all black chassis version of the rock crawler featuring a modified blown v8 of which the base was designed by someone named legomaniacman on youtube. The plan is to make some kind of crazy mid 50's semi truck body with road warrior style barbs and spears etc. I'm a big fan of the original Road Warrior film and I love the new Fury Road trailer. I'm working on setting up the motor for the v8 which looks fantastic as it spins. I also want to rig a rumble device to shake the blown motor which will be on a separate IR / remote.
-
My 9398 Crawler Build
Graydingo replied to JohnR33's topic in LEGO Technic, Mindstorms, Model Team and Scale Modeling
Fun set. I swapped out the gears for more torque in the Portal hubs. It does a nice job of crawling over various things. The servo motor is awesome. -
Ha! Been waiting for this one. Very creative!
-
Shotgun Booms. I love it. I built the Ultimate 42009 but this thing is wildly even more ambitious. nice work.
-
[JFAIR] RC Helicopter
Graydingo replied to Milan's topic in LEGO Technic, Mindstorms, Model Team and Scale Modeling
Fantastic entry. I had to do a double take to make sure you were using all Lego pieces. well done! -
[MOC] 60's Crawler
Graydingo replied to astakos's topic in LEGO Technic, Mindstorms, Model Team and Scale Modeling
Very cool looking crawler. I'm wanting to rebuild my 9398 soon. I would love to see some more detail photos of the chassis. -
Love what you did with the body design.
-
^ awesome dolly! I'm doing the Ultimate and had time to burn waiting on motors so I'm trying to enclose the crane. I wanted to hide the battery box but also make it easily slide in and out. It's a WIP
-
[WIP] 1968 Ford Mustang
Graydingo replied to VKTechnic's topic in LEGO Technic, Mindstorms, Model Team and Scale Modeling
The leafs were very cool. I think the design is great, but obviously it needs to be injected molded abs or something more sturdy than printed. Unless printed can print better plastic? Your prototype is very promising. I'm looking for leaf springs sings many many american cars used them and still do. -
You guys rock! Thank you!
-
Probably going to head to the TRU today. I'd use bricklink but I'm building up a new collection and i'd prefer to pick up the part i need now. I need one more of these and though rebrickable says its in a lot of sets it doesn't tell me which ones unless i'm missing how to do it. http://rebrickable.com/parts/87408 anyone know what current kits might contain that piece?
-
Firstly, a big "thank you" to Jurgen for this amazing mod. I'm having a wonderful time building it. I'm currently waiting on a lego.com order for the motors and IR receivers i didn't previously have. I really enjoyed the original mk II build, and it has been the most challenging technic set I've ever constructed. Jurgen's mod really improves on the original build. http://www.flickr.co...in/photostream/ A couple things I noticed when doing the build for any future builders. 1. Absolutely tear down the 42009 and organize it into pieces on your table or into small bins. The ENTIRE thing. you may be tempted to disassemble only the truck and leave the crane. As mentioned before, this is a complete rebuild. 2. I think I found 2 errors so far in the instructions, but likely it's my own build fail. I'll clarify with an edit. Edit: ok I've uploaded these minor minor things. :-) http://www.flickr.co...th/12994313553/ First error is just a floating arm on one of the fenders. Minor. Second error is the picture of the mounted fender on the side of the truck with the long axle that runs parallel has the support pins in the wrong area. Third is just confusion on my part when mounting the front steering pinion gear. The gear and the support bracket behind it are not flush to the assembly, they float one stud off the assembly and later are supported by a clever setup underneath. It's fairly obvious in the picture but when you are building it, you are looking out for gaps in axles as this is a pretty rare occurence. Also the pinion gear and axle is driven by gears that are added in subsequent steps. I think just for clarrification a top down view showing gear allignment would have saved me 20 minutes in building here. :-) bravo on these awesome instructions!! and just my 2 cents on parts. you will need a ton of the 24 tooth tan beveled gears, and a lot of the 3L 2 pin / 1 axle connectors. Thank's again to Jurgen and the other testers for the instructions!
-
Awesome! I drove a pinzgauer some years ago for a tour company and they are amazing vehicles. Very nimble and capable. I've always liked the look of them too. I was planning to build the 6 wheel pinzgauer version.
-
Motorised Astromechs
Graydingo replied to vmln8r's topic in LEGO Technic, Mindstorms, Model Team and Scale Modeling
Love this! -
42009 Extended Boom
Graydingo replied to afol1969's topic in LEGO Technic, Mindstorms, Model Team and Scale Modeling
Thanks for getting this. 42009 is set to be delivered tomorrow! :-) -
My grandma gave me a piece of blue heavy duty cloth when i was a kid. 30 years later I'm still using it. :-) It's almost like leather, but synthetic with grippy white felt on the bottom and smooth dark blue 'leather' on top. It's big and it folds out onto my dining room table. Pins and other things really don't roll much on it and its hard enough to snap things together but soft enough to keep tiny parts from rolling around. http://imgur.com/jrqHalc
-
can I substitute the new 8883 and 8882 motors (M and XL) for the ones listed on rebrickable? (58120 and 58121) Also it says I need 4 IR receivers. I have one already from 9398. Is this one I need a different IR receiver? it seemed to recognize the IR remote from the same set, saying I only need 3 to complete my parts list...