
Graydingo
-
Posts
207 -
Joined
-
Last visited
Content Type
Profiles
Forums
Gallery
Everything posted by Graydingo
-
 If you've removed the hoses a few times, the ends can split. Cut off split ends with scissors and when you reattach the hoses push all the way to the base of any nipple. They will leak as it is a toy, but I feel your leak is a bit more than usual.
 -
[WIP] 63 Chevrolet Impala
Graydingo replied to Graydingo's topic in LEGO Technic, Mindstorms, Model Team and Scale Modeling
Yeah the measurements on the perspective stuff was a brain fart. I totally realized it when I went to measure the windshield and hood and I saw it was clearly a perspective drawing. I had forgotten about it though and I'm super glad you pointed it out. The side drawing and the 'end' of the front and rear should be enough for now. The only measurement I've used so far is rear axle to the back bumper. Speaking of which...guess what came in the post last night!!! Just a heads up, if any US customers are looking to order, expect it to take about 5-6 weeks My package was pretty rough looking having come all the way from Budapest! The stickers all got mangled, but the Sbrick and box was perfect. in a matter of minutes it was up and running and it's such a joy to be able to control speed of a motor! Here's the rear axle so far. Shocks work great at any angle. The hydraulics are really fun and so far my clutch system works under the current weight. I have a feeling that they may not be able to lift the weight of the car with the added weight of the body. In that case, if anyone can think of a good clutch solution I'd be grateful. The current clutch is a linear clutch that has two blue (1/2 axle - 1/2 pin) pins in either side. Works great for light applications. I was able to shorten the clutch to just 3 studs beyond the motor. This allowed me to mount both motors in the back in the same line so that the gear ratio's to raise that corresponding side would be simple and the same. I'll see about getting another video up. soon, It's fun to see them in motion. Here's the video -
[WIP] 63 Chevrolet Impala
Graydingo replied to Graydingo's topic in LEGO Technic, Mindstorms, Model Team and Scale Modeling
Quick update. The above dimensions were off if anyone has an eagle eye. The rim width is 8.6 studs, not the 9.2 seen there. I've been working on the rear end. I decided it might be fun to incorporate mechanical lowering system. All my air stuff is tied up in my other MOC and not quite ready to take it apart. However Sorry Lucio...I had to take apart your lovely 4X4. Great build if anyone is interested. Gotta break some eggs to make an omelet And I needed my XL and servo motors back. Not to mention all those lovely black beams. Here's my current build. Don't worry, those are temp wheels that are pretty close in size to the ones I bricklinked. It uses a worm drive lowering system. The drive has to be stiff enough to still allow the shocks to function. This presents a problem, you want the drive gear to hold the pressure when using the shocks, but you also want to use a clutch gear so that you don't twist the axle that moves the lowering mechanism. I've tried a variety of setups and leaning more toward an ingenious linear clutch that I got from Sariel's book. (Buy it! it's awesome!) Here's a vid of the linear clutch in motion. This is just a mockup really as i need to somehow incorporate a motor on each wheel for the lowering/raising each corner. This way I can do some really fun gangsta style hydraulic action (3 wheeling) Yes yes I know. I was supposed to be making this a street rod - but playability means 4 way "hydraulics" Maybe... -
Do you even lift bro? Great attachments!
-
[WIP] 63 Chevrolet Impala
Graydingo replied to Graydingo's topic in LEGO Technic, Mindstorms, Model Team and Scale Modeling
Yes definitely! These are the following improvements: Fake v8 (hahah I swear it will happen) 2 XL motors, and servo motor Shocks, with a single pneumatic cylinder per axle for the air ride. Possibly a way to control the pneumatic ride more precisely. air tank with auto regulator style setup/ and two pumps. Better air switch design More compact / lighter Better interior ----------------------- I found these wheels and rims. http://www.bricklink....asp?P=44772c01 They are a low profile tire and yet a rather large rim that looks pretty cool. It's a 6 star rim, that I might end up getting Chromed. (anyone know a good US chrome lego plater?) Here's snapshot of some basic measurements: thanks to Sariel for his tools. They are SO useful. He's probably checking his web visitors log and seeing Vegas USA all over it. also what do you guys think for color? I was thinking blue body and white hard top. (the 63 is a hard top - ie you can roll all the windows down and there are no B pillars) There seem to be 3 shades of blue. The new baby blue (less parts avail), the blue off the Cargo plane and wind up dragster (dark blue) and that electric blue they use for seats all the time. -
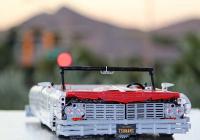
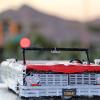
EDIT:___________________________________________________________ Here's where I'm currently at: Modeled after this Impala. and some current build pics Well I'm off to a fresh start on a new MOC. I learned so much during the process of my last build that I thought I would dive right into another car with similar properties. It will likely be another air ride model with a more competent power train and taking all the things I learned on my truck and incorporating them into a lighter, smaller and more functional MOC. The 63 has a lot of really great body lines and it should be fun to take a sort of street rod approach to a version of the Impala. Right now I'm sorting out what wheels I want to scale the model to. I was thinking these; off the MKII With those tires I'm looking at about 27 studs wide and 64 or so long. I'm also thinking about ordering some of the 8448 super street sensation wheels since they are already sort of chrome and have an extremely low profile tire. The problem (as I found out in my 66 custom moc) is the wide tires make adding air ride harder, since it gives you less distance between tires to achieve your steering and suspension setup. Plus if I go with those, it'll be up to 80 studs long! Lastly, I was perusing Effermans custom parts page. Someone posted some American Racing style rims, but I don't see them on his shapeways account. Anyone know how I might achieve the style as shown in the first photo for the rim?
-
[MOC] Bac Mono RC
Graydingo replied to cutzish's topic in LEGO Technic, Mindstorms, Model Team and Scale Modeling
dat body tho... sexy. I wanna see just something to sort of offset the red. most awesome moc sir. -
Awesome!
-
[WIP] Honda S2000
Graydingo replied to VKTechnic's topic in LEGO Technic, Mindstorms, Model Team and Scale Modeling
Great choice. What color are you thinking? -
wow, that is massive! Love to find these two sets online but I'm afraid it would cost an arm and a leg.
-
To me, I think you'd have to work so hard to make money turning someone else's mocs into profit. With all the fees and trouble with shipping, I feel like you could earn money easier breaking up new sets and selling them on bricklink if you wanted to do a lego business. Or buying new sets and holding them and reselling them later. Edit - and let's face it, time is money. These mocs can take all day or multiple days to build. That time is not often factored into the profit.
-
[TC6] '66 Chevy C-10 Kustom
Graydingo replied to Graydingo's topic in LEGO Technic, Mindstorms, Model Team and Scale Modeling
What do you guys think of my mirrors? not completely sold on 'em but the more I walk by, the more I like them Also switched up the front end a bit to make it look more finished by adding the black cylinders, a few yellow beams behind the turn signals and strengthening the axle that holds the yellow cylinders across the top of the grill and replacing the axle joiners with the ...uh yellow sliding cylinder thingys (technical term). I worked on the cab quite a bit. It's still not there, but it's definitely more enclosed. I ran out of small black beams so I had to sort of compromise with some axle connectors. Look's a'right It's definitely more secure as I connected the front a pillars as always intended. Also made the tailgate shorter. i think it looks better. These are all updates post tc6 deadline and are not to be taken into consideration for votes. (i'm not a top contender anyway! It's more about the fun of building and showing my results ) of course if anyone objects I can remove these updates. I'm also considering taking apart this badboy that I just completed. It's lucio Switches 4x4 truck: It contains my two XL motors and my servo motor! (25 bucks? are you kidding me?! We need to get that servo motor price down yall!) -
'32 Roadster Hot Rod
Graydingo replied to OneMoreRobot's topic in LEGO Technic, Mindstorms, Model Team and Scale Modeling
Love these! So much chrome! It's hard to get a sense of scale from the pics but these are huge! I wanna see more of the pickup. -
[TC6] Hot Rod Wrecker [WIP]
Graydingo replied to Lipko's topic in LEGO Technic, Mindstorms, Model Team and Scale Modeling
The steering setup is genius. -
Multiple motor drive systems
Graydingo replied to Seasider's topic in LEGO Technic, Mindstorms, Model Team and Scale Modeling
Here's a dual motor drive setup I built for my tc6 moc but didn't end up using. It gears down the motor to 1:1677 Here it is with the L motors attached I did not end up going with this solution though. Instead, I used the 4 prong drive sprockets in a 1:1 ratio @Bruno, that is a fantastic setup. Heavier moc's really need 2 xl motors. The 2xl with 2L motors will probably be my next setup for the impala I'm building. -
Generic Contest Discussion
Graydingo replied to Jim's topic in LEGO Technic, Mindstorms, Model Team and Scale Modeling
Yes! The wrecker is awesome! If the contest was judged on looks alone I would have voted 1 for this moc. My dad used to have a Model A pickup. I would love to send him the parts for him to build this. SO many great instructions out there! Winning created instructions is a great idea too. -
[WIP] Ultimate 42009
Graydingo replied to grum64's topic in LEGO Technic, Mindstorms, Model Team and Scale Modeling
Take another look. The "First" one is the existing 5L gray axle with mid stop from page 49 step 1. Correct me if I'm wrong. -
[WIP] Ultimate 42009
Graydingo replied to grum64's topic in LEGO Technic, Mindstorms, Model Team and Scale Modeling
I'm looking at it now Grum and it appears to be a typo concerning the quantity of the 4l axle with stop. I've scrolled forward and backward concerning that area and I don't see any other 4L being used. The other grey axle nearby is the gray 5L used in step 1 on page 49. I do believe only 1 4L with stop is used in step 10 on pg 51. Also concerning the errors I posted previously, sorry I didn't confirm, as I don't know if the pdf file has been updated since the last 6 months. You can check page 162 and see if the gray liftarm is floating off the fender in the rendering. If it is, then the following is a rendering error I believe: If you look at page 165, locate the black axle that runs adjacent to the battery box and the corresponding black axle support mounts. Those mounts are shown to be attached where a black and a blue pin would fill the whole as seen here: I believe the two mounts are actually mounted as shown in my picture here: BTW fantastic progress! one final warning, this area cost me a huge amount of time if i remember. I think it involves the front steering rack and pinion, and the pinion gear itself. The tendency is to push it all the way back on the axle, however I think it aligns with the tan beveled gear on a nearby axle. I'm having a hard time interpreting my own notes. I think maybe it doesn't align with that gear, but I disassembled my ultimate for the TC6 contest. :-D As seen here: http://www.flickr.co...in/photostream/ -
So many great entries. Everyone who entered should hold their head up high. Astounding competition!
-
Red Dakar rally car
Graydingo replied to Samolot's topic in LEGO Technic, Mindstorms, Model Team and Scale Modeling
Awesome! having just built air ride suspension I'm very impressed! -
38: 10 26: 6 10: 4 21: 3 37: 2 16: 1
-
Generic Contest Discussion
Graydingo replied to Jim's topic in LEGO Technic, Mindstorms, Model Team and Scale Modeling
Prizes are always cool but ultimately not necessary. I think a great prize would be instructions! There are a lot of cool instructions that cost $$. We'd be supporting builders by buying copies for the contest. Edit. Or prominent builders could give one set of instructions to the contest which would give that instruction tons of exposure and free advertising. -
[TC6] '66 Chevy C-10 Kustom
Graydingo replied to Graydingo's topic in LEGO Technic, Mindstorms, Model Team and Scale Modeling
8860-1 for Scale -
Tiger 2 / King Tiger
Graydingo replied to Sariel's topic in LEGO Technic, Mindstorms, Model Team and Scale Modeling
Very cool Sariel! Looks like fun to drive. How did you make the on/off switch? -
Wow! The details and chrome are amazing.