

Paul B Technic
-
Content Count
1786 -
Joined
-
Last visited
About Paul B Technic

- Birthday 03/23/1982
Recent Profile Visitors


.thumb.png.ac42fe5bf808b68722d021abc3bc5691.png)


-

MOC - LEGO Technic 42164 C Model Tractor with Three Attachments
Paul B Technic replied to Paul B Technic's topic in LEGO Technic, Mindstorms, Model Team and Scale Modeling
Thank you. I spent a lot of time trying to get the look right. -
MOC - LEGO Technic 42164 C Model Tractor with Three Attachments
Paul B Technic posted a topic in LEGO Technic, Mindstorms, Model Team and Scale Modeling
Recently I have designed and built a custom C model tractor based on LEGO Technic set 42164. It has three functional attachments: a plough, slasher, and post hole drill. Step 1: Conceptualization and Planning The first step in any LEGO project is to conceptualize the design and plan out the structure. For our tractor, we envisioned a sturdy yet versatile vehicle capable of handling various agricultural tasks. Step 2: Building the Tractor With a clear vision in mind, we began assembling the base of the tractor using the components from set 42164. We focused on ensuring stability and functionality, incorporating hand of god steering, via the grey exhaust on the top of the engine area. Step 3: Developing Attachments Once the tractor was complete, we shifted our attention to designing the attachments. Each attachment required careful consideration of its purpose, size, and compatibility with the tractor. We experimented with different configurations and mechanisms to create functional implements that could be easily swapped and operated by the tractor. 1. Plough: The plough attachment was designed to efficiently till the soil for planting. 2. Slasher: For clearing overgrown vegetation, we created a slasher attachment. 3. Post Hole Drill: Lastly, we developed a post hole drill attachment for digging holes for fence posts or other structures. This attachment featured a rotating drill bit. Conclusion: Designing and building a custom LEGO Technic C model tractor with three attachments was a rewarding and enjoyable experience. From conceptualization to final assembly, each step of the process required creativity, problem-solving, and attention to detail. By combining the versatility of LEGO Technic components with innovative design techniques, we were able to create a functional and realistic agricultural vehicle capable of tackling various tasks with ease. Whether you're a LEGO enthusiast or an aspiring engineer, this project serves as a testament to the endless possibilities of LEGO Technic sets. https://paulbtechnic.blogspot.com/2024/04/moc-lego-technic-42164-c-model-tractor.html -
42176 Porsche GT4 e-Performance
Paul B Technic replied to Ngoc Nguyen's topic in LEGO Technic, Mindstorms, Model Team and Scale Modeling
This whole thing makes me really sad :( -
MOD - LEGO Technic 42178 - Slope Tractor C Model
Paul B Technic replied to Paul B Technic's topic in LEGO Technic, Mindstorms, Model Team and Scale Modeling
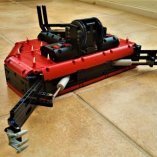
42178 - Slope Tractor Attachment - Trailer This trailer is an attachment for the C model of LEGO Technic set 42178. This is mounted to the rear of the tractor and can be raised and lowered via it's own hitch. -
MOD - LEGO Technic 42178 - Slope Tractor C Model
Paul B Technic replied to Paul B Technic's topic in LEGO Technic, Mindstorms, Model Team and Scale Modeling
42178 - Slope Tractor Attachment - Plough This plough is an attachment for the C model of LEGO Technic set 42178. This is mounted to the rear of the tractor and can be raised and lowered. Video -
42163 Wall-E - alternate build [free MOC]
Paul B Technic replied to Timorzelorzworz's topic in LEGO Technic, Mindstorms, Model Team and Scale Modeling
Amazing, very cute. -
MOD - LEGO Technic 42178 - Slope Tractor C Model
Paul B Technic replied to Paul B Technic's topic in LEGO Technic, Mindstorms, Model Team and Scale Modeling
42178 - Slope Tractor Attachment - Dozer Blade This dozer blade is an attachment for the C model of LEGO Technic set 42178. This is mounted to the front of the tractor and can be raised and lowered. -
MOD - LEGO Technic 42178 - Slope Tractor C Model
Paul B Technic posted a topic in LEGO Technic, Mindstorms, Model Team and Scale Modeling
Recently I built this C model of LEGO Technic set 42178, it was an enjoyable experience and I was very impressed with the end result, however I felt a few areas could be improved. New Front End: One thing I noticed was that the front end was very bare. I added some panels and beams plus some flexible tubing to create a more robust front end. Cabin Changes: The way the cabin was connect was a little weak in places, I added some extra beams and supports. I found a few parts which had colours that didn't really fit, this was due to it being a C model. As I was able to use a wider range of parts, I swapped over some parts to different colours in places. Rear Hitch: The rear hitch was quite basic and only allowed it to be locked in the raised position. I have removed this and replaced it with a hitch that uses a worm gear to allow this to be easily raised and lowered. https://paulbtechnic.blogspot.com/2024/04/mod-lego-technic-42178-slope-tractor.html -
[MOC] Chevrolet Corvette C8.R - B Model of 42156 Peugeot 9x8
Paul B Technic replied to davidragon's topic in LEGO Technic, Mindstorms, Model Team and Scale Modeling
Great work, I love the level of detail in this. -
Studless 8479 Barcode multi set
Paul B Technic replied to msk6003's topic in LEGO Technic, Mindstorms, Model Team and Scale Modeling
Thanks for sharing this, you have done an amazing job with this. -
42178 Surface Space Loader LT78
Paul B Technic replied to Ngoc Nguyen's topic in LEGO Technic, Mindstorms, Model Team and Scale Modeling
There is a very cool C model of this, I have written a short review of it: https://paulbtechnic.blogspot.com/2024/04/review-lego-technic-42178-c-model-slope.html -
MOC - LEGO Technic 42147 - Bush Plane C Model
Paul B Technic replied to Paul B Technic's topic in LEGO Technic, Mindstorms, Model Team and Scale Modeling
Thanks. The spare wheel is for if it gets damaged while landing on rough air strip's -
MOC - LEGO Technic 42147 - Bush Plane C Model
Paul B Technic posted a topic in LEGO Technic, Mindstorms, Model Team and Scale Modeling
I have recently spent some time designing and building my latest MOC, this is a bush plane, which is a C model of set 42147. I have seen some other planes built from this set but wanted to go for something that would be used in remote areas. One of the highlights of this model is its spinning propeller, which adds a dynamic element to the finished build. As you attach the propeller assembly and give it a spin, you can almost hear the roar of the engine and feel the rush of wind as the plane takes off into the wilderness. The inclusion of a spare wheel and jack adds an extra layer of realism, allowing you to imagine scenarios where the plane lands on dirt airstrips in remote locations, ready to tackle any terrain. This took me about 4 hours to design and build, given the limited part count, I am very happy with how it has turned out. https://paulbtechnic.blogspot.com/2024/04/moc-lego-technic-42147-bush-plane-c.html -
MOC - LEGO Technic Tracked Aerial Access Vehicle
Paul B Technic posted a topic in LEGO Technic, Mindstorms, Model Team and Scale Modeling
I have recently spent some time designing and building my latest MOC, this is a tracked aerial access vehicle. This is used on building sites to lift workers up to heights, to allow them to safely work above the ground. I spent some time researching these online and after trying a few builds, I am happy with the end result. It has three features: - Knob to turn the turntable. - Knob to raise and lower the bucket - An opening access panel, to allow the inner workings to be viewed. Overall I am happy with how it has turned out and how the features work, I am planning MK2 at the moment, which will have a higher lifting range. https://paulbtechnic.blogspot.com/2024/04/moc-lego-technic-tracked-aerial-access.html -
Aston Martin Valkyrie 42154 alternate build
Paul B Technic replied to Marvelous Bricks's topic in LEGO Technic, Mindstorms, Model Team and Scale Modeling
I love this, it has such a great level of detail.