

TechnicSummse
-
Content Count
249 -
Joined
-
Last visited
Everything posted by TechnicSummse
-
[WIP] 40+ km/h racer - need your help!
TechnicSummse replied to TechnicSummse's topic in LEGO Technic, Mindstorms, Model Team and Scale Modeling
i didnt know that Well... to my latest 8366... im pretty happy at the end. This is how it arrived...dirty and NOT working :( First i cleaned the RC-units battery-contacts, and tested it with a pair of pf leds. The steering seemed to work, but the 3rd power-step (full power) did not work... the leds were like: glowing a bit, brighter, dark... When testing them at the auxilary output, everything was fine. So i made the same test with my old remote... and HEY... everthing worked fine :) So i took a look into the remote... and i found a broken cable at the drive potentiometer. I soldered it and glued it to the circiut board. And... again... Yeah! ... it works. At the end i removed the leds... and tested it with the motors, you can see the result in the video below: So... 32€ and the last two days of free-time to work on it... and i am a happy guy Oh... is this still unmodifed lego now? :D To Topic: I was testing my suspended version 2 days ago at the evening... with the result of a big crash again (it was dark, and the street still wet... not a good combination) :( Steering was still sh**... so i started rebuilding again... but last 2 days went to the new 8366 repairing... Also the weather is so f***ing bad... its raining for about 1 week now... and it seems the weather will stay like that for the next few days :( -
[HELP] Serial Numbers on Buggy-Motors and RC-units
TechnicSummse replied to TechnicSummse's topic in LEGO Technic, Mindstorms, Model Team and Scale Modeling
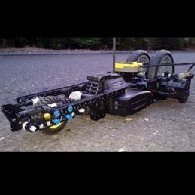
A "new" 8366 arrived -
[WIP] 40+ km/h racer - need your help!
TechnicSummse replied to TechnicSummse's topic in LEGO Technic, Mindstorms, Model Team and Scale Modeling
It was just announced as "lego rc car"... in the description he wrote, it's a toy from the late 80's or early 90's. Well... it has been sold as non working... but at the end...just one working motor would be worth the price... so i could not do anything wrong here i think :D Maybe i will get a gopro in the next month... i heared they have included gps in some versions... I will not enter TC12... i think i don't have the modeling skills for such things... i am more technically... looking for working solutions wich seem not possible to solve... I don't know how many versions i disassembled before they were tested, just because of the weather... I wish you good luck :) Any chance to see some of you progres in the last months? -
[WIP] 40+ km/h racer - need your help!
TechnicSummse replied to TechnicSummse's topic in LEGO Technic, Mindstorms, Model Team and Scale Modeling
Basicly its just building for fun, since i could not test anything in the last days. The point of having no dampers i have in mind, since i startet with lego again, but ... these builds are just to do something And i really hate it, to do nothing :( If everthing goes fine, my 3rd 8366 will arrive soon, then i will have 8 motors and 3 units... so i can build two 4-motor-cars at the same time, if the weather stays that bad. I know... one day i did not want to buy even a second one... but sorry... 30€ including shipping... i could not say no I had a 40+ run last week, but i was not 100% sure, if there maybe was some slipping at the rear wheel... that's also the reason, why i mounted the speedcomputer at the front wheel now... especially for you :D -
Race Buggy Radio Controller and Receiver Unit Problem
TechnicSummse replied to rm8's topic in LEGO Technic, Mindstorms, Model Team and Scale Modeling
You will find the working controller in those 6 sets: http://rebrickable.com/parts/5282/electric-rc-controller-rc-vehicles/0/ Why do you think so? Rebrickable says it's the same controller for all 6 sets... 5282 Edit: Sorry, i thaught you mean 8376... -> http://rebrickable.com/parts/2514c01/electric-rc-controller-complete-assembly/0/ Red Beast and Sunset Cruiser do have the right remote https://www.bricklink.com/v2/catalog/catalogitem.page?P=2514c01&name=Electric, RC Controller Complete Assembly&category=[Electric]#T=S&C=11&O={"color":11} -
[WIP] 40+ km/h racer - need your help!
TechnicSummse replied to TechnicSummse's topic in LEGO Technic, Mindstorms, Model Team and Scale Modeling
from 10 to 8 studs between the wheels... yes :( But 8 studs is what i had all the time before and worked well... -
[WIP] 40+ km/h racer - need your help!
TechnicSummse replied to TechnicSummse's topic in LEGO Technic, Mindstorms, Model Team and Scale Modeling
@Marxpek nice to see you again... no time right now... gonna write some more later... here the promised pictures: -
[WIP] 40+ km/h racer - need your help!
TechnicSummse replied to TechnicSummse's topic in LEGO Technic, Mindstorms, Model Team and Scale Modeling
I wanted to change the wheelbase.... but currently i decided to follow a new idea. The battery-box will be behind the rear-wheels i think, and like this i will have a 20:80 weight ratio i guess. Hope i can show you some pictures soon :) I never said its a 1:1 copy of the real life thing... but it's similar to it... but still the caster stays positive with fully compressed springs... so everything should be fine :) And at the end, this was just a protype to see what i maybe could use. The lego shocks do not allow to work like regular bike shock absorbers do. They only work at relativly small angles... if they are tilted to much... like they would be in a regular motorcycle fork... there will be to much friction, and they wont compress. -
[WIP] 40+ km/h racer - need your help!
TechnicSummse replied to TechnicSummse's topic in LEGO Technic, Mindstorms, Model Team and Scale Modeling
I know this one... it is really nice. But i dont see, why to suspend the front axle, if 80% of the weight rest on the rear wheel, wich is not suspended :D But i can not use such a long-travel suspension on my car... It is like you would compare a dragster (my car) vs a dune buggy (your suspension thaughts/ the cars in the videos). I like THIS suspension the most :D -
[WIP] 40+ km/h racer - need your help!
TechnicSummse replied to TechnicSummse's topic in LEGO Technic, Mindstorms, Model Team and Scale Modeling
Hmm where is the difference to "it has to be in the center of the wheel"? :D The center of the wheel basicly has nothing to do with the caster... it is sometimes on this line... but not allways...and does not have to be there...as you can see at the following pictures: Hmm... it seems i work in the wrong garage :D Never seen something like this? Yes... it seems this is my problem... that's why i made the rear-axle wider in the last step. But the way i made my gearing (36:16), i can not put the motors to the middle of the car. But i had an idea this morning... while using my smaller frontwheel it seemed to work without that much tilting. The biggest difference to the big frontwheel now is the wheelbase i guess. I think it's about 5-6 Studs bigger now. I think i will change this at first now. Hmm... i would need to change the steering-lever to 0,5 studs then :D The balance point now is right between the motors and the PF-battery-box, i am afraid, i will loose contact with the frontwheel, if i put the weight more at the rear. But i will also try this. Thank you for the suggestions so far... any other ideas? :D -
[MOC] Volvo excavator [video online]
TechnicSummse replied to steph77's topic in LEGO Technic, Mindstorms, Model Team and Scale Modeling
Really nice model, i like it :) How did you manage the tower rotating+ roation limiting? Did you use a servo for the rotation? Or a m-motor+clutchgear? -
[WIP] 40+ km/h racer - need your help!
TechnicSummse replied to TechnicSummse's topic in LEGO Technic, Mindstorms, Model Team and Scale Modeling
Well they are, since i want to go as fast as possible... you can see the difference of wheels supported at the outside and wheels not supportet, if you look at @mocbuild101's speed car, and compare it to my 2-motor-record-car. His car is lighter then mine, but still ~2kph slower, using the same gearing as i used. The difference is... he put the wheels at the end of the axles... i supported them at the outsides. I made tests with exact same setup... one time supportet at the outside, and the second time without support... the result was ~1,5 kph less. If you want to use double wishbone with the Lego-wheel-hubs it will be even worse... they will produce a horrible friction at higher speed. There is a big caster change... yes thats right... but even fully compressed, there is still a positive caster ;) I would do this, if i wanted to build a fast fun-car being able to run on rough terrain, like this one: But that's not what i am aiming for... Well again... i am not aiming for rough terrain... i am trying to reach highest possible speed on a as smoth as possible surface. The battery-pack have to be mounted (suspensiontravel+ groundclearance)= 7+2= 9 studs above the ground in the example. This is verry high, as you can see below... i need some ideas/help ___________________________________________________________________________________________________________________________________ Here i could need help: As i wrote last week, i had/have some steering problems: What i did...: - i removed the supporting wheels - i set center of gravity ~1 stud deeper again - i made the rear axle even wider as you can see in the following picture: But, as you can see in the picture above, my "motor-protection-beams" are damaged after the first testrun again. The follwing happens: I am driving ~30kph, and at some point i need to do small steering corrections. Up to this speed everything goes pretty ok... but at 30+kph i do just little corrections, and the car tilts to the opposite side ... ...once the car tilts, it hits the ground with the "motor-protection-beams" and the rear part lifts, looses traction and does a 180° turn... like you would use the handbrake in your car while driving a curve. Any idea what i could do? - Wider rear-axle does not work, because there is no differential, and it will bring problems to the steering. Also this would add air resistance, axle-bending and so on. - Shorten the wheelbase? Should result in less tilting, but a more instable car at all. Also this would require to move the battery-box at the end of the car, what will change the balance of the car... not sure if in a good way... - any other ideas? I am open to all, since i want to test this gearing at its full potential... i have allready the next idea, and want to build it... but at first i need to know what this one could do... so please help -
Redneck Muddin' Truck
TechnicSummse replied to nerdsforprez's topic in LEGO Technic, Mindstorms, Model Team and Scale Modeling
Well it's what we did in mud-races :D The idea is, that it more acts like a propeller, then a tire whithin the mud. Because you do not really hit the ground... you are more like swimming at some point. I'm not sure if it really helped... but we won a few races... and many (not all) also mounted the tractor-profile-tires inverted. But at the end... it felt good doing so :P -
[WIP] 40+ km/h racer - need your help!
TechnicSummse replied to TechnicSummse's topic in LEGO Technic, Mindstorms, Model Team and Scale Modeling
I was checking this again... basicly caster is the angle of the steering axle compared to the wheel-standing-point, and trail is the distance between those both points (axles hitting the ground). But here also the caster angle is just used to reach a trail, with the steering-point being behind the frontwheel. So again... i am at the point, that my front-setup is pretty ok. @nicjasno As @PorkyMonster said again... the steering-axle does not have to run trough the center of the wheel. Take a look at the following video, wich shows the "regular" bike-setup as unstable as mine while not in motion... you should also "shake" the trike in your video like you did it with my setup ;) But thank you for the ideas. There is another problem on those tests you build. The wheels need to be whithin a casing... they may not be at the end of the axle, because this produces axle-bending, and like this friction, wich reduces speed. So a front-setup with 2 wheels would only work, if you place them on one fixed axle, or if you house the wheels from both sides, but this again will need a really complicated construction and lead to 4 bearing points at the front. Look at the text above @nicjasno I was bored a bit, since i could not testdrive today (bad weather)... so i build just for you something like you was thinking about (i think) . Caster like in real bikes, huge suspension travel and so on... it looks nice... works ok... but results in a really high center of gravity. Everything would need to be a bit more reinforced here... especially the steering part, but it is just a prototype. This setup could be really nice for a offroad-trike-racer :D But it would need a wide and stable rear-axle. Maybe i will build somethin like this for fun in the future. Suspension travel: 10-3= 7 studs -
Question to LDD-builders
TechnicSummse posted a topic in Digital LEGO: Tools, Techniques, and Projects
I see many guys building theire models with LDD. I can understand if brick-builded things are made with LDD... ... but how can you make technic models without to big problems in LDD? I saw many models, including complicated geartrains made in LDD... how can you do such things? (I have even problems to fit 2 gears together in LDD) Is there any way, how you can test geartrains/racks/any motions or technic functions in LDD? How do you solve (in a usable way) the problem of finding the right pinhole, fitting bushes to the right position at an axle and so on... Do you just accept the ~10 times more time you need to build in LDD? Or are there any tricks, wich i just did not find yet? -
Question to LDD-builders
TechnicSummse replied to TechnicSummse's topic in Digital LEGO: Tools, Techniques, and Projects
but like this i unhide everthing... I would like to unhide just the last hided part for example, or unhide just one group. So lets say i am unhiding my model from outside and hiding 1 panel after another to see a special part of the frame for example... but if i accidently click a wrong part to hide... how do i undo just this last step, without the need to start hiding each part until this step again? -
Question to LDD-builders
TechnicSummse replied to TechnicSummse's topic in Digital LEGO: Tools, Techniques, and Projects
Well basicly nothing new to me... but this is just tons of work and time :( Do you just need to do it a few times and evrythig goes easy? :D Uhm... there is a much easier way for this: -> (Gear1 + Gear2) / 16 (8+8)/16=1 -> two 8 teeth gears will fit to the next pinhole (16+16)/16=2 -> two 16 teeth gears will fit 2 pinholes away from the first. (8+16)/2= 1,5 -> a 8 teeth gear and a 16 teeth gear will fit with 1,5 pinholes away from the first one and so on... its really simple :) _____________________________________________________________________________________ @agrof i did check your ldd file... but i did not find a group showing your geartrain. But i first time realised, you can create sub-groups. While looking through your model, i hided single groups, one after another... but i did not find a way to unhide single groups... ...can you only unhide all stuff together? Or is there any way to unhide just single groups or parts? -
Question to LDD-builders
TechnicSummse replied to TechnicSummse's topic in Digital LEGO: Tools, Techniques, and Projects
Well basicly i did this also... i think i need to learn more about the hiding-function, and especially the grouping. But when i start hiding stuff, and start grouping components... things getting confusing fast. But the way you describe your building... it sounds like you need to permanently zoom in and out, to c+p thing from the edges, and then place them correctly to the model. @agrof the picture looks insane... and horrible to build in LDD at the same time to me. So you just drop your gears on the digital table, bring them in position like you like it... and at the end, you start building a frame arround them? -
Question to LDD-builders
TechnicSummse replied to TechnicSummse's topic in Digital LEGO: Tools, Techniques, and Projects
Well theoretically this sounds easy... but at the end, this means, i have also to rotate all the stuff allready connectéd to this gear. And if you want to connect two parts, each with own geartrains... how do you do this? You cannot rotate simply the 2 gears wich should be connected to each other... you would need to rotate each single gear in this row... but this does not work, because it will be blocked by his follwed gear... My intention to build digitally was, to be able to use parts, wich i do not own yet... and still build what i want to. And at the end... just ordering the required parts when the model is finished. If i build physically, i need to order parts while the building progress... eating a lot of time until they arrive, and also like this i will buy a lot of stuff wich i do not need, because builds allways change until the construction is finished. -
[MOC] Ocean Racer
TechnicSummse replied to thekitchenscientist's topic in LEGO Technic, Mindstorms, Model Team and Scale Modeling
awesome -
General Part Discussion
TechnicSummse replied to Polo-Freak's topic in LEGO Technic, Mindstorms, Model Team and Scale Modeling
https://store.bricklink.com/1974&itemID=106900492#/shop?o={"q":"htf","showHomeItems":0} This one sells a lot of purple stuff, wich does not exist. He also sells a minifig-legs in trans-clear for 1000€ I still dont know how you can proof such stuff to be real lego... someone could have purchased an old molding form... and produce its own stuff like this. A really strange point on all this "not existing" stuff is, that all those shops seem to sell parts just in one special color... -
Lego Truck Trial Moscow Challenge 2017
TechnicSummse replied to zver's topic in LEGO Technic, Mindstorms, Model Team and Scale Modeling
nice :) Do you know anything about the rules? Modelsize, tires... -
[WIP] 40+ km/h racer - need your help!
TechnicSummse replied to TechnicSummse's topic in LEGO Technic, Mindstorms, Model Team and Scale Modeling
@PorkyMonster Hmm... i have to check something here again. In german there is just one word for caster and trail. The german translation for cater is: "Nachlauf" and to trail means "nachlaufen". So basicly the word to "trail" is the verb of the noun "caster" Well you are right... it depends on the direction of the force... as allways :D The bigger the caster is, the more stable the car/bike will be in driving direction. But at the same time... the bigger the caster is, the more unstable it will become vs side-forces. -
[WIP] 40+ km/h racer - need your help!
TechnicSummse replied to TechnicSummse's topic in LEGO Technic, Mindstorms, Model Team and Scale Modeling
I did not see your post earlier, thats why i did not answer to it. ... also i just found your video in your last post. Did you look at the right wheel in you video? It runs perfectly smooth ;) The left wheel is fluttering, because it does not really hit the ground. There are a few reasons why shopping carts start fluttering even if they have a positive caster. The wheels are pretty small, and also the positive caster is pretty small, it only helps to align the wheels in your whished direction. Another point is the 100% vertical turning axle, wich is right above the wheel... Imagine something like this: Do you think the wheel will flutter? The wheelfluttering is allways a question of the lever act. This counts for all points of the wheel-geometry including kingpin. In my image above the force to bring the wheel out of its current position must be huge, because there is a big lever pulling it in the front direction. -
[MOC] Mercedes Zetros 2733 - 6x6 - Full RC
TechnicSummse replied to jrx's topic in LEGO Technic, Mindstorms, Model Team and Scale Modeling
Ok... this looks more like it should look like with 4 buggy-motors :)