Search the Community
Showing results for tags 'vw'.
-
I have a friend from my job who drives a black VW Beetle and knows I build LEGO models. She asked if I could build a model of her car for her or her to own, and I said yes. I then took my digital Herbie model I recreated from a Rebrickable MOC's video instructions and recolored it into an almost entirely black scheme. You can see the original Rebrickable MOC that I modified here. The vehicle can seat 1 figure at the wheel. The rear of the car. Thoughts?
-
My second 7 stud wide build! This time i built an another compact hatchback, and now it's something from Germany! A Volkswagen Lupo! The model features functioning doors and hood, and has some engine details. Which makes it my most complex build so far. FEATURES 2 minifigures fit inside openable doors openable hood Video review:
-
Here's my MOC (rather old, actually) – VAG BUG (vw beetle buggy) Features & Functions: Opening doors (with locks), cabin interior with roll cage, v8 fake-engine (operates via M), very soft independent suspension. PF: 4L (single motor for each wheel), M, servo, 2x LiPo, 2 sbrick, 3x lights. Video: More images:
-
 MOC Volkswagen Golf GTI TCR in Lego Technic Dear friends of the LEGO Technic theme world, in this post I present you my latest MOC of the VW Golf GTI TCR. The model has an elaborate front axle for the front-wheel drive, a 4-speed DSG transmission, steering, brake and a pneumatic lifting system. I used two SBricks for control. My version is built with 3d printed wheels, but lego wheels fit, too. Drive: 2 XL motors Steering: 1 servo motor Gearbox: 2 servo motors Brake: 1 M motor Control: 2 SBricks Light: 3 pairs of LEDs First, I'll show you a picture and the YouTube Video In the following I would like to introduce you to the individual functions and the history of the project. Preparations: In 2017 I saw a photo of the prototype for the first time and as a VW fan I knew directly that this would be my next project. Because there were no blueprints from this vehicle, I took the blueprints of the basic model, VW Golf 7, and overlaid it with appropriate pictures of the vehicle. The scale was set with the choice of tires (Wheel 56mm D. x 34mm, Tire 68.8 x 36 ZR (15038 / 44771)), to 1: 9. After that I converted all dimensions into studs. Construction of the front axle: Now it was time to get the bricks out of the boxes. First, I built the front axle. The model has a front-wheel drive with Ackermann geometry, caster, stabilizer, suspension and brake. The drive axle for the fake engine runs in the lower part of the axle to couple directly to the XL motors in the back. Without consideration of the Ackermann geometry, I have created a YouTube video for the front axle. For the construction manual I am not sure if I should install the Ackermann geometry there. Some used parts are very rare and expensive. In the video you can also see how the brake works. By rotation, two rubber bricks are pressed against the differential. With the SBrick control, I have created a sequence that first lets the M motor press against the differential and releasing it again. Due to the scale a disc brake was not possible in the wheel. The suspension was massively strengthened in the course of the project, so that the vehicle weight is held up. Unfortunately, the stabilizer (red) has no longer a technical function. YouTube - Front axle Construction of the rear axle: For the rear axle, I initially had the idea that the wheels should have a slight camber. I have implemented this as followed. Maybe someone else can use this. However, this was implemented later due to the vehicle weight and the desire that a multi-link axle by VW is represented. Construction of the 4-speed DSG transmission: The construction of the transmission took the most time. I wanted a transmission that could be controlled blind with the smartphone. It should work reliable and without constant monitoring of the moving parts. In addition, it had to be so small that it fits "between" the front seats (The model has like the original only a driver's seat.) and under the seat, but in front of the drive module. Overall, it was very limited. Here is a photo of the final version, which is very trivial operated with two servos. One servo controls the 1st and 3rd gear, and the other servo controls the gears 2 and 4. This allows quick and smooth switching. An extra video is also available. YouTube - Gearbox Construction of the pneumatic lifting system: At that moment I was done with the chassis. However, the pneumatic lifting system fascinated me and in other MOCs something like that was already realized. Since there was still room for the necessary works, I developed and installed three modules with cylinders. Here's an example of how I built the front left cylinder. In general: I built and organized the entire model in modules. The chassis is subdivided into the following submodels: front axle, transmission module, drive module and rear axle. The rear lifting cylinder is integrated in the drive module. The front lift cylinders connect to the transmission module. Then all modules can be assembled to the entire chassis and fastened with a few connectors. Other modules are the fake engine and the dashboard with steering gear for the moving steering wheel. The conclusion has formed the body. Again, I worked with many submodels, so you could always work on small to medium sized submodels. This has especially facilitated my work in the Stud.io program. The entire model is already built in BrickLink’s Stud.io with all building steps. I am still considering whether I should offer the construction manual for sale or keeping it unique. Too many companies are copying MOCs and do not refer to the artists. You can find more pictures on BrickSafe or my Social Media channels on Facebook and Instagram. Give me a feedback and ask your questions here in the thread. I like to explain the things even further in detail. I love the render function in Stud.io :-)
 -
My attempt at making a minifig scaled Volkswagen Beetle, couldn't do it all in red like I Initially wanted, but I think this colour combo makes it looks sporty. One minifigure can be seated inside although I did not provide proof of that. Lego Volkswagen Beetle by legomanijak, on Flickr Lego Volkswagen Beetle by legomanijak, on Flickr Lego Volkswagen Beetle by legomanijak, on Flickr
-
 Hello, I am curious what will happen with the LEGO and VW partnership. What sets do they have left to make. They have already made a few VW Beetle sets and a VW bus. What more could they make? I don't think LEGO will want to give the partnership away (considering that they have had it since the 1950s). William
 -
The latest incarnation of my VW Beetle MOC, in minifigure scale. Incorporating new backend shaping to assist with the difficult matter of the curves. Enjoy
-
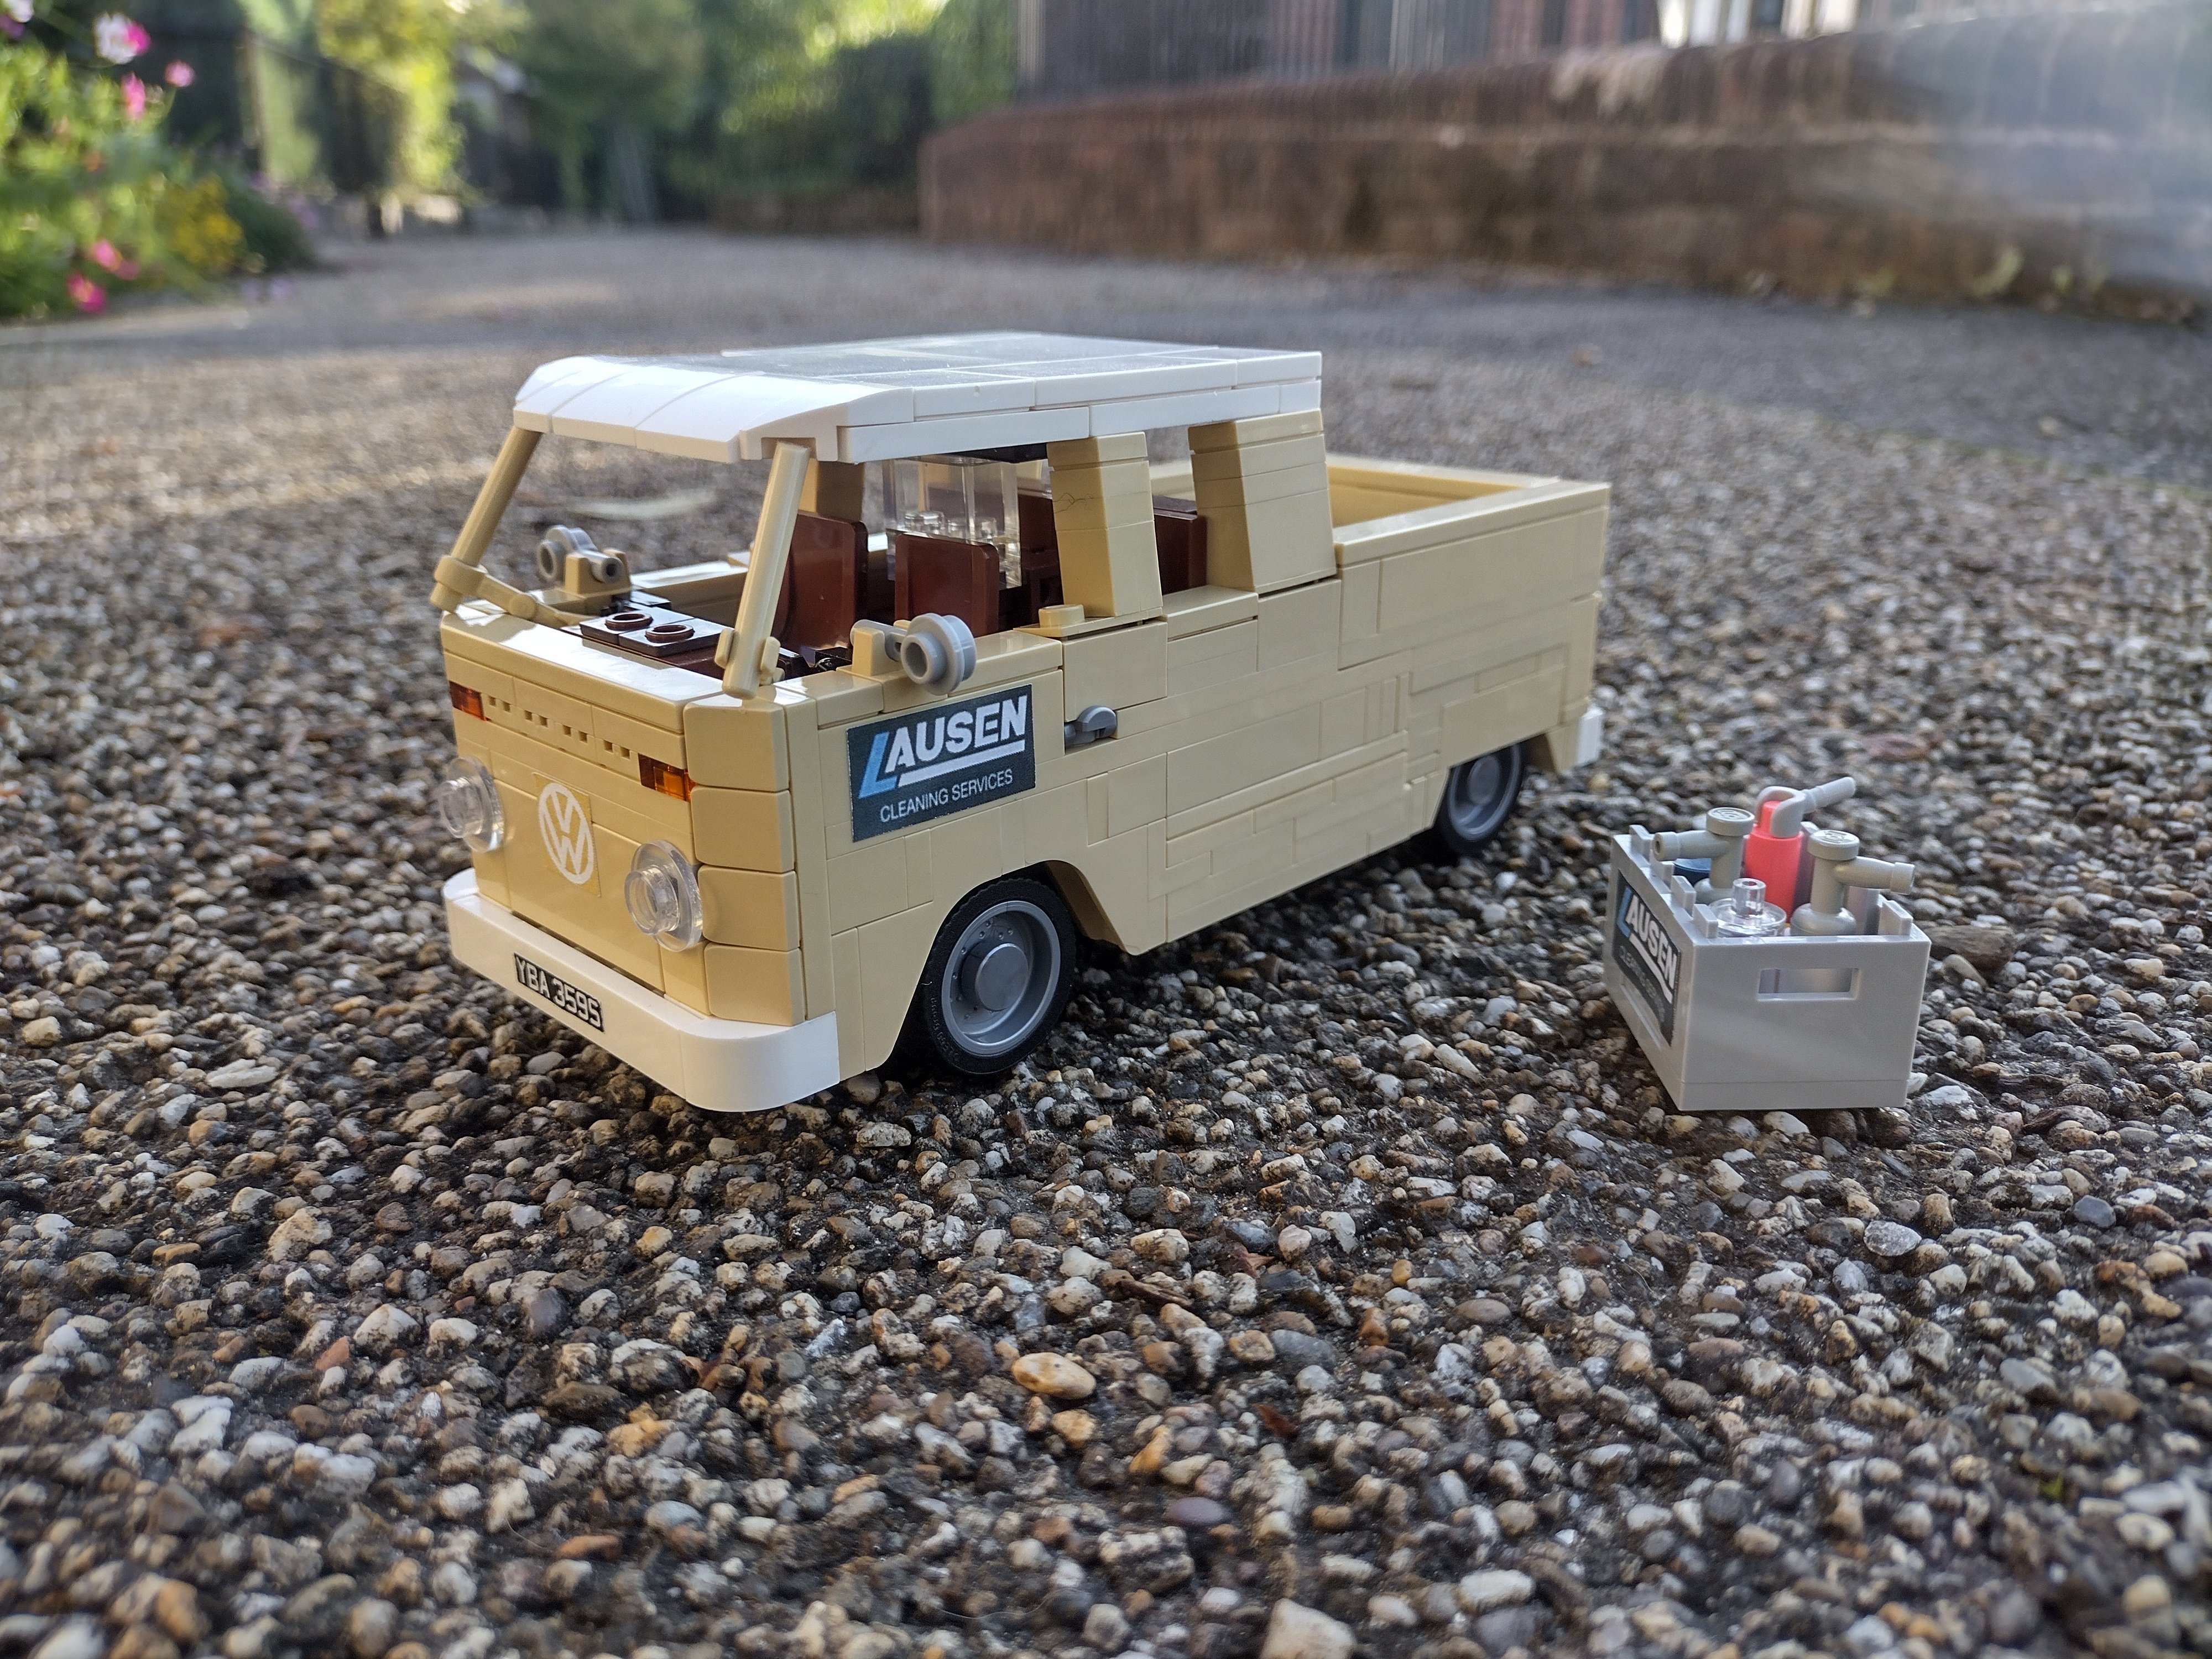
Back again with another 8 studder, this one being the VW bus featured in the BBC sitcom "The Cleaner", starring Greg Davies. Complete with crime scene clean up kit in the back, accurate decals, and a plethora of SNOT techniques, the free instructions can be downloaded on Rebrickable One of my personal gripes with other LEGO models I've seen with rear wheel spats or "fender skirts" for the americans, is that the rear wheels are recessed by a non insignificant amount compared to the front wheels. My primary aim was to ameliorate this by means of using the half-stud thick panel piece mounted upside-down. Thus, the front and rear wheels are collinear, without sitting too far into the arches. Full photoshoot on my Bricksafe

-
Hello, I would like to present to you my MOC of Santa's Sleigh. Initially it was supposed to by more typical endeavor but my local LUG (WAWLUG) held a small contest to build whatever using Stuntz motors. It only had to go half a meter, which gave birth to idea of a Diesel Sleigh :) The sleigh is pulled by three Stuntz motors and one regular and on very even surface can go up to about 1,5 meters. The biggest problem is the fact the sleigh have only one wheel that is used to "ring" two bells it has. Those will swing back and forth as the sleigh go. I hope you'll enjoy this little piece of X-mas, even though it is a bit late :)
-
After my rusty train, I was wondering if I can give the same treatment to a car. I wanted to build a beetle for so long, but I don't wanna copy other's work, and also wanted to make some weird stuff, it's a kinda trademark that I have :P After Several hours of designing, I came out with this Baja Rat Rod based on a Beetle The suspension and steering are fully articulated and posable, but they won't work as real suspension/steering, considered this more like an action figure that you can do some dynamic poses to take some cool photos. Even though most of the car is gone, I tried to keep the recognizable beetle profile.
-
 Lego released a new Creator veichle and as a tradition I have motorized it with remote control. A bit easier to hide all electric parts this time as the car is really big. But it is also heavy and slow with only one L motor for drive. There are some small changes to the interior, but all details are still there. I have created instructions to build it with Powered Up parts, but if there are any interest I might add instructions for other power systems later. Rebrickable Instructions Youtube Video
 -
 Enjoy, my scale reworkings all 6 wide
 -
A new home for my VW Collection, be it old or new or rodded, enjoy
-
i suprised myself with a new version, with opening bonnet (hood) and boot (trunk), and of course doors, as per prev models roof can be hard top or soft top and fits 2 mini fig in front and one in back, 2 at a push if roof is down, comments thoughts welcome, is a work in progress as would like to enhance the engine/roof etc etc
-
The future version of the vw beetle, "The Space Bug", travel for the future
-
My version of the famous bug, Wip, as never satisfied, so keep on updating This is based on my real build beetle moc, all comments welcome, old rear end. rally version (i believe this is Gulf oil racing colours) classic version
-
My MOC that was completed couple months ago, able to sit 3 minifigs in there :) Thanks for viewing ! Regards, KMP FB : www.facebook.com/kmpmocs Flickr : www.flickr.com/photos/149274215@N03/
-
Ive built a vw beetle minifig scale, just ordered all the parts so will post pics when i get to build it for real, but am having difficulty with joining the roof parts, the scale is great but am needing thin plates to join them, are there such pieces? images from bluerender can be found at this link https://rebrickable.com/mocs/MOC-13350/bamsham363/vw-beetle-revision/#comments its almost 100% complete however im about 1/2 a flat out on getting a minifig in with hair, bald hes fine, its now bugging me, as doesnt look so good if raised one thin higher...im sure ill get there but its at that stage where its bugging me, and wishing lego could invent a new piece, so all help comments would be appreciated.
-
 New LEGO/ Lego MOC, VW T1 BUS (VW Camper Van) Is still 10 grain width, the new version is not based on the past version of the upgrade, I refer to a large number of original drawings and objects, re design details, body length, internal structure, and customized manual spraying (silver effect) parts. The new version of the T1 will be a series of my design, I will be based on this chassis for a variety of T1 modified car design (such as: pickups, SUVs, racing cars, trailers and so on, of course, will also consider the static model). T1 is a classic, multi-purpose models, it is worth pondering, I hope there will be more based on the design of the personal style of the modified car appears, I will always maintain this series of drawings sharing. The current version is 1.1, the design will be updated at any time, with the design of the trailer will be released, welcome to communicate with me through MocPages, Sina (Weibo) and other social platforms. http://weibo.com/moonein http://www.moc-pages.com/moc.php/438905 https://rebrickable.com/mocs/MOC-8059/moonein/rcpf-vw-t1-camper-vanvw-t1-bus-10-wide/
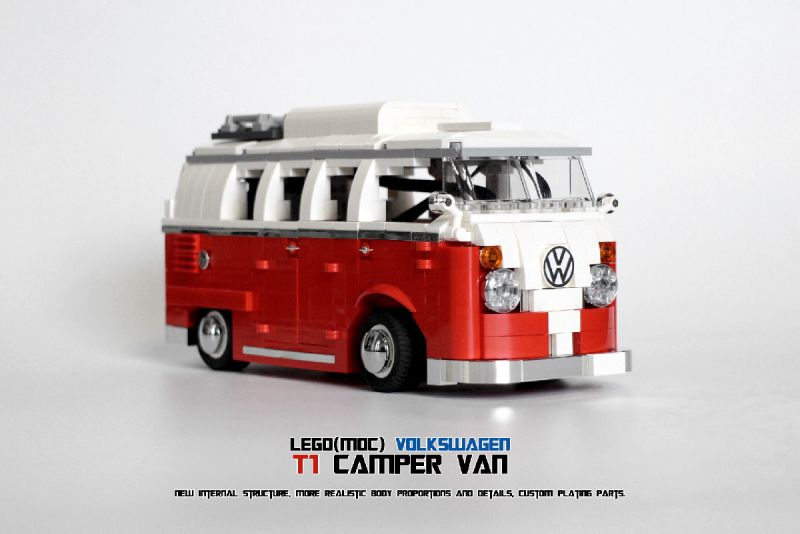
-
A couple of weeks ago, I finished my long planned VW T1 Microbus. Working steering, openable backdoors and a full interior in a 6-wide body. by OutBricks by OutBricks by OutBricks The instructionvideo: And a speedbuild:
-
 This is a redesigned, custom version of Creator Beetle (10252), which I've wanted to do since it came out. A lot of people complained, saying the Lego model looked more like a Citroen 2CV. I personally think it's a great model, with all its details. I have nothing against it. That said, I do think the shaping could look more a little more like the real thing and I wanted to give it a shot. It's quite the challenge, with all its curves. There are only so many dark azure pieces to work with. I figured lowering it as much as possible would also add to that difficulty (not to mention it's hilarious). It took a lot of time and figuring out, but this is the result, which I'm mostly happy with, considering what I had to work with, the goal, and the comically large new fender pieces. All chrome is original Lego, except the wheels. They're real Lego wheels, chromed by another company (randomly found browsing Bricklink one day). The 8-ball shifter knob is from Killer Croc Tail-Gator (70907), the shifter stick from Frightening Knight (CMF s15), the tinted windshielf from Mini Cooper (10242), and the "love" tile on the dash is from the Yellow Submarine (21306). These pieces are unique to those sets and relatively recently produced for the first time, along with many of the Beetle's dark azure parts. Meaning this car couldn't have been built at all a couple years ago.
 -
It's Christmas time... What if Santa couldn't find his sleigh? I'm sure he'd drive a Vee Dub T2 full of gifts... Merry Christmas to all of you! Andrea Lattanzio | Norton74
-
 Hello mates, today I show you probably the last VW transporter of my series, at least for a while... It's a sandblasted T2 bodywork ready to be painted. Below, the bodywork in the workshop... Side by side with my VW T2 pick-up The back... ItLUG (Italian LEGO Users Group) has recently published the complete story of my VWs and of my VW garage. Here you can read the complete story: Volks…heaven: tutti i Bulli di Norton74 Complete gallery: Norton @ flickr All the best!
 -
 So my friend Eric built a 24 Hours of LeMons race van from a 91 VW Vanagon and a 2.5 subaru legacy motor. I helped out with making the Polizei decals but overall it was a sweet deal for me because all I really had to do was show up and drive. It was my first LeMons race and my first time on a track in an actual road race, and it was FUN. If you haven't heard of the series, check it out here... http://www.24hoursoflemons.com/ Our van even got some great press on roadkill.com... http://www.roadkill.com/lemons-sears-pointless-vans/ http://www.roadkill.com/sears-point-lemons-winners/ Anyway, my friend spent a lot of money and hours building this awesome van so I wanted to do something nice to thank him for his hard work so I made him a LEGO version of our van to say thanks. Obviously this box is just a mock up, but I did make these designs into an actual box using a LEGO box I turned inside out and covered with some large photo prints from my 13x19 printer...I just forgot to take a picture of it before giving it to him. Since I knew he'd appreciate building it, I made the van into a kit with instructions made from photos since making actual quality instructions is a huge pain in the megablocks... http://odometer.org/polizei/ I really like the minifig fez as an aircleaner... Overall I'm super happy with how it came out, it was my first attempt at a larger vehicle and I think it worked out well. I did cheat a bit with the black decals to make a wider grill, but I figured if TLG can use a sticker for the middle divider on the split window of their VW bus, then I can get away with that. Here's some pics of the real van in action...
 -
A revamped version with new elements from the latest LDD parts update! I especially like the SNOT portion of the roof's front section and the improved tail lights!