
D3K
-
Posts
1,317 -
Joined
-
Last visited
Content Type
Profiles
Forums
Gallery
Everything posted by D3K
-
 Do you want an even more compact design that does the same thing? What are you going to use it for?
 -
My favourite set from my childhood! Taught me the principles of reversing with a trailer! Also, great video as always!
-
Indeed, and the "list" is the only thing I miss too! Especially when it comes to stepping a build. As far as I have seen at least, LDcad doesn't let you have an overview in the same way. But having used it for less than a week now, I can really see the potential in it! :thumbup: As for the time to make it all, I really don't know, but I feel it was pretty quick! The ability to drag and place "waypoints" in three dimensions in real time, and instantly see the route of the tube, is a major time saver!
-
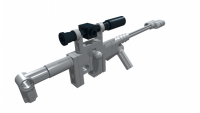
Not a bad idea that, will definitely give it a try! In the mean time, I have been busy with MLcad and LDcad, and have now made a stepped LDraw file for the entire superstructure with arm, including the pneumatics! Once I've made the undercarriage/chassis, I will make it available for anyone to do with as they please. I will not make .pdf instructions due to the time involved, but anyone wanting to build it should be able to do so quite easily (for example going through it step by step in LDcad). I really like LDcad more and more, it has some pretty genious functions! Just one thing I noticed: When you make the pneumatic hoses, you start with a short length, and then manipulate it into the shape/length you want. With the "snap to parts" function on, the ends easily snap onto outlets/inlets of solid pneumatic parts. But the true genious is this: When you select a completed pneumatic hose, it gives you the exact length of it in millimetres! Simply brilliant! Anyway, here are a couple more renders of the completed assembly, as well as a colour coded pneumatic chart (again clickable for higher resolution): EDIT: Cabin lift Bucket Dipper Auxilliary Boom lift Pump->valves
-
Thanks for the help! Yes, I did try to read up a bit, and saw some of Roland's videos on youtube, and off I went! Found the topic you referred to as well, and it was quite helpful. Regarding the cylinder length; YESS!! That is awesome news, can't understand why they are not modelled as two parts for MLcad (like the LAs are). This will be really helpful indeed, especially for models where the cylinders physically can't retract or extend 100% (like the dipper cylinder in this model, it is only able to retract perhaps 97%). Again, thanks a lot! Now to try to make sense of the hoses havoc inside of the model! EDIT: yay!
-
Generic Contest Discussion
D3K replied to Jim's topic in LEGO Technic, Mindstorms, Model Team and Scale Modeling
You said so almost two months ago Anyway, looking forward to new contest, been a while since the last one now! -
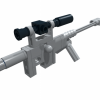
Yes, I suppose one could add another valve, to cut the old cylinders off from the rest of the system when they are to be lowered.. But I think I'll just wait for the new long cylinders to come along Yeah, it's brilliant! I've only used it to make the hoses yet though, the UI is kinda messy and has some annoying issues, but that's probably because I haven't used it before Much of it can probably be fixed in the settings, but so far so good.. I use LDcad to make the hoses, and then MLcad to fix everything else. From what I can see, it seems like the hoses and other flexible parts show up in MLcad as parts, so thay can be moved around order wise, for when one makes instructions? Anyway, got the arm all hosed up: Pictures clickable for higher resolution
-
@legolijntje I have made an .mpd of the arm assembly that you can have a go at. It has six pneumatic tubes and two rigid hoses. You (and anyone else) can download the file here. EDIT: Decided to give it a go, and it seems like a really neat tool! The hoses show up in both LDview and LPub, so maybe I can actually do it myself!
-
Thanks, glad you like it! To get the retracting effect I would then need to have a separate circuit incorporating the old style pump as well, as the new and old types of pump work in different manners. The old one is in effect similar to the old cylinders, except it has a spring. So it is closed off. The new one lets air into the compression chamber (correct terminology?) when it moves up, which is then pumped into the system when it is pressed down again. The old system actually really sucks in the whole retracting action, as it is dependent on the negative pressure created from the spring in the pump as it moves up. Don't know how much sense this made, but I think Blakbird has a probably better explanation on his Technicopedia page concerning the updated pneumatics in 1989.
-
Thanks! And no, I hadn't concidered that, but I do now However, the exhausts are actually pneumatic switches, so I'd have to use axle connectors instead.. I'll give it a try! There is indeed tubing criss-crossing and going all over the place on the inside. The boom assembly is designed to be easily disconnected from the superstructure, so that tidies things up a bit, but like I mentioned, there isn't a lot of system to where the cables are routed inside the superstructure, right now they are just connected to the right places Thanks! And yes, I am planning to make an LDraw model of it, not sure if I'll take the time to step it and create sub assemblies though... If you would make the tubes for an otherwise finished model, that would be awesome! I haven't used LDcad, and LSynth hasn't worked properly on my computer, so I wouldn't be able to myself I'll give you notification when the LDR is completed! Thanks! Yes, there definitely is.. somewhere.. with some minor repositioning of one of the valves The reason I don't have one, is because of the old cylinders. Whenever you want to lower the boom, since the number two port on the boom lift valve isn't connected to anything, all the air in the system is vented, effectively making an air tankt pretty unnecessary However, I plan to implement the new pneumatics being released later this year, and then I will definitely fit an air tank!
-
6x6 Offroad Truck "Modular"
D3K replied to D3K's topic in LEGO Technic, Mindstorms, Model Team and Scale Modeling
WOw, those lights look amazing! Great video (except maybe a little dark ). Could you give some more details about the modifications you made? My thoughts exactly! Not to mention all the contents of the bucket being flung all over the place! I can't understand how some people think this is a better setup than one made with small LAs -
[WIP] 1:50 NASA Crawler Transporter
D3K replied to OzShan's topic in LEGO Technic, Mindstorms, Model Team and Scale Modeling
Wow, didn't realize how huge this was gonna be until I saw the pics in post #29! Truly epic build, can't wait to see it finished! -
Thanks, glad you like it! :classic: I have five of these old cylinders, and they all act kind of differently Some have a lot of friction, and some have little. One of them leaks a little, and one is broken. For this I chose the two with the least friction, so when I flip the valve, the boom freefalls as the air is released from the cylinders. In this setup, it can't be forced down, but I imagine the weight of the boom is enough to drive the bucket into most stuff people would dig with a Lego excavator. I will make a video, and hopefully I'll get some digging action going as well. The truck will be presented in due time, but several critical parts are currently tied up in yet another build I've been working on (have a lot of free time as of lately). The model has a couple of features that are not immediately apparent from these pictures
-
I've been playing around a lot with pneumatics lately, and want to show you one of my recent MOCs. This one has been made over the last week, from a smaller, more yellow prototype. It is fairly small (scaled to the tracks, as they are the size they are), and the width of the body is 15 studs, compared to 8043's 19. Also, it's manual. No compressor or anything. I'll go ahead and show it off in "Excavator mode" first As you can see, the range of movement is quite decent, and it folds up pretty nicely for a transport configuration. The boom is lifted by two of the old style long pneumatic cylinders, and the dipper and bucket are each controlled with one normal cylinder. There is a third pneumatic circuit going to the end of the boom, but it's not in use when it only has a normal excavator bucket mounted. There is also a dozer blade on the chassis, operated by two small pneumatic cylinders. Next I have fitted the material handling claw, and as you can see this is where the extra pneumatic circuit comes in to play. The claw is operated with two small pneumatic cylinders. An added feature present is many material handlers is a lifting operator's cab. This has been implemented with a normal pneumatic cylinder. Next up is a picture of the top of the superstructure, with the pneumatic lines and some detail of the cab lifting function Now, if you've made it this far. you might wonder where the pneumatic pump is ? As I said, the model is afterall manual Well, it is actually mounted horizontally inside the superstructure. The 2L black pin connector (on the right hand side of the grey "air filter") in the above picture is connected to it, and by pushing it forward, you pump air into the system. Here is a picture from an early stage in the build that shows the principle: Also the valves are hidden on various places inside the superstructure. Well, that's it more or less, hope you guys like it. Like I said, this was put together fairly quickly, so there is definitely room for improvement both aestethically and build-wise (the inside is per now a mess of reinforcing and pneumatic tubing with not much system to it Lastly, another picture with one of my other recent pneumatic MOCs (still a WIP): EDIT: All pictures, as well as some others, can be found in a lot higher resolution in this Bricksafe folder I have recently started using my aging DSLR again, so it might be worth a look if you want to see more details
-
Kaneda's Bike from AKIRA, RC version
D3K replied to Sariel's topic in LEGO Technic, Mindstorms, Model Team and Scale Modeling
Looks very smooth! As always! -
Wtf? I wouldn't worry to much about them making a profit off of this
-
[MOC] X-wing
D3K replied to Jeroen Ottens's topic in LEGO Technic, Mindstorms, Model Team and Scale Modeling
You better be sorry! Here you say it's time to stop, and then you tease us some more! Can't wait to see a video of this, as well as more detailed pictures! Fantastic looking MOC, love the seriously TECHNIC approach to all the styling and details! Regarding the pneumatic problems; I agree with Blakbird; the problem could very well be the cylinders. Lately I have been building a lot of different pneumatic MOCs, and I too have a lot of pneumatic stuff from back in the day (from 8868 and earlier). The hoses are actually what works best! But I've had to discard several of the cylinders as well as two pumps, as they either leak, or hangs due to friction (pumps). Luckily I have a parted out 8455, so I'm mostly good, but there are some things that work better with the studded cylinders! Well, again; great looking MOC! You truly are a master builder! Now show us some more pictures!!! -
I think the main reason for TLG using rack+pinion without advanced geometry in most models is its simplicity compared to other systems. That being said, doesn't the 2H2015 Arocs feature a different system? I recently made a MOC (midscale 4 axle truck) with multilink steering, and although it does have some advantages (mainly ackerman and the pivot inside the wheel), it is set back by slack and a semi small large steering radius.
-
Wow, this is surely looking like it's going to be pretty awesome when it's done! Love the grille and the way you made the curved side of the "bonnet" above the wheels!
-
[NMOC] Pagani Huayra
D3K replied to darksheep's topic in LEGO Technic, Mindstorms, Model Team and Scale Modeling
Really great looking car! Also the Aventador looks fantastic! I really appreciate the minimalistic approach to styling, when the result is this good! Just look at the roof of both cars, maybe especially the Aventador! -
Not the police.. I guess I am more of a vigilante Like Batman of duplicate threads!
-
What amazes me is how useful I find many of the new parts when they are released! Some of them I can't imagine how I ever managed to live without I have several of both, but I almost exclusively use #2, as it feels like it's more secure, and also allows 20 tooth bevel gears to be used. In some cases, when space is limited, #1 might be the only option. Also, didn't you create a topic much like this half a year ago? EDIT: http://www.eurobricks.com/forum/index.php?showtopic=102595
-
Chassis
D3K replied to jorgeopesi's topic in LEGO Technic, Mindstorms, Model Team and Scale Modeling
Looking good! I say go for a GT-R -
Hadn't seen this model before, it is absolutely beautiful!
-
(MOC) Damen ASD 2009 TUG
D3K replied to Konajra's topic in LEGO Technic, Mindstorms, Model Team and Scale Modeling
Your previous ships are the stuff of legends, they look so incredibly impressive! And this smaller model is no exception! Would love to see your models in person!