
D3K
-
Posts
1,317 -
Joined
-
Last visited
Content Type
Profiles
Forums
Gallery
Everything posted by D3K
-
Technic General Discussion
D3K replied to Jim's topic in LEGO Technic, Mindstorms, Model Team and Scale Modeling
Haha, yeah there should be a big, red lever on the right hand side of the superstructure of that Liebherr as well! -
42043 Mercedes-Benz Arocs 3245
D3K replied to AndroTech's topic in LEGO Technic, Mindstorms, Model Team and Scale Modeling
I was told the same thing a couple of months ago. Couldn't understand why the hoses were so damn expensive when looking through the inventory of 42008, so when I saw some fairly long tubes listed at 0.30 NOK (UK£ = 0.03 roughly) I ordered 50 of them together with other parts from Bricks&Pieces. Everything went OK, until I got a secong confirmation e-mail, showing a total price of more than 7000 NOK. Called customer service, and they told me they'd made a mistake in the price listing, and also that the pneumatic parts from the set was sold together as one item. However, I have previously on more than one occasion bought small cylinders there successfully, as they are (brand new) half the price they are on Bricklink -
Hi, and thanks for taking an interest in this MOC The reason I put in this annotation, is simply becauseit is, in fact, not needed, and takes up space in the rear that was later needed for the dump bed mechanism. The fact it shows in later steps shauld just be ignored. I don't know if you're familiar with the process of making instructions using LDraw/lpub, but the way I (used to) do it, is I make the stepped model in MLcad, and then the instruction steps are fine tuned in LPub. I then export every step as a -png picture, and use PowerPoint to make a slide show where I add the necessary arrows and annotations, and then export that whole slideshow as a .pdf file. Seeing as replacing every picture in the powerpoint file is a fairly time consuming task, it's a lot quicker to just write a note on the steps that are changed or altered in the original instructions, as opposed to re-exporting the .pngs and re-making the better half of the powerpoint document. If that makes sense. Bottom line is; making instructions like these are quite time consuming, so when I notice something is off after making the initial instructions, I tend to take the easisiest way to fix the problem, as I am at that point pretty fed up with the whole project . This is also one of the reasons I don't charge any money for my instructions, because I know they're not perfect . Hope that answers your question (the axle is not needed, and can be difficult to remove later without major disassembly, if I remember correctly), and I hope you enjoy the model! Unfortunately I won't be making any more of the previously promised attachments to this so-called "modeular" design any time soon, but both the side tipping bed and the logging crane shown in various pictures should be pretty easy to replicate
-
42043 Mercedes-Benz Arocs 3245
D3K replied to AndroTech's topic in LEGO Technic, Mindstorms, Model Team and Scale Modeling
Synchronized outriggers for a crane truck like this (or pretty much any crane truck I know of, at least) is not realistic at all.. Ideally one would have individual controls for each side, both for extending/retracting, as well as deploying of the outrigger pads. Often you see these kind of trucks working on one side only,so it only needs to fully extend its outriggers on that side. Typically when working on the side of a road etc.. -
42043 Mercedes-Benz Arocs 3245
D3K replied to AndroTech's topic in LEGO Technic, Mindstorms, Model Team and Scale Modeling
Good to see the set is showing up and people starting to buy it! Anyone bought more than one yet? Looking forward to seeing the new parts used in MOCs, shouldn't be too long now! I still have to accumulate some more money before buying one -
Hull is probably as good as any other hull, your problem is the centre of gravity compared to the centre of buoyancy. Also, the propeller is massively oversized. Adding a second hull as you suggest will definitely make things a lot easier for a Lego ship of this type! That being said, I am impressed at the effectiveness of your propeller! Great vid! Made me smile! Looking forward to seeing how you progress on this project!
-
MOC methodology
D3K replied to niknarjc's topic in LEGO Technic, Mindstorms, Model Team and Scale Modeling
For models where I know there is going to be a lot of gears criss-crossing and working multiple functions, I find Lego CAD software to be pretty invaluable. Using different colours to keep track of where the different motions go when designing complex gearboxes etc is really a very helpful tool. Also, to keep things "in line", especially when thinking of the spacing between axles that need to be connected with gears and so on and so forth. That being said, I usually find that there is some mistakes, some things that aren't properly braced, or some things that interfere with gears etc when I come to building things in physical bricks. Most of the Technic functions are inside the models, and I find it easier to build a second model, implementing changes that are needed while at the same time trying to keep the initial ideas intact. All the while using digital tools (LDcad mostly these days) to work out how to fix the problems and find doable solutions. All things concidered, a MOC is rarely perfect in its first iteration -
[MOC] Midi-scale Pneumatic Crane Truck
D3K replied to D3K's topic in LEGO Technic, Mindstorms, Model Team and Scale Modeling
I have finished an LDraw model of this truck, that can be downloaded here for anyone interested. And some quick (LDcad) renders of the internals: Higher resolution renders can be found in the appropriate Bricksafe folder -
8043 - The Bucket that Never Was
D3K replied to LennyRhys's topic in LEGO Technic, Mindstorms, Model Team and Scale Modeling
Thanks, and yeah.. not so much from this angle: -
8043 - The Bucket that Never Was
D3K replied to LennyRhys's topic in LEGO Technic, Mindstorms, Model Team and Scale Modeling
Looks great! Wouldn't mind having one or two of those myself! This topic inspired me to pull out the ol' hacksaw and a tube of superglue, and I just made this: Absolutely no precision work here, done in less than ten minutes, but it might look better than the original bucket on the 8043? I don't know, thought I'd just show it off. Given some more time and precision, it could prove a viable option for those willing to sacrifice a 10x18 bucket -
Face it; mine is better Check it
-
On a positive note, I have through this website found a (the first?) video of my Swingloader Mk II. Pretty bad though, not much juice in those batteries! It's on a chinese video site, and even that seems to be a rip off off YouTube (it's called YouKu.com) On topic: I frankly don't get too worked up over this kind of stuff, as I am aware there is absolutely nothing me nor anyone else can do to prevent it from happening. Feel bad for those poor souls being conned into paying for instructions that they can get for free legitimately elsewhere though, and of course I can see it as being a bit worse for those of you who charge people for your instructions.. Hopefully, making people aware of this issue (by making topics like this), will not make future potential instruction buyers take the cheaper, chinesier route to obtain them.
-
Jesus christ, how can you see that as an attack on your person?? All the replies in this topic have been meant as help or advise to you, so you don't need to spend too much $ on parts you can get cheaper elsewhere. Remember; you're the one who started this topic! Get your act together! If this is such a big problem to you, then take it elsewhere, as the solution is dead simple: use Bricklink!
-
That would indeed be awesome, and with the release of the "V2" pneumatics, I think if we're ever going to see RC pneumatic valves, now will be the time. Unfortunately, I highly doubt we'll ever see such parts from TLG.. but here's to hoping! That has been one of my biggest issues with LDD since I started using it quite a long time ago! However, having used LDcad a lot lately, I don't think I'll ever go back to LDD! LDcad does all the things I wished that LDD would do, and it has the complete LDraw library of parts, including unofficial ones
-
Ideas for MOCs
D3K replied to efferman's topic in LEGO Technic, Mindstorms, Model Team and Scale Modeling
Do it! I am wanting to build one of the rather unusual Mecalac wheeled, articulated excavators, but I need to "finish up" with all my existing MOCs (video, LDraw etc) before parting them out for new projects -
I like the model, but unfortunately I can't view all the pics nor the video as I am (as you stated in in the uppermost topic on your blog) automatically redirected to your radio site, which I frankly don't care about. Sad to see you go (again), but I think we all know by now that you'll be back Hope things work out for you, and I can only echo the other guys' suggestions regarding YouTube, Bricksafe, etc See you around!
-
Technicopedia
D3K replied to Blakbird's topic in LEGO Technic, Mindstorms, Model Team and Scale Modeling
Awesome! Love the frequency of updates as of lately! -
[MOC] Hummer H2
D3K replied to Fanylover's topic in LEGO Technic, Mindstorms, Model Team and Scale Modeling
That looks fantastic for the scale, immediately recognizable as an H2! Very good work! -
With the obvious investment that went into the new pneumatic system, I am absolutely sure we'll see more pneumatic models in the coming years. An advanced grader with lots of pneumatic functions would be pretty awesome, but I don't really see TLG going "all in" and releasing a set with 10+ cylinders. I think 8455 was a one off, unique model in that regard. That being said, I hope I am wrong, and they do do it! However, I think it is far more likely we'll see a good pneumatic excavator, maybe even wheeled, as that haven't been done in a very long time! Orange?
-
[MOC] Swingloader Mk IV
D3K replied to D3K's topic in LEGO Technic, Mindstorms, Model Team and Scale Modeling
Thanks guys, glad you seem to like it! Personally I am very satisfied with this model, perhaps more so than the truck (but that seems to be just me ) Thanks, I posted the truck more or less the same time as this, if you haven't already, you can have a closer looks at it here Thanks! That is very true, but pretty unavoidable. I decided the wheels first, and scaled everything accordingly (more or less). The loader assembly really is as small as I managed to make it, I had to use thin liftarms exclusively to not make it too wide, and due to the geometry and size of the cylinders the height had to be what it is. I concidered using small cylinders, but they were too small and weak, and would have reduced play value -
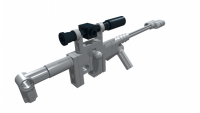
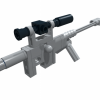
[MOC] Midi-scale Pneumatic Crane Truck
D3K replied to D3K's topic in LEGO Technic, Mindstorms, Model Team and Scale Modeling
Thank you all, I am really glad you like it! I am quite overwhelmed with all the positive comments, wasn't really expecting that! It's one sliding switch. I am quite happy with how the equipment tower turned out, sorry there isn't a better picture of it Thanks! I'll make a 3D model of the mechanism to give a better understanding.. it really is a very simple design. The other key factor is how the cylinder is attached, to allow it to move the bed in both directions. Thanks a lot! And of course I wouldn't mind, go right ahead. But like I said, it's not very rigid, and provides somewhat more "sag" in the model than a more solid solution -
As promised in the white excavator topic last month, here is a closer look at the red four axle truck from that topic. The trailer is nothing special, just thrown together for the fun of it. Now let's unload that loader and have a closer look at the truck! Key features: -Pneumatic crane boom raising -Pneumatic crane jib lifting -Manual crane jib extending -Manual crane winch -Mechanical crane rotation -Pneumatic dumping of bed -Tilting cabin -Proportional steering with Ackerman geometry and good pivot point (more details later) -Manual outriggers -Bed walls can be lowered As you can see, the outriggers are of an extremely simple design. Their geometry and the way they are stored is pretty accurate to real life, but they are entirely manual, not very strong, and there mostly for looks rather than function. At this scale, to make something mechanical or pneumatic that actually works, would have taken way too much space. I tried to make a detailed equipment tower, with an ACU, some tools and some storage compartments etc. The bed is dumped with a normal pneumatic cylinder. It also has the ability to dump sideways, by sliding a mechanical switch that frees the bed on the rear right hand side, while at the same time locks it for rotation around a point on the front left-hand side: The red parts in the above picture are part of the switching mechanism to from rear tipping to side tipping. The cabin tilts to reveal, well, not very much really. Due to the steering setup, I had to ditch the fake engine I originally had mounted. As you might spot, I had to use the old stye 14 tooth bevel gears for the steering. This because I used the older style 8L gear racks, and for the gears to mesh properly, this was the best solution. Last picture show the steering setup. While it provides a very good pivot point and fairly good Ackerman geometry, it is not as rigid as a more standardized solution. But I prioritized a good pivot point to keep the aesthetics of the wheel arches as nice as possible. Again, I reccomend taking a look in the appropriate Bricksafe folder for higher resoution more detailed images. Hope you like it!
-
Yes, it's that time again - time for a new Swingoader I took a wholly different approach this time around.. Like I have mentioned in certain other topics, I've enjoyed playing around with pneumatics lately, and my latest Swingloader is no exception: All pictures are available in much higher resolution in this Bricksafe folder Firstly, as you can see, it is a lot smaller than the PF versions (Mks I, II and III) I made previously. The main problem with this was finding a decent placement for the pump, believe it or not! But once that was sorted, I had a pretty clear idea on how to build the rest of the MOC. Features are as follows: -Pneumatic lifting of loader arm -Pneumatic dumping of bucket -Pendular rear suspension -Steering on both axles (loader is non-articulated) via HOG on the back -Turning/swinging of the loader assy via HOG on top of the cabin -Openable doors The entire loader assy is mounted on a small turntable, which has just enough space to fit four pneumatic through it. As you can see from the two previous pictures, the bucket achieves both a nice "scraping angle" as well as a decent "transport angle." It can be lowered further to lift the front axle off the ground as well. Overall, I'm very satisfied with the kinematics of the assembly this time around. I of course forgot to take a picture of the raised transport position, but I assure you it's good The bucket raises high enough to swing over the roof, but practical rotation is limited to +/- 90 degrees due to the pneumatic hoses through the turntable. And lastly comes an underside shot, which might give you a better sense of the relatively small dimensions of this MOC I'm well in to making an LDraw model of this MOC, but I redesigned the rear/counterweight area just before I took the pics, so I'll have to update the file before posting it. As a final note, with the recent Technic Photography topic being very popular, I must say I am very satisfied with these pictures! Taken outside with a simple white cardboard backdrop, with my Canon 50D with the "nifty-fifty" Canon EF 50mm cheap lens Post processing consists of pressing "automatic adjustment" in Windows photo gallery on some of the pictures. Again, have a look in the Bricksafe folder for full resolution DSLR glory
-
[C-MODEL] 42030 Telehandler
D3K replied to MrTekneex's topic in LEGO Technic, Mindstorms, Model Team and Scale Modeling
Pretty nice concidering the parts available! Regarding the scissoring mechanism used for extending the boom; is it stable and does it work under load without bending? I tried my hands at a similar solution to extend the reach of pneumatics quite some time ago, but found that while great in theory, in practice it really didn't work that well.. -
New pneumatics: tests, comparisons
D3K replied to Sariel's topic in LEGO Technic, Mindstorms, Model Team and Scale Modeling
Really looking forward to getting my hands on these pieces! Thought I'd just mention that the really old long cylinders have a 9/15 length (retracted/extended), so the stroke is the same as the new long ones, but the pieces are actually 2 studs shorter, so it's not exactly a drop-in-replacement. I am almost certain we'll see a pneumatic excavator in 2016