
Redhead1982
-
Posts
1,798 -
Joined
-
Last visited
Content Type
Profiles
Forums
Gallery
Everything posted by Redhead1982
-
Nice work. The dark tan and white colour combination with some texture works well on the facade. The only detail I don't like are the flowers on the facade. They seem a bit unrealistic, mostly for reason other have mentioned - how do you water them? On the other side, the interior is great. Well done.
-
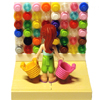
Do you want to earn some extra money for allowance? Be creative. Make yourself a stand, bake the cookies, squeeze some lemons and make a fresh lemonade. It's not as complicated as it may sound, and it offers a nice refreshment to LEGO citizens on a sunny day! Basic info of the set Set no.: 410027 Name: Mia's Lemonade Stand Theme: Friends Year: 2014 Pieces: 107 Minifigs: 1 Age group: 5-12 Price: £ 9.99 / US$ 9.99 / EUR 9.99 Links: Brickset, Bricklink, LEGO S@H The box The box is a standard size of Friends 10 EUR sets. It's in standard bright colours with dark purple round sides. A cartoon of all five main characters is presented on the top right corner. The set art reveals a suburban setting of Mia's lemonade stand. The houses in the background and the tree in the front left corner complement the set really nicely. The stand fits really nicely in this green environment, although it could be easily placed anywhere in town. The back of the box has only three pictures of various features of the set. It looks as there's not much action going on, but it's only because Mia's customers are not there yet. Nevertheless, the box art reveals some of the more exciting parts of this year, but more on that later. The side of the box has the aviator helmet presented as measure of scale. It's not a new mold, only the colour, but it stands out really nicely, and offers safety while riding the scooter. There's two polybags and an instruction booklet in the box. Similarly to my other Friends review, Andrea's Bedroom, I had the same feeling of a full box. This time I made sure to document it, as it's really nice to see a full box for a change. The booklet One of the downsides of a small full box is the fact that the booklet has to be folded and the crease is not so easy to get rid of. The art on the booklet cover is the same as on the box, but we get a wider view of the area. A random page from the instructions reveals a typical Friends background in lavender and two of the smaller builds. On the right bottom corner there are silhouettes of a butterfly and a heart in lighter lavender colour which is another Friends characteristics. The parts needed for each step are pictured in light blue boxes, and are easy to follow. When you've finished building Mia's Lemonade Stand, you can see that the model in the booklet differs slightly from the model pictured on the front of the box or as seen on the front page of the instruction booklets. The changes are not so obvious - it's a nice game of find the differences. (A hint: objects on the stand are arranged in a different order.) The pieces The larger polybag has most bricks in 4 different colours (lime, yellow, white and medium dark flesh). For a Friends' set, there's not a lot of pinkish colours included. The parts standing out here are the scooter, aviator helmet, and the white dome bottom. These three parts are also new in this year. The helmet is not a new design, but it's the first time it appears in magenta in a set. It's actually a nice addition in a ''friendly'' colour. Both the scooter and the dome bottom are new molds, and new colours as well. We saw them for the first time in another great set of 2014, the Parisian Restaurant, in red and dark red, respectively. In the smaller polybag are small parts in many different colours, including three shades of pinkish colours, typical for Friends. The useful and exciting parts here are yellow, green and dark pink flowers, trans-clear cups, and of course the cookies. The special parts in this set include the light aqua scooter, magenta aviator helmet with a trans-clear visor, white dome bottom and the cookies. In addition, worth mentioning is the 2x4 printed tile with a lemonade in a jug. It's great to have a print instead of a sticker, and this part could be easily included in any juice bar or even a coffee shop. Another printed part are the cookies with 'frosted cookie pattern' according to Bricklink. I like to think of them as chocolate chip cookies with zero calories. There's 4 of them included in this set, and you can get more of them if you buy any of the other four sets with this part (Merida's Highland Games, Rapunzel's Creativity Tower, Stephanie's Bakery Stand or Sunshine Ranch). It seems as the part is specific to the Friends/Disney Princess theme, but I'm sure it'll find its way in other sets soon as well. The LBG angular handles are another part almost exclusive to Friends, but surprisingly they can be found in a Ninjago set Thunder Raider. The minifigs There's only one minifig in this set, Mia. Luckily for her, she's got a new outfit to wear. The bright pink skirt and white shoes are not new, but it's the first time we see it on Mia. On the other hand her top design is new. The olive green shirt with flowers looks lovely. It's always nice to have a variety of tops and bottoms to choose from. When Mia doesn't wear her awesome magenta helmet, she has a magenta ribbon pinned to her hair. Although the ribbon is a nice accessory for the minifigs, I don't think magenta fits with her dark red hair. But then, I'm not a fashion expert. The build The set is meant for a target group of girls aged from 5 to 12 years, and it consists of several small and relatively simple builds. The first mini build, which I found very exciting, is the assembly of the light aqua scooter. The body of the scooter is a one piece, and we have to add the wheels, a trans-clear stud as a light, a pearl gold bucket handles for stand support and a luggage rack to complete it. The result is lovely, but mostly due to the amazing design of the scooter's body. The luggage rack is handy for storing Mia's helmet, and for transport of small luggage. More details of the scooter can be seen here. I intentionally removed the luggage rack. It was bothering me initially as it felt too big for the scooter. I can find only one minor flaw of the design, and that's a missing stud on the back of the scooter, where a red break light would fit. Another flaw might be the inability of the scooter to stand up without the support of the bucket handle, but having the handle to support it is actually a fantastic detail. With this picture I wanted to compare the new scooter mold with a previous version of a motorcycle. The white motorcycle's design is from 1987-1996, and it was my favourite up till now. It was meant for the classic minifigs, so it's impossible to sit a Friend on it (their feet is too big). A plus of the new scooter design is the exchangeable handle. Different handles, suitable for either minifigs (the black version in the middle) or for ladyfigs (the grey version on the right) can be attached to the clip. Minifigs have an advantage to use both handle types, because they can move their wrists. On the old motorcycle, the minifig has to move forward a bit to reach the handles, and it looks like a natural position. On the other hand, a minifig on the new scooter can reach the handles in a normal straight position. This doesn't look as natural as you don't usually ride your scooter standing up. I tried bending minifigs legs at an angle, but that made the minifig look even more awkward, because its waist level was below the seat level. Mia looks more elegant on the scooter than a classic minifig and the luggage rack acts really nicely as a seat as well. With slightly bent legs, Mia can lean on the seat and still have a torso in natural looking position. This gives me a filling the scooter was primarily designed for the ladyfigs (but I might be wrong), nevertheless classic minifigs will also be able to enjoy joyrides on the new scooter. The second, the simplest, and the least exciting build is a white and yellow chair. Mia can sit on the chair, but it's a bit tricky to position her. If she's not balanced right, she easily falls off the chair. This is a common thing with the Friends minifigs, but it gets easier to sit them down with some practice. The third mini build, and again more exciting than the simple chair design, is the crate with lemons and limes. There's not much building here either, but the inverted slope on the bottom of the crate is a clever addition to make the crate stand at an angle. I was actually surprised with this part as I thought that the angled crate was just pictured angled on the box art. Although the lemons and limes are a bit too big for the minifigs, Mia doesn't need many of them to squeeze enough juice to make the lemonade. The forth and the largest build is the lemonade stand. Here you can see more colours. The yellow and lime are standing out more, and I wouldn't mind seeing more muted colours for the stand. But, this is a Friends' set, so the bright colours are a must. The stand has two parts, separated with a hinged brick. This gives you more options to position the stand either in straight line or angled. I prefer it angled, as it gives more depth to it. More than the stand itself, it's the contents on the stand that are interesting. On the left side under the 'Lemonade' sign, there's pink plate with the frosted cookies next to some cupcakes with lots of cream. Not (so) visible are the hundred dollar bill and some coins (round flat silver tiles). I wonder who bought a 1 dollar lemonade with a 100 dollar bill. The right side of the stand features a juice squeezer, so Mia doesn't have to do the squeezing herself, and a large jug for the lemonade. It would be nice if a trans yellow minifig head would be included, so the jug would look half full with the lemonade. If you're lucky enough to own it, you can try how a half full jug of lemonade looks like. Flowers are planted in a white dome bottom and are an accessory, that's not necessary for lemonade business, but it's nice to have. I think it's great that the new dome was included in this set as part of the stand decorations (a big thanks to the designer). The finished product At last, here's how the set looks like. All four small builds create a nice scene together. The center of it is the lemonade stand, and the accessories such as the lemon and lime crate, the chair and the scooter add to playability of the set. There are no flick missiles included in this set, so majority of the play is based on your imagination. Mia can drive herself to the stand with her scooter, pulls of her helmet, takes some fresh fruit from the crate, and voila, makes a fresh glass of lemonade. In addition, you can always make a good bargain buying some of the sweets from her stand. The Final Verdict Design: 10/10 The overall design is fantastic. There are several mini builds simple enough for the beginner builders which is accepted as the set is targeted at the age group of 5 and above. There are some lively colours, characteristic of Friends theme, included. One of the best hallmarks of this set is also the fact that the designers chose to include accessories not necessary in a lemonade business, such as the scooter and the dome bottom as a flower pot. This is definitely a plus, as a small set like this offers you some interesting parts. I can't point out a single weakness of the set. Parts: 10/10 Similarly to the design, the parts in the set are a nice selection of various bits and pieces, that you can use to play with in different MOCs. The parts standing out as something unique to the set are the above mentioned light aqua scooter, printed cookies, magenta helmet, and white dome bottom. Build: 8/10 It's a simple and straight forward build with no special or advanced techniques. I like it for what it is, it's simple enough for inexperienced builders, but offers playability also to more advanced builders. In addition, it can easily be incorporated in any town layout - it looks great in a suburban settings, in a park, or on a large city square. Playability: 10/10 Playability is a very important feature of this set. Girls are the target audience for this set, but I'm sure boys will love the set too. There are no missiles in the set, but the play can be based around different situations (squeezing the juice using the machine, picking up a new stock of lemons and limes with your new scooter, buying some sweets or enjoying a glass of lemonade). In addition, this set can be added to the existing Friends' sets, such as the Downtown Bakery, City Park Cafe, or Stephanie's Outdoor Bakery to complement the line of various catering services in Heartlake. Minifigs: 9/10 Mia has a unique top design, seen for the first time in this set, which is a great detail. Her skirt and white shoes were used before, but they're not very common, so Mia from the Lemonade Stand is a nice addition to other figures. Price: 10/10 It's a small set, yet it offers a lot for the price. The most outstanding part is definitely the light aqua scooter, unique to this set. Considering you can get a red version in the Parisian Restaurant for a much higher price, it's wonderful to have this fantastic part included in a small and relatively cheap set. The fact that at the time of this writing this set is already out of stock on German S@H is a nice indication of the popularity of the set. Overall: 57/60 (95%) As the overall score implies, this is a set worth having. The simple builds are still enjoyable to build, but the true value of the set lies in its design that offers a lot of playability and some great parts specific to this set. This is a set I enjoyed building, although my initial interest in the set was to just to get the new scooter. It's a set that can be easily combined with other sets or MOCs. And all this you get for a relatively low price. This is a set I'd definitely recommend to buy to anyone.
-
When the first rumours of a new 'girly' theme started, I was thinking about what could be new and 'girly' about LEGO. I never considered bricks as a gender related toys, and I was pretty surprised when I saw the first pictures. The Friends theme introduced new and exotic ladyfigs, very much different from the general minifig population. Luckily for those who weren't enthusiastic about the appearance of these ladyfigs, their lifestyle was more appealing. Many of their activities and hobbies taking place outdoors and indoors were presented since the beginning of 2012. In addition to Mia's bedroom, Andrea's bedroom was revealed in 2013. If you want to know what her bedroom looks like, you can find the highlights in this review. Basic info of the set Set no.: 41009 Name: Andrea's Bedroom Theme: Friends Year: 2013 Pieces: 75 Minifigs: 1 Age group: 5-12 Price: £ 9.99/ US$ 9.99 / EUR 9.99 Links: Brickset, Bricklink, LEGO S@H The box The box is a standard size of Friends 10 EUR sets and measures approximately 15.5 cm x 14 cm x 4.3 cm. It's in standard bright colours with dark purple round sides. A cartoon of all five main characters is presented on the top right corner. The set art reveals a room in an attic with a light yellow and pale blue walls. Andrea is standing in the middle of the room on a bright carpet. If the walls and the carpet were added to the set, this would be a great bonus. The back of the box usually presents different features of the set, and this set is not an exception. Again, a cartoon image of Andrea is placed on top right. As seen from the box art, Andrea obviously loves to do her hair in front of a mirror and most likely surfs the internet for tips and tricks for hairdos. One side of the box has a warning sign about the choking hazard with small parts, while the other side has a lovely detail of a vase with flowers as a measure of parts size. At least to me, this is an appealing feature, and I'm always wondering how the designers select this little detail. Inside the box we find two polybags, instruction booklet and a small sticker sheet. I was surprised to see that the inside of the box looked very full, which doesn't happen often, and it gave me an optimistic feeling about the set even before I started building it. The booklets There's only one booklet due to the set's small size. There's a crease in the middle of it, as it's packed in the box bent in half, and the crease is pretty hard to remove. After storing the booklet in a binder, it gets better, but when you're trying to build a set straight from the box, the twisted pages can be a problem. This is how a random page from the instructions booklet looks like. It has a light lavender background, characteristic of the Friends series. Despite the bent pages, it's easy to follow the building process. The colours are bright, and a chance of mixing them is very close to zero. The Pieces In the larger of the two polybags we can find Andrea's body parts and 28 bricks in 9 colours and a smaller bag with medium azure hair accessories. What's standing out here are the medium lavender cupboards and the laptop. The black laptop, specifically, you can find in 13 different sets, 4 of them being from the Friends series. The girls seem to use the computers often at work, at school and at home. In the other polybag, we can find the smaller parts. Similar to the larger polybag, bricks are very colourful. My favourite parts are the flower stems (you can never have to many of those), the transclear minifig head/vase, lipsticks, and bright light orange flowers. An interesting part (and not that common) part is the golden fez. It's a useful part and can be used as a decorative stand or a minifig accessory. The parts are quite common and are used to create various details around the room. Besides the two polybags, you can find a small sticker sheet in the box. To me, this is one of the best parts in the set (I know, stickers are usually less welcomed parts of the sets). When the set came out, I bought extra stickers to use them in MOCs as they are very versatile. The sticker can be used as a mirror in a bathroom, bedroom or just as a wall decoration. The Minifigs Andrea wears a bright light orange mini skirt and a white top with a magenta necklace. Both the skirt and the top are unique so far, and the bright skirt nicely complements her medium dark flesh complexion. For special occasions, you can add various hair accessories to the side or top of her hair. The Build The set is meant for a target group of girls aged from 5 to 12 years, and it consists of several small builds. The first mini build is a small table with a crystal vase. The flowers in the vase are the standard sort, and I wouldn't mind to have more exotic flowers in the vase. I'm missing the flowers with six- and seven petals from the first Friends wave in 2012. The second mini build is a sofa bed with a small stand for perfume bottles and a lipstick. I find it a bit unusual to have an open lipstick on a stand, but I guess it's some super kind that has to be kept open for everyone to see. Her perfume bottles are a nice collection. The sofa bed is designed interestingly. It can be extended into a double bed, and bright orange decorative pillows can be used on both beds. I was a bit sceptical if these beds would fit two minifigs, so I tried it, and it was easy. The ackward space where the hinges are is the right size and the Andrea and Olivia are barely touching with hands. The top side of the sofa bed (or the left on the picture) even has tiny legs on the back, which is a nice little detail. Lying down is not a problem for this girls, but sitting unfortunately is. It took me several minutes before Andrea decided to finally sit steady on the sofa bed. Sitting seems to be a common problem for these girls, as it's hard to balance them correctly. I'm not sure how younger population sees this problem, but I got annoyed with it and didn't try any other pose. The third, and last minibuild of this set is the makeup vanity and stool with hair accessories. This is where the sticker is applied, and the set looks better with the sticker. The mirror is large and reflective, and the colourful lights above it are probably just a decoration. I can't imagine putting on makeup in pink/blue light. Her makeup corner looks tidy, but it's actually far from it. Andrea has so many different hair accessories, that she hardly finds enough space in the cupboards. Maybe adding another cupboard or a basket would be nice to keep her accessories more organized. Before heading out to a party with her girlfriends, Andrea need to brush her hair. The mirror is a nice playful feature, as you can position Andrea in various poses to catch her reflection in the mirror. In my opinion, the sticker is a nice addition to this set. The Finished Product Despite the small builds, the set as a whole does not look small at all. The mini builds are simple to put together even for beginners, and you can play with Andrea in lots of different situations (in front of the mirror, choosing the right hair accessory, surfing the net on the laptop. For intermediate or even more experienced builders, this set is handy when you need some furniture for town houses or just ideas of how to decorate rooms. The Final Verdict Design: 10/10 The design is great overall. There are several mini builds simple enough for the beginner builders. The shapes of the furniture are very realistic, and the colours are lively as expected in the Friends theme. I can't point out a single weakness of the set. Parts: 9/10 Similarly to the design, the parts in the set are a nice selection of various bits and pieces, that you can use to play with in different situation. None of the parts stands out as something unique to the set, yet there are several that are more interesting. Laptop is a nice addition, and seems quite common among the Friends. There's a sticker included in the set, and in my opinion, the set looks much better with the applied sticker. I'm also a fan of mirror-stickers, and this one was my favourite part in the set. Build: 8/10 It's a simple and straight forward build with no special or advanced techniques. I like it for what it is, it's simple enough for inexperienced builders, but offers playability also to more advanced builders. In addition, it can easily be incorporated in any larger room - it looks great in a tight space and in large rooms. Playability: 10/10 Playability is definitely the most important feature of this set. Girls are the target audience for this set, and they can play with Andrea in different situations. You can help Andrea with her beauty routine at the makeup vanity, surf the internet on her laptop or host a girls' sleepover party. Minifigs: 9/10 There's only one minifig, Andrea in the set. Her clothes are unique to this set, which is a great detail. Andrea has a medium dark complexion, and because of that she can't borrow clothes from her friends. Price: 9/10 It's a small set, but not the cheapest in the series yet it offers a lot for the price. Overall: 55/60 (92%) This is a set I really enjoyed building, and the individual builds were satisfying despite simple building techniques. The true beauty of the set is its design. It looks great as a whole, yet it can be parted in two sections easily, and each of them retains enough playability to enjoy it. It's a set that can easily be shared to play with a friend or it can be combined with other sets or MOCs. Another great aspect of this little set is the furniture. It's nicely designed and realistic, and can fill empty rooms in many LEGO houses. This is a set I'd definitely recommend to buy to anyone interested in Friends or Town. Andrea and her girlfriends Olivia and Mia are gathered in Andrea's bedroom, enjoying hot drinks and cupcakes.
-
I was never a fan of licensed sets. They have flesh minifigs that represent specific characters, which can limit the figures' use in MOCs, plus they generally tend to be more expensive. However, lately I got a few licensed sets, and I have to say they're not bad at all. Cavalry Building Set was one of them, and I have to admit that after opening the box, building the little scenes, and positioning minifigs in different poses, my opinion of the set is... (if you want to know, read through this review or skip to the end). Basic info of the set Set no.: 79106 Name: Cavalry Building Set Theme: The Lone Ranger Year: 2013 Pieces: 51 Minifigs: 4 Age group: 6-14 (or more) Price: £11.99 / US$12.99 / 14.99 EUR Links: Brickset, Bricklink, LEGO S@H (there's nothing on Peeron yet) The box The box is the smallest in the Lone Ranger series, measuring approx. 15.5 x 14 x 4.3 cm. The top part has a Disney's logo and a profile shot of Lone Ranger from the film on a yellow background, making it easily distinguishable from all the other Lego sets on the shelves. The front of the box reveals all there is in the set, a shooting cannon, a chicken wing on the camp fire, Lone Ranger on a white horse with moveable hind legs, and assortment of different weapons. Actually, there's not much left to reveal at the back of the box. An interesting feature is how to load the cannon and shoot round bricks, in case you're not familiar with this design. One side of the box has a warning sign about the choking hazard with small parts, which is definitely informative, but at the age of 6 everyone should know about the dangers of small parts (and sharing them with their younger siblings). The booklets Being a very small set, there's only one thin booklet. It's slightly curved from the packaging, and follows the design of the box with a yellow line characteristic of The Lone Ranger series. The Pieces Inside the box we find 2 polybags, the instruction booklet, and the horse I was actually buying the set for. In polybag number one, we can find larger parts, including soldiers' and Lone Ranger's torsos and legs. In general, the contents of this bag are not very impressive, apart from the few plates and bricks, other parts are more or less specialized. None of the parts found in this polybag are exclusive to the set, except for soldiers torsos which are discussed in more detail later. On the other hand, bag number two holds much larger number of parts, and is more interesting to look at. Most of the parts are common, some bricks, plates and specialized parts. The highlights of this bag are various accessories discussed in more detail later. As I feel more at home in the Town sub-forum, the greatest potential I saw in this set was in its various accessories. Both the blue cavalry hats and the white cowboy hat can be easily seen as part of the street fashion in any Town layout, as well as the backpack and tan messenger bag. The flat silver frying pan and the battery/torch (actually, it's supposed to be a telescope) are a nice addition in any house in Town as well. The Minifigs There's 4 of them in the set, a surprisingly large number for such a small set. On one side, there are 3 soldiers in uniforms. What I'm missing, is some sort of variation in the design of the uniforms to reveal different ranks of the soldiers. Other than that, I can't point out any flaws. Considering the same rank of the soldiers, it's nice to have different faces to distinguish between them. The back of the soldiers reveals printed torsos. The creases on the jackets and the pouch on the belt are nice details. The fourth figure in the set is one of the protagonists of the Lone Ranger series, the Lone Ranger himself. His torso is much more detailed than the soldiers' and the print continuous on the legs, however it's harder to use in Town, except maybe as a sheriff costume. Similar to the soldiers, the back of his jacket has some creases, and no other prints. The Build The build is simple and straight forward. I was actually surprised to see a label 6-12 years, as the build is almost too basic. It starts with a small camp fire. I actually like the simple design of it, with a couple of trans-orange flames used instead of round plates as it's common in themes I'm more familiar with (such as Creator). The second mini build in the set is the cannon. I'm not an expert on cannons, so I don't feel qualified to criticise its design. What I like about it, is the black wheels (I haven't had those in black before) and a rammer. Having a rammer in the set definitely adds another play feature. The amount of ammunition is not large, however, I'm pretty sure everyone can find extras in their LEGO collection. The third build is a small barricade, again a very simple build. It works as a defence line for the soldiers, and can be positioned in different set-ups varying the angle (thanks to the hinge). The flag on the pole is a sign of the occupants of this mini barricade. The Finished Product The end product doesn't look so small, as the mini builds would imply. Considering this is the smallest set in the series, and actually has only 3 mini builds, the scene looks full and offers different options to play with. The barricade can be positioned differently, so one can find himself either behind or in front of the barricade, enjoying a chicken wing or preparing a cannon. The Final Verdict Design: 8/10 I have mixed feelings about the design. It's obvious (even from the set's name) that the set was intended as an army building set. It's great to see a small set with 4 minifigs. Minifigs' torsos have nice printed designs on both sides. However it'd be great to have slightly different uniforms to reflect soldiers' ranks. Parts: 8/10 Similarly to the design, the parts in the set don't stand out in general, yet there are quite a few interesting accessories (the blue hats, the white cowboy hat, the backpack and the messenger bag) that can be used in other themes, as well as the highlight of the set - a white horse with movable hind legs. This is actually the smallest of the (only) three sets in which the horse appears, so this is a plus. In addition, the black wheels appeared in only three sets so far, and are thus a nice addition to every MOCer's collection. Build: 6/10 It's a simple and straight forward build with no special or advanced techniques. Considering the age limit (6-14), I was a bit surprised to see such simple builds. Despite being the smallest set in the series, and having three simple mini builds, the set looks much larger when all the builds are displayed as a scene. Playability: 9/10 Playability is definitely the most important feature of this set. Offering three soldiers on one side, and Lone Ranger on the other, there's plenty of characters to choose from for role play. There's a lot to do as well, enjoying a warm meal, preparing a cannon, or being on a watch. In addition, positioning the horse in different poses can be a lot of fun. In my opinion, playability is the strongest feature of this set. Minifigs: 8/10 The selection of minifigs is very nice for a small set, and the amount of minifig accessories is definitely in favour of the set. Lone Ranger is the star of the series, and it's always nice to be able to get the main character in a budget friendly set. Price: 7/10 It's a small set, the cheapest in the series, and it offers a lot for the price, so it's hard to complain about it. Finding the set on a sale is even better for the budget, yet as it is, it's budget friendly enough to build a large army, get different accessories and a white horse. Overall: 46/60 (77%) The set is not outstanding due to simple builds, but it is for sure above average considering its design and what it has to offer. Whether you're getting the set for the white horse, the soldiers or various accessories, it's a nice addition to every LEGO collection. I got the set for the horse alone, and I found much more in it than I expected.
-
Thanks! I learned some new tricks at the RA, but taking pictures of this building was far from easy. I should keep in mind to avoid white facades. My space is limited, and I'm glad you like the result of the photo-session I had with this modular. Thanks. The building was finished in early November, and I had some hard time figuring out the furniture design. I always feel I'm repeating my ''standard'' designs from previous buildings, and I try to experiment at least a little bit. Thanks. I often see buildings with modern/classic old facades, and they don't always look good. Some do, and I tried to replicate this here.
-
LegoSjaak, your building looks great. Is there an overhang of the roof on the sides ''attaching'' to other buildings?
-
Try to make an outline of the floor using just 1xX or 2xX bricks, and then lay large plates on top. Making plate layout can be tricky, so try to use different size plates, including the smallest one. That's how I do it.
-
It looks amazing even without comparison to the real-life model. I like the amount of details on the black body of the engine. Really well done!
-
Thanks, Legogal. Incorporating a dumb waiter for brick delivery sounds fantastic, and useful. Imagine yourself dragging large boxes all the way up on the stairs. I'm always afraid a bag is going to snap, and the box will fall out all the way down to the first floor.
-
I made several modular buildings in the last few years, and I thought I'add my share to this thread. Unfortunately, this is very true. But on the other hand, a modular building is finished, it feels great. I started my first builds without any LDD planing. The only limit was my brick collection (very small at the time). However, with my last modular, I made the entire ground floor facade in LDD to see how it looks. If you plan to build your model with bricks, I strongly suggest to limit yourself to your existing collection, and don't let LDD's enormous collection of bricks and colours change your mind. This sounds a lot like my working plan. Most of the time I get an idea of what a facade details should look like, or what kind of business should be in the ground floor. It helps if you know from the beginning that you're building a residental or a business building. Sometimes, I work on the interiors at the same time as building the floor, but most often, the interiors is done after the building is finished at least 90%. That's a great start, especially if your collection is somewhat limited in certain bricks. Creator houses and Friends sets offer a nice selection of parts, their prices are budget-friendly, and often building designs are a good models to start moding them into a modular building. My first modular was a MODed Market Street. I didn't have the original at the time, but I was fascinated with the stair design. So I chose a tan/white combination and followed a pdf instructions for Market Street. Whenever I had to use some bricks, I didn't have, a I worked around to use the ones I had. Another option is (if you have any of the official modular buildings) to make a MOD/MOC out of the bricks from the set. I did that for the Fire Brigade. I learned a lot just from building the official sets. All of my houses were either 32 or 16-wide, and I found that helpful for building a larger layout. Making buildings of various widths sound great, and would add more versatility to any layout. The only thing to keep in mind is that it has to fit in a 32-wide frame (e.g. a 12-wide and a 20-wide buildings).
-
It looks lovely. Florist as a business fits nicely in any town. Yours has an interesting window display with slightly hinged side window, and the facade looks very interesting. I like the use of white mudguards as an extra detail, and they really stand out. The colour scheme is fine as well, but my favourite detail is the roof garden. Well done.
-
@LegoSjaak: Your double PR looks fantastic. I'm getting my first one today (or tomorrow), and I'll definitely try to get another one to make it double. This set seems to be one of the best lately - looks excellent, and still has room to be expanded and upgraded to look even more spectacular.
-
My 1st MOC: 'Friends' Apartment Building and Bookstore (WIP)
Redhead1982 replied to LukeWarmTea's topic in LEGO Town
I agree with Kristel. Many Friends' sets have a potential to make them into a building, and if the build is intended also to play with, stability is an issue. Personally, I never post WIPs, because they change too much during the build itself. However, your first floor design seems neat, and finished, so it's nice to see it. Enjoy the build and let us know how it develops. -
A 4-wide VW Beatle! It's one of my favourite car models, and I'd love to have one. Yours is instantly recognizable, and you did an excellent job with snoting the curves. Judging by the specific bricks used, there's a limit to the colour selection. Excellent work!
-
It looks great. I'm not generally fond of LDD creations, but this one looks realistic enough to be built eventually. I'm not familiar with Tintin house, but this manor looks very elegant. It could do with a bit more interior details and some greenery, but there's time to built that as well.
-
Thanks, Kristel. Being blogged on your very inspirational Modulars blog means a lot. Imagine yourself being the owner of the whole building, renting out the store and spending the money on bricks. There seems to be many candidates to live in this house.
-
It looks great as it is. Specially, I like the shed's curved roof.
-
Thanks, everyone for nice comments. I'm glad I'm not the only one liking this building. Roof is actually olive green cheese slopes. I found them on PaB wall in the summer, and got plenty of them with a roof in mind. Sand green would look even better, I think, but it's not so easy to collect enough bricks. The shower screen is clipped in place by a plate with a clip, and then a brick (the top step of the stairs) is place over it to fix it from the top. A similar design is found in Olivia's House (it's not my idea). Well, in this specific case, the shop facade was built first, and later on the classic facade was added to the rest of the building. I'd like to think about this as the classic facade made the building look better. Actually, when I started this, I had in mind the house where Copenhagen's store is in, which has a modern flat white facade. Actually, I visited Lego stores in 5 different countries, and decided it's best to build myself my own store (there's no Lego store in Slovenia). This way I get to choose which parts to put on the large PaB.
-
Congratulations to the winners and all participants. These EB contests are more interesting every year, and the entries are always fascinating.
-
I'd like to share my latest modular building. This one was inspired by Lego Brand Retail Store. On the ground floor, there's a Lego store. I included the dragon which I've seen in some stores. The walls would be too bare without decorations, and the dragon also fills the space a bit. And there are some happy customers leaving the store with full bags. At the back of the store is a PaB wall. The store is small, so two employees can manage all the work. I include displays as seen in the stores. The round displays only have a coloured background, while in the ''windows'' there a micro scale versions of some sets. The displays from left to right include the Death star, Creator Family house and the Blue Roadster, Olivia's house and the Tower of Orthanc. The apartment above the store is an open-floor type. The living room and the kitchen are separated only by different floor designs. The only closed room on this floor is the bathroom with shower, toilet and sink with mirror cabinet. On the second floor, there's a bedroom with a working area and a small terrace. I think all my MOCed modulars include bookshelves, and this one is no exception. The shelves in the middle of the floor are dividing the room in two parts, one is for work, and the other one is for resting. A street view with 16-wide apartment buildings. More photos can be found on my Flickr.
-
Thanks for a great review. I'm not so fond of the cute animals, although they do look nice and I like the sets as such. Penguin is my favourite animal from this series, because it looks more realistic than the lavender turtle. As a set, the Tiger's Beautiful Temple is the most interesting, mainly due to its selection of bricks - I'm looking forward finding (at least) one in the local stores to get the new plants, golden ornaments and lavender bricks.
-
Another fantastic building from you, Kristel. It looks beatiful. My favourite details are the front window displays with cupcakes, the roof terrace and the floor inside the cupcake shop. I like the two tone exterior facade. It has enough texture in both colours to look interesting. On the inside, the splash of colour looks great. The wall art is a nice addition in both the shop and the appartment. Well done (as usual)!
-
Making an inverted corner modular building is a challenge, and you did a great job. The minimal front facade is very interesting with the curved windows, but the back side and the interiors are the true gems of this MOC. The color scheme is interesting, but what I like the most is the difference between two sides of the buildings - on one side there's a lovely outside seating area, and just around the corner, there's more chaotic background.
-
I believe the boxes can be used in any LEGO store, but until the end of March only.
-
I like the house, both exterior and interior. The amount of details inside is amazing. The set seems like a good buy for parts alone, although the price is high (especially if you're not a Simpsons fan). I'd like to have the set, but it's not something I can't wait to find a good deal on. Anyways, the designers did a great job with this one. I wonder what the other Simpsons' sets will look like.