
ludov
-
Posts
686 -
Joined
-
Last visited
Content Type
Profiles
Forums
Gallery
Everything posted by ludov
-
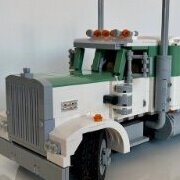 That is so cool! Very nicely done. I like how you put all the machinery behind the cabin. Also the trailers and the load is very nice. Can it still drive with the two trailers?
 -
I think Didumos69 needs a badge. Or at least a subtitle. "Porsche Perfectionist", or something like that
-
42053 - Volvo EW160E
ludov replied to Jim's topic in LEGO Technic, Mindstorms, Model Team and Scale Modeling
So many goodies The new hand pump is interesting, and the additional mini pump answers the question about the PF functionality. It's going to be tough to choose between this and the Claas -
Running in a Loop
ludov replied to Athos's topic in LEGO Technic, Mindstorms, Model Team and Scale Modeling
I was thinking also of legolijntje's suggestion. It's 4 studs high. You could make it 3 studs high using the principle used in the forklift of set 8872 (see page 10 of the instructions) with a Beam 1x2 with cross and hole instead of the cross block. But then your "rail"/"gap" needs to 2 studs wide instead of the 1.33 in legolijntje's solution. However, the beam will probably ensure more smooth motion in corners. -
9.5L springs alternative
ludov replied to arshiaIQ's topic in LEGO Technic, Mindstorms, Model Team and Scale Modeling
Sorry, I didn't mean to insult. I was just confused because you said before that "International payments arent available here", so I was wondering how you managed to pay for the instructions. I was going to offer to send BL'ed springs to you, but it turns out it's not allowed to send toys from EU countries to Iran... The list of items not allowed is really long (in Dutch), and aside from things like alcohol, weapons, items that are in disagreement with Islam, etc. there's also things on the list I don't really understand (hats, shoes, fashion magazines...). Sorry mate... Hopefully it'll get easier in the (near) future. -
9.5L springs alternative
ludov replied to arshiaIQ's topic in LEGO Technic, Mindstorms, Model Team and Scale Modeling
How did you pay for the instructions then? Sheepo's website seems to use Paypal, so can you use that to transfer money to people outside your country? Those springs are expensive by the way... I didn't expect they'd go for 10 euro's each. -
Thanks for the diagram, but that was not the confusion My question is in this picture: why does the configuration on the left has the result on the right? Or, in other words, why is the lines intersecting in the center of the rear axle (left image) required to have Ackermann steering (right image)? I understand the trapezoid is an approximation of the perfect geometry that works for all angles, and probably I could figure out why if I wasn't too lazy to do the geometry In any case, I don't want to further distract your topic!
-
I'm familiar with that image. I'm confused however how that image relates to the first one (where the lines intersect in the center of the rear axle). When the wheels are pointing straight, the yellow dot (centre of turning circle) is somewhere at infinity... I once started with the math, but quickly ran out of paper Maybe this is not the right topic to discuss this. Sorry Didumos!
-
Thanks to your floor, the difference in angle is quite obvious (to me at least). Can you assess if the line through the pivot points and steering arms indeed intersect at or near the rear differential? Since you mention no scrub, I would think so. (I never understood why those lines have to intersect there, but never bothered to do the math either... )
-
I never thought that would be possible in LEGO. It's hypnotising...
-
42053 - Volvo EW160E
ludov replied to Jim's topic in LEGO Technic, Mindstorms, Model Team and Scale Modeling
I'm curious about the size. The clams are the same as on the Arocs, but the I have the impression that this excavator is in a bigger scale. A comparison of the two would be nice, if possible. -
I never thought of that... I guess my OCD brain doesn't allow me to thing of asymmetrical constructions, but it makes a lot of sense. The one on the left is indeed very useful. I didn't know about the existence of the right-hand one...! Very true, how could I forget about those... It seems a lot of people struggle with this part. I believe Jeroen Ottens used it in his DB11, and people commented there that the part looks so useful but is actually hard to use. I only notice now that it's 2 wide along the short side, which would make it fit in nice with studded frames. I don't have it though...
-
There have been a number of topics dedicated to the studless vs. studded discussion, but I'm more interested in uniting the two paradigms. I really like the new possibilities that studless building gives me, but I also like the look of studded models. The combination is wonderful, as builder like e.g. like 2LegoOrNot2Lego, Erik Leppen, M_Longer and others show. So I'm interested in learning techniques on how to combine the two. In particular, how do you deal with the odd vs. even number of studs along the width of your model? Parts like are useful, but I guess there's many more possibilities. Can you share some? Illustrated examples are welcomed
-
[MOC] RC Articulated Tractor
ludov replied to Anto's topic in LEGO Technic, Mindstorms, Model Team and Scale Modeling
I've been trying to figure out how that PTO driving ring thingy works... but no luck. Nice tractor though I like the attachments you made. -
Wow, this is so nice. Indeed instantly recognisable as a Porsche. Also the interior is nicely done with minimal parts. Excellent!
-
I didn't plan to buy the Porsche, but I'm almost tempted to just to be able to compare before and after performance. I'm very impressed with all the fixes you guys have come up with!
-
[LDD Idea] Spinning Gyroscope
ludov replied to sheo's topic in LEGO Technic, Mindstorms, Model Team and Scale Modeling
So sad to hear you are not continuing this project It's the most original and cool idea I've seen in a long time, with excellent execution! I hope you might find some time in the future to continue... -
It is. And it's pretty darn cool, especially for a B-model. 8872 was one of my favorite sets as a kid. Good memories
-
That's amazing. I like the acceleration/deceleration in the stations, just like the real thing. The only thing missing is a couple of hundred minifigs with skis fighting to get it Great build, absolutely amazing! (I once started to try and build something like this myself, but I quickly got overwhelmed )
-
Adam Savage's One Day Build
ludov replied to Phantom59's topic in LEGO Technic, Mindstorms, Model Team and Scale Modeling
He... he... he cut the axle Bad Adam! Otherwise, cool. Nice to see it being built. I'm surprised there's so many pieces, but I guess the reliefs take a significant part of the part count. -
Very nice, and the video is also very cool (of course) Do you have more photo's available?
-
Great review! I really wanted this set when it came out, but didn't. I recently got me a second hand copy, with box and instructions. It is still wait for me to clean it and rebuild it. This review made me more anxious to start! (Just moved house, so no space yet ).
-
Indeed. In fact, your Koenigsegg One:1 might be the first SEC (Someone Else's Creation) I might build because of this I really hate to keep buying batteries for models and I don't use the PF often enough to warrant the expense of expensive rechargeable batteries (which often die on me anyway). I might consider buying the rechargeable PF battery box, but since I mostly own old 9V stuff, I usually use the old Control Centre to "power" motorised MOCs (although it's usually limited to a pneumatic pump...).
-
Ultra Small Forklift - Muravi
ludov replied to mahjqa's topic in LEGO Technic, Mindstorms, Model Team and Scale Modeling
This is so cool! It must be so much fun to play around in the warehouse How high can it reach? It seems to have two stages, but I couldn't tell if it actually can reach the top shelve. Did you really build three, or was that the result of some really good video editing? Cool Thunderbirds box -
Very nice! Like a grown-up version of http://brickset.com/sets/42023-1/Construction-Crew I like all the details on both the truck and the trailer and the color combinations is something new. Are both rear axles of the tractor driven or only the first one? And is there suspension on the trailer (couldn't see). Too bad you couldn't fit double wheels on all three axles of the trailer due to the linear actuators.