
Balrog
-
Posts
988 -
Joined
-
Last visited
Content Type
Profiles
Forums
Gallery
Everything posted by Balrog
-
My very own Supercar - WiP
Balrog replied to Balrog's topic in LEGO Technic, Mindstorms, Model Team and Scale Modeling
Thanks for your opinion. I am happy to hear you like the fron so far. And about the back, I already said, I am not sure about it. Most likely I will do something different there. We'll see what my sick head comes up with -
My very own Supercar - WiP
Balrog replied to Balrog's topic in LEGO Technic, Mindstorms, Model Team and Scale Modeling
Update #2 (First post also updated) It's sunday. Time for an update. Today I worked on some ideas for the back and the hood. After playing around with some panels and liftarms, I have a result for today, though I will probably change it again. Here is a picture of the back. I will at least keep the exhaust. But I am not sure about the panels. And here is a picture of the front. I still have no idea how to fix it in position and make it movable, but that is something I'll look after next week. Work will continue next week. -
It is exactly as you say. Compared to other sellers of such storage containers, they are still very cheap, even if you had to pay 10,00€. But, compared to Germany, everything is more expensive in Suisse. And I think the quality is more than sufficient for storing and sorting Lego.
-
My very own Supercar - WiP
Balrog replied to Balrog's topic in LEGO Technic, Mindstorms, Model Team and Scale Modeling
Update #1 (First post also updated) I worked a little bit on the body and did a first attempt to my "fancy door mechanism". I played a lot around with parts. And I think I have a front now, that might survive into the final model. Here it is: It is very insprired by Lipko's latest MoC. Though it looks a lot different. Perhaps I have to try to get the lights more to the outside of the body. The next thing I did was the side skirts and a first attempt to the doors. While I am pretty happy for now with the skirts and the mechanism of the doors, I don't yet really like the doors as they are now. I have to play a bit more with the panels I got from the Jet Plane (once disassembled). So please have a first look. The rear bumber is still in the works. I guess that will be my job for next week. Here is another view from a more isometric perspective: So now, it is beginning to take shape. -
My very own Supercar - WiP
Balrog replied to Balrog's topic in LEGO Technic, Mindstorms, Model Team and Scale Modeling
Thanks, I'll keep the new gearbox design in mind for a new model. New iteration with new improvements and so on. I am still learning and your models are a great help and inspiration. Thanks for the hint. I already thought about this. On the other hand, I probably leave it mostly as it is now. Two reasons: 1. Learning process by producing failures. 2. I would need to remodel most of the front and I am glad it currently works at all :D The same goes for lightweight AND sturdy models. I think I need to fail at some point to be able to improve. Thanks. I am glad to draw some interest. -
Lego Technic 2h 2013
Balrog replied to sama's topic in LEGO Technic, Mindstorms, Model Team and Scale Modeling
I would say, that if the model changes in areas visible on the box-art, they will have to change it. I have never really seen the box-art to be different from the model. Usually the fron side is also shown on the building instructions, which would be very bad to show something different. -
Lego Technic 2h 2013
Balrog replied to sama's topic in LEGO Technic, Mindstorms, Model Team and Scale Modeling
I think people should calm down a bit. As you can clearly see, they changed a lot between the 42009 from Nuremberg and NYC. These are still preliminary models. We should wait until the final model gets shown. Then we can still argue over this and that. For those who don't like the crane at all, these people can't be helped. But all others should shift down a gear and practice patience. -
My very own Supercar - WiP
Balrog replied to Balrog's topic in LEGO Technic, Mindstorms, Model Team and Scale Modeling
I just began with the body earlier. And indeed, this is gonna be a tough one. Hopefully my parts last. Red connectors already seem to just vanish. -
My very own Supercar - WiP
Balrog replied to Balrog's topic in LEGO Technic, Mindstorms, Model Team and Scale Modeling
I would say (to have a comparison) steering is as good as in 8070, where the steered axle isn't driven. The steering rack goes a full stud to the left and right, which seems to be the most that the hub allows. Steering is not easy, so there is quite some friction. But with the HoG, steering still works when the chassis stands still. Friction in my steering could also result a lot from all the gears I used. Without the steering rack, there are 10 gears involved, just for steering. -
My very own Supercar - WiP
Balrog replied to Balrog's topic in LEGO Technic, Mindstorms, Model Team and Scale Modeling
Oh Lipko. I forgot about you. I will definately "steal" from you as well. What exactly do you mean with "driven first axle"? Regarding flexibility: It twists a fair bit. From just viewing, I would estimate the twist to be 2 studs from end to end. -
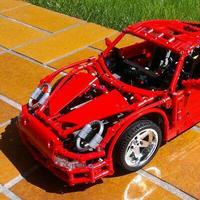
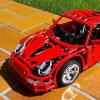
Dear Readers. Please note, that I chose to cancel the project and consider it failed. I will move on to something new. Opinions and ideas are still welcome though. A final update is at the end of this post. Hi @all. This topic will serve me as a place for posting updates to my first real Technic MoC. I am currently building my own Supercar. It has no name yet. I will decide on that, when it is finished. I decided to make a Supercar, because they usually represent relatively "real" functions, good looks and a huge variety of building techniques. I got back into Technic last year, when I purchased the Unimog and later that year the 8070 Supercar. This is basically my Technic collection and with just two sets I got a huge assortment of parts which exceeds everything I ever had of Technic before my dark age. Recently I got the 9394 Jetplane to mostly add useful parts (mostly red parts) and another useful assortment of panels to my current collection. So what functions should my Supercar have? 1. V10 Engine 2. Independent suspension 3. 4 wheel drive 4. At least a 4-speed gearbox 5. Steering via HOG 6. Steering wheel 7. Openable trunk 8. Nifty door mechanism 9. Openable Hood In my stadium of building wisdom, I didn't even think about integrating power functions (too complicated for now) or remote control (missing parts). Before describing my procedure until now, I want to thank Paul Boratko (Crowkillers) and Fernando (Sheepo) for their great models, ideas, pictures and information they shared on the web. I was heavily inspired by you guys. Additionally I want to thank all those great builders of Supercars for inspiration. Please note, that I might have "stolen" some ideas from Paul or Sheepo, but refined them to my needs. When the car is finished, it might resemble other cars in several bits. So I want to give credit to those parts beforehand. Step 1. Getting a kind of chassis. I did think about this a lot. But with my little knowledge I couldn't invent my own chassis. Then I stumbled upon Sheepo's MPS. This gave a newbie like me the chance to build a great chassis without the need to "invent" everything. I went through all the possibilities and built: Front: F.CD.1.1A Chassis: C.A.1 Rear: R.BD.1.2 This resulted in this chassis. Please note, that there are already some differences to Sheepo's versions, due to the lack of parts and having to build some things just different. At this stage I had already integrated some of the functions. But I already knew, that the center chassis would need to be reworked a lot and that I would not be able to keep the modularity intact. So I looked around for a gearbox and chose it as the next necessary step. I found it in Paul Boratko's Supercar Deluxe 2. I looked and looked at the pictures of it and finally started to build it from what I could see in the pictures as I already did it with the MPS modules. I finally had it finished and started building the center chassis around it, because I couldn't integrate it with the MPS module I had already built. I tried and succeeded to keep the mounting points for the modules mostly intact so I could easily connect everything. This was quite a challenge. Not only because I chose to put the motor in the back, but also to get everything connected and sturdy AND to build the center diff in the front. So basically I re-engineered Paul's gearbox, but integrated it the other way around. What I found pretty strange, was how to integrate the shaft for steering. The gearbox would not let me route it through it. And having the engine in the back is another problem for having the HoG in the back as I planned. So I finally decided to skip this idea and keep the HoG in the front. You can see that later. Now where I already was thinking about steering, I chose to more or less finalize the steering. I re-worked some routing of the shaft in the front module. I wanted a shaft with u-joints to directly drive the steering wheel. But I found the angles to be too big to get it working. So I first placed the HoG and then worked out how to get the steering wheel driven. The HoG is now placed directly above the center diff. This was again quite a challenge, but now it is realitvely sturdy and I hope to get it fixed even better when I build the body. The steering wheel is no driven by a perpendicular shaft that goes along behind the "dashboard". You can see that in the next photo. The only current problem is, that the dashboard is not very fixed in position and steering with the steering wheel is not yet working properly. But it turns without a problem when using the hog. Finally I needed to integrate the engine. I encountered two problems here. In Paul's model, the engine is connected via a 16T gear to a 24T output gear to the gearbox. But, I couldn't integrate the eninge as low as needed or the gearbox one stud higher. So I changed the 16T to a 24T gear. But still, it was not enough. I had to lower the engine mount by half a stud so the gears could engage. Have a look for yourself. So that is it for now. I consider the chassis finished for now. I will only change things that require to be modified for the body. And I already have the features 1-6 working. But, there are also some negative parts. 1. Since I had to integrate the gearbox so low, gears are exposed to the ground. This is not optimal, but no problem as long as only front or rear suspension is pressed. 2. The whole drivetrain is so complex, that it will not go easy. 3. The front suspension is on the edge. When pressed completely, the front of the chassis is barely touching the ground. 4. Integrating the gearbox in reverse also reversed the gear pattern. I did not think about that before, but I will not try to change that now. 5. Wobbly dashboard. But, all in all I am very happy until now. Everything works so far. I ran into several problems and could work around them or find a different solution. And it is already quite sturdy. Here you can see the model as it is right now. I hope you like it. The next step will be to build some seats and after that I will go on with the front and rear bumbers. More pictures in Hi-Res are available in my Brickshelf folder (once moderated). If you have hints, comments or questions, please post them in the comments. Update #1 I worked a little bit on the body and did a first attempt to my "fancy door mechanism". I played a lot around with parts. And I think I have a front now, that might survive into the final model. Here it is: It is very insprired by Lipko's latest MoC. Though it looks a lot different. Perhaps I have to try to get the lights more to the outside of the body. The next thing I did was the side skirts and a first attempt to the doors. While I am pretty happy for now with the skirts and the mechanism of the doors, I don't yet really like the doors as they are now. I have to play a bit more with the panels I got from the Jet Plane (once disassembled). So please have a first look. The rear bumber is still in the works. I guess that will be my job for next week. Here is another view from a more isometric perspective: So now, it is beginning to take shape. Update #2 It's sunday. Time for an update. Today I worked on some ideas for the back and the hood. After playing around with some panels and liftarms, I have a result for today, though I will probably change it again. Here is a picture of the back. I will at least keep the exhaust. But I am not sure about the panels. And here is a picture of the front. I still have no idea how to fix it in position and make it movable, but that is something I'll look after next week. Work will continue next week. Update #3 This will be my final update for this project. I have considered it as failed, because I coulnd't think of a good way to go on. And I still have to learn. Though, I really liked building the car so far. It was a huge challenge. Basically, the pics I show now should be considered two updates. As you can see, I made some changes to the hood. This was basically experimental. I also made some changes to the seats, raising the dashboard by 2 studs, so it comes out more to "scale". As you can see in this pic, I reworked the front. I realized, that it would be stupid to have the cooling for the engine in the front, when the engine itself is in the back. I think it looks quite interesing here, but I wasn't too satisfied with the position of the headlights and the how the long panels are here. I also changed the doors for regular ones. Though the are not finished here, but I discarded my idea for a fancy door mechanism. All in all, this was a great experience so far. I had interesting ideas and a lot of fun (and probably brain-damage) when integrating the functions and building this far. Though I realized, that for now I will not be able to complete this. I already dismantled the whole thing yesterday in the evening. My fingers still hurt What I will do next, is to build Paul Boratko's Supercar Deluxe 2. Not completely as he has it (due to the lack of parts), but more or less my own version. I have already ordered some parts from bricklink to supplement my collection and bring me close to be able to build this nice car. I hope you all liked the model so far. If there are still some opinions on this, I'd definately like to here about them. Thanks for your time and all the commenters and criticism.
-
Well done dokludi. Just a quick question. In the video from the Nuremberg Toyfair, you can see that the superstructure is sitting kind of wobbly on the turntable. Did you experience the same with your replica or did you fix that directly when building it?
-
8878 vs 88000
Balrog replied to davidmull's topic in LEGO Technic, Mindstorms, Model Team and Scale Modeling
A solution would be to use a 7- or 8-cell rechargable battery pack which would have 8,4 or 9,6 volts. The latter being even better than a regular battery pack. But that would need to be custom made. As far as I have seen, 9,6 volts should not be a problem for the lego electronics. -
8878 vs 88000
Balrog replied to davidmull's topic in LEGO Technic, Mindstorms, Model Team and Scale Modeling
The biggest difference is, that a rechargable battery pack only runs with 7,2 volts and a regular battery pack runs with 9 volts. Less volts means less rpm for the motor(s). Another point is amps, which can vary by the used battery cells. So more expensive batteries can give better amps than cheap ones (usually). That needs to be thought of in concerns of power consumption through the motors. I have no idea what the exact specs are for the recharable pack, but the biggest drawback are the lesser volts in my opinion. If anyone knows better, please correct me. -
Seriously ... you are crazy. Will you make instructions? Just kidding ;) I am really looking forward to the finished model. And to have my own.
-
Lego Technic 2h 2013
Balrog replied to sama's topic in LEGO Technic, Mindstorms, Model Team and Scale Modeling
Old news are old! -
Lego Technic 2h 2013
Balrog replied to sama's topic in LEGO Technic, Mindstorms, Model Team and Scale Modeling
I already had the exact same thought. Since there is a second gearbox for the stabilizers, the driving shaft could run continously. Edit: That will be a must for a first mod I guess. -
Lego Technic 2h 2013
Balrog replied to sama's topic in LEGO Technic, Mindstorms, Model Team and Scale Modeling
I am not too fond of the monster truck model. Though I still might get it as a parts pack (wheels and panels). Oh my, what have I become, buying Lego just for the parts. -
I am here to bring up some new information on the storage containers from Aldi Süd in Germany. So for all Germans, here is a interesting note. From Thursday to Saturday, Aldi Süd offers again the stackable storage containers for 6,99€. More info and pictures are here: Click this link. I personally will get 2 or 3 more of those so I can finally store away my LotR sets.
-
Lego Technic 2h 2013
Balrog replied to sama's topic in LEGO Technic, Mindstorms, Model Team and Scale Modeling
I thought that, too. But if you look very closely, you realize, it is just a shadow that causes this illusion. -
Lego Technic 2h 2013
Balrog replied to sama's topic in LEGO Technic, Mindstorms, Model Team and Scale Modeling
And he explains, that it's something new for Lego to present a vehicle with 5 axles. And he stresses the realism of the chassis through the different steering angles. -
Thank you for the instructions. Though I will not build the model (lack of RC components), I will take a good look at it and steal some elements ... ehem ... draw some inspiration for the build I am currently on.
-
Lego Technic 2h 2013
Balrog replied to sama's topic in LEGO Technic, Mindstorms, Model Team and Scale Modeling
I am really eager to get the crane truck. Not only because it is big, but to enhance my parts collection, which is still too small (though it is already bigger than my old technic collection. and just through 2 sets). The only thing I really dislike about the crane truck is, that the super structure seems to be also super wobbly. But perhaps that is just in the preliminary model. Perhaps I'll also get the new tow truck. I find the combination of pneumatics and LA very intriguing. Anyone can have his own opinion, but I think they combined the best of both worlds there. -
Lego Technic 2h 2013
Balrog replied to sama's topic in LEGO Technic, Mindstorms, Model Team and Scale Modeling
A closer look reveals, that indeed a shadow from an above beam tricked me. -
Lego Technic 2h 2013
Balrog replied to sama's topic in LEGO Technic, Mindstorms, Model Team and Scale Modeling
Is it just me or does it look it has double wheels on the middle axle?