Search the Community
Showing results for tags 'gearbox'.
-
 The new parts in 42083 have opened the doors to some new gearbox designs. I saw that @Didumos69 and @Erik Leppen have started working out some potential designs, I think it would be good to have these new gearboxes collected in a single topic. @Jim or @Milan If you think this should be merged with a different topic, please do so. * * * Here is a design that makes it easy to visualize the gear ratios. It's far from compact, but the ratios are well spread out with only one overdrive gear. Yellow - control Green - input Red - output
 -
 Hi, I modded the mercadees benz arocs so that it has steering and suspention and drive on the two front axles as well as acenter diff between the two, RC steering, and a drive motor for the wheels. The flat 6 is in the same place roughly and the gearbox motor is roughly in the sam place too. Now I'm trying to add the same sort of outriggers that the 42009 has, but to the mercadees benz arocs, I ALSO am trying to have the steering axle going through this assembly to the rear wheels as well as a centre differential underneath. the outriggers. This sounds like a lot yes but the pnumatic pump can be moved to the back and there is new connectors now to make more compact assemblies. The gearbox would still have two clutches, the only difference, is the pnumatic pump is connected to the same output as the turntable, which frees up one output for the small linear actuators of the outriggers. Does anybody have any ideas on building this? I have been trying but I cannot seem to put my ideas into actual assemblies. I think it is a good idea to use the black 12tooth 13L gear strips like in the 42009 because the arocs outriggers are much too cumbersome. I did manage to fit a centre differential under the original arocs outriggers which is good. The purple axle is for the tipper, the green axle is for the turntable , the orange and brown axle are for the outrigers.
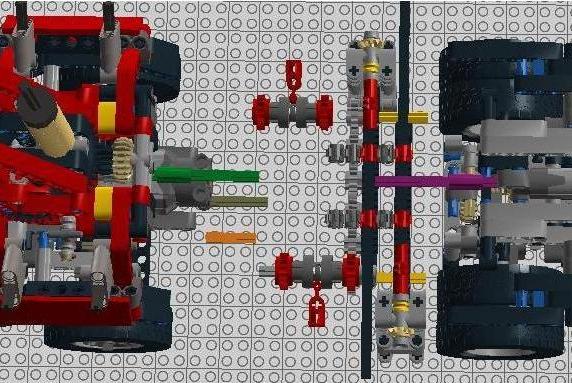
-
My latest car: Abarth 595 Competizione Features: -Detailed Exterior -Opening Hood and Trunk -Working 4 Cylinder Engine -Working Gearbox (on an only 12-studs wide car)
-
.thumb.png.116032e930e483fb4ebbfdc62183bd34.png) Scattered over the last few months I've been working on a proof of concept of an improved paddle shifter unit for the Porsche 911 GT3 RS (42056) that uses the stepping principle from Attika's stepper. After several redesigns I finally came up with something that I'm so content with - because of its reliability and sturdyness - that I thought it would not only be valuable as a 42056 MOD but could be of interest to other car builders too. Just like Attika's stepper this setup relies on the interaction with a 90 degree indexer. And just like the orginal 42056 unit it makes use of silicon bands to return the paddles. I tried to hide the silicon bands inside the unit, but that would give too much unbalanced stress to the whole shifting system. The operation is optimal when the bands are close to the paddles. About the operation of the shifters: Each paddle pulls a pusher against a central knob gear independently. When the central knob gear gets pushed over the 45 degree point the 90 degree indexer takes over and completes the 90 degree step. This completion makes the knob gear push the pusher outwards, which allows the pusher to be pulled back into it's starting postion by the silicon band. While being pulled back, the 5x7 frames to the sides of the unit (with their smooth sides facing outwards!!!) make sure the pusher is pulled back inwards too. The video shows a setup that mimics the situation in the Porsche, with the 90 degree indexer integrated in the gearbox. When combined with the indexer, the unit itself can be used in the original Porsche as is. Feel free to add comments or post (suggestions for) improvements. LXF-file here.
Scattered over the last few months I've been working on a proof of concept of an improved paddle shifter unit for the Porsche 911 GT3 RS (42056) that uses the stepping principle from Attika's stepper. After several redesigns I finally came up with something that I'm so content with - because of its reliability and sturdyness - that I thought it would not only be valuable as a 42056 MOD but could be of interest to other car builders too. Just like Attika's stepper this setup relies on the interaction with a 90 degree indexer. And just like the orginal 42056 unit it makes use of silicon bands to return the paddles. I tried to hide the silicon bands inside the unit, but that would give too much unbalanced stress to the whole shifting system. The operation is optimal when the bands are close to the paddles. About the operation of the shifters: Each paddle pulls a pusher against a central knob gear independently. When the central knob gear gets pushed over the 45 degree point the 90 degree indexer takes over and completes the 90 degree step. This completion makes the knob gear push the pusher outwards, which allows the pusher to be pulled back into it's starting postion by the silicon band. While being pulled back, the 5x7 frames to the sides of the unit (with their smooth sides facing outwards!!!) make sure the pusher is pulled back inwards too. The video shows a setup that mimics the situation in the Porsche, with the 90 degree indexer integrated in the gearbox. When combined with the indexer, the unit itself can be used in the original Porsche as is. Feel free to add comments or post (suggestions for) improvements. LXF-file here. -
 The idea of @nicjasno in for a gearbox can be improved as follows. There is no need for a 24 or 28 gear with clutch: the setup can be built as (two axles) 28-24-(20 with clutch)-clutch-(16 with clutch) (16 with clutch)-clutch-(20 with clutch)-24-28. For these gear combinations, a distance of 44/16=2.75 studs is desired. By using the above configuration, there is a distance of sqrt(2^2+2^2) or approximately 2.828 studs. This can be improved by xx -> 1 x 2 technic brick with 2 holes with axle at the left xxxx -> 1 x 4 technic brick with axle at the right. Then the distance is sqrt((3*2/5)^2+2.5^2) or approximately 2.773 studs, which is much closer to the desired 2.75 studs and then the gears run much smoother.
 -
 So here's the latest project I have been working on. I am actually waiting for 5 parts to arrive (4 tiles on the "boomerang" at the bargeboards and the exhaust in flat silver instead of LBG), but otherwise it is finished. I tried to recreate a F1 car with 2019 specfications with "typical" Red Bull stuff in mind (rake and pullrod in the rear for example). I took some liberty here and there. All the freaking winglets on these cars in real life+Technic=meh. So I went for a pretty basic flow of panels and wings. Another reason I also took some liberty was because trying to find blueprints or other good images for size reference of the 2019 or even 2018 cars were hard to come by for any of the teams. Or I just suck at searching, but I'd find it understandable if it is actually hard to find, since teams wouldn't want that stuff public. 20190921_135837 by Appie NL, on Flickr Functions are: - 8 speed gearbox (used didumos' and JB70's revised Chiron gearbox again, that I made 3 studs shorter again) with V6. - HOG steering through the T-cam and working steering wheel - Pushrod suspension front, pullrod in the rear - Had to sacrifice the driver's seat for a very basic gear selector mechanism due to lack of space elsewhere. 20190921_135940 by Appie NL, on Flickr 20190921_140038 by Appie NL, on Flickr The point at which the nose goes from angled to flat is too far towards the front of the car compared to real life, as the curving point tends to be right above the axle of the wheels. I am aware of this, due to the suspension setup in that section this was the best I could do. 20190921_140228 by Appie NL, on Flickr The diffuser isn't looking too good from this angle, the only good angle is looking right into the rear of the car. Couldn't figure out a better one with the limited mounting options in that section and the diff+suspension. 20190921_140301 by Appie NL, on Flickr 20190921_140342 by Appie NL, on Flickr In case you were now going: This belly shot sucks! Got you covered! (pun intended :D) 20190921_140422 by Appie NL, on Flickr I wanted to make a similar floor at first for my Rolls too, but dropped it because I am not going to be flipping that model very often to show the belly. And having to uncover it too after flipping, would be troublesome on that model. 20190921_140610 by Appie NL, on Flickr Close-up of the pullrod suspension in the rear and my crappy DRS system. Due to lack of space to route some controls for DRS to the cockpit with a diff, suspension, V6 and gearbox blocking alot of the way, I opted for this instead. 20190921_140645 by Appie NL, on Flickr Should have angled this pic more on the cockpit, but oh well. T-cam for HOG, yellow knob gear in the headrest is to flip the gears. 20190921_140956 by Appie NL, on Flickr Since Red Bull is known for the rake they have on their cars I had to mimic that too. It's a small angle, but it's there and pretty close to real life I think. In case you wonder, the car weighs about 1.7kg.
 -
I finally took the time to write down the things I have come to understand with regard to LEGO 4-speed sequential gearboxes. I am receiving many questions about gearboxes and I hope these understandings can help you reason about a gearbox layout while you're building one or trying to design one. I hope this also answers a question I received from @nerdsforprez more than a year ago, which I did not answer yet. Gearbox layout Let's take a look at this 4-speed sequential gearbox layout. Black is input, red is output and orange is control. The main input is divided over a high input (black) with high input ratio and a low input (white) with low input ratio. The high input ratio is 1:1 (via a 12:12 mash) and the low input ratio is 1:2 (via a 8:16 mash). This makes for a combined ratio of (1:1) : (1:2) = 2:1 between the high and low inputs. I will refer to this ratio as the primary ratio. In fact this ratio is the ratio between the two driving rings. Both driving rings have a high output (green) with high output ratio and a low output (yellow) with low output ratio. For both driving rings, the high output ratio is 1:1 * 2:1 = 2:1 (via a 16:16 mash and a 16:8 mash) and the low output ratio is 5:3 * 1:2 = 5:6 (via a 20:12 mash and a 8:16 mash). This makes for a combined ratio of (2:1) : (5:6) = 12:5 between the high and low outputs of each driving ring. I will refer to these ratios as the secondary ratios. Rotary catch and quadrants Even though I will explain things in terms of the gearbox layout described above, the first understanding I want to address, applies to practically all 4-speed sequential gearboxes with 2 driving rings. Let's take a look at the rotary catch and driving rings from above and divide the layout into four quadrants. Each quadrant represents one of the four gears of the 4-speed gearbox. When we turn the rotary catch clockwise (seen from the left) with 90-degree steps, it will always make the following path through the four quadrants. From the path the rotary catch draws, we can see that it toggles from one driving ring to the other driving ring for every 90-degree step. So if we want to obtain a useful gear sequence (either a 1-2-3-4 sequence or a 4-3-2-1 sequence) along that path, we need to tie gears 1 and 3 to one driving ring and gears 2 and 4 to the other driving ring. Otherwise the rotary catch can never 'toggle' between subsequent gears. Now let's take a look at all distributions of the four gears over the four quadrants that meet this requirement. Starting top-left, this will produce a 1-4-3-2 sequence. Repeating the sequence will give 1-4-3-2-1-4-3-2-etc., which effectively boils down to a 4-3-2-1 sequence. Starting top-left, this will produce a 1-2-3-4 sequence. Starting top-left, this will produce a 3-4-1-2 sequence. Repeating the sequence will give 3-4-1-2-3-4-1-2-etc., which effectively boils down to a 1-2-3-4 sequence. Starting top-left, this will produce a 3-2-1-4 sequence. Repeating the sequence will give 3-2-1-4-3-2-1-4-etc., which effectively boils down to a 4-3-2-1 sequence. Starting top-left, this will produce a 2-3-4-1 sequence. Repeating the sequence will give 2-3-4-1-2-3-4-1-etc., which effectively boils down to a 1-2-3-4 sequence. Starting top-left, this will produce a 2-1-4-3 sequence. Repeating the sequence will give 2-1-4-3-2-1-4-3-etc., which effectively boils down to a 4-3-2-1 sequence. Starting top-left, this will produce a 4-3-2-1 sequence. Starting top-left, this will produce a 4-1-2-3 sequence. Repeating the sequence will give 4-1-2-3-4-1-2-3-etc., which effectively boils down to a 1-2-3-4 sequence. Surprisingly, every distribution that meets the requirement, will produce either a 1-2-3-4 sequence or a 4-3-2-1 sequence. What this tells us, is that it's enough to tie gears 1 and 3 to one driving ring and gears 2 and 4 to the other driving ring, to obtain a useful gear sequence. Nothing else matters! Primary ratio vs. secondary ratios The next understanding I want to address, concerns the relation between the primary ratio (the ratio between the high and low input) and the secondary ratios (the ratios between the high and low outputs of both driving rings). We have already seen that in the gearbox layout at hand, the high and low output ratios are the same for both driving rings. One thing we can say about 4-speed gearboxes in general, is that the ratios between gears 1 and 3 and between gears 2 and 4 need to make a bigger difference than the ratios between gear 1 and 2 and between 3 and 4. Now when we take into account that gears 1 and 3 need to be tied to one driving ring and gears 2 and 4 need to be tied to the other driving ring, and we use the same high and low output ratios for both driving rings, we can say that the secondary ratios, which constitute the ratios between gears 1 and 3 and between gears 2 and 4, need to be bigger than the primary ratio, which constitutes the ratios between gears 1 and 2 and between gears 3 and 4. The gearbox discussed in the beginning of this post has a primary ratio of 2:1 and secondary ratios of 12:5, so it meets the above requirement. Check! Swapping and reversing If we go back to the distributions we listed above, we can see that half of them generate a 1-2-3-4 sequence and half of them generate a 4-3-2-1 sequence. When we study them more thoroughly, we can see that all 1-2-3-4 distributions have a horizontally flipped counterpart with a 4-3-2-1 sequence. In other words, if we flip the distribution horizontally, we reverse the gear sequence. Example: Swapping 1-3 with 2-4 in a 4-3-2-1 sequence produces a 3-4-1-2 sequence. Repeating the sequence will give 3-4-1-2-3-4-1-2-etc., which effectively boils down to 1-2-3-4. Example: Swapping 1-3 with 4-2 in a 1-2-3-4 sequence produces a 4-3-2-1 sequence. What this tells us, is that when we mirror the gearbox layout left-to-right (top-down in the quadrants), which boils down to swapping the high and low inputs, the effect is that we reverse the gear sequence. Practical value: If you find yourself in a situation where you want to swap the upshifting and downshifting directions, simply swap the high and low inputs, like in the image above. Finally, if we take one more look at the gear distributions above, we can see that when we swap gears 1 and 3 or gears 2 and 4 in any distribution, we get a distribution with the reversed order. 1-2-3-4 will produce 4-3-2-1 and 4-3-2-1 will produce 1-2-3-4. When we swap both gears 1 and 3, and gears 2 and 4, we reverse the order twice and get again the same order. Example: Swapping 1 and 3 in a 1-2-3-4 sequence produces a 3-2-1-4 sequence. Repeating the sequence will produce 3-2-1-4-3-2-1-4, which effectively boils down to a 4-3-2-1 sequence. Example: Swapping 2 and 4 in a 1-2-3-4 sequence produces a 1-4-3-2 sequence. Repeating the sequence will produce 1-4-3-2-1-4-3-2, which effectively boils down to a 4-3-2-1 sequence. Example: Swapping 1 and 3, and 2 and 4 in a 1-2-3-4 sequence produces a 3-4-1-2 sequence. Repeating the sequence produces 3-4-1-2-3-4-1-2, which effectively boils down to a 1-2-3-4 sequence. What this tells us, is that when we mirror one side of the gearbox front-to-back (swap the high and low outputs of one driving ring), we will reverse the gear sequence. When we mirror both sides front-to-back (swap the high and low outputs of both driving rings), we won't affect the gear sequence. Practical value: If it's more convenient for the rest of your build to mirror your gearbox layout front-to-back, like in the image above, you can do so without any consequences. If it's more convenient to mirror only the left side or the right side of your gearbox layout, you need to also swap the upshifting and downshifting directions. If you want to inspect the gearbox used in this post in 3D, here it is in Stud.io format and here in LDD format.
-
 Hi everyone ! Fasten your seat belts, because today I’m reaching the top speed of 420 km/h with this replica of the Bugatti Chiron 1:8 scale ! Around 4,000 parts, a weight of 3,7 Kg it takes me 2 years of study and design to achieved it. First of all, the pictures renders are slightly different than the video content. I made some modifications (for the roof...) The french manufacturer mixed-up performances and sophisticated design for an unique masterpiece with only few units sold for. The real challenge grabbed my attention so I decided to design it. For more informations about the car, please visit : The road map includes parameters following : 1:8 scale (using of 42056 tires) PFS features (powered by one Buwizz ®) 7 speeds Dual-Clutch Gearbox (DSG) Full 4WD transmission A good approximation of the bodywork Active spoiler feature A high rigid chassis Modular assembly This MOC includes a lot of characteristics as well basics manual ones that more complex ones. But first, here are some pictures below : Main features : Dimensions : 56 x 24 x 16 cm Weight : 3,7 Kg Power supply : 1 Buwizz with easy access Motorisation : 5 mottons Independent suspensions Manual ones : Openable doors with locking system, and openable hood by friction Steering HOG Unplugable motorisation (RC motors and steering ) for playability because the car is very heavy ! Openable trunk providing self-invented W16 engine details and Buwizz access Openable gloves box… …hidding a secret key witch unlock nice PFS features ! (insipired by the real top speed key) After a long build process, I’m very proud of the result. During development, I decided to put an additional feature to improve playability : a small lever to unplug motorisation. Indeed, the car is very heavy so you can’t move it easily. From wheels to the drive train and the 2 RC motors, the high gear reduction lock any movement. The secret key system create some kind of manual interaction allowing selection between 2 motorised features powered by one M motor : Spoiler extension (3 handling modes reachable) Adjustable suspension in height I’ve made a small video to illustrate spoiler mechanism : I found inspiration on Pipasseyoyo Bugatti Veyron system for height setting https://www.youtube.com/watch?v=eaX5JLdBcyg. Irreversibility is performed by 4 worms screw, one for each axle. http://www.techlug.fr/Forum/topic10504.html I assume all similarity with @Didumos69 anti-roll bar and torsion bars system on the front axle. His advanced setup is very strong and reliable. https://www.eurobricks.com/forum/index.php?/forums/topic/143038-moc-rugged-supercar-hammerhead-19-scale/ Remote ones : 5 motors : 2x RC motors / 2x M motors / 1x XL motor 7 speeds Dual-Clutch Gearbox (DSG) driven by XL motor Spoiler animate by 1 M motor and its own gearbox Suspension height controlled by the same M motor Steering by 1 motor or the HOG Full 4WD transmission driven by 2 RC motors Gearbox ratios : 1st : 1:9 2nd : 1:6 3rd : 1:5,4 4th : 1:4,5 5th : 1:3 6th : 1:2 7th : 1:1,8 R : 1:9 Gearbox inspiration : @Sheepo Rubicon Jeep shifting system :http://www.sheepo.es/2016/06/jeep-wrangler-rubicon-instructions.html @ibessonov gearbox : https://rebrickable.com/mocs/MOC-5565/ibessonov/sequential-rc-4-speed-dual-clutch-gearbox-with-pf-servo-motor/#comments Other pictures : Hell yeah Enjoy pictures in HQ : https://flic.kr/s/aHsm9s9M7C And here is the video : I hope you'll like it ! I'm making instruction video for the DSG gearbox, see you soon !
 -
Hi All, im currently in the throes of building a transverse fwd Lego moc. It’s in its early stages at the mo, it it has an ultra 4 speed gearbox, engine and differential all mounted transversely. Ive still to do a bit of work on the gear selector to make it a little easier, but here’s a small video of it in its current state if if you see bits of your Lego Design in this model, thanks for the inspiration
-
Here is a sneak peak of one of my biggest projects up to date: Project started with a new type of a gearbox, which uses only two toothgears at any time in order to transfer power from motors efficient to the wheels: Here are a few specs of the model: Length cca. 80cm when folded Width cca. 30cm Height cca. 25cm Weight cca. 4,5 cm Dual rear live axles in the back independent suspension in front 4 electrically controlled gears + 1 additional electro-pneumatically controlled gear Working towing arm in the back capable of lifting weights of over 1kg Dynamic lights All functions controlled by 3 Sbricks Currently we have snow here and I can't shoot a video as planned I will post more info as soon as I manage to take more photos and a video.
-
 The 2017 Ford GT is effectively a GTE race car converted to road use. After the 2016 race car won at Le Mans, exactly 50 years after Ford's historic win with the GT40, they had to build some road cars for homologation purposes. These road cars have a 3.5-litre twin-turbo Ecoboost V6 producing 647 horsepower, and an extreme amount of downforce from the active rear wing, diffusers, front splitter and those gigantic flying buttresses on the sides. The interior is sparse to reduce weight. The initial allocation sold for around $500,000 each, and Ford received more than 5,000 applications for 500 cars. Getting hold of a car is extremely difficult, and even those who are successful must wait for several years to receive their car. The recent incident of Ford announcing that they would sue John Cena for selling his car (supposedly for profit) and breaking the terms of the contract is a testament to how sought-after this car is. After several months of rather intermittent building, I've finally finished what turned out to be a prime example of how not to manage a project. Anyhow, at least the car is finished so I can get to work on building something I'll hopefully enjoy more... Initially, I planned for this to be a fast RC vehicle, using every single motor that I own. That meant three EV3 Large motors, a PF XL and a PF L for drive, an EV3 Medium for the gearbox and a PF M for the steering. However, as I chased the GT's distinctive styling, the car got heavier, more fragile and closer to the ground. In the end, the car would barely move in anything other than 1st gear, and it would scrape its bodywork on the ground. That's what happens when you change tack mid-way though a build. However, at least I think I can call this my best-looking car model to date. The car has a 4-speed sequential gearbox mounted behind the rear axle to save space and take advantage of the car's huge overhangs. There is no suspension to reduce complexity and because the model is a little too narrow for an independent driven axle to fit. All the motors in the drivetrain are hard-coupled together (yes, I know it's a little naughty, but the gear ratios are closely matched and the stresses put on them by this are probably dwarfed by the load caused by driving the car uphill). The steered axle is extremely simple with just a little return-to-center mechanism. This is in order to leave enough space for the PF battery box under the bonnet. There was just about enough room to have a convincing-looking cabin and seats, although it is considerably smaller (compared to the size of the whole car) than in real life. The rear wing is mounted on a scissor lift system to raise or lower it - there wasn't much space over the gearbox so I had to resort to using those ugly yellow beams. The doors are hinged about the A-pillars in order to give that characteristic motion, opening both upwards and outwards. An elastic band puts some tension on the mechanism and keeps the door either in the closed or in the open position. Styling-wise, the Ford GT is quite a challenging car, but at least it is more angular than curved. I did my best to focus on the characteristic features: the two big vents on the bonnet, the giant side vents and flying buttresses, the red circular brake lights and the carbon sill running along the length of the sides, part of which lifts up with the doors. I don't have that many pieces, so I had to do a few colour-mismatches, but I tried to keep to the grey theme. In the end, the car is easily-recogniseable as a GT, and that's what counts to me. Here is a video showing pictures of the car and a time-lapse of building. Unfortunately there's no driving footage (it would be pretty underwhelming anyway), but you can see the opening of the doors and raising of the rear wing. Music is composed by me as usual. My next build will be what this one failed to be: an incredibly fast RC car. This time, I'm going for minimal bodywork and no gearbox.
 -
 To be honest this video was supposed to be my video releasing a new version of the RC Car with Sbrick along with some instructions. However, after a request for a build battle by LEGO Technic Mastermind, I have decided to postpone that video, but that will happen sometime in the future. In the meantime, I have made a rear-wheel drive sports car with an opening hood, small-cylinder V8 engine, functional headlights and taillights with PF LEDs, full independent suspension on all four wheels, a steered front axle with toe in (steered by a PF servo), and a four speed manual gearbox driven by 4 PF L-motors. To control all the powered functions, I have used two Sbricks, each connected to their own AAA battery box. I have not much else to say, just enjoy the video and photos below.
 -
 Dear friends! Finally, I started to clean out my MOC closet, which has been gradually filling up the last two years and somehow, I couldn't get myself to empty it. The first of more-to-come skeletons to fall out of it is this TATRA T813 KOLOS in truck trial version, that I have built almost a year ago for our LUG’s annual 14th truck trial race “KockeTerenci”. I got inspired by this little canary on steroids: This is my biggest truck so far, that is actually capable of tackling some terrain. The dimensions are as follows: l / w / h = 65 cm / 19 cm / 25 cm or 81 / 24 / 31 studs. It is a bit to narrow for my liking, but one of our TT race rules states, that gates on track are 30 studs wide, so I went for a fitter width. Truck weighs slim 3,3 kg with 2 AAA battery boxes, with Buwizz a little less. It is a bit front heavy as the cabin weighs more than 0,35 kg+ the steering mechanism protrudes a bit into the cabin. Some photos of exterior before further babbling… I tried both PF and Buwizz for power, which one did better is obvious… I hereby thank @imurvai for BrickController application – it was a pure joy using it. Truck features 8x8 drive with typical TATRA suspension and single drive shaft where left and right half axles are misaligned for half a stud, similar as IRL. Fatso is driven by two PF XL motors that are hard-coupled on a two-speed gearbox, which is a modification Sariel’s linear heavy-duty transmission and is placed between the 2nd and 3rd axle. It is remotely controlled with a small linear actuator driven by a PF M motor between 3rd and 4th axle. Total gearing in 1st gear is 23.2:1 and in 2nd gear 8.3:1. 1st gear is pretty sluggish but does the job well and the 2nd gear is good only for rather flat terrain with minor bumps. Unfortunately, I ran out of place for hiding the motors inside the chassis so not to good looking from above but the body covers them well from the side. I had to rebuilt and modify the gearbox a couple of times, bracing each pair of gears as close to them as possible. Previous versions of gearbox resulted in some ABS abuse as you can see on photos below . Front two axles are steered by an L motor which also turns the steering wheel in the cabin. Steering mechanism is a modified 2 axle steering system from Madoca’s Tatra T813 which is some studs wider than my version. Below the cabin there is a working mini fake V12 engine with fan (original design by @jorgeopesi). The cabin has two seats, some gauges around the steering wheel, and fake shift stick. As you can see, I had to make front axle suspension pretty stiff due to heavy front of the truck. There are three pairs of hard spring shock absorbers on 1st axle, two on 2nd and 4th axle, and one pair on 3rd. When there were only two pairs of shocks on front axle, the truck was sagging pretty bad. And now (IMO the highlight of this MOC) to stickers. The truck is full of them, as is the real truck. I searched the web for some that I found cool and funny. Stickers were printed on plain white sticker sheet and some on a transparent sticker sheet for laser printers. The latter took some colours very well and some not – especially red colour pealed off rather quick, which made the rad claw marks look old and worn out which turned out even better. I find it quite hard to tear it apart as I am very pleased with how it turned out. In addition, teardown is being postponed continuously because the transparent sticker sheet leaves some glue spots on bricks and I haven’t found the right mood to clean them. I hope you don't mind, if I point them out... A funny thing with those septic tank cleaners - on Facebook,a guy from Republic South Africa comes out and says he sees trucks of this company all the time as they have HQ in town next to him - small world isn't it? I hope they don't mind some extra commercial . To end, here are some more photos from the beast’s natural habitat and a video of course. In order for you not to fall asleep, I sped up some of the footage. I also apologise for some part of the video being a bit on the lower side of quality - it comes so that my cellphone is practically all my shooting gear. Thank you for your time reading this and I hope you like it. I am looking forward to your thoughts and comments. Fire away. Higher resolution photos can be found in my BrickSafe folder. Best regards, Miha P.S.: In case someone wonders, how I did on the race – see photo of competition below. Mine is that small yellow fella in the middle. As you can imagine, I was no match for those small and fast woodpeckers FREE BUILDING INSTRUCTIONS AVAILABLE!
 -
 Hello fellows, Let me present my idea for a stepper mechanism for sequential gearboxes (4 speeder). Please forgive me giving such a a short description, but I wanted to share this idea before I take of to my hollyday. I didn't even packed yet and I depart tomorrow So I'll insert the video and copy its description here. I'm going to try to get online every day and react on questons and comments. Finally let me say a big thank you for Didumos69 and his 90 degree limiter for the inspiration. This video meant to demonstrate the stepper, not the gearbox. The nature of this design allows it to be used with almost any kind of gearboxes. I'll make instructions for the gearbox later however I've been trying to show it from every angle in the video so you can attempt to reverse engineer it. It isn't that complicated. Stepper: I've got the inspiration from an other idea what Diederik van Leeuwen came up with. He goes by the name of Didumos69 on the Eurobricks forum. Click on the link below to see his post: http://www.eurobrick.../forum/index... The reliability of this stepper depends on the right rubber rings. For the limiter I was using the small lego silicone ring and for the stepper (the green ring) a non lego one that is much weaker than the white. If it is too strong it pulls the knobwheel back instead of sliding trough on it when it returns to the basic position. So find the right combination by experimenting. It requires the frictionless driving rings in the gearbox. The motorisation can be solved by using PF medium motor combined with return to center mechanism too. Sorry for the lack of quality, it was a hasty work. I hope the point I was gonna make gone trough. If there is any question, please use the comment section. I'll try to answer it as quick as I can. Thanks for watching an reading. Hope you find it usefull. There is a few failed changes in the video, those wre caused by applying shorter route on the handle. This design requires to be turned to the end point (about 65 degrees). UPDATE Gearbox instruction video is uploaded:
 -
Hey there guys! I finally got myself an S-brick, i wanted to test it out so i built this go-kart. Functions: - 2 gears gearbox - auto clutch - braking system - differential The vehicle turned out to be pretty fast and with a great handling, unfortunately i need to wait some better weather to shoot a video of it and a bigger place as well. Like in a real kart there's no reverse gear so i'll probably need something like a parking lot to test it out. The gearbox is working great with the buttons of the S-brick operating the M motor I hope you'll like it!
-
 Hi everybody, This is my entry for the Porsche contest! It features: - working steering wheel and HOG steering - full independent suspension - 5 + R gearbox using a link system - opening doors and hood The gearbox mechanic: Animated gif, switching from 3 to 4 to 5:
 -
 As soon as I heard about the competition I started working in LDD to make the most functional and realistic representation of the legendary Le Mans racing car. Here's what I wanted to encorporate: - Pushrod suspension - 6 speed sequential gerbox driven by rear wheels - KERS with front wheel drive - Working steering wheel - Detailed V4 engine - Realistic dimensions and looks And this is what I managed to create with my limited amount of bricks: All the functions I wanted to incorporate have been squeezed in this small 1:10 scale 47x18x12 cm model and more! The additional features are: - Opening doors and engine covers - Working lights - Double dual speed KERS gearboxes Here's a gif to give you an idea, just how crammed everything is inside (for some odd reason the battery box and steering M motor were not rendered): And a still picture with various color coded modules: Getting back to the real model at hand, notice the eight working lights: The rear covers can open, exposing the V4 engine and the KERS generator unit: Here you can see the rear suspension and the massive spoiler with integrated lights: I even managed to make some room for the driver's seat and the detailed working steering wheel. The orange arms with towballs are the switching paddles. The yellow handle switches the KERS powered front FWD's gears: Just like in the real one, the batteries are where the co-driver is suppose to sit: And this is how the model would look like if I had all the pieces in correct colors and some custom stickers: Oops, I meant like this And finally here's a short 1 minute video of the model in action: To finish up, this has to be one of my more crammed and densest models to date. Even though its smaller than the 42039 it uses almost twice the number of pieces. This makes the car really stiff and heavy, so driving in the high speed is a bit demanding from the 2 L motors. I also had to use a different than usual approach in the rear suspension, since I wanted the car to be in 1:10 scale. This meant I had to find a way to bring wheels closer together, yet still have drive on both axles. The rear axle uses a live-axle driveline, but the wheels are independently suspended. The front wheel drive uses two 90° gearboxes to power the individual hubs. All in all I am quite happy with it, even though it uses a bit too many different colors. It's one of my prettier models, though it may not be as pretty as the competition. But one thing is sure. It doesnt get more technical and functional than this Oh and before I forget : Oh and one more thing. If you are intrested the LDD file, than please wait for a few days for me to make a video on how-to use LDD in developer mode. The model was made in that mode and cannot be correctly opened in normal mode due to all the collisions.
 -
Hi everyone ! Today I'm glad to present my latest creation : a replica of a Le Mans Prototype, the Lola Aston Martin ! See below the result, I worked on this creation during 1,5 month : SPECIFICATIONS : - Fake V12 engine - Independent pushrod type suspensions - Steering by HOG + Working steering wheel - 4 speeds sequential transmission + paddle shifting - Rear cover articulated - Elytre openable doors DESIGN : I used this part https://www.bricklink.com/v2/catalog/catalogitem.page?P=24118#T=C from 42056 Porsche to create the cockpit front curved shape. Into the cockpit you can find some details sport wheel and seat. The dashboard include speed indicator serigraphed tile but also green/red indicators to speeds shifting. Paddle shifting is created by 2 short yellow liftarms. You can notice presence of a red extinguisher ! Red and white pins indicate two sides of the paddle shifting ! FEATURES : To create the HOG, I used one couple of knobs and one couple of 16t. A friction axle avoid steering free wheeling. In other hand, doors are openable. For the rear cover, I used Nathanaël Kuipers tips to keep it open with friction like NK03 (https://www.nkubate.com/predator-supercar/) The fake V12 engine is a Crowkillers design : https://bricksafe.com/pages/Crowkillers/mini-v12 The sound it makes in functions of speeds is awesome ! Supensions pushrod system is a copy slightly modified of 8674 set. For the front pushrod I re-used Nico71 design like on his own LMP1 : https://www.nico71.fr/lmp1-racecar/ I created my own 4 speeds gearbox for this model. It's a flat design like 42056 Porsche one but there are less gears so less friction. I use blue rubber for the 90° indexor. See how its works in the video bellow. Ratios (without diff) : 1 : 1:1 2 : 1:1,667 3 : 1:3 4 : 1:5 I put a paddle shifting in the back of the car to up and down gearbox speeds. I re-designed 42083 shifter to make it smaller. MODULARITY : Main assembly is easily operate by a modular design. There are 6 modules and 2 structural elements. Cockpit itself is a part of main structure. I choose this kind of design in order to make instructions in the future. VIDEO : INSPIRATION : I'm sharing links of creations that somewhere gave me ideas for my Moc : https://www.hellobricks.com/2017/01/porsche-919-le-mans/ https://pikdo.biz/p/kimkamza/2048722475702589051_176999168 https://www.flickr.com/photos/158776396@N06/32215776147/in/album-72157676668829937/ https://www.eurobricks.com/forum/index.php?/forums/topic/138348-porsche-962-c-le-mans-racer-in-185/ http://www.techlug.fr/Forum/viewtopic.php?f=5&t=10823&start=45 I hope you'll like it See full HD gallery on Flickr : https://www.flickr.com/photos/147164115@N07/albums/72157712427943327/with/49298358508/ See you !
-
 Here's my previous transmission design equipped with a torque-sensing shifter. The result is that the transmission starts at 4th speed and shifts down lower the more resistance the output meets. It's not perfect, the shifting is jerky because of a "gap" when both transmission rings are disengaged, but it works. I'm hoping somebody can improve on it and make it shift more smoothly. And the original transmission with instructions:
 -
 I recently published my findings on using a sprung differential as a torque converter. I believe I have proved that a simple combination of a pb&g motor and a differential can amplify the pb&g's spring action down the drivetrain to compensate for a resistance on the wheel assembly. I would like to ask for some help with this. My mechanical engineering knowledge is topped out, and I'd really like to continue exploring this. Let me know if you have any ideas, more formal collaboration would be appreciated also. I'm looking at combining this torque converter with existing gearboxes, and also exploring its response at different speeds. http://imgur.com/gallery/IRGFReN
 -
 I have made my first gearbox using differentials. It's a 63 speed gear box using 6 selectors. The gearbox implements all gear ratios from -32:1 to 31:1 using five differentials.
 -
 Hi to all, I like motorcycles so i made another one. Functions are, flat4 motor, simple 2 speed gearbox and of course suspension. IMG_20200302_162553 by nikolyakov, on Flickr IMG_20200302_162554 by nikolyakov, on Flickr IMG_20200302_162707 by nikolyakov, on Flickr IMG_20200302_162708 by nikolyakov, on Flickr IMG_20200302_162821 by nikolyakov, on Flickr
 -
Hi all, a while ago I posted about my 63 speed gearbox MOC using 6 switches and some people here asked for build instructions. These are now available on Rebrickable for those interested https://rebrickable.com/mocs/MOC-40533/TechnicBrickPower/63-speed-gearbox-including-reverse/ youtube:
-
Hi Everyone, I have created this 4 speed gearbox based on the "change over rotary catch" component and I have used it to select 1 of 4 gearing inputs in possibly a new way by connecting to four clutch gears which then connect to a differential housing used as a method to transfer motion whilst allowing the rotary catch to be rotated freely inside of it. The gearbox implements 3 forward speeds, and 1 reverse. I was wondering if anyone has seen this technique before (I am guessing yes since most ideas are not new)? Anyway thanks in advance.
-
Hey y'all, First time I'm gonna try to do a WIP page... Been fiddling around with this Kraz 255b MOC by the one and only Ingmar Spijkhoven and figured out what attachment I'll build finally. In short, it's a mini portable bridge (called a TMM-3 or a scissor bridge). Functions of this add on attachment consist of- Actuator for raising and lowering the bridge Winch for deploying and retracting the bridge 2 stabilizers at the end of the truck to... stabilize the truck Propulsion has been swapped from 2 L motors on the sides to 1 one buggy motor under the hood. Now the replica engine can be put on display. The gearbox I really wanted to try part 35188 to make all the functions AND propulsion run on the one motor. Where I guess we can call the "transfer case" is at is right behind the cab, so here's what the result is for now. It was tricky since the tandem axle left no room for fit it in between the chassis rails. The rear shaft will actually hit the bottom of this when compressed all the way. It's as compact as could get it with Studio (kinda a LDD fan). It'll probably need to be reinforced even more, but wanna see how it mates with the buggy motor first. Never built a gearbox before and destroyed many other MOC's with gearboxes so don't have high hopes. Note- all of the motorized attachments will be ran with worm gears, so not to concerned with the gear ratios... buggy motor just gonna make everything super fast anyways with a Buwizz. Where buggy motor is planning to be in the future a bit more securely. Just seeing how a gearbox could be placed and how high it'll be. Part 87408 is now mounted securely below the motor with two 24t gears feeding it above (will get a shot of it soon). Getting the motor to fit underneath the hood was very miserable. Couldn't use a servo anymore since the buggy motor is so low it'll interrupt the travel of the front axle. (yes the fenders are mounted backwards when rebuilt...) Ordered the parts for the gearbox and will update once they come in. Planned order of the build- Gearbox Wheels Test drive Stabilizers Building the frame/chassis of the TMM winch Scissor bridge Survive the misery