Search the Community
Showing results for tags 'claas'.
Found 19 results
-
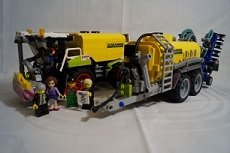
After a few month break it's time to get back to Lego and Eurobricks, and why not do it in style I give you the leopard 4x4: The model is a combination of the following ideas and concepts: Quite some time ago I came up with double torque tube suspension idea and now it was time to use it in a real model Claas tyres were an obvious choice due to their agressive profile and massive size. With the release of the 42069 set, I was finally able to build a model with a unique and striking color combination The final model took me some 12 hours to build and the features are as following: - Powered by 4 RC motors and 2 Buwizz - Double torque tube suspension - Independent dual drivelines - Dual servo steering gemoetry - Working winch - Working lights - Openable doors - Openable hood - Openable and removable rear cover Specs: - Width: 24 cm - Height: 24 cm - Weight: 1600 grams - Final gear ratio: 1:5 from outermost RC motor output - Total power: ~60 watts Now onto the photos: The rear trunk can be opened: There is barely enough room left for seats in the interior. Notice the different springs used to potimise suspension. The before mentioned springs give the model excellent flex: There are two servo motors used in order to keep the steering system as stiff and strong as possible: Under the hood there is a hidden winch, which is strong enough to lift the car: And the final, most important photo. Notice how the left and right side wheel drive axles use different colored joiners and bushes: And finally there is a video of the model in action: Safe to say the combiantion of the four RC motors and two Buwizzes with a low gear combiantion of 1:5 results in a model with impressive performance. As seen in the video Leopard can wheelspin all 4 wheels when accelerating on flat surface, which is a first for any of my Lego offroaders. Dual servo motors provide massive steering power and rigidity and allow the wheels to be steered into obstacles with ease. Only downside to the model is it's slightly high center of gravity cause by all the added panels and detailing. P.S. It feels good to be back
-
 Ever since Lego released the 42054 set, I've been waiting for a smaller size agricultural tire to be able to build a medium-sized tractor. Unfortunately, there are no smaller agriculture tires, but I decided to build a medium size tractor :) New Holland TM 140: The model was built to create instructions. Knowing this, I've created a compact chassis that I can use in the future. The tractor has a drive with a Large motor with gear ratio 1:7 and steering using a servomotor. Three-point hitch systems are raising by the medium's engine . The front one can be detached. In addition, the power shaft drives the medium motor (gear ratio 1:3). The model has 4 functions so it is controlled by sbrick I had to limit the amount of details so that everyone can easily build such a model after buying the instructions. The original fits very well with building from bricks. I am very happy with how it looks because it's hard to know that it's a LEGO model. The instructions have been created for me by M_Longer Creations. Thanks Marek! Parts list in Rebrickable, Bricklink XML, Brickstore and png versions can be found here: https://bricksafe.com/pages/M_longer/misc/nh140 Instructions can be bought at Sellfy and Rebrickable: https://sellfy.com/m1longer https://rebrickable.com/users/M_longer/mocs/ Claas Quadrant 2200RC I did not want to build only a tractor. I decided that I would build a straw baler. I chose the Claas Quadrant 2200 RC. It seemed to me that it would be possible to copy it very well in bricks. The original machine has very many curves. In the end, I managed to build everything and put a lot of details. An additional function is moving the straw bales and the next ones can be put on the top of the machine. More photos: Video: Thank you for reading and all the comments! :)
 -
Here ist my next modell: Zunhammer ZUNI-X-Trac, based on Claas SaddleTrac: ZUNI-X-TRAC Review promobricks
-
 Hello everybody, It's been a while since I posted (and read) something, but this topic will change that. The last years I've been busy with school, found a great job, just recently finished school and some time ago I moved to my own place. Between all that I did have had some time to work on some lego projects, but lacked time to show them here. So this topic will show what I have been working on. I want to start with saying thank you to @Sariel for sharing the instructions for his Mustang. I build this great car and really like it. And the chassis wil be a base for future cars. So here is my version, in white with blue stripes. As you can see it isn't finished yet, I still need some missing parts. Next is a smaller model. Some of you might remember I build a small version of a Claas Xerion, in black. Some time ago I transformed it into an octopus. That's an Xerion with four mowing arms, to mow a ditch in one pass. It isn't the best looking thing I've build, but it looks good enough to me. Another small model I think I haven't shared is a model of a Challenger. It's a tracked tractor in approximately the same size as my Xerion. Then I have two projects, which probably get their own topic in the future. The first is a model of a Hardi Commander sprayer with a Fendt Xylon, both scaled 1:16. The sprayer features working boom (pneumatic/mechanic) and steering (mechanic). The axle is also suspended. The Fendt features steering, suspension, lights, rear hitch and pto. The pto is driving the mechanic part of the boom, pneumatics still by hand and steering the sprayer using hog. The sprayer in the next picture is already version 2. This one is completely rebuild en beter than the first one. Next is a complete rebuild of the tractor, to match with the functions of the sprayer. The second project I'm working on for at least more the two years now is a scaled model of a Herder One. This is a self propelled ditch cleaner/mower. It has drive and steering on both axles, including three steering modes (front, all and crab), all controlled using S-Brick. S-brick also controls turning the arm. A second S-Brick is used for controlling lights. The pneumatic functions in the arm are controlled manually (controls under the hood) and a motor powers the pneumatic pump. The current version shown in the next pictures features a suspended front axle, just like the real machine. I also started building a second version of the Herder One. Thanks to the planetary hubs I can make better/stronger axles. This version also won't have suspension, as it takes to much space. Now the servo used for steering the front axle fits above the axle, which leaves more space in the middle of the chassis. See bricksave for a few more pictures of these projects: https://bricksafe.com/pages/nick97 This is it for now, please leave your comments/questions/tips. Kind regards, nick97
 -
 This MOC was originally planned to be a third submission for BrickFair VA 2018 - after finishing my Red Beryl GT I realized I still had a month before the expo, and seeing that I had an abundance of lime pieces I decided a CLAAS tractor would be a perfect build. However, problems soon arose when I overestimated the amount of pieces I had, and I had to begin compromising parts of the build. When I realized the number of compromises I was making would greatly hinder the model's functionality and aesthetics, I decided to put it off until after the expo. The original chassis only contained M motors, had a poorly designed rear PTO and an inaccurate fake engine. However, after taking apart my BrickFair MOCs I was able to use the two L motors on my Red Beryl GT as the propulsion motors for the tracks. They sit side by side, driving the front sprockets with a 5:1 reduction. This left ample space in the rear of the chassis for the rear PTO and elevating mechanism. I originally wanted to include an inline-6 fake engine under the hood connected to the PTO motor, but due to lack of space, concerns of overloading the front end and the absurdity of an engine connected only to the PTO, I decided to omit it and simply connect the motor to the rear PTO. A driveshaft passes down the center of the chassis linking the M motor to the PTO, with a clutch gear and 3:1 reduction at the motor. The elevating rear attachment point was a modular build, which included a worm gear driving a pair of levers that uses links to raise/lower the attachment. This mechanism also uses a M motor with clutch gear and 3:1 reduction. Despite originally being a modular element, it fit into the chassis very well. As for the aesthetics, the hood was the most challenging part to model. I spent the bulk of my work on this project before BrickFair on modeling the hood, trying to get it as close as possible to the real thing. The curvature and combination of lime/white were especially challenging, and I ended up "marking" the bottom curvature of it using lime flex axles and used System pieces at various points. It was not perfect, but I was pretty satisfied with it as to how it compared to the real thing. The cab was much easier, but getting the proper angle with the front windscreen was also quite challenging. Restricting myself to only using black axles was the main obstacle - as I could not use beams due to the angle towards the bottom of the cab. I also had to make sure the roof was not placed at an angle, since I'm not a fan of roofs that angle downward to accommodate the windscreen angle. I ended up attaching the front windscreen to the roofs with beams at an angle - not the prettiest but better than a leaning roof I guess. The rear attachment, simple as it is, was very fun to build. I decided not to go too crazy with it, so I made something similar to the mower attachment on the back of the 8284. The mower blades are manually folded with mini LAs which also allow them to be angled. The red tiles with the "DANGER" print are custom printed pieces I got at BrickFair. The model, of course, has its share of drawbacks. The main one being the rear of the tractor, as I was simply too lazy to get the complex curves back there. I used panels to sort of get the curves, and left the battery exposed in the rear. Not everyone's favorite solution, but if they do it on official sets (e.g. 8043) then whatever I suppose. The lack of larger Technic sprockets was another problem - the tracks ended up "flatter" compared to the original tractor. I initially built the tracks with pairs of oscillating sprockets to sort of prevent this look, but this proved to be very bad as it would always cause the model to tilt on its front end. I eventually connected all the sprockets to a solid beam which solved the problem, but I cannot help but think the tracks are a bit out of proportion. I also had issues with the clutch gear in the rear PTO - it slipped with too little torque. This caused the mower blades to stop when bumped against anything. Adding another clutch gear or removing them altogether would have remedied the issue, but I simply overlooked it while building. Despite not having fulfilled its original intent as a BrickFair submission, I was nevertheless very satisfied with the result. It had its drawbacks, but in my opinion this was a great experience with modeling a real vehicle. Such projects allow me to actually consider how the real thing looks before choosing what piece to use, which makes the building process much more interesting. Video: Photos:
 -
Hey guys, here's a third model I'm making for BrickFair Virginia this year. I know the event's just weeks away but since I found myself way ahead of schedule I thought why not make a third MOC. It is, of course, going to be much simpler than my other BrickFair MOCs, but I have a feeling this build's gonna be interesting: UPDATE: I'm not bringing this MOC to BrickFair as it is likely going to place a strain on my already limited amount of necessary parts. There's no way I'll get this done in 10 days without making a ton of compromises, so I'm waiting until after BrickFair so I can make it better. I already have a good amount of this MOC done at this point - the entire chassis is pretty much together. The functions will include: Tank drive with a single Medium motor per track, geared down 3:1 Straight-4 piston engine Rear power take-off manually raised/lowered rear attachment The entire model only contains 3 motors, 2 driving the model with the third one driving the rear PTO as well as the fake engine. Note that the battery box and IR receiver are probably not in their final locations yet - I just attached them to the chassis at seemingly reasonable points to avoid a mess of wires while working on the model. I also realize the rear attachment is way too long so I'll definitely look at that part a second time. I'll also make at least one attachment for this tractor - either a mower or a crane like the 42054. If you guys have any suggestions for me, please let me know. Photos:
-
 Soooo, before i take it to pieces i thought i'd share a mostly finished moc of the Claas Axion 960. First thing to mention is the use of 3rd party rear tyres. These allow the scale to be 1:16.5 which means squeezing in features is much easier! Also mean the Xerion wheels are the correct size to be used as front wheels. Here is a link to a flickr album.. if i work out how to embed sensibly sized images i will also - https://www.flickr.com/gp/152155419@N02/229t54 Features: Full RC drive, steering, Pneumatic pump and 3 point linkage - 4 motors. 4 wheel drive, engaged via driving ring clutch Rear Diff-Lock engaged via driving ring clutch Realistic 3 point linkage... 42054 had a very none-real arrangement. Rear PTO engaged via driving ring clutch Narrow (3L) waist to allow 45 degrees of steering lock while retaining a to-scale track width - just realised there's no pic of this, i'll add one. Rear wheels will not be to everyone's taste! But to get a decent scale, i think its needed.. all the supercars are around 1:8 or 1:10 scale which gives you room to fit things. even with these 130mm tyres, its still only 1:16.5. One of the biggest squeezes is getting the track width narrow enough with 4wd and steering.. its actually about 0.5L to wide, the axle will allow a narrower track but then the lock will be 30 degrees or something equally poor. Its 39cm long and 23cm wide, not weighed it yet. Piece count is totally unknown. I'll take a vid of all the function and add it to youtube in the next day or so before i dismantle.... I've got plans to build a proper Xerion with 3 difflocks. Axle is already built so i'm itching to start! I know tractors are a fairly niche category, but i love building them.. all comments welcome! 20180908_181504 by Team Thrifty, on Flickr
 -
 Hi! Finally, I present to you my dump trailer for Claas Xerion 5000 Trac VC, which I've built quite a long time ago and teased you with in this topic. My intention was to model a really cool looking trailer Krampe HP30 - a 3 axle offroad heavy haul trailer, which goes perfectly to Claas Xerion 5000 set. I didn't actually scale it, but scetches/blueprints on the official site were of good use. As you can see on the photo below, I made a fake front cylinder, which unfortunately doesn't exist in LEGO Technic, so I had to cheat and used a pulley system to lift this huge red bathtub. String drum located on the front of the trailer is rotated by rear PTO of the tractor. I used the fantastic Efferman's motorized remake, but an OOB 42054 model could run it too. The trailer is steered as well - BUT! - Shamefully, I've realized 1st and 3rd axle should be steered and not 2nd and 3rd like I built it. And that happened just an hour ago while editing the video! Oh well, I will have to put more effort in research next time Somehow, I missed the video explaining the steering part on YT. Steering is modelled by levers and works according to the angle between the tractor and the trailer. The 3rd axle has larger steering angle than the 2nd. As you can imagine, it has some play in it... All three axles are suspended (normal springs for 1st and 2nd axle, hard springs for the 3rd.) - I borrowed and altered axle designs from MB Arocs set. Tailgate raises automatically and is locked when the dumper is lowered. Here are some details, to make the trailer more juicy . ...and the underbelly - for those eager Technic fans, who can't do without . For the end, here's one with a little breeze and a video of course. I hope you enjoy it! You can find more photos here. Partlist and instructions here. Thank you for your attention and constructive criticism! Best regards, Miha
 -
Hey all, here is something I've been working on. Its a mini Claas Xerion, black edition. Length, width and height are about half the size of set 42054. It started with an idea for turning the cab, as I want to put almost the same systeem in my bigger Xerion. (It isn't complete as I'm missing a few parts.) Building the steering systeem to get 4 wheel steering has taken the most time. Turning of the cabin. I'm also building an implement for the Xerion, which I also want to build for the bigger Xerion. It's a slurry tank based on the Kaweco swan neck tridem. some more pics: http://bricksafe.com/pages/nick97/mini-claas-xerion# I hope you like it. Any comments are welcome
-

[MOC] Claas Atos
Thirdwigg posted a topic in LEGO Technic, Mindstorms, Model Team and Scale Modeling
I'm getting a little behind on posting some of the projects I have finished. Either way, here is a mid sized manual tractor, based (can't we get some red medium sized wheels) of the Claas Atos. A full gallery may be found on Flickr, and much more at thirdwigg.com. Features: Rear wheel drive Steering 3 cylinder engine Front PTO Front Drawbar Rear PTO with on/off Rear Drawbar a couple of implements, more coming (probably) -
 I' ve decided to make an alternative model for 42054 CLAAS XERION 5000 TRAC VC set. I' ve wanted to design something different from all those excellent c models already made, so I made a truck capable of off-road conditions, with crane and many other functions. The result: Functions: rear axle drive with 4 piston engine steering live axle suspension side outriggers cabin tilting rear PTO (power take off) crane arm rotation crane arm 1st stage elevation crane arm 2nd stage elevation grabber closing/opening Please watch the video to see this machine in action and for more details. This model is powered by one m motor with rotation direction selection. It powers main selector, crane selector. and PTO. Main selector switches between worm gear powered functions and arm rotation. When worm gear functions are selected, there is another switch to choose between outriggers and cabin tilting. The crane selector switches between 1st and 2nd stage elevation. I had to use some interesting (I think) solutions because of parts selection in 42054 set: Piston engine There are no piston engine parts in the set, so i made them from some connectors. You can see it working in the video. Suspension There are no shock absorbers or wishbones too. So I' ve made a suspension based on twisting axles: Every wishbone is suspended independly. 3 of those connected to axle make a well-working long travel soft off-road suspension: Grabber There was a grabber in original set, but when building the grabber I've already used the worm gear for more important functions, so I' ve designed a different locking mechanism: Turning the green axle makes the red grabber frame move up and down and becouse of engaging the blue knob gear with h-frame opening and closing blue grabber. Instructions Instructions are already available here on rebrickable! I hope you liked this model.
 -
 I'm planning to build a series of tractor mocs and here is the 7th of them: Case IH Magnum Rowtrac Index: Case IH Magnum Rowtrac Case ih magnum Massey Ferguson 7480 CLAAS Axion 900 CLAAS Axion Terra Trac New Holland T7 HD Steyr Terrus #1 CLAAS Axion 900 Features: Pivoted solid front axle HOG steering Adjustable front hitch Adjustable rear hitch Rear PTO connected directly with rear differential Modular design: chassis, rear hitch, cabin are built separately So no front PTO nor 4 wheel drive due to its small size, sorry guys... Instructions are at: https://rebrickable.com/mocs/MOC-129921/ Video introduction: Some comparison photos with a Siku model: A little closer look at it: Exploded view: Hope you like it! Thanks for watching.
 -
 Small Hummer - 42102 Mini CLAAS XERION Alternative Build (Building Instructions) Building Instructions: https://play.google.com/store/apps/details?id=max.set42102.alternative.models Small Hummer - 42102 Mini CLAAS XERION Alternative Build (Building Instructions)
 -
Windmill - 42102 Mini CLAAS XERION Alternative Build Free Building Instructions: https://rebrickable.com/mocs/MOC-69818/makushima/windmill-42102 Lego Mini CLAAS XERION 42102 Alternative Build - MOC - Windmill (Free Building Instructions) by makushima
-
Small Euro Truck - 42102 Mini CLAAS XERION Alternative Build Building Instructions: https://play.google.com/store/apps/details?id=max.set42102.alternative.models Lego Mini CLAAS XERION 42102 Alternative Build - MOC - Small Euro Truck (Building Instructions)
-
Toy Helicopter - Lego Mini CLAAS XERION 42102 Alternative Build Free Building Instructions: https://rebrickable.com/mocs/MOC-71747/makushima/toy-helicopter-42102 Lego Mini CLAAS XERION 42102 Alternative Build - MOC - Toy Helicopter (Free Building Instructions) by makushima Three-wheel Extended Version Lego Mini CLAAS XERION 42102 Alternative Build - MOC - Toy Helicopter (Free Building Instructions) by makushima
-
Small Dune Buggy - Lego Mini CLAAS XERION 42102 Alternative Build Free Building Instructions: https://play.google.com/store/apps/details?id=max.set42102.alternative.models Lego Mini CLAAS XERION 42102 Alternative Build - MOC - Small Dune Buggy (Free Building Instructions)
-
 I present my method of controlling the mini xerion. Along with some aesthetic modifications.I guess I’ll point out the aesthetic modifications first as they are the most interesting I have changed the mud guards, added headlight extensions to the bumper, and added an exhaust stack. How could TLG miss the exhaust stack... Oh yeah three letters, TLG now for the actual post;)I decided to make a trailer to carry all the electronics so as to not clutter up the tractor. The drive is transferred by the universal joint on the bottom, and steering by a combination of cv and universal on top.Here is the layout of the components in the trailer.And now for the driving video. I apologize for the poor quality, as I only have one phone;P and it is used for driving. Any questions or comments, please ask
 -
Hello Over the past couple of months I have been enjoying building 42054 - what a great little set. Once I'd finished it, I wet about MODing the appearance somewhat, and have ended up with two different set-ups. Descriptions and photos below (hopefully the pics aren't too big, but apologies in advance to the mods if I've messed it up yet again...) Configuration 1 - 8-wheels with stock silage plough & cosmetic modifications Apart from the obvious addition of four extra wheels, I also modified the bodywork as follows: - Altered wheel hubs (apologies, I can't remember who did this white/red mod to the Claas wheels originally, think there's videos on Youtube but if that person is a member EB then thanks to you.) - More rounded fenders/mudguards, both front and back. - Exhaust with chrome parts and decals. - Windscreen wiper to deal with any flying 'muck' - see Configuration 2 below... - Chrome filler cap. - Additional spotlights at the front. - Slight change to roof detail including aerial/additional red hazard lights to rear. - Improved step ladder. - Additional warning decals at front. So, nothing very revolutionary or technically interesting, but I enjoyed making the changes and personally I think the mudguards look better than the stock versions. I did build the crane first but didn't like how bulky it was compared to the tractor, so I ended up with the stock 'B model' () silage plough. I took it outside for some photos: Configuration 2 - 4-wheels with slurry tank trailer & cosmetic modifications I then removed the plough and the extra wheels, and set about creating my first-ever MOC. I was inspired, first generally by the amazing work on 42054 of @BrickbyBrickTechnic, and secondly by one of these - single-axle slurry tank trailers: My tank includes: - Dual slurry pipes and sprayers, for the sprayin' of that muck. - Third wheel for stabilisation when disconnected from tractor (can be released by partly pulling out the axle with stop & red bush). - Custom decals. - Fake on/off switch for slurry pump. - Full set of hazard notices and warning lights, plus chains on the hitch. - Black cover can be easily slid back by removing a couple of securing axles. For when it's time to blast-clean the old muck, before re-filling with fresh muck. I absolutely acknowledge that my MOC is only an approximation of the above, rather than a replica (in particular, using the available spare pieces at my disposal, I wasn't able to recreate the cylindrical shape of the tank). It also doesn't use particularly great building techniques and hasn't got decent functions. However my aim was to create something for my Claas to tow that looked quite nice, and also to complete my first ever actual proper MOC (one previous failed attempt notwithstanding). By these criteria, I achieved something of which I'm happy. I'd love to hear your opinions, but I realise that it isn't up to much, so no worries if you don't have an opinion on any of this, one way or the other.... I also added some headlight effects, again influenced by @BrickbyBrickTechnic's past work on the Claas: