

Selander
-
Posts
648 -
Joined
-
Last visited
Content Type
Profiles
Forums
Gallery
Everything posted by Selander
-
Thanks to comments and proposals. These concept structures are only for a rail yard environment. Along the line it is no doubt catenary like ScotNick proposed are right choice. I do not plan to run any "wire" along the tracks, but I do have plans to add some details to simulate the bars and stuff that hold the wire in position. These details will be attached to the horisontal part of the structure. I add a photo taken 45 deg angled, which gives a better picture of what these concepts look like right now.
-
I also think the near one is a better design for a couple of reasons. It is easier to change height, simply add or remove window frames. It is easier to hang things in. And the overall proportions are more in balance. Did anyone notice the whole (near version again) structure is built studs facing downwards? Why? Because rails are very slightly "arched" (happy smile) so when I assembled 2-3pcs studs up gravity makes an event bigger "smile". By flipping the structure upside-down, gravity compensates the arch effect, making it look more stable and optically closer to horisontal.
-
I made two concepts for rail yard catenary, using roller coaster rails and window frames. This is the primary structure, some more details may be added, to get a more realistic look..... Please let me have some opinions on concepts so far.
-
Collaboration Train layout at Bricking Bavaria 2019 in Fürth/Germany
Selander replied to HoMa's topic in LEGO Train Tech
Link doesn't work... What is Dirks Flickr name? -
Q&A: What is your favorite LEGO Vehicle?
Selander replied to Driver Brandon Grumman's topic in LEGO Town
3177 Simple yet brilliant... -
Great approach to a scale discussion that interest me highly. I agree 100% to your "conclusion" of reducing vehical height and width !! I try to build 4-5 wide cars, 6 wide trucks and 7-8 wide trains and rolling stock.
-
Collaboration Train layout at Bricking Bavaria 2019 in Fürth/Germany
Selander replied to HoMa's topic in LEGO Train Tech
Amazing.....!!!!!!!! -
Yes, and for each cut axle I use 2x ball bearings to give it that extra stability, as one in each 3702 and one in each 32017.
-
Sorry for bumping an old topic. In my decoupling bogie, I replaced technic axles with ball bearings and old 9v-era steel axle + wheels. It runs really smooth, with very low rolling resistance.
-
Impressive indeed !!!
-
MOC: Vossloh style "DSB" locomotive with remote decoupling
Selander replied to Selander's topic in LEGO Train Tech
You can indeed make a program that runs two motors simultaneously at opposite direction, no problem. But programs I made so far envolves setting a time for each operation and I guess you want to run motors continuously...so I am not sure what would be the best solution programwise.... (newbie at programing.....) -
MOC: Vossloh style "DSB" locomotive with remote decoupling
Selander replied to Selander's topic in LEGO Train Tech
Thanks for your praise ! It was fun and easy to use the programing tools in the Powered Up app. -
MOC: Vossloh style "DSB" locomotive with remote decoupling
Selander replied to Selander's topic in LEGO Train Tech
I made one more Vossloh locomotive with onboard remote decoupling. This version is similar, but has horizontal doors for added playability and it has Powered Up Components. Via the Powered Up App, I created a simple automated decoupling program. Very conveniant ! In my Flickr I uploaded a short video that shows the action. Any comments are welcome as usual. -
I think this is the best option. I try to design my locos so that taking out the battery box require moving a minimum of items. For the smaller box 88000, I typically undo the screws so the base is attached to the train base studs, and then the upper part (incl batteries) can be lifted for conveniant change of batteries outside the loco body.
-
MOC: Vossloh style "DSB" locomotive with remote decoupling
Selander replied to Selander's topic in LEGO Train Tech
Mainly because of the cable sallad, to keep all as short and neat as possible. Furthermore, there is simply no space to run cables pass the battery with the present overall dimensions of locomotive. So all connections had to be done in the cabin. Signal travels fine pass the clear windows, so no disadvantage in that sense either. -
MOC: Vossloh style "DSB" locomotive with remote decoupling
Selander replied to Selander's topic in LEGO Train Tech
Thanks for all kind comments. Here are two photos of locomotive without covering sides... hope that helps if someone wants to know more…. -
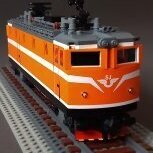
As regular readers of this forum well know, I have an interest in onboard remote decoupling, see for example my (old) article in Railbricks. Recently I updated the decoupling bogie design to be more mechanically robust, to have wheels with lower rolling resistance and (hopefully) to look better. With the deoupling bogie ready I needed a new locomotive to try it in....so I designed a new locomotive around the bits and pieces needed…. This time I decided to make a build solely with bricks already "in stock"....hence not the normal shopping rounds on bricklink. I found the german Vossloh locomotives and liked their light grey / green livery which also matched my available bricks and elements. The green cab really cried for white decals so I used some Danish DSB that I already had….. But DSB + Vossloh is not a combination from real-life, as far as I know, so please see this as a product of my own imagination… The locomotive is quite full of PF Components: Battery box, IR receiver, M-motor + gearing for driving the mini actuator plus a regular train motor for propulsion.
-
Congrats to an amazing train !!
-
This is a quality build. However I Iike to see some close up photos of motor decor and those three part side windows to fully appreciate what you built. Is that possible?
-
Thanks ! I need to remove it to activate the hub.
-
Beautiful building !
-
No you misunderstood, it IS a ladder, but the ladder is hold in right position by jumper plates. That is what I meant.
-
Thanks. It is a hinge bar, ref 2880. The bed can slide off, but there is no tipping mechanism.
-
Half stud offset normally means jumper plates, so that is what I used.
-
Thanks. It is a plate 1*2 with ladder ref 4175, assembled with half stud offset, so it becomes flush with sides.