
Pvdb
-
Posts
256 -
Joined
-
Last visited
Content Type
Profiles
Forums
Gallery
Everything posted by Pvdb
-

[WIP] New Supercar
Pvdb replied to Pvdb's topic in LEGO Technic, Mindstorms, Model Team and Scale Modeling
Maybe not quite as bomb proof as your rugged super car chassis I will take a picture from the bottom in my next update. -
[WIP] New Supercar
Pvdb replied to Pvdb's topic in LEGO Technic, Mindstorms, Model Team and Scale Modeling
It is all form-locked and a real pain to take apart, as is the new version, but that is the only way to make the chassis stiff. -
42083 - Bugatti Chiron
Pvdb replied to Jurss's topic in LEGO Technic, Mindstorms, Model Team and Scale Modeling
I am not 100% sure about the looks of the Chiron either, although this version http://www.supercarsuk.co.uk/cars/bugatti-vision-gt-or-chiron-concept/ looks pretty savage. The engineering (just the tyres alone) is pretty amazing though. I am looking forward to see what Lego can make of it. -
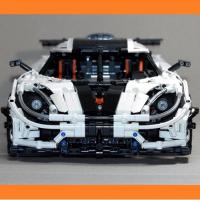
What with a certain company ripping off my Koenigsegg One:1 and making a pretty bad job of it at that if you have seen some of their marketing photo's where the flex axles bend into strange shapes. Also due to the fact that my own Lego version started to look a bit shabby when parked next to the more recent Ultimatum GTR V10, i decided to do a major upgrade, basically start over, but this time without trying so hard to replicate the real Koenigsegg, but rather with the aim of making a Koenigsegg based car that is designed more with the aim of making it look good in Lego Technic (we will see how that turns out!) I will be aiming to replicate the Koenigsegg suspension, slight tweaks to my previous rear suspension and a major improvement to the previous front suspension to make it stiffer. I am looking at a combination of my previous 3+R (fake) paddle shift gear box from the Koenigsegg, and the Ultimatum's improved 5+N+R. I have already designed a compromise 4+N+R to fit under the 8 cylinder engine. I just have to work out the shifter mechanism. The engine will be 1 stud lower than the previous Koenigsegg The doors MUST use the same mechanism as the previous Koenigsegg, but I am looking to change the method to actuate them. The roof needs to be at least 1 stud lower than previous (that was my main issue with the bodywork of the previous Koenigsegg when standing it next to the Ultimatum) and here I may move slightly away from the real Koengsegg design, I will see where it all takes me. Again it will be 1:10 scale or thereabouts as I am not yet that inspired to work at 1:8 as I like the challenge of less space to work with. The back end is in progress, and while it looks similar to the previous Koenigsegg, virtually every part has been re-designed and I think significantly improved, so far, I am having fun.
-
Chevrolet C10 1972
Pvdb replied to KikoTube's topic in LEGO Technic, Mindstorms, Model Team and Scale Modeling
The bodywork is so clean, I like the pneumatic pump disguise and it drives really nicely. Great MOC -
The only way to make it truly stop is to rip it apart. Another way to make it stop is to publish instructions because once you have gone through that pain then you won't want to make any changes to the MOC. Putting it in the loft is also quite a good way to make it stop. That's where a few of my favourite older MOCs are currently residing.
-
[WIP] LEGO Technic McLaren P1
Pvdb replied to LithuanianTF's topic in LEGO Technic, Mindstorms, Model Team and Scale Modeling
It's a tough one all around to replicate, front, back, door mechanism. And then there is the adjustable ride height that you could try to fit in at 1:8 scale. I will be interested to follow your build. What are you starting it off with? -
Bugatti Chiron 1:8
Pvdb replied to Leviathan's topic in LEGO Technic, Mindstorms, Model Team and Scale Modeling
It looks so much better now that you have fixed the roof and brought it a bit lower. It was definitely worth doing that. Great functions as well. Now it will be really interesting to compare your bodywork with the Lego version that is coming out soon/maybe/one day. -
42083 - Bugatti Chiron
Pvdb replied to Jurss's topic in LEGO Technic, Mindstorms, Model Team and Scale Modeling
Maybe you are hoping for too much with this. -
Grum's Shed
Pvdb replied to grum64's topic in LEGO Technic, Mindstorms, Model Team and Scale Modeling
Getting close now to be able to turn it on and see if the functions all work -
This is really nice. I like all the details and the shaping.
-
[MOC] Micro Forklift & Truck
Pvdb replied to Anto's topic in LEGO Technic, Mindstorms, Model Team and Scale Modeling
I love the little forklift. -
[MOC] Ultimatum GTR v10 Supercar
Pvdb replied to Pvdb's topic in LEGO Technic, Mindstorms, Model Team and Scale Modeling
No problem. This was the first time I have made instructions myself - it has taken weeks!! If you do make the model and find any parts in the instructions that are illegible, then please let me know. My 9 yr old checked them by building the red version so I guess they are ok!! When constructing the gear box, those white bands need to be tight enough - it all works fine in my white version of the car, but the "newer" bands used in the red car don't seem to be so tight, and could do with an extra twist or two. -
[MOC] Ultimatum GTR v10 Supercar
Pvdb replied to Pvdb's topic in LEGO Technic, Mindstorms, Model Team and Scale Modeling
I have put together a short video (filmed with my phone) https://youtu.be/MKvvzvIShgQ And a couple of pictures of the red version that my kid just finished building - a couple of minor part substitutions required - I almost like this better than the white version. -
[MOC] Ultimatum GTR v10 Supercar
Pvdb replied to Pvdb's topic in LEGO Technic, Mindstorms, Model Team and Scale Modeling
My son is building a red version so we will stop the build at an appropriate point and make a video of the gearbox in action. -
This is huge and really nicely done. I like the way that you have gone the extra mile to fill the space with as many functions as possible such as the microwave. Great Work and a good looking truck. The chrome sets it all off.
-
[MOC] Ultimatum GTR v10 Supercar
Pvdb replied to Pvdb's topic in LEGO Technic, Mindstorms, Model Team and Scale Modeling
And a couple of quick mock ups of Red and Black colour variations. -
[MOC] Ultimatum GTR v10 Supercar
Pvdb replied to Pvdb's topic in LEGO Technic, Mindstorms, Model Team and Scale Modeling
Coming up. -
Grum's Shed
Pvdb replied to grum64's topic in LEGO Technic, Mindstorms, Model Team and Scale Modeling
A bit of a balancing act going on there!!! It is all coming together now. -
[MOC] Ultimatum GTR v10 Supercar
Pvdb replied to Pvdb's topic in LEGO Technic, Mindstorms, Model Team and Scale Modeling
A first attempt at using Pov-Ray to create some renders - ok - I changed the headlights colour -
The blue one looks great I think.
-
Technic Pub
Pvdb replied to jantjeuh's topic in LEGO Technic, Mindstorms, Model Team and Scale Modeling
I agree with Jim, grey is the way to go. When I get fed up with working on the house, then its time for a bit of Lego, and as for the kids, they are probably a reason why I do more Lego than less, although the younger one is mostly into Ninjago whichi is slightly out of my zone -
Brilliant, Watching your gret little clip and can say this is the first time I have been tempted to go out and buy a buwizz as it looks a lot of fun.
-
[MOC] Ultimatum GTR v10 Supercar
Pvdb replied to Pvdb's topic in LEGO Technic, Mindstorms, Model Team and Scale Modeling
Yes, your shifter mech works well and has enough power to drive the additional toggle that switches between the low and high range gears. The headlights!! my oldest boy hates these lime green headlights and keeps switching them to trans clear whenever I am not around but I think that is a bit bland! In terms of colour, I really wanted to use some of the new blues for this car but the range of parts in these colours isnt yet wide enough. Given the curved panels for the roof, black is the only colour that you can built this car in its entirity The back end was a little bit inspired by the Venom F5 below although not intended to be identical, thus I also used the cocnept of black roof etc. -
[MOC] Ultimatum GTR v10 Supercar
Pvdb replied to Pvdb's topic in LEGO Technic, Mindstorms, Model Team and Scale Modeling
Cheers Lox Lego, The gear box looks bigger than it actually is in that CAD image, the only slight issue was the length of it including the shifter, but it fits pretty perfectly under the V10 engine. Regarding the front end, there are a couple of panels in similar location to Madoca's Icarus, but the whole front end was pretty much designed from the ground up in the end. Saying that, I am glad there is a little bit of Icarus front end left in this car as I really like Madoca's design. I agree, the collar extenders are a neccesary evil in this design. They introduce a bit of delay but this is only really apparent if you push the car back and forwards. If you continue to push the car in a forwards direction while sequencing through the forward gears then there is minimal delay between gears as the gears and collars in the gearbox continue rotating in the same direction.