
Pvdb
-
Posts
255 -
Joined
-
Last visited
Content Type
Profiles
Forums
Gallery
Everything posted by Pvdb
-

[WIP] Koenigsegg One:1
Pvdb replied to Pvdb's topic in LEGO Technic, Mindstorms, Model Team and Scale Modeling
A few updates and ideas for the rear end -
[WIP] Koenigsegg One:1
Pvdb replied to Pvdb's topic in LEGO Technic, Mindstorms, Model Team and Scale Modeling
The Gearbox is buried too deep so I will have to digitise it in MLCad. Here is the first part - the gear shift mechanism. The image is just missing one rubber band which is held by the two tow balls and holds the beam 3 against the knob wheel with a bit of force. I will do more Cad over the next week and add some more images of the gearbox. -
[WIP] Koenigsegg One:1
Pvdb replied to Pvdb's topic in LEGO Technic, Mindstorms, Model Team and Scale Modeling
Regarding the gear box, it shifts quite reliably using those 2 red liftarms at the front which are there for testing purposes. I am quite happy with the selection mechanism. In the gear box I have used the 2L connectors without ridges, but I do not see that as a non purist solution, rather it is using the best piece of Lego for the job required. My concern is the final linkages from the paddles to the point where currently the red liftarms attach will not be strong enough to take the force required. So like you I have my doubts but I will look for a solution to that. -
[WIP] Koenigsegg One:1
Pvdb replied to Pvdb's topic in LEGO Technic, Mindstorms, Model Team and Scale Modeling
The door hinge. -
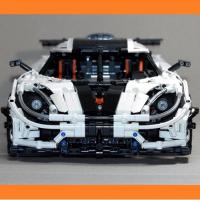
This car grabbed my attention a few months ago so I decided to try to build it. The design parameters that I want to achieve include the following: Tough enough to withstand my kids playing with it. Simple enough for my kids to explore the functions Copy the rear triplex suspension set up of the Koenigsegg One:1 as closely as possible Replicate the front suspension set up Syncro dihedral door hinges!! Paddle shift gearbox A good approximation of the real car with the bodywork. Pictures below show WIP so far. I am happy with the front and rear suspension set ups, using the standard hubs does not allow for so much versatility in the build but at least the wheel stay on The gear box is 3 speed plus reverse. I decided on this compromise as I really wanted to try to build a paddle shift gearbox. The shift mechanism is complete, I just need to sort out the linkage to the paddle shifters and work out if this can be made sturdy enough to change the gears or whether the paddles will be purely aesthetic - i.e. they will move correctly when the gear is shifted but the actual lever that is pulled is located elsewhere The door hinges are done. I used actuators rather than sprung dampers as the actuators are much easier for kids to operate. The dampers need quite a lot of force to push in. I am starting to work on the body work, but don't expect a final model anytime too soon!!!! Rear Suspension Front Suspension
-
[WIP] Megacar
Pvdb replied to VKTechnic's topic in LEGO Technic, Mindstorms, Model Team and Scale Modeling
Nice job on the rear suspension incorporating the sway bar. I am also working on a One:1 at the moment (well for the last 6 months). I am using the standard wheel hubs as my end product will no doubt be played with by a 3 year old (he may be 4 by the time it is finished) Anyway, I look forward to seeing how your model develops and I will start a thread with my WIP. -
The Gearbox, it is like it needs some oil in there - it squeals. Simple solution is to take one of the little 8 tooth gears out. As for the steering, double checked and it is all as the instructions say it should be. The pins gradually work loose, and fall out. Having looked at the front steering and suspension in a little more detail, it is definitely not my favorite part of this model. I am also not in favour of the "Toe Out" set up on the front wheels. I have found that it is better that the front wheels have a little bit of "toe in" if the model is to be played with as this reduces wheel scrub and therefore the stresses. This means that things are much less likely to come loose etc.
-
This is the first time I have ever bought instructions for a MOC - I am usually happier designing my own. I agree with many of the previous comments. The final look is pretty stunning, looks wise, the only thing I don't like much is that the steering wheel is so far to the side of the cabin. This maybe because the seats are forced out wide due to the engine protrusion. Mechanically - the gear selector is brilliant, however, the gearbox is way to tight - so that in first and reverse the wheels actually skid along if no pressure is put down on them. As my 7 year old plays with (and helped build all the bodywork) the model, I can also say that it is really frustrating that the front suspension pins continuously fall out when the car is driven around. (I think that the vertical links inside the suspension arms are supposed to stop this happening but it doesn't work. A couple of mods to improve these two aspects would make this a great MOC in my opinion.
-
[MOC] McLaren F1
Pvdb replied to Pvdb's topic in LEGO Technic, Mindstorms, Model Team and Scale Modeling
The Wheels - Back wheels/tires from 42000 F1 car, Front wheels/tyres from 42039 24 hours racer Cheers Kronos - I need to tidy up the digital file a bit then will probably release it. -
[MOC] McLaren F1
Pvdb replied to Pvdb's topic in LEGO Technic, Mindstorms, Model Team and Scale Modeling
I disagree - see the image below -
[MOC] McLaren F1
Pvdb replied to Pvdb's topic in LEGO Technic, Mindstorms, Model Team and Scale Modeling
Cheers The size difference between the front versus rear tires was based on the real thing. -
The McLaren F1 was an iconic and unique supercar. 20 years on it still looks great and performs well against some of the more modern machines. Suspension – Modelled on the McLaren F1 set up. Positive caster angle on the front steering linkage was added to help with the return to centre on the RC model. This was retained on the non powered version. Steering – A relatively simple set up due to the central position of the steering wheel in the car. Gearbox – I wanted to try to model the transverse gearbox set up on the McLaren but I also wanted the gear selector to be simple, accurate, and easy for a kid to use and understand. The end result is a transverse, high / low gear box. The gear selection is really crisp, and it works well so I am really pleased with the compromise. Engine – A big v12 that was difficult to fit in. The size of the engine led to some of the size compromises on the gearbox. Butterfly Doors – The butterfly doors are partially pneumatically assisted in that it was not possible with the current design to generate enough pneumatic power to lift the doors, but the pneumatics are able to hold the doors in raised positions Front Bonnet – Manually opens Rear engine bay cover – The door is held in open position by a passive pneumatic mini cylinder Rear exhaust silencer cover - Manually opens. Airbrake – This can be raised and lowered pneumatically. Spoiler – Two mini pneumatic cylinders block the spoiler into a raised position but allow continued use of the airbrake. Pneumatic pump – the pneumatic pump is disguised under the large engine air intakes. It is operated by manually turning a small handle that tucks back down when not in use. One pneumatic switch operates the airbrake – Up/Down. The other pneumatic switch operates the spoiler up function in one position, and in the other position pressures up the pneumatic cylinders that assist the butterfly doors.
-
Great Entries 31:6 16: 4 21: 4 40: 3 46: 3
-
54. Tucker-Terra Sno-Cat Entry Name: Sno Cat Part Count: 199 The model is a mini representation of the Tucker Terra Sno Cat range Functions: - Front / Rear Interconnected Steering - 4 Independent Suspended Tracks - Raise and Lower Snow Plough Promotional Image: Parts List: WIP Thread: http://www.eurobricks.com/forum/index.php?showtopic=98132&hl=
-
[MINI] Sno-Cat
Pvdb replied to Pvdb's topic in LEGO Technic, Mindstorms, Model Team and Scale Modeling
I can replace the no.9 axle and axle connector that is used as the push/pull lever to raise and lower the snow plough with a no.10 axle. Not as nice, but it will fit within the rules good idea. -
A mini snow groomer. Based on the Tucker Terra Sno-Cat 200 series, and also on a much larger MOC that I created last year. It was a major challenge getting down to 201 parts with this tracked vehicle especially as the track links took up the first 60 parts! One more part to remove!! I think we should have a Top Gear type rule where every additional part over 200 count as a negative point!!! Some LDD pictures below, real pictures to follow. It has front/rear steering (HOG doubles as the exhaust) All four tracks pivot. The pull/push lever at the back raises and lowers the snow plough The Big Brother
-
Audi RS 5 DTM
Pvdb replied to Lipko's topic in LEGO Technic, Mindstorms, Model Team and Scale Modeling
Brilliant Looks Out of interest, is the rear suspension based on the real thing? -
MOC Tucker Terra Sno-Cat
Pvdb replied to Pvdb's topic in LEGO Technic, Mindstorms, Model Team and Scale Modeling
In the end the suspension and track connections turned out quite simple and effective. It took a while to come up with the sturdy design though. Regarding the tracks themselves, the tyres I used on the track guide wheels in the MOC look better, but are a little thick so needed an extra chain link to be put in - reducing performance. For best performance you need to use the thinner - tyres with offset tread. I will make a video at some point, I don't have a great video camera though!!! -
MOC Tucker Terra Sno-Cat
Pvdb replied to Pvdb's topic in LEGO Technic, Mindstorms, Model Team and Scale Modeling
-
The design is based on the Tucker Terra 1000 / 2000 models. The first version is designed with functions and looks in mind rather than driving performance (by performance I mean speed). RC power functions control - XL motor for Drive - M motor for High/Low gear selection - M motor for Steering - M motor to raise/lower the snow plough The model also features - Full Suspension - simulating the action of the leaf spring suspension. - Drive to all four tracks via central differential and Differential for each track pair - Pivoting Tracks - Opening Doors - Manual adjustment to Snow Plough to angle it Left or Right - Steering wheel in Cab turns as the tracks turn I think that in time for winter I may strip out the High/Low gears and put in two L motors to increase the power and speed, then test it out on the snow. I may need to double up the tracks as well. You can see it here http://www.mocpages.com/moc.php/370154
-
Supercar Lamborghini SV
Pvdb replied to spiderbrick's topic in LEGO Technic, Mindstorms, Model Team and Scale Modeling
As well as the impressive functions. Nice body design. -
Madoca1977's Wing Body Truck
Pvdb replied to AndroTech's topic in LEGO Technic, Mindstorms, Model Team and Scale Modeling
Great looks and functions. -
Madoca1977's New Supercar
Pvdb replied to Kwon's topic in LEGO Technic, Mindstorms, Model Team and Scale Modeling
It looks great, especially like the front / lights. -
Pneumatic Autovalve - non clicking
Pvdb replied to Pvdb's topic in LEGO Technic, Mindstorms, Model Team and Scale Modeling
I also like your solution there, is there enough control so you can stop at neutral as with the one I made? (a feature of the switch movement being quite slow)