
Pvdb
-
Posts
255 -
Joined
-
Last visited
Content Type
Profiles
Forums
Gallery
Everything posted by Pvdb
-

[MOC] ICARUS Supercar
Pvdb replied to Madoca 1977's topic in LEGO Technic, Mindstorms, Model Team and Scale Modeling
You are fast Blakbird. It's looking good. Indeed this quarter panels look challenging. -
[MOC] ICARUS Supercar
Pvdb replied to Madoca 1977's topic in LEGO Technic, Mindstorms, Model Team and Scale Modeling
Have to say that I tried LDCad but went very quickly back to MLCad when digitising my recent car. Should have also said. I really am going to have to make this as it is such a great looking car -
[MOC] Koenigsegg One:1
Pvdb replied to Pvdb's topic in LEGO Technic, Mindstorms, Model Team and Scale Modeling
Hi Blakbird - thanks for your offer to help. I will definitely take you up on that. I have done the vast majority of the CAD work now, should be finished in the next week or so, I will let you know when I have reached that point. With regards to the MacLaren - I have a CAD file for it that can be shared, but have never got round to making proper instructions. -
Grum's Shed
Pvdb replied to grum64's topic in LEGO Technic, Mindstorms, Model Team and Scale Modeling
Nice work Grum. Having had the pleasure to visit your so called "shed" I can confirm that it is way nicer than the average British garden shed and that is before considering the lego inside. I think I need something similar in my garden. Then I might get some peace and quiet when trying to build. -
Great MOC and nice video. I like both the style and the functionality.
-
[MOC] ICARUS Supercar
Pvdb replied to Madoca 1977's topic in LEGO Technic, Mindstorms, Model Team and Scale Modeling
That is a really great looking front end Madoca 1977 and the performance also looks great. May I ask you to explain (since I have not really got into Sbrick yet) why you need two of them on this model. Also does the SBrick allow you to have some proportional control on the PF Servo Motor?? -
42056 - Porsche Speculation
Pvdb replied to Jim's topic in LEGO Technic, Mindstorms, Model Team and Scale Modeling
Going back to the Porsche In my opinion – for a released set, Lego have done a pretty good job here in releasing the basics of what can possibly be modded into quite a masterpiece. A few design aspects that are so far disappointing to me The front wishbone suspension set up. I guess that having shorter wishbones means the same springs can support a heavier front end weight but unless they have created some 3L link arms then there will be some bump steer – although as has been pointed out, the new hubs are so badly designed and slack that this will barely be noticeable. The New Wheel Arch panels. I wish Lego had designed these in two halves with a 1 or 2 stud width curved extension panel in the middle. The 1 or 2 length panel would have been really useful in other aspects of design as I am sure the new 6 width curved panel will be (on the door of the Porsche). The two halves set up with extender would have allowed for the wheel arch to be made smaller or wider to accommodate difference size wheels etc in futures MOCs -
[MOC] Koenigsegg One:1
Pvdb replied to Pvdb's topic in LEGO Technic, Mindstorms, Model Team and Scale Modeling
That depends how you slide them through. The smooth joiners have two opposing rounded off edges and two opposing flat edges. If the flat edges are lined up with the catches then there is no pressure on them. -
[MOC] Koenigsegg One:1
Pvdb replied to Pvdb's topic in LEGO Technic, Mindstorms, Model Team and Scale Modeling
For those who have asked, The CAD is coming on slowly but surely. Thanks to Brunojj1 I may have a collaboration to help make proper instructions. -
[MOC] Koenigsegg One:1
Pvdb replied to Pvdb's topic in LEGO Technic, Mindstorms, Model Team and Scale Modeling
Thanks for all of the comments guys. It means a lot especially when coming from other great MOC builders. When building this gearbox and after experimenting a bit with the older driving rings (red) and smooth connectors I discovered that it matters which way the connector is orientated through the driving ring. If you look closely at the connectors you will see two flat edges and two more rounded edges. If the connector is placed into the driving ring with the flat edges lined up with the small driving ring catches, then this enables smooth movement and without the slight deformation of the catch on the driving ring which does occur if you line up the slightly rounded edges with the catches (and which I guess could constitute an “illegal” use of the part) The smoother the movement of the driving rings, the better the gearbox works. All built into the model, the gear change is very reliable. -
[MOC] Koenigsegg One:1
Pvdb replied to Pvdb's topic in LEGO Technic, Mindstorms, Model Team and Scale Modeling
Or this newer video (poor quality shot with my phone just now) https://vimeo.com/154623743 -
[MOC] Koenigsegg One:1
Pvdb replied to Pvdb's topic in LEGO Technic, Mindstorms, Model Team and Scale Modeling
Thanks to all for the kind comments and constructive criticisms. Regarding the high roof - it is a slight departure from reality. If I find a way, I may address that in future if I find the time. -
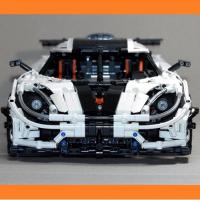
The Koenigsegg One:1 was introduced in 2014. Seven examples, including one prototype, were built during 2014 and 2015. This was one of the most exclusive production car programs ever envisaged in the car industry. The hp-to-kg curb weight ratio is an astonishing 1:1. This has been called the “dream” equation, previously thought impossible when it comes to fully road legal and usable sports cars. The One:1 is the first homologated production car in the world with one Megawatt of power, thereby making it the world´s first series produced Megacar. More on the One:1 at http://koenigsegg.com/one1/ This car grabbed my attention about a year ago so I decided to try to build it. The design parameters that I want to achieve include the following: Replicate the rear triplex suspension set up of the Koenigsegg One:1 as closely as possible Replicate the front suspension set up Syncro dihedral door hinges which are typically Koenigsegg Paddle shift gearbox - a new challenge for me. A good approximation of the real car with the bodywork. Tough enough to withstand my young three year old playing with it. Intuitive enough for my kids to explore the functions. After a long build process and lots of experimentation I am really happy with the end result. The paddle shift gear box ended up being 3 speed plus reverse mainly due to space restrictions and also complexity. Perhaps a future project will be to expand this concept to include additional gears. The paddle shifts at the steering wheel are aesthetic in that they are linked to the actual manual shifters which are camouflaged on top of the dashboard, but it is not really possible to exert enough force on the dash paddles to change gear. This is presented in the images below and in the CAD image. Over time I will digitise this and add a bit of video to show the functions, but first, here are some pictures. [TBC]
-
I like this blue and white colour scheme a lot. Nice work.
-
42054 - Claas Xerion 5000 Trac VC
Pvdb replied to Jim's topic in LEGO Technic, Mindstorms, Model Team and Scale Modeling
I like your solution but there are some problems in the large backlash caused by the fact that the clutch gears only have 4 internal pickup points. And as said before the fact that the steering MUST be in neutral position when changing modes. I tried a similar solution years ago on a crane and it didn't work well due to the above issues. So I agree with following posts in that it must be some clever linkage system. It has me intrigued anyway and is the reason why I would buy this set. -
[WIP] Koenigsegg One:1
Pvdb replied to Pvdb's topic in LEGO Technic, Mindstorms, Model Team and Scale Modeling
The car is finished now, but the CAD is at a very early stage and I am not that fast in Mlcad!!! -
[WIP] Koenigsegg One:1
Pvdb replied to Pvdb's topic in LEGO Technic, Mindstorms, Model Team and Scale Modeling
Last WIP, I just need to attach a couple more parts -
That is a great model. It must have been great fun building it. Amazing end result.
-
[WIP] Koenigsegg One:1
Pvdb replied to Pvdb's topic in LEGO Technic, Mindstorms, Model Team and Scale Modeling
The car is almost complete bar a few details and one slight modification so all going well I will be able to take some photos in the next week. In the mean time, here is a very rough and ready video that shows the approach I took to designing the paddle shifters. Given the lack of space at this scale I decided that a kind of HOG mechanism for changing gear was the best way to go, the paddle shifters at the steering wheel which are virtually impossible to get to anyway are therefore aesthetic. In the final solution the HOG shifters are blended with the top of the dash, and elasticated so that they spring back. https://vimeo.com/153777673 -
Manias in building?
Pvdb replied to jorgeopesi's topic in LEGO Technic, Mindstorms, Model Team and Scale Modeling
Grum64 - your reply to this post was quite modest, but don't you exhibit one of the so called real "manias" as descrbed by Lipko?? i.e. washing - no not just washing - but steralising parts before building -
[MOC] Walking Tank (Hexapod)
Pvdb replied to Hugolin's topic in LEGO Technic, Mindstorms, Model Team and Scale Modeling
This is a brilliant model, and looks great too. You have used the panels really well, and as for the mechanism, it works really nicely. -
[WIP] Koenigsegg One:1
Pvdb replied to Pvdb's topic in LEGO Technic, Mindstorms, Model Team and Scale Modeling
Front Update - still someway to go but things are taking shape! - Compromise made on the wheel arch which should be integrated with the opening bonnet, but this proved very difficult to achieve whilst also looking good. -
Manias in building?
Pvdb replied to jorgeopesi's topic in LEGO Technic, Mindstorms, Model Team and Scale Modeling
This is an interesting thread as I now realise I am not alone in having some of these "mania's". -
[WIP] Koenigsegg One:1
Pvdb replied to Pvdb's topic in LEGO Technic, Mindstorms, Model Team and Scale Modeling
A few recent replies to this post reminded me that I was supposed to be updating this WIP thread from time to time. Here is some progress, quite a lot to do still although the body work is starting to take shape. -
That is a great display and some great lego ships. Well worth all the time and effort that you have put into your creations.