
emielroumen
-
Posts
226 -
Joined
-
Last visited
Content Type
Profiles
Forums
Gallery
Everything posted by emielroumen
-
Effe's MOC Corner
emielroumen replied to efferman's topic in LEGO Technic, Mindstorms, Model Team and Scale Modeling
Thank for sharing @efferman. I would love to try this XL actuator myself, but is a rather expensive part to have 3D printed. Anybody in the Netherlands, Belgium or Germany that can create a small batch at a reasonable price, say 50 Euros? -
@896gerard: were you able to put the actuator to use on the Liebherr? Any pictures you can share?
-
DNR Shifter Issue
emielroumen replied to StudWorks's topic in LEGO Technic, Mindstorms, Model Team and Scale Modeling
Hi Studworks, are you describing the same issue in this thread? It would make sense to keep it all in 1 instead of 2 threads. -
Limited Technic Reviews
emielroumen replied to Jim's topic in LEGO Technic, Mindstorms, Model Team and Scale Modeling
I enjoy reading the longer reviews with high quality pictures, videos are very nice to have but not a must. Perhaps TLG should do trial runs with certain forum members before production, as most of the sets get criticized (usually rightfully so). However, almost immediately followed by improvement suggestions and proof of concepts and enhanced building instructions: Bugatti, Porsche, Liebherr just to name a few :) -
That looks great! I’m tempted to get the 42100, not sure yet because of the new electronics. However this combo makes it much more interesting!
-
Wow, amazingly complex build!
-
Correct, front axle indeed. I was referring to the 2 not aligned u-joints that might cause unnecessary vibration and/or friction in the drive mechanism.
-
Very nice MOC! Minor comment about the alignment of the u-joints below the differential of the rear axle.
-
It should not matter; the build is not symmetric.
-
What a beast.. The grey pins in the bucket are not properly inserted it seems.
-
Leaking Batteries -
emielroumen replied to doug72's topic in LEGO Technic, Mindstorms, Model Team and Scale Modeling
I've noticed this on a few occasions too, although only with the AA boxes not the AAA boxes. I used the same brand alkaline batteries (Kodak MAX) in all the boxes. -
Awesome build! Very nice to see you can still operate it, despite the wind!
-
3/4 scale 8860
emielroumen replied to kraai's topic in LEGO Technic, Mindstorms, Model Team and Scale Modeling
The original is also just the framework. -
Very much appreciated and inspiring! Below my attempt, based on your redesigned rear-axle, mixed with some Pimp my Bugatti v1.4 changes and some changes I made myself. Amongst others, bracing of the rear axle using the 2 blue pins (with Friction Ridges Lengthwise and Pin Hole), additional bracing of engine cover to gearbox, etc. Taking a break since I don't have enough spare perpendicular 3 x 3 bent connectors.
-
Very interesting! Can you post a video with a comparison between normal, alkaline AA and the type you have purchased?
-
I would love a blog post with more details.
-
Effe's MOC Corner
emielroumen replied to efferman's topic in LEGO Technic, Mindstorms, Model Team and Scale Modeling
Great to see the progress and hope the Lego company is inspired by your printed components. Just one minor remark: belly shot, look at the connection of the 2 uni-joints, 1 needs to be rotated on the axle for a smoother drive train. -
I followed the excellent, improved building instructions. Pleasure to build, although it is sometimes not easy to figure out where the parts should go. Adding some arrows might be an easy fix. Would not mind if they would come with a small fee, given the quality!
-
Nico71's Creations
emielroumen replied to nico71's topic in LEGO Technic, Mindstorms, Model Team and Scale Modeling
Thanks @nico71 for this model C. Just bought the instructions, now need to find time to dismantle the crane :) -
I saw it yesterday, although not in action. A giant build!
-
Don’t think so, although it looks like Nico created a toolbox with the components: http://www.nico71.fr/simple-toolbox/
-
So model C instructions will be announced in October?
-
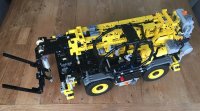
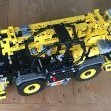
I just couldn't wait for the blue parts so I continued the build in yellow-black. With only a few minor modifications it is going according to plan. Added the wheels for the picture only :)
-
I've just started to build this MOC after taking apart my versions of @Jurgen KrooshoopTelehandler and @D3K Swingloader for parts. While I was planning to have it in yellow-black, I've ordered all missing blue parts earlier this week. The model so far is not color accurate, but since most of the internal structure will be hidden from plain view when done. Claas tires did arrive earlier, although I also had to order grey rims.
-
[MOC] Swingloader Mark Two
emielroumen replied to D3K's topic in LEGO Technic, Mindstorms, Model Team and Scale Modeling