
Immo
-
Posts
245 -
Joined
-
Last visited
Content Type
Profiles
Forums
Gallery
Everything posted by Immo
-
 Nice test, as always! I recently bought a whole bunch of these attachments to test them on my 42065. Mostly because most of (scarce anyway) area in my apartment is either covered in tiles or wooden flooring and the tracks were sliding crazy. I bought one for each link, being convinced using two would cramp the turning performance. I kept the two "stock" M motors. I stuck them in a row on each track because of my obsessive personality traits combined with the fact the odd number of links in each track. I used the internal row first but then the attachments "drew" longer walls of an rectangle. The turn performance was much weaker than with no attachments. So I decided to try an external row on each track - then, the rubber attachments "drew" two walls of a near-square. Performance was way better. Of course, bare tracks have better skidding performance and the perform better on blankets, towels and other "fuzzy" materials. But on the hard flooring the acceleration, speed and handling is way better. Also, the climbing (especially over the obstacles like a vacuum pipe etc.) performance increased. Then I tested them set in an alternating fashion and the performance was cramped and it caused too much vibrations. Anyway, I play around with the modified 42065 around my house only, so I consider those rubber attachments a great investment and I gladly traded the cons for pros. To sum things up: CONS: skid speed quite reduced on any surface turning speed a bit reduced on any surface (except super-smooth ones) performance on "fuzzy" surfaces deteriorated greatly PROS: almost no sliding on wooden and tiled flooring = acceleration bettered handling bettered climbing ability improved straight line speed increased track links deterioration rate greatly reduced If you're curious as to whether the rubber attachments themselves are of good quality or tend to pop out - YES to first and NO to second. Haven't lost a single one yet, they sit firmly enough to not get torn out by torque or climbing, yet they are quite easy to remove by hand. Haven't noticed any wear on them yet either.
 -
The Technic Confessional
Immo replied to Didumos69's topic in LEGO Technic, Mindstorms, Model Team and Scale Modeling
Being a purist (to an obsessive point sometimes), I never destroyed a part purposefully. The only sin I'm guilty of is using a sharpie to "paint" the pieces back in the teen days. Seeing how many pics in this thread were 'cringy' to me, I accept the fact I'm ill adapted to live in a world full of venturesome AFoLs -
General Part Discussion
Immo replied to Polo-Freak's topic in LEGO Technic, Mindstorms, Model Team and Scale Modeling
So many brown bits! For me, they scream RAT ROD, but then again, even a cold three day sandwich in my fridge screams HOT ROD to my obsessed mind -
Technic Photography
Immo replied to Werlu Ulcur's topic in LEGO Technic, Mindstorms, Model Team and Scale Modeling
I always took photos with my phone's camera, mostly with horrible results that even processing couldn't fix. Then, my GF won a "real" camera (Sony DSC H300, which is low budget but quite good device). I did some experiments with photos and obviously most were better than those taken with the phone. Last time I tried an experiment with two stiff posters, a plank of wood (spare shelf from IKEA wardrobe) and just sunlight as a light source. Thus, the photos for the Hob Rod were taken. They are far from perfect, but for NO processing whatsoever, only cropping, they are quite good - good enough to surpass anything I did before and that's why I posted them even if the focus was a bit off. Of course, when I'll move to an apartment that's bigger than a two car garage, I'll buy the biggest roll of white paper in the world and a lamp with an umbrella or a softbox. -
Oh, how this would benefit from a sticker or two (just as the Saturn V benefits from the printed parts)... Nicely done, it's well done for this scale and how you handled the sun shield is great
-
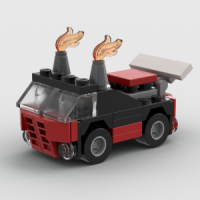
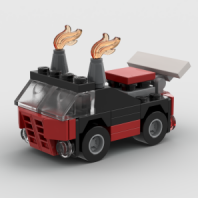
Also, if you need your build to be heavy (you want no holes and/or your design requires a lot of decorations etc.), try setting a low point of mass. The Wideguy Van I built (of 42030 parts, excl. wheels) is pretty heavy, but runs relatively fast on single XL motor. Said motor and servo are set as low as I could and they, just like the battery box, became the key elements of the frame (replacing the batteries is more difficult, I admit, but it was worth it). Adding numerous lighter parts above had no noticeable effect on speed and as I used a preposterous gear ratio (w/ sandwiched gears I mentioned a few posts above), it goes fast for a bulky and heavy vehicle. The battery box' upper "arms" are mounts for the exhausts, lower - for rear fenders. Motor is just below the floor on the right side of the vehicle and servo - on the left:
-
Gears indeed reduce torque and overall efficiency of the motors. For example, 42065 has two motors directly attached to axles rotating the drive sprockets and one is in the front, the other in the back for a reason. I guess if the gearing wouldn't decrease performance, both motors would be placed in parallel to vehicle's length, alongside each other (then again, weight distribution is also important). A VERY important thing when building the gearing is making it solid. For example, when using XL motor and small, 8-tooth gears (it was a must in my case of a quite compact RC C-model of 42030), the gears MUST be sandwiched between liftarms or connectors on both sides if the motor is used under even a slightest load. Otherwise, the gears will skip and wear super-fast.
-
I mainly build Technic C-Models, but I also enjoy Creator alternatives, so here's what I built out of set 5763. In the photo, hot-rodder sigfig is added for scale and reference). Features: ► minifig scale (with adjustable steering wheel) ► openable and adjustable canopy-cage with roll bar ► rear suspension (individual for each wheel) ► details such as engine with radiator and twin turbo, lights, steering wheel, twin exhaust and rear view mirrors Browsing through OLX (online marketplace fo classified ads) I found old (2011), used 5763 for a price of a new small, ~50 piece set. I liked how the set contained big wheels and offered possibility to build suspension, so I bought it right away. Only one super-cheap plate was missing, so it was a nice deal. The MOC Alternative uses almost every part from the set. As you can see, the build came out quite clean:
-
Technic Color Palette
Immo replied to Jim's topic in LEGO Technic, Mindstorms, Model Team and Scale Modeling
Thanks, Jim, you made my fear of incoming 30th birthday even bigger! Being elderly is around the corner! -
Technic Color Palette
Immo replied to Jim's topic in LEGO Technic, Mindstorms, Model Team and Scale Modeling
I never used Pick a Brick, but I reckon they only seel parts from the sets as they produce parts for sets mostly. You'll never get a panel that's not in a colour used in one of the released sets. Same goes with the "old" colours like " Stone" shades of Grey (replaced with "Bluish" shades of Grey), I guess. You'd probably be able to get a panel that was used once in, let's say, 2009 set. I did a quick look at PaB and it looked pretty limited, though. Maybe because they detected I'm Polish? We seem to have many limits on us everywhere. -
Technic Color Palette
Immo replied to Jim's topic in LEGO Technic, Mindstorms, Model Team and Scale Modeling
I still dream of a truly modern Lego, where the company releases sets as they are now, but also produces parts in all the colours from the pallet, available for purchase. That would make our lives easier, folks wouldn't be buying bootlegs like Dec**l, Xi**ao, Le*in etc. to get more or less matching parts in desired colours. But I guess the ecological and economical impact will be too big... -
I once had a problem with servo that worked right, but was noisy (screeched). I asked them via technical help as to how maintain/lubricate it and they just sent me an extra servo. I was deceived by the post title into thinking Lego became much more strict when it comes to replacing parts! I think the topic's name should be changed to reduce panic attacks in AFoL population ;)
-
LEGO ATV WITH BELTS ON SNOW
Immo replied to LEGO ADAM's topic in LEGO Technic, Mindstorms, Model Team and Scale Modeling
Whoa, it's brave of you to play around with it so close to the water. It seems tough, though. -
Lego street sweeper
Immo replied to LEGO ADAM's topic in LEGO Technic, Mindstorms, Model Team and Scale Modeling
Love the MOCs with the "meta" vibe and this one is it. Besides, it's nicely executed. Well done! -
[MOC] The Hob Rod (Redux)
Immo replied to Immo's topic in LEGO Technic, Mindstorms, Model Team and Scale Modeling
The 42022's scale and overall 'mood' was my inspiration, but I wanted much more The two issues that needed solving the most were incorporating the drive gear for the chain while keeping the chassis rigid and making the steering work. As you can see, I used the 6L thin liftarms in the front to reinforce the undercarriage while making room for the chain (I wanted the pulley to spin fast, so 1:1.5 ratio - not 1:1 ratio - was a must). The exhaust mounts and steering joint mounts reinforce the whole front part of chassis. Actually, the thin bar in the front acts not only as a towing bar, but torsion bar as well. And then, when it was done, the steering still needed to work. There wasn't enough space for any typical solution, so I modified the 42022's drag link steering by shortening control arm and alternating the Pitman arm and then putting the drag link at an angle. Still, the turn radius for one direction was different than the other, so I added a mirroring link on the other side for symmetry. Also, I wanted the steering wheel to turn with the HOG, so I used a drive shaft bypass system based on 16-teeth gears with clutch. -
[MOC] The Hob Rod (Redux)
Immo replied to Immo's topic in LEGO Technic, Mindstorms, Model Team and Scale Modeling
In case someone wanted to see the underside. There's quite a lot happening down there. -
[MOC] The Hob Rod (Redux)
Immo replied to Immo's topic in LEGO Technic, Mindstorms, Model Team and Scale Modeling
Thanks! I used the big resolution phots I had uploaded on BrickSafe. I'll change them, thanks. -
[MOC] The Hob Rod (Redux)
Immo replied to Immo's topic in LEGO Technic, Mindstorms, Model Team and Scale Modeling
Thanks a lot! I'd love to incorporate some rear suspension as well, however, given the available space, it'd be rather impossible. As for the tailgate, I first wanted it to match the sides of the bed, but there are neither 9L nor 11L liftarms in Bright Orange in existence and two 7Ls in Bright Orange topped with LBG 9L looked bad, believe me, I tried. All in all, the color scheme is deliberate and all parts are in a colour I wanted them to be. The gate was meant to be in "metal" colour hence LBG. The same goes with the bumper and the Black center section of the rear is part of the rolling chassis "painted" black to have the "metal parts welded to a chassis" feeling Hot rods usually have the "smooth" part omitted anyway. -
Some of you may be familiar with the Hob Rod, the project I was doing on and off throughout a few years. The idea was to pull a hot rod with some nice functions and details while keeping it in a ~35 stud size. Various other things and issues made it a long term project and I have no doubt this baby will be improved even further. Well, here's how it looks now. 37 studs long because of the exposed rolling chassis arms, uses Technic and System parts as you can see. Intended as a cruiser and salt flats racer - and a small tribute to the Kustom Kulture - it's based on the '30s trucks and features many details that won't let you forget about that. Raise Hob. Features: ► fake mountain V6 engine with moving pistons ► blower with chain-driven pulley (1:1.5 crankshaft-pulley ratio; 1:3.501 axle-pulley ratio) + Enderle-style bugcatcher + fake carburetor + external tachometer and oil pressure gauge ► working differential and transmission (2.334:1 crankshaft-axle ratio) ► coupled '30s style link steering connected to steering wheel and a HOG ► detailed cockpit with a steering wheel, dashboard, custom skull-shaped gear shifter and comfy channeled couch for two ► channeled and chopped body style with kustom roofline + functional bed with Moon tank ► classic radiator grille and "zoomie" exhausts, front tow bar and rear push bar and rear engine emergency shut-off lever ► locking suicide doors with internal handles and slanted edges + locking, chain-suspended bed gate ► exposed suicide front axle + wide, fake leaf spring-suspended rear axle, each wheel with fake drum brakes
-
Purism
Immo replied to Erik Leppen's topic in LEGO Technic, Mindstorms, Model Team and Scale Modeling
I'm a purist. First and foremost "thing" with Lego for me is the challenge. Overcoming limitations and obstacles. I accept changes in official Lego line, new parts and so, but I let them "come at their own, natural pace", so to say. But then again, sometimes you can't stop progress. So, the only non-Lego entity I'd be cool with using would be a custom power-related stuff like sBrick or BuWizz (and perhaps some other PF extensions for lights or sounds). I'm also fine with all the usual stuff purists are OK with - rubber bands (but ONLY used for shock absorption or as a means of transmission; can't get over using them as a way to increase thread link friction, also aesthetically), string cords and custom stickers. I'm also OK with using almost semi-legal methods of building like putting round system 1x3 bricks or minifig heads on pins with friction (did that when made a shifter for my hot rod). I'd possibly accept custom copies of capes/cloths (by copies, I mean reproduced shapes, but personalised colour/pattern) some custom tyres, but only when dealing with RC or a scaled model. 3D printed parts, painting/chroming and part modifications? Nope. Sometimes I'm tempted to test some custom electronic solutions that require modifying parts (like shadow_elenter's electromagnet), but only if they look super-clean and legit (like aforementioned electromagnet). -
[MOD] 42065 RC Tracked Racer
Immo replied to Lasse D's topic in LEGO Technic, Mindstorms, Model Team and Scale Modeling
I'm rather thinking about adding an extra link and additional pulley on top to "tighten" the whole extended thread -
[MOD] 42065 RC Tracked Racer
Immo replied to Lasse D's topic in LEGO Technic, Mindstorms, Model Team and Scale Modeling
Not exactly as I described - the alternating fashion is not "perfect" as the number of links is odd. It triggers my obsession with order -
[MOD] 42065 RC Tracked Racer
Immo replied to Lasse D's topic in LEGO Technic, Mindstorms, Model Team and Scale Modeling
I'm really bugged how 42065 performs on my floors (panels and tiles) and would want to improve it while keeping it 100% Lego ;) Want to add more details to the model, too (increased weight would also require increased traction to reduce thread link wear). I did some tests with adhesive "microgum" and the performance was stellar: the threads weren't spinning in place while the turning performance wasn't hampered noticeably. But the glue was too weak and it started to fall off... The current plan is to go 100% "legal": to buy 80 pcs. of 24375 (rubber attachment for Technic link threads). I want to use 74, 37 set in a row on each thread (and leave 6 as spares). I'd much rather see them set in an alternating fashion, but since the number is odd, at one point there would be two in line anyway. And as far as I reckon, setting them in a row will have lesser effect on turning. What do you reckon? -
However, as I stated before, my apartment is too small to HIDE Lego. And I won't resign from it until I'll be able to relocate!
-
After Vicks and Tabasco (!!!) failed me and cat INSULTED me again with his teeth, I resorted to INSULATING tape No, I did not used it to shut the jaws of the beast, I just used it to mask the teeth marks. The level of "shine" the tape has matches the shine of official Lego stickers, so it doesn't look half bad and is cheap to replace should the hairy monster attack again. Also, the tape is thin and lightweight enough not to disturb the spinning of the props in any noticeable way.