Search the Community
Showing results for tags 'Review'.
Found 810 results
-
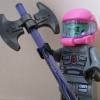
Name: Squirrel's Tree House Theme: Friends Year: 2013 Pieces: 41 + 10 extra pieces Minifigs: 0 Animals: 1 Price: USD$4.99 SEK 39.00 My local toy store got some of the new sets for 2013 this week (The Hobbit, Ninjago, SW, some City and Friends) including the first batch of the new small animal bags from Friends. I definitely wanted the squirrel the most so I got it and here are some pictures and my thoughts about it: I started with ripping open the bag and then realizing I should've taken a picture of it before that. Ah well, it's not the bag that's the interesting thing here, it's what's inside: Instructions and yet another bag! The instructions got the same front picture as the bag. I'll spare you the picture of the Win!-girl at the back. No piece call out, that's what's to be expected by such a small set. The instruction are easy to follow and I didn't spot any mistakes. Parts list, click for higher resolution. There is a small ad showing how you can combine the three animal bags to strange structure: To me it looks like the squirrel is sitting on a throne and waiting for the turtle to bring him the offerings of a plate with fish. Chieftain Squirrel will have to wait for a loooong time to get that fish. Meanwhile the cat has her own private room and can enjoy the luxurious meal of a bowl full of... bow-ties? Well, let's not dwell to long on that mysterious picture, I'm sure there is a logical explanation... Here are the pieces that comes in the set: Nothing that pops out, everything is standard and mostly useful pieces. It's this what the set is all about, the squirrel: The bow-tie fits is a hole on top of the tail. The build of the tree-house is quick and simple: Alternative views of the tree-house: It's not the most interesting build, but it uses useful pieces and does the work. It could be a good small present to a kid I think. Some concluding thoughts: If you buy it, you buy it because of the squirrel of course, so it all comes down to if you like the animal or not. But the pieces you get with it aren't useless so the higher price than the Collectible Minifigures is not unbearable. The squirrel is of course very cartoon-y, just like the rest of the Friends animal, but I still find it quite alright to use in a normal LEGO setting. It's certainly too big to be realistic, but all small LEGO animals are too big (ants anyone?) so it's not too much of a big deal. It's about the same size as the chimpanzee that can be found in the Collectible series. Ratings: Design: 5/10, simple and standard. Nothing out of the ordinary. Parts: 8/10, most are very useful and there is actually more pieces than I had thought. Animal: 7/10, so far the best of the Friends animals in my opinion, and something we have never seen before. Price: 6/10, not so bad. Arguably it's mostly small parts, but the price per piece is quite ok in SEK. Maybe it's a different story in other countries. Total: 7/10, if you want a squirrel, buy it. If not, then pass. It's as simple as that. Let me finish by quoting General McAuliffe during the Battle of the Bulge, WW2: "Nuts!"
-
My old thread vanished during the server problems yesterday, so I'll post this review again. I hope I'll be able to recreate it adequately, if you have any requests for specific pictures, please write them in your comment and I'll try to add them to the review. I bought this set in the LEGO store in Cologne last weekend and it is my first set from the Hobbit theme. Set Name: Barrel Escape Set Number: 79004 Pieces: 334 Minifigs: 5 Price: €49,99 / £39.99 / US$39.99 Theme: The Hobbit "When the barrels were empty the elves cast them through the trapdoors, opened the water-gate, and out the barrels floated on the stream, [...]. For some time Bilbo sat and thought about this water-gate, and wondered if it could be used for the escape of his friends, and at last he had the desperate beginnings of a plan." J.R.R. Tolkien - The Hobbit First of all, let's take a look at the box. On the front we have a picture of the set itself, standing on a (painted) wooden floor. On the top we can see the new logo for the Hobbit-theme and in the bottom left corner there is a little picture showing and naming the five included minifigures. On the back of the box there is another picture showing the minifigs and different parts of the set, additionally the play features and the story behind the set are shown. The contents of the box. There are two numbered bags and one instruction booklet. The box could be a lot smaller, but I guess at this price people expect a somewhat larger box. The instruction booklet. Random page. As you can see, the instructions are printed on a background that shows Thror's map. I love this design choice! Now to the minifigs. I expect there will be quite a few of you that want to purchase this set just for them and can absolutely understand that, they are stunning! Let's start with Bilbo, Gloin and Oin (starting from left). Oin's hair and beard comes seperately packed and is made from a somewhat flexible rubber while Gloins hair is just the standard plastic material. Bilbos alternative facial expression and the printing on his back. The dwarves without their hair and beards, just to show the printing on the back and the alternative facial expressions. As requested in the old thread, here's a picture of the front printing on Oin and Gloin. There are a few dwarf and Hobbit weapons coming with this set. Gloin gets two axes, Oin a twohanded mace and Bilbo his sword Sting and the ring. Some of these come with extra pieces. Apart from these minifigs the set includes two elves. The one on the left is called Mirkwood Elf Guard and the other one Mirkwood Elf Chief. I'm curious if those characters will be in this particular scene in the movie or if LEGO just included some generic elves. In the book, the elves drinking themselves into a stupor in the wine cellar are the elven king's butler and the chief of the guards. The printing on the Chief's legs is slightly off on my minifig. And here we have their alternative facial expressions and the back printings. When building the wine cellar you start with just the contents of the first bag, no need to unpack the second one already. Here are some interesting parts coming with the set. Some of them may be new, I for one didn't know the small arch with the "step" in it and the big arch piece. In the second bag I found another cool piece I didn't know. It is used in building the lantern that hangs above the prison cells. Now to the wine cellar! You start the build with the mechanism that lets you roll the big barrels into the down the ramp and into the "river". The middle segment is added and the first mechanism is covered with some plates and other elements. The segment in the middle gets a few barrels and a beautiful stone arch. I really like the technique used in this part of the build! The third and last segement of the cellar comprises the stairs to the upper parts of the elven king's castle and the cells in which the dwarves are held. The cellar is completed but the set includes three additional small builds. The first one is a wine barrel rack with a glas. The second addition to thew cellar is a weapon rack with two elven blades and a bow. The third and final addition is a table with a wine glass, two bottles and two stools for the guards. The set is complete! Behold the cellar and its occupants in all their bricky glory. These are the extra pieces included in the set. I wasn't expecting a brick seperator in a set of this size, nice surprise there! The set has two play features. The first one is the ramp. You can push the lever to let the barrels with the dwarves roll down the ramp into the river that is supposed to be running along under the floorboards of the cellar. The second mechanism lets you destroy the prison cell. Considering the chapter in the book, this doesn't make any sense whatsoever. Design: 7/10 While I'm not a huge fan of the design of this set, it does one thing particularly well: It both works as a display and a set your kids can play with. The play features may not be particularly true to the story, but they are well incorporated into the set. I don't think I'll keep mine assembled for very long, though. The wine cellar, the prison area and all those extra details like the weapon rack make it clear, that LEGO has tried to incorporate a few different scenes into this set, which is understandable in regards to the target group but makes it much less interesting for me as an AFOL. Parts: 8/10 While there are few extremely interesting pieces in this set, it offers a lot of useful parts in brown and tan. Apart from those, you get some interesting minifig accessories like the elven swords and the additional rings. Build: 8/10 The build is not particularly difficult or time consuming and the instructions are pretty clear. Minifigs: 9/10 The minifigs are what I mainly purchased this set for. They are absolutely brilliant, especially the dwarves and Bilbo. I am not a huge fan of elves in general, but the two that come with this set are pretty great, too. I am somewhat sad that the printing on the second elf's legs is a bit off, but the printing quality and design on the other figs is great. Playability: 8/10 The set has two play features and some useful additions to the cellar scenery. One of the play features, the destroyable prison cell, does not make a lot of sense considering that the dwarves are freed with the key (that is hanging right next to tghe cell ), at least in the book. But I guess features like this are a big hit with kids. Price: 6/10 This set is expensive, especially here in Germany. I can understand that licensing fees have to be paid, but 50€ for a set with only 334 pieces leaves a bitter aftertaste nontheless. I would have waited with my purchase but this set seemed the obvious choice when I visited the LEGO store because I had ordered most of the other sets already and wanted to get my hands on at least one Hobbit set as fast as possible. Overall: 46/60 I doubt that this set will be my favourite from the first Hobbit wave, but it's not a bad one either. The price is pretty steep, but you get some great minifigs and useful pieces. I hope you liked my review. Sorry for the picture quality, but I don't have my usual setup at the moment. Maybe I can replace some of the blurrier pictures in a few days.
-
3300014 Christmas Set 2012 Release year: 2012 # of parts: 109 # of figures: 4 RRP: GBP 9.99* * Once again, although this set was given away with a minimum spend of GBP 50 during the Brick Friday event(s) and S@H's online promotion, the set was valued at GBP 9.99 on the receipt. Promotional image Welcome to another SilentMode review, and this time we're going to be taking a look at this year's promotional "holiday" set. Almost a year ago we came across the infamous Holiday Set 1 and 2, as well as the impromptu birth of EvilMode. This year's "holiday" set is more expensive, comes in a larger box and has slightly more parts than its previous counterparts. How will it fare? The Box The first thing you'll see is that the box design screams "exclusive", if not "premium". It has a really nice colour and design to it, and like last year's sets it matches the general look of their in-store promotions (except not so much green). I almost don't want to open the box. Back of the box On the other hand, the back - while keeping the luxury colour scheme going - is a little plain. It does, however, show the other side of the sleigh, while letting the young girl and boy switch places. Sides of the box The long sides of the box have the usual information about where the sets were assembled and manufactured. Chinaphobes will be pleased to know that they had nothing to do with this set - or so we're told. Also there's a small reminder: outside of the Brick Friday event(s) and the current online promotion, you can't get hold of these (unless someone kindly sells one to you). The short sides have the obligatory reminder, in three hundred different languages, that there's a choking hazard once the box is opened. Interestingly enough, although I may have missed it before, this is the first time I recall seeing a "sad onion" on a box of LEGO. The Contents Probably the most noticeable thing in this set is the inclusion of the prancing horse, which doesn't quite have the impact of the 1x1 round tiles that made their debut in Holiday Set 2 (you know, the piece that automatically made that set better than Holiday Set 1). Other than that, there are two bags of parts, the crisp instructions folded in two, and a very hard to see 4x12 plate in White. White parts These are a few of the parts in White available in this set, most notably the 4x12 plate and the three quarter circles. Red parts Interestingly enough I've spent most of the year getting rid of my Red parts, simply because I don't have a use for them. This set ironically features most of its parts in Red, mostly for the sleigh. Greenery + lamppost For anyone who couldn't get hold of the previous three Winter Village sets, you'll be pleased to know that the set comes with a black lamppost. I like these, although I've not really put them to any use yet. But besides that, there are a few very useful plant parts included in the set, perhaps just not enough of them! Watch out for that leafy part (at the front) next year, where it will be making an appearance in this year's Olive Green (and perhaps other colours). Best of the rest For the cheese slope lovers we get nine of them in white, as well as a few in Dark Bluish Grey and Red, and even a couple of doubles in Red. We also get two transparent minifigure heads for the lamppost, but sadly not much in the way of tiles. The minifigures Very generously, for a set this size, we're given four minifigures to play with. Of the most value are the torsos for the children: the Bright Green jacket only appearing in last year's City Advent Calendar as well as this year's Winter Village Cottage, and the Medium Blue jacket appearing in the Winter Village Post Office as well as the Cottage. Both higly desirable torsos in my book. I can't help but be a little concerned - and this is something I had an issue with in the Winter Village Cottage - that whomever at LEGO decided to give a young girl boobies. Le cheval This is actually the first time I've gotten hold of the new minifigure-scale horse, which was introduced in the Lord of the Rings theme. For those who don't know: this new horse has the ability to rear (stand on its hind legs), while still looking similar to the old-style horses. One other difference is that both the neck and back legs "snap" into place. Anyway, the set makes it possible to display the horse on its own, by providing a 1x2 brick to place inside it (as shown above). For the assembly of the set - the horse pulling the sleigh - we require two 1x2 plates mounted on top of the grey piece, as shown here. One issue I have with this feature is that the set only includes one 1x2 tile, which means it will have to be switched between the plates and brick. This means a greater likelihood of losing the tile, resulting in an incomplete horse, if we're not careful. The Build The sleigh In a twist of events, we're actually going to build the main part of the set first. The base of the sleigh is the 4x6 Red plate, with some other smaller plates to get the shape going. I've actually attached the front two plates incorrectly in this picture(!). Because I was too lazy to disassemble the horse from the previous photo, here's the next stage of the sleigh attached to the horse. If it wasn't so unstable, it might actually be fun to ride this way. This assembly, using the Technic parts and a Bright Green flower plate, form the decorations for the sleigh. Possibly the equivalent of "go faster" stripes. We're virtually done with Red as the finishing touches to the sleigh are added. The horse is starting to buckle under the pressure - we'd better add some supports! Well here they are. While it may have been too much to bring back the large ski parts, these look a little too basic for my tastes. What are the alternatives though? Here's the complete sleigh along with a very relieved horse. I've actually forgotten to add one part at this point, namely the 1x2 Red panel that separates the passengers from the driver. As pictured in the set, here's a rather pleasant vision of a one-horse open sleigh, complete with privileged single mother and child, and a driver cracking a whip. There really must be something going on with the presence of whips in Winter sets: stay tuned for the 50 Shades of Light Bluish Grey special edition. Scenery All of the White plates and cheese slopes - as well as the brick - go into making this patch of scenery to accompany the sleigh. Using the remainder of the Reddish Brown parts, this tried and tested bench design is assembled. Lamppost In addition to the tradition of including different lamppost designs with each Winter Village set, we have another one here. This time we have two Black SNOT bricks stacked on top of each other on the lamppost, with one of them serving as supports for the lamps. The other SNOT brick is uses to suspend the leafy plant part, used to represent a holly leaf - complete with holly berries - on the lamppost. It's an all right design, but may have benefited from a single SNOT brick with four studs instead of the two with two studs. Both the lamppost and the bench sit on top of the snow patch, and all that's left is to add... ...the little girl and the two small trees. The Complete Set Here's the entire scene, and it really is a complete scene. One can imagine the rows of houses, maybe a frozen pond and some trees surrounding it, in the background. Leftovers Quite a few spare parts are left, but nothing incredibly ground breaking apart from the Bright Green flower plate. The 1x2 Reddish Brown brick is a leftover from the horse, assuming it's carrying the sleigh. The instructions Other than the nice-looking covers, which match the box art, the instructions look exactly the same as any other set - though they match the yellow border, blue background design of larger instruction manuals. There is nothing of any note inside it: no adverts, promotions or even our beloved Gewinne!son. The Verdict In all honesty, although I thought it was a nice set from the pictures that surfaced, I wasn't as enthusiastic about it as most people were when it was announced. I saw this purely as a set I'd want to part out for the more interesting pieces, whatever they were. Having gotten the set at the VIP event preceding Brick Friday, my mind hasn't changed much. For me the highlight of this set is the lamppost, as well as the inclusion of four minifigures, when a set at this price would usually have two at the most. Given that regular Red is the predominant colour in this set, I'd guess that the minifigures make up the bulk of the price, whereas it was the inclusion of Dark Red parts in last year's promotional sets. Dark Red instead of Red in this set wouldn't have changed my perception of it. I personally don't have much use for horses, although this is a good opportunity to get hold of the new-style horse if you don't have one. The lack of an extra 1x2 Reddish Brown tile may cause problems for those who want to play with the horse as well as have it on display. Where I will agree with other people is that it makes a very good inclusion in Winter Village scenes, especially if you have all four buildings. Even if the little girl has had a visible growth spurt, none of these figures would look out of place with any of the buildings. As with last year's Holiday sets, there isn't going to be an overall score or rating. However, I would rate this set as being right between Holiday Set 1 and 2 in terms of desirability. If I do get hold of another one, it would be to put in the vault. Here's to a Merry Christmas, and the most Christmassy image I could think of at the moment.
-
REVIEW: The Unofficial LEGO Technic Builders Guide by Sariel
Siegfried posted a topic in Frontpage News
Is it worth putting on your LEGO book shelf? See what I think! See what DLuder thinks! -

Review: Technic 8485 Control Center II
mostlytechnic posted a topic in LEGO Technic, Mindstorms, Model Team and Scale Modeling
Lego 8485 Technic Control Center II This large Technic set cost a fortune when it came out in the mid 90s, but it was a beast. With 3 motors and a massive programmable control box, it was the equivalent of a Mindstorms set. Even the RCX was still a few years away, so this was top of the line electronics in Legoland. Instructions are included for 3 models - a hovercraft, a helicopter, and a dinosaur. I'd be terribly remiss not to mention here the excellent writeup Blakbird already did in his Technicopedia here. He has excellent renderings of all the mechanisms so you can clearly see how everything works. Definitely go check his page out - but after you read mine here of course! Name: Technic Control Center II Set Number: 8485 Pieces: 1079 Price: $219 originally Minifigs: 0 Theme: Technic Year of Release: 1995 Links: Bricklink Peeron Brickset Building the Hovercraft, 1 Building the Hovercraft, 1 by mostlytechnic, on Flickr The hovercraft begins like most old Technic vehicles, with a beam and plate frame. There's a bevel gear on one of the axles, and a pair of power cables have been installed. We'll see later what these all do... Building the Hovercraft, 2 Building the Hovercraft, 2 by mostlytechnic, on Flickr A lot gets added pretty quickly. The shape of the vehicle is now obvious. Wheels are installed (with those red belts connected to one of them to provide power). A pair of motors sit on those power cables from the beginning, with the other ends of the cables stuck down next to the motors for later connection to the rest of the system. Building the Hovercraft, 3 Building the Hovercraft, 3 by mostlytechnic, on Flickr The upper layers of the craft are taking form as well. There's a sporty yellow stripe to give a little color to the black vehicle. A driver seat is up front (but no figure is included in the set, even though it's close to Technic fig size). We can now see the second motor's purpose - it drives that black belt on the outside, which then drives the worm gear in the gearbox at the back. That gear then rotates a single wheel below to provide steering. Also note here the normal build method of the older studded Technic - bricks and plates are stacked, and then beams are added vertically to hold it all together. It's a very strong building technique, but can be annoying since you have to alternate layers of bricks and plates to get the thickness right. Building the Hovercraft, Finished Building the Hovercraft, Finished by mostlytechnic, on Flickr The completed hovercraft. The long wires are used to make a wired remote from the control box to the craft. They run through some axles at the top center to keep you from pulling them off. It's a decent idea, but the cables still aren't near long enough to actually use this way. Granted, I'm a 6'3" adult, but I'd have to pretty much crawl to drive it on the floor. A couple flex cables are used at the back to "shroud" the "fan", but otherwise there's no rare parts in this vehicle. From the control box, the red A and B buttons provide forward and reverse (driving just one of the front wheels so that no differential is needed) and the yellow W and E steer the rear wheel. Building the Hovercraft, The Rear Building the Hovercraft, the Rear by mostlytechnic, on Flickr Here's a closer look at the back of the hovercraft. A few axles and various joiners make the frame for the flex cables to attach. The fan is driven from an axle connected to the front motor so it spins when the vehicle moves. The Hovercraft's Underbelly The Hovercraft's Underbelly by mostlytechnic, on Flickr A look at the underside of the hovercraft - you can see the drive of the front wheel near the center of the photo. The 24 tooth gear behind the bevel gear transfers motion upward to an axle running along the top of the craft to spin the fan at the back. Looking near the top of the photo, you can see the steering wheel. It has a pretty wide range of motion, so this craft turns pretty sharply for its size. The Hovercraft's Spares The Hovercraft's Spares by mostlytechnic, on Flickr There are a TON of leftover parts on this build. It's obvious that the other models were the main design and the hovercraft was just a 3rd build tossed in. That's a gallon bag there, full of parts. Building the Helicopter, 1 Building the Helicopter, 1 by mostlytechnic, on Flickr The helicopter starts right off with a motor. This will eventually be the cockpit here, and that motor (double-geared down with the red belts and then down again via the worm gear in the gearbox) will tilt the copter side to side. Building the Helicopter, 2 Building the Helicopter, 2 by mostlytechnic, on Flickr Ah, now it's starting to actually look like something. It's a pretty good sized chopper too. The key interesting bit here is the black frame in the center (where the cargo or passengers would be in a real helicopter like this). Right now that's attached to the motor in the cockpit which tilts it side to side. Later a front to back tilt mechanism will be installed into that frame to make a nice gimbal setup. Building the Helicopter, 3 Building the Helicopter, 3 by mostlytechnic, on Flickr Again, we get a yellow stripe to keep this mostly black set from getting TOO boring. The second motor has been installed now, where the engine would usually be in a copter of this style. That one will eventually spin the main and tail rotors. There's some very interesting angles formed to make the tail of this helicopter. It doesn't appear to be right for quite a while, and then suddenly it pops into shape. Building the Helicopter, 4 Building the Helicopter, 4 by mostlytechnic, on Flickr Almost done. The wheels are stationary, and the gear at the front of the turbine under the main rotor is just decoration. But you can see the axle running to the tail rotor and how a lot of hinge plates have made for a nice shape to the helicopter. Building the Helicopter, 5 Building the Helicopter, 5 by mostlytechnic, on Flickr Here's the rest of the gimbal. This block mounts inside the frame in the cargo hold. The axle will go down into the support structure and connect to a motor below. That rotation will work all the way up through this gearbox to tilt the chopper forwards and back (the axle through the 24 tooth gear will support the whole weight of the helicopter). Building the Helicopter, 6 Building the Helicopter, 6 by mostlytechnic, on Flickr A look at the mechanisms. The gimbal is fully assembled now, and you can see the electrical connections on the underside of the helicopter. Eventually long cords will connect to those and provide power to the two motors inside the copter. The pin holes in the light grey base of the gimbal will connect to the support structure that's yet to be built. Lego also had to cheat a bit and put a couple gears on the outside of the helicopter since there's not room inside for them. The drive system here: There's a motor in the cockpit. It has a small bush on it, connected to the large pulley via the red belt. That drives the bevel gears, which turn the two gears on the ouside of the chopper. That then drives the worm gear and then the 24 tooth gear in the gearbox, which finaly tilts the black frame of the gimbal side to side. Building the Helicopter, 7 Building the Helicopter, 7 by mostlytechnic, on Flickr The base for the helicopter is fairly massive. You can see the abundance of Technic beams used already, and it's just getting started. The whole light grey section pivots up (except for the two light grey vertical beams at the right end with pins sticking out). There's a motor tucked into the right end of the light grey section as well - that drives the vertical axle coming up and then into the helicopter eventually. They did a nice job here of making a reliable system - there's a set of slopes on the black base that ensure the grey portion is centered when it comes down each time. Building the Helicopter, 8 Building the Helicopter, 8 by mostlytechnic, on Flickr The motor, closeup. This is obviously now raised into the air. The motor drives the vertical axle via two sets of pulleys and belts, gearing the rotation down significantly. Building the Helicopter, 9 Building the Helicopter, 9 by mostlytechnic, on Flickr A platform on the left has been added - in a moment the huge control panel will be mounted here. There's tiles on the beams since the control panel strangely has no holes on the bottom for studs. Building the Helicopter, 10 Building the Helicopter, 10 by mostlytechnic, on Flickr This is how the unit raises - when you push the left platform down, the motor on the right rises. Thanks to the interesting geometry Lego used, you get more height on the right than you lower the left. Building the Helicopter, 11 Building the Helicopter, 11 by mostlytechnic, on Flickr Now the brains are installed. There's beams on the top and sides to hold it in place (and it's pretty darn solid, since there's studs on the top of the control panel). All three outputs are used, with wires running to the three motors. Well, just one motor so far, plus two cables that WILL be attached to the motors in the helicopter. You can also see here the very rare white coil that bundles the wires together. With multiple long wires like this, that's a very handy part. A pain to put on, though. Building the Helicopter, 12 Building the Helicopter, 12 by mostlytechnic, on Flickr Finally some color! This large platform is light grey beams with lots of red plates on top. There's not enough plates though to make it solid, so this will have to do. Good thing the helicopter can't move horizontally though, since landing on those skinny sections would be mighty tricky! Building the Helicopter, 13 Building the Helicopter, 13 by mostlytechnic, on Flickr The platform mounts to those lonely grey vertical beams. It's only held on by a couple pins, but it's sturdy enough since it doesn't really have to support anything. The lift mechanism will hold all the actual weight. Building the Helicopter, Finished Building the Helicopter, 14 by mostlytechnic, on Flickr Finally done! The helicopter itself mounts onto the lift mechanism, and the wires connect to the two 9v connectors on the bottom of the chopper. Now it's a fully functional model. One of the best features is how the lift mechanism is stable at any position. It's pretty well balanced between the copter and the control panel, plus all the pivot points in the lift mechanism are friction pins. Building the Dinosaur, 1 Building the Dinosaur, 1 by mostlytechnic, on Flickr Like most builds, this one starts off looking NOTHING like the end result. We start with a motor in the center and a gearbox on the right. Quite the lengthy chain of gearing down here - a small bush to large pulley (white rubber band), across an axle to another small bush and down to large pulley (red band). That axle runs under the gearbox to a small gear and up to the 24 tooth on the right. That drives the worm gear and then another 24 tooth gear. The large platform on the left, well... looks about the right size for the control panel, right? Building the Dinosaur, 2 Building the Dinosaur, 2 by mostlytechnic, on Flickr Yep, that's the control panel. The assorted beams hold it in place VERY securely. Vertical axles now come off the gearbox to the right. Pressing the red buttons on the panel raise and lower them. There's small stubs that block the liftarms from rotating too far, and since the drive is coming via rubber bands, they'll slip when the arms are blocked. Building the Dinosaur, 3 Building the Dinosaur, 3 by mostlytechnic, on Flickr With the stand done for now, it's time to start the dinosaur itself. This unit has an obvious motor up front and there's gearbox buried inside at the rear, but they're not connected. The rear gearbox drives that double-pulley on the side (and a matching one on the opposite side). And somehow, I suspect those axle connectors hanging down to the sides of the motor will eventually connect to the vertical axles from the stand. The spacing is right at least... Building the Dinosaur, 3b Building the Dinosaur, 3b by mostlytechnic, on Flickr Here's the same unit from above. Note that the pulleys on each side have the frictionless pins opposite each other. Seems like a good way to drive reciprocating motion like legs or arms or something. And there's strangely a big hole up the middle. Building the Dinosaur, 4 Building the Dinosaur, 4 by mostlytechnic, on Flickr Now more of the internals are coming together. The front motor drives (or at least it will shortly, when another rubber band is added) the worm gear on the side. There's lots of pins on the sides ready for the vertical reinforcing beams to be added as well. Building the Dinosaur, 4b Building the Dinosaur, 4b by mostlytechnic, on Flickr The back - the motor goes through a couple stages to drive the pulleys on the sides. Building the Dinosaur, 5 Building the Dinosaur, 5 by mostlytechnic, on Flickr There are so many pivot points here it's crazy. So much flexibility, this has to be the tail. Building the Dinosaur, 6 Building the Dinosaur, 6 by mostlytechnic, on Flickr The dino is starting to take shape. The tail is attached to the back of the motor unit, and several flex cables link it together. There's one up the top center for support, and a pair on the sides that hook to the pulleys to make the tail sway back and forth. Building the Dinosaur, 7 Building the Dinosaur, 7 by mostlytechnic, on Flickr A lot of black beams have been added. Too bad the slope bricks at the back of the body have stickers on them... with all the pieces in this set you'd think they could have avoided reusing stickered pieces like this. On the technical side, there's more pulleys added up front and additional flex cables on the sides. These flex cables route through the dark grey tubes so they can bend but stay in place. Building the Dinosaur, 8 Building the Dinosaur, 8 by mostlytechnic, on Flickr It's almost alive... there's cute little T-Rex arms with "claws" connected to the side pulleys so they move. A short flex cable hooks to the back of the neck for support, while being connected to a cam in the center of the body so it pulls. Building the Dinosaur, 9 Building the Dinosaur, 9 by mostlytechnic, on Flickr A head. And yes, I realize I mounted the lower jaw upside down. It'll be fixed for the next image, I promise. Didn't seem worth taking the set partially back apart to remake this photo though. So, the side flex cables hook to the balls on the sides of the steering arm to rock the head side to side. Another flex cable hooks to the back of the head to hold it up and make it open and close as it moves. Building the Dinosaur, 10 Building the Dinosaur, 10 by mostlytechnic, on Flickr Nearly done. The hole in the center (remember that, from many steps ago?) goes onto the stand and there's a single axle through the body for support. The vertical axles do connect to the body, and the power from the body motors hooks to the control panel. The whole thing is pretty well balanced on that pivot axle, so it's easy for those vertical axles to tilt the whole body up and down. Building the Dinosaur, 11 Building the Dinosaur, 11 by mostlytechnic, on Flickr A leg. With so many pivots and angles and beams it'd take an engineering degree to design. Building the Dinosaur, 12 Building the Dinosaur, 12 by mostlytechnic, on Flickr Two of those legs, mirror images of each other, attach to the body and the base. They look great, even though they don't actually support any weight. It's a great way to hide the light grey support stand though. The Complete Beast The Complete Beast by mostlytechnic, on Flickr From the front, the dino looks properly menacing with the teeth and eyes. The Rare Pieces The rare pieces by mostlytechnic, on Flickr So, this is a prime example of Lego being financially unsound back in the day. This big red plate - there's 4 f them in the set (well, 2 left and 2 right). This wing-like piece was only in this set and one other, years later, in red. It came in black/white/grey at the same time, so the only reason it was used in red for this set was to make the helicopter platform stand out. Why not use simpler, common red pieces instead? Second piece is a cute white coil. It is used to bundle wires together. It only came in this set, the earlier 8082 Multi-Control set, and a handful of educational sets. It's a great part, but not necessary. Finally, this steering part on the right. It's used in the neck of the dinosaur, but a similar effect could have been done with axle connectors and liftarms, just not as neatly. This was the ONLY set to ever include it in black, and it only ever appeared in white in a late 80s Technic car. There's also 5 flex cables in the set that only appear in this model. The Video A set like this demands video. This is not a static model like many Lego designs - this is motorized and programmable and moving. I made a separate video for each model, so you can see what you want easier. The hovercraft - cool idea and mechanically well done, but not nearly as impressive as the other two. Plus I just can't get over the short cable length. The helicopter - awesome! There's clever design here with having some of the motors inside the chopper and one in the base. The balance and friction pins let it stay wherever you put it vertically, and the motion is just cool. It's a nice design aesthetically and very playable. The dinosaur - in my opinion, the star of the show. It might not be as playable as the helicopter, but the motion is just so unique and well done. It's impressive to see a toy like Lego, rigid and bricklike and normally used to make simple mechanical machines, be so fluid and natural in its motion. The use of flex cables is vital to making this work and it's done brilliantly. (Note though in the video that my set is second hand and old. It was obviously left built as a dino for a long time, since the flex cables have a permanent bend to them. This makes the tail movement not as smooth as it should be.) This is hands-down the version I'll keep on display - though I'd love to have a second set to have the helicopter on display as well! Hm, I wonder if I get just a control box, build my own stand, and mount the Sopwith Camel on it and motorize it... that'd make a sweet combo too! (all videos can be seen full 1080p HD on YouTube) The Conclusion: GET THIS SET if you love Technic. It's such a change from the trucks and construction equipment that we're used to. The build style is so different (for you youngsters who only know the studless era of Technic) and the designs are expertly done. I actually though skipped one whole feature of this set - the programability! That control box can save and replay "programs" of button presses, so you can automate your creations. It really was the precursor to the RCX and NXT systems, although there's no logic in the controller. It simply records your button presses (including timing) and plays them back. Two sequences can be remembered at a time. Frankly, the main use I'd see for that in this set is for display. If I was going to have the dino or helicopter out on display, I'd definitely record a nice set of movements so I could play them back with a quick button press for visitors. The Ratings Value: 10/10 - It was an expensive set in its day, and it's expensive now. However, you get the control box, 3 motors, tons of Technic bricks, and great designs. Design: 10/10 - The design is outstanding. All 3 models are visually spot-on. I personally love this era of Technic where models weren't trying to look cosmetically perfect with lots of panels. It's still instantly recognizable and lets you see the internals. The mechanisms are brilliantly executed and make great use of the part selection AND the control panel. Playability: 9.5/10 - I wanted to give another 10, but those short wires on the hovercraft still bug me. Since no one will play with that model for more than a few minutes before building the other two though, I only took off half a point. Parts: 9/10 - There's tons of bricks and plates, a bundle of electronics, flex cables, and more. However, it's mostly black and grey, so not visually terribly interesting. Overall: 10/10 - The helicopter and dinosaur are simply awesome, some of the best designs ever to come from Lego. I'm glad I spent the money to get this set! -
It's my first review here so please bear with me. Long time lurker, big Lego Ferrari fan. Today I'm gonna review one of the Shell Promotional sets, 30195 (FXX) The set comes with 56 pcs. (including the pull-back chassis of course), an instruction leaflet, and a sticker sheet. Pretty straightforward. The only piece that intrigued me was the nose/hood of the car. It's similar to the nose of 30190, only difference is it's black. As with the other Shell Promo sets, it's pretty much a 5-minute build. I ended up with 4 extra pcs after building, although that 2x3 light grey pc seems pretty big for an extra pc. Without stickers, it's pretty plain and nothing like the original FXX So yeah, stickers are a MUST in this set, unlike the 30192 and 30194 which have printed bricks (not sure about 30195 since I don't have one yet) What's that in the background? Why, it's his big brother 8156 of course! Design: 4/5 - pretty much at par with the details considering its size. Stickers suck though. Parts: 3/5 - nothing special here, and the unique brick doesn't seem really useful outside of Tiny Turbos. Build: 3/5 - solid build from the door to the front. can't say the same about the spoiler, which detaches with relative ease. Playability: 4/5 - pull-back motor makes it highly playable, but the sturdiness (or lack thereof) of the spoiler could be a concern Price: 3.5/5 - considering how one could get these plus the fact that its details are mostly stickered, it's one of the promo sets which has less bang for the buck Overall: 3.5/5 Cheers Eurobricks! hope you enjoyed my first review here ever. :)
-
6596 Wave Master This is my first rewiew of my first set .It was a very great set for me, because it was my first. Set details Theme town Subtheme boats Year released 1995 Pieces 134 Minifigs 1 RRP US$12 Box: Because I have this set for 17 years and I havent got box but I saw one on Peeron: Instructions: Same boxart as box. Random page: Showing how to build car. Last page: Showing altenate model. Decals: Decals to decorate boat. Pieces:Black: All black pieces. White: White: Sorry for light effect. Transclean bricks: Other pieces: Interesting pieces: Minifig: Only one minifig in this set man with classic head and cap , Octan oil torso , blue legs Acessories: Car: Great 4wd car. I love smooth lighs on top of car simply an good detail. Trailer: Trailer nothing interesting Boat: Great speed boat with two engines , but four peaces are mising 2 red clips, and 2 forks on engines . Whole set: With two acessories live vest and helmet. Alternate model: Thanks for watching.
-
[pid][/pid] Introduction Welcome to my sixth review on Eurobricks! On my way to review every old Pirates set that I buy new (full story on my 6247 - Bounty Boat review), I've chosen what I consider to be the first Lego Pirates set ever (as it has the smallest set number among the first wave) and one of the two impulse sets (the other one being 6245 - Harbor Sentry). Its name is Buried Treasure, which is one of the most iconic scene for any Pirate stuff. Is this treasure a real jewel, or should have it been kept buried? Product Details Set No: 6235 Set Name: Buried Treasure (USA) - Bo'sun Will with pirate treasure (UK) - Le trésor du pirate (France) - Pirat mit Schatztruhe (Germany) - De Schatbewakers (Netherlands) Theme: Pirates Released: 1989-1991 Minifigures: 1 Pieces: 16 RRP: $3,25 Purchase Price: $17 new on eBay ~Box~ Front As with all first wave Pirates sets, we have a classic yellow box. The picture shows a pirate, a monkey and the treasure which seems to have just been dug out. Back Here we have our classics alternate models. You can see closer pictures in the next chapter, and built models in the last chapter. Side An alternate setup of the main model. ~Alternate models~ Alternate model 1 Alternate model 2 Alternate model 3 As with other impulse sets, it's hard to make alternate models out of such a small part count. However I really like them, especially the first and third models, which depict nice scenes. ~Box opening~ Yo-ho-ho! Every remaining MISB Buried Treasure now has gone up in value! Inside the box One loose plate, one plastic bag, and the folded instructions. Unlike any other Pirates set I've reviewed, it didn't come with a promotional catalog or flyer. Instructions A single two-face sheet, with only five steps. Any skilled builder shouldn't have too much problem ~Parts and minifigure~ Part layout There's not many interesting parts here. However it's always nice to get a monkey, and we never have too much gold pieces! Minifigure It is the most common Pirates minifigure after Captain Redbeard. I shot his back, but at this time they wasn't being printed. I have a nostalgic feeling looking at it, as it brings back so much good memories! ~The build~ After step 3 The whole structure is built here, as you can see it's not very elaborated without the accessories. ~The finished models~ Main model With the accessories added, it really becomes a lovely scene. At this time, the shining metal gold made its first appearance and looked way better than the yellow round 1x1 plates that came in Castle sets. Alternate model 1 I love it, it's a clever use of parts to make something different. The monkey seems nice here. Alternate model 2 I don't quite get why the treasure's lid is put like that. It's the weakest alternate model in my humble opinion. The monkey is holding a sword this time. Alternate model 3 Again, we have a clever setup by remonving the pirate legs. However the chest looks really deep that way . Meanwhile, the monkey keeps getting nastier, with a cutlass AND a pistol. The pirate should really be careful... ~Final thoughts~ Design: 7/10 - It's hard to rate impulse sets. This one is average, with a really small sand and rock structure. What makes the set good is all those accessories which come along. Parts: 8/10 - Several useful accessories, a monkey, and gold! However I think it's lacking a treasure map. Minifig: 6/10 - Back in 1989, it was a good way to start getting pirates minifigures, but today, it really is a common minifigure. Build: -/10 - Built under one minute, so there is nothing much to say. Playability: 6/10 - Having a bluecoat instead of the monkey would have make it more playable. Why not include a treasure map? Alternate models: 9/10 - A clever use of parts, and actually I think the first one looks better than the main model. Price: 10/10 - $3,25 for all those parts was a pretty good deal. Today it can be found for ~$4, which is still a great deal for Pirates lovers. Conclusion: 6/10 - A good impulse set, and a nice way to start a Pirates collection. As a standalone though it's not a must-have.
-
Number – 3675 Name – General Store Theme – Fabuland Year – 1987 Minifigs – 3 Pieces – 103 Price – MSRP sadly unknown, bought for an undisclosed sum as a present. Links: Brickset, Peeron, BrickLink My love of Fabuland is a well-known fact, so it is no surprise really that I might receive some for my birthday a couple of months ago. Fabuland is such a happy place, with such adorable characters, that I find I cannot help but smile when I see them. As it was a present, I didn’t personally buy this set, but I might just have pointed out that it seemed like a great set to have, and thus set wheels in motion ready for my birthday. This is also a second-hand set, not MISB, however it came with the original box and (most of) the original parts, so with that in mind I have tried to record here the experience of opening the box and building and playing with the set inside... The Box The very front of the box is old, battered and faded, but you can still make out the extremely bright Fabuland colours, and the idyllic scene the Fabuland characters play out with the combined shop and post office. This front picture gives a very good view of the set as a whole, as it allows you to see a little of the detailing at the back of the set. The most delightful aspect of the box, though, is that this frontage is actually a flap that lifts up to allow you a preview of the parts inside. As you can see, the top lifts to reveal the Fabuland inside. This was a huge excitement to me – having some of the pieces placed on display in the clear plastic container greatly increased my anticipation. I began to see exciting parts, in the upper display, yet (even though they had been repackaged by the seller) I could also make out some tantalising glimpses of further Fabuland promises underneath. In truth I simultaneously wanted to get the box open as quickly as possible whilst wanting to take great care not to damage this delightful design feature of the box. Here’s a better view of the clear tray which contains a somewhat random collection of parts, but perhaps most importantly for some also shows the Fabuland figures included in the set. We’ll meet Freddy Fox, Hannah Hippopotamus and Boris Bulldog later, but underneath the tray you can glimpse some of the other LEGO also included. The inside of the box lid isn’t left plain either. There is a genuinely cute picture of a little boy and girl playing with their General Store and reading the accompanying story booklet. There’s also a pictorial indication that the recipient of this set need not fret, as the instructions are included. The back of the box shows a wide variety of alternative builds. Some of these, like the boat-home in the top left seem a little bizarre, but most are adorable scenes of Fabulanders going about their daily routine. The colour scheme remains bright and bold, and the pictures are absorbing to look at. The sides demonstrate another alternative build; here the designers seem to have deliberately engineered a tall and narrow townhouse with a balcony whose picture fits perfectly on the side of the box. This may have been coincidence, but I appreciate that these areas of the box really could have been left blankly covered with the Fabuland green, and had a text box declaring that this set is suitable “from 5 years” rather than have Hannah say it in a speech bubble. After all that excitement, one might expect the remaining contours of the box to be calm and plain, but even the bottom of the box manages to squeeze in yet another alternative build, while the top of the box shows Freddy posing in a photo-story with Boris. He seems to be shouting “Fruit” at Boris (who purely has a cameo role to deliver the post) which seemed a little odd until I realised that he’s advertising his wares as a greengrocer. Or fruiterer to be exact. Despite this innocent explanation, I still find the third picture along somewhat sinister... So having contained my excitement long enough, the contents of the outer shell are extracted carefully. Here you can see that the clear tray rests on top of a simple box in the Fabuland green colour. The clear tray simply lifts off, and itchy fingers have free access to all the LEGO parts and the booklets within. The Instructions Every Fabuland set comes with a story booklet, which often, for larger sets such as this, doubles as the build instructions. The pictures of these instruction booklets are charmingly hand-drawn, and the colouring used is more pastel-shaded, and so slightly gentler on the eye. I have recorded each double page spread below: The first few pages of the book give instructions on the build in story form. Keen eyes must look closely at the accompanying pictures to ensure the parts are correctly placed on the baseplate, but the adorable characters describing how they build the store make you really not mind that too much. In fact it really is quite fun to follow along with the characters as they build “their” General Store. I’ve included pictures of the pages with the build as a reference, and also because, well, they’re just lovely to look at really. The remainder of the booklet contains another story of what happens to our FabuFigs when the store opens for business. Again, it’s all hand drawn and adds detail and interest in one’s mind regarding the set you are building. The very last page shows a group shot of all the characters from this generation of FabuFigs, and their names, no doubt in an attempt to make children want even more of these adorable animals. If you’d like to see high resolution versions of any of these pictures, please visit my flickr page. The very back page shows a composite sketch of all the sets of this generation of Fabuland, and reinforces, by use of another picture of a boy and a girl, how Fabuland is intended to be unisex. The composite sketch itself gives an idea of how this incarnation of Fabuland fits together, and brings life to the sets; making them part of an active world. There is another booklet with this set, and it’s the generic “let’s show you all the other LEGO you can buy, too” style of booklet. The rather nice thing about is that many people’s favourite, the Forestman, takes pride of place in the picture, but Edward Elephant from Fabuland isn’t far behind, even if he does look like he’s kicking Classic Town dude out of the wall. I’ve resisted the urge to photograph every single page of this second booklet, however here I’ve shown the Fabuland double page spread. Please click the picture for a high resolution view. This picture’s purpose is really to make you (or the child reading) really want to buy more and more Fabuland. And it works. Once again, seeing these adorable animals having fun together in their adorable world just makes you want...moar! in addition you can also see the types of Fabuland sets that were around at the time this set was released. The back shows the old harbour sets, and is thus mercifully free of the later added Gagne-Child. Once again LEGO have the marketing sense to pose their minifigs and form a scene with their sets, and this is far nicer to look at. It may seem irrelevant, as I can no longer order these sets from LEGO, but I find it nice to look at nonetheless and I’m glad it was included in the set, especially as it’s second-hand. The Parts Of course the sets are really about the parts, and the most important parts to me are the Minifigs, or rather the FabuFigs. Here are our adorable stars of the set. These are second generation FabuFigs, so they are slightly different from their first generation counterparts, most noticeably with the eyes.. The eyes... Aaargh, the eyes. They aren’t so bad for Boris Bulldog, he still manages to look cute, but Freddy Fox looks slightly psychotic and Hannah Hippo looks like she has a serious anxiety disorder that makes her surprised at everything. They are still undeniably cute, though, if a little mad looking, and look closer and you’ll see that Hannah has ladylike eyelashes, too. The other difference from first generation FabuFigs is the printing on the front. All three have a design on their torsos. Hannah is a laaaydee and so has a sweet necklace printed on her top, while farmer Freddy wears printed overalls, and Boris has the postman motif on his torso (because...he’s a postman) along with some smart buttons, that you can imagine him polishing proudly. The hats are not removable, which is a shame, and there is some slight wear to Boris and Freddy’s facial printing, but not too bad overall. Boris only appears in this set, while Freddy also stars in 3683 – Amusement Park 1987, but Hannah features in three other sets! These are: 3662 – Bus 1987, 3798 – Hannah’s Garden 1988, and 3622 – Rowboat 1988. Please note that I am specifically referring to these second generation FabuFigs. Very similar incarnations of these FabuFigs were seen in the first generation (Buzzy Bulldog springs to mind), however the first generation had the cuter eyes but lacked any printing on the torsos. From the back, the torsos are plain, and you can see Boris and Freddy’s moulded hair poking out underneath their hats. This brings the realisation that Helen Hippo is bald! But she’s a hippo, so that’s ok. Plus you can see she has cute little hippo ears, now that you aren’t distracted by her manic gaze. There’s a decent sized green baseplate with this set; 32x24 to be precise. Always useful to have around, and in proportions that aren’t so easy to find these days; there are a few lots on BrickLink, but they aren’t all that cheap. There are some larger pieces in this set, many of which will be classed “<insert that tiresome argument>” by some. The large bay window is one of them. I really like that there are LEGO bay windows and if it comes in a part that has the surrounding wall included, I’m happy with that. The colours are typical Fabuland colours (blue and yellow), and one could argue that they could have provided the window itself and the bricks to build around it, but that isn’t the point of Fabuland - it was designed for younger children, after all. There is another wall piece, also with a large window and also in the bright primary colours of Fabuland, along with a larger door (for access for the larger FabuFigs) which, like the Minifig scale doors, fills the doorframe. I’ve resisted the word System here to describe Minifig scale, as Fabuland is System, however the scale of these details is different because the scale of the FabuFigs is larger. The stickers were already applied when I obtained this set, and you can see that the window piece has the 75 sticker fortunately nicely placed and that it hasn’t worn too much with time. There’s no reference to the Store being Number 75 on a particular road, it’s evidently just an arbitrary number, however I appreciate the detail. The back of the window piece also has shelves, which is a useful quality as it allows for more detail to be added in to structures using this part. It is certainly preferable compared to a hollow piece. The roof pieces in Fabuland are more than just slopes. The base of each roof piece is 2x6x2, however they are composed of two parts joined together. They don’t separate, so please don’t try. In this set there are a handful of such roof pieces. Not an overwhelming amount, but as they can cover a wide area, they are still welcome. The surface of the roof pieces have a nice wood-grain mould to them, marking them out as such, whereas the slopes used in System sets to make roofs are left plain, allowing them to be re-used in other ways. There are of course regular System elements to the set; there is a little building required rather than merely the placement of larger pieces. There are a reasonable selection of plates in various sizes, and again in the primary colours we associate so much with Fabuland. There are System bricks, too, again in a variety of shapes and sizes, and again in primary colours only. The red and yellow 1x4x1 fence pieces are a welcome addition, but not particularly rare. The set comes with a large post box in blue and consisting of two parts – the base and the lid. The design on the front is printed on and clearly denotes that this is where you should deposit your packages and letters if you want Boris to deliver them. It’s a large part, and uncomplicated, but it easily denotes a post-box, and you could even fit a FabuFig in there, if you wanted to. This, as mentioned, is a second generation Fabuland set from the 1980s. The trees in the second generation had apple printing as this does, which is a pleasant detail. The trees in the second generation sets weren’t as widespread as those of the first. The plain tree appeared in 10 sets in total, while this tree only appeared in this set, and 3 others; 3659 - Play Ground 1987, 3680 - Camping Caravan 1988, 3682 - Fire Station 1987. I’m very happy to have it, although there is a temptation to want to place the red apple minifigure accessory in the holes denoted by the apples. To add to the outside detailing there’s also a bright and cheery petrol pump. Clearly the Fabulanders are wise economists and realise that profits won’t be made with fruit or post, but by selling gasoline to the various inhabitants who have vehicles. Unfortunately for a grown-up mind, this comes with the realisation that there might be pollution in the green fields of Fabuland, but put such thoughts from your mind, this was the 1980s where the words “catalytic converter” were only just becoming known in common parlance. The petrol pump itself has a sticker on the front that the previous owner wasn’t too careful with, but the hose detaches and reattaches providing a feature to allow play in filing up tricycles and scooters with petrol and it hasn’t even been chewed. It does also make sense in the set, as Boris himself has a car, as we’ll see later. This part only appears in this set and the first generation 3670 - Service Station set from 1984 (where there are two) and there aren’t very many available on Bricklink – certainly not complete ones with stickers intact. For more architectural detail there are these lovely light grey lamp posts, which are used as columns in this set. The moulding gives them a Victorian feel, and they are certainly parts I would like to have more of. Unfortunately these lamp posts are only available in this colour in this particular set. The mould is still going though, as a white version was seen most recently in the 2011 Cars set 8639 - Big Bentley Bust Out. There are a good number of parts to add details to the outside of the store. There are two Fabuland fence pieces, which are a little twee, with their heart shaped cut-outs, however it cannot be denied that they are actually intricately moulded pieces and also quite useful. I have seen them often used in MOCs to denote bed heads, for which purpose they work well. The bench is a Fabuland mould; it was only ever seen in Fabuland sets. The white version (as we have here) was present in 10 sets altogether, the red version, however, was only seen in two Fabuland sets. I actually prefer the white version, personally, and although there are System sets with pieces and instructions to build more traditional brown wooden benches, I like the detail of this piece. Also included are two Fabuland flowers and three Fabuland flower-stalks, and a broom in Earth Orange, all of which are widely available. There are two signs included, to denote both the general store and the post office. The actual LEGO of the sign is a fairly intricate part with the swoops and curls that connect the “sign” portion to the post, which is also detailed. The stickers were applied by the previous owner, and unfortunately they got them the wrong way round. The General Store sign stickers are supposed to be front and back of one sign, with the Post Office stickers on the front and back of the other. It doesn’t matter too much in the grand scheme of things, but I know we have eagle-eyed readers here at Eurobricks. The interior of the general store also has furniture, which in itself also serves to provide walls to the shop. This is the outer orientation of the dresser, which has a sticker applied showing the prices of various items that may be for sale here. The addition of the sticker transforms what would have been a plain wall into a detailed part. The inside of this piece is a charming dresser. I really do like how this is both a structural element and a piece of furniture, with shelves and a cupboard at the bottom. I like the detail that even the shelves have brackets moulded in, although that may be just to make the actual LEGO piece more sturdy. Another charming thing is the attention to detail; the doors to the cupboard actually open. I know this sounds silly, but they could have just been a block with stickers to imply doors. It’s details like these that children notice, too. It is another way of providing interaction with the set, and making it “playable”. There are two sets of 2x3x2 chests of drawers, and the draws themselves are removable; they actually function as draws. The questions that people often ask about when they see a MOC are along the lines of “does it have an interior”. Interior detailing is important to many AFOLs and having the means of providing some detail is great, although you have to not mind too much that they are in bright Fabuland primary colours. The draws are put together with some plates and 1x2 bricks (from the above inventory) to form another structural piece, which again is also functional. The colours of the desk and shelves made me think very much of Sweden, and because they’re furniture, very much of IKEA, however these pieces of furniture are infinitely easier to construct than anything from IKEA. To go with the desk, there’s a red Fabuland chair, slightly larger than the Minifig chair, understandably, and with more curves to it. The round base allows the chair to be oriented at different angles rather than just in the direction of the studs. Hmm, you can’t help noticing these mugs are pink. Pink isn’t really a Fabuland colour, but this is what I got. They are actually supposed to be one blue and one yellow. But I got pink. On the plus side, yellow and blue mugs are plentiful, but pink mugs are only available in Paradisa sets, and so are slightly rarer, so it isn’t the end of the world. Other accessories (there are lots here) also include a lovely red telephone, with its string still attached and a lovely bright blue Fabuland teapot, because there’s no point having mugs if you don’t have the means to make tea, let’s face it. In addition to stickers, there are also printed parts, and everybody loves printed parts, especially if they’re tiles. We have a 1x3x1 red brick with printing to denote the top of a cash register, and some printed tiles to represent letters, for Boris to collect and deliver. There are actually only supposed to be two printed letters; one 1st class and one 3rd class, but for some reason I received two 3rd class letters, but I’m really not complaining, especially as one of them is somewhat worn. You can see that there are three tiles with fruit printed on them. These are used to denote the produce that Hannah herself grows in order to sell, and they are used to denote the items for sale. They are such a simple way of representing these items, but they’re still cute, and it’s clear what they represent. Unfortunately, there is also supposed to be an apple tile like this one (image from BrickLink): but I didn’t receive it. I’m sure the observant reader will wonder what on earth a Pirate treasure map is doing here. I wondered too. It seems to be a compensatory replacement tile, for the lack of apple. So you will see Hannah selling a variety of fruit, and a treasure map, just in case any of our Fabulanders have dreams of taking to the high seas and plundering loot. Boris needs a little car to get around and deliver the post, and Hannah needs a little car to deliver her produce to the inhabitants of Fabuland. Provided in the box are parts with which to build such a vehicle. These are synonymous with Fabuland vehicles and have appeared in a number Fabuland sets, however some parts have also appeared in Belville, Disney and Paradisa sets. The pieces are larger, the chassis itself includes the wheel arches already, and there is a piece with the headlamps and front bumper as part of the mould. Again, some may call these pieces <insert that tiresome argument>, however these sets were designed for younger children, and there is still construction required – albeit not very much, but arranging the pieces once gives the builder the opportunity to consider how else they may be arranged. The chassis has been seen in a couple of Fabuland sets in various colours, and because it is a standard mould it also has the tow-bar at the back and the tow-bar connection at the front. There’s no sense in that in this set, as there’s nothing to connect the chassis to, however in the 1985 set 3641 Car and Camper there are two parts to the whole vehicle and they connect in this way. As that set was the first time the chassis was seen, it seems obvious that TLG would continue to use the same mould. It does also mean the parts are interchangeable and adaptable; you could build a Fabu-Convoy if you so wished. The Main Build So as mentioned when I spoke about the accompanying booklet, the instructions are essentially a story which describe how the characters themselves build the General Store (and indeed, why). I’ve taken a few pictures to illustrate a few stages of the building, and tried to recreate the scenes found in the instruction booklet itself. At this point Hannah and Freddy have built the cash register section at the back of the shop, and built the walls around the right hand side of the building, which is not a taxing task as the walls are the larger 2x6x7 pieces. They have also managed to add a few System bricks and plates to form a porch with a balcony, making pleasant use of the red 1x4x1 fence pieces. By now Hannah and Freddy have added a roof to the initial part of the building and continued the walls round the left hand side of the store, which is actually the post office. You can begin to see here that the furniture itself provides the boundaries for the store; the shelves that were constructed earlier (the IKEA shelves) actually form the left wall of the post office. You can also see how further System bricks and plates are used to cover this left hand side. Having now added the roof to the post office (and deliberately decided to use grey roof pieces to make it different to the store), Hannah has decided that there’s no better time to try out the new balcony. This is a faithful re-creation of a scene in the instructions – diagram number 17 to be precise. I have no idea what Hannah is doing on the balcony, but at least she looks happy, which is more than can be said for poor old Freddy who looks either forlorn or puzzled at the IKEA shelves. So when our adorable friends have constructed their post office and general store, they also add in some additional detailing to the exterior. There are some flowers, a tree and some fencing to add to the cute little garden at the side of the post office portion, and the charming Fabuland bench is placed in front of the grand bay window, so that our characters can sit and chat whilst watching the world go by. The post box is also placed at the front, on the opposite corner to the petrol pump, so that Boris can zoom by and pick up the post on his way to fill up his fuel tank to ensure he can deliver his letters around Fabuland. Moving round to the left side of the building, there’s a better view of the little garden with the built-up yellow flower (which is why there are three Fabuland leaf parts to two Fabuland flower heads) and the Fabuland tree, which is slightly less impressive side-on. From here you can also see how the IKEA shelves fit into the structure of the building, and that they look built in (because, effectively, they are). From the back you can see better how the store and the post office are laid out. You can also see that the previous owner of this set did indeed get the stickers on the signs the wrong way round, which is mildly annoying. The post office maintains the mostly-blue-with-a-hint-of-yellow colour scheme, and although the shelves are somewhat bare there is a nicely appointed desk, complete with shiny red telephone. The mug on the desk of the post office is supposed to be blue, to match the colour scheme (as I’ve already mentioned), as indeed the mug on the counter of the general store is supposed to be yellow. The post office desk has the lovely red Fabuland chair, jauntily angled at the desk, and there is a letter on the desk that clearly requires closer examination from Boris or Freddy. It’s possible Freddy thinks there’s some money in it, naughty fox that he is, or perhaps Boris the official and officious bulldog has noticed some wires poking out, and one of the Fabulanders has in fact sent a letter bomb? Here you can also see the counter next to the cash register and some of the shelves in the general store, and although there is a great view of the bright blue teapot, it isn’t easy to see how the shelving units are arranged. This view allows you to see better: From this angle more of the general store layout can be seen, and the bright yellow colour scheme with red accents is clearly apparent. What can also be seen is that unfortunately some of the shelf space from the window piece is lost and the interior looks a little clumsy as a result. It really is unfortunate; the pieces are arranged this way so that the external walls are flush and the roof pieces economical, however it really doesn’t look so good on the inside. I’ve arranged the “fruit” as described in the story/instructions (and here the part of an apple is being played by a treasure map) but it does leave the shop looking slightly bare. There are lots of pieces placed on the counter next to the cash register, almost swamping the cash register itself, but still somehow I hoped for more. As we move around to the side of the general store, my adult logic starts to niggle annoyingly. I want the continued suspension of disbelief, however practicality and function must be addressed. Here you can see that the walls indeed do sit pleasantly flush, and that it would be a shame to lose part of the dresser’s back wall as it has the price list for customers on the back (also a sticker, and also applied by the previous owner) – a price list for things the shop doesn’t have for sale... Hmm. Anyway, this price list is sensibly positioned next to the cash register, on the side where customers might walk past it on their way to the cash register... or at least they might if the post box weren’t in the way. Oh well, the stickered wall certainly adds interest to this side of the building, and from here you can also see more of the balcony, which I feel forms a very pleasant architectural feature, especially as a roof to the porch. I shall not dwell too much on the fact that there’s no clear way for our FabuFigs to get up there, I fear I’m destroying the magic as I type.. The latter part of the story/instruction tells of how to build Boris’ car. Indeed in the story initially it isn’t clear to whom the car actually belongs, but come on, it’s blue and yellow, it must be Boris’ car, right? The construction is very simple, essentially adding the five pieces to the chassis, one by one. The end result, though, is adorable. It is a cute little open-top run-around, complete with headlights and a windscreen. And to demonstrate just how cute it is, Boris has kindly stepped in to model the car, complete with a letter for him to deliver. You can see how well the car matches Boris’ own colour scheme and that of the post office, and that the proportions suit a FabuFig extremely well. Boris just has to sit in the small box-seat and look cute, for there are no unnecessary trivialities like a steering wheel to worry about. This is Fabuland; everyone gets to where they want to go. So when we add all these adorable elements together, how does it look? Here I have again tried to re-create a scene from the box; you can see the characters and the car as well as the other accessories, as the whole set is displayed. The set comes to life when the characters and the car are added, and it looks like a busy and vibrant Fabuland general store and post office. It’s not just a shell with a few figures, there are also enough details here to make it playable without being swamped with pieces. There was no need to add the garden, or the bench or the broom, however these additions are pleasant and unassuming. There are plenty of scenarios for children to act out, and plenty of scenes to re-create with the parts available. Overall, I think it is adorable. Now a few people may remember that on the back of the box are a few alternative models shown. Quite a few in fact, and some of them are... a little odd. I’m a sucker for an alternative build so I’ve picked out a couple to re-create. Here’s the first: Boris’ little postal run-around has been transformed into a sort of charabanc. Freddy sits on the upper deck admiring the Fabuland countryside, while Hannah sits waiting for her ride. It seems to me as though Hannah is saying to Boris “There’s no way I’m getting in that crazy contraption” and Boris is replying “Just get on the damn bus, hippo!” It’s a fairly simple construction, and the upper deck of the vehicle is supported by the windscreen at the front, and a few layers of bricks at the back. Freddy is actually sat on the single red chair, so even if Hannah could catapult herself up there, there’d be nowhere for her to sit. Such practicalities as these don’t matter in the minds of children, though. This isn’t ever the most bonkers of the vehicles shown as part of the alternative builds on the back of the box: I present to you the backless house-car thingy. I admit the name needs a little work. It might be a caravan, or a Winnebago, I honestly don’t know. There is the possibility that the area above the car portion might be intended to be a sleeping section. However what completely boggles my mind is why a door is necessary when the whole of the back of the vehicle is open! It is fairly sturdy, and even zoomable, but it really makes me think it should be a vehicle in Wacky Races; it bears a passing resemblance to the Creepy Coupe to my eyes: That said, it was quite fun to build, as was the other alternative build, and their bonkersness just adds to the Fabuland charm, really. Conclusion Design 8 /10 This is a cute shop, and I particularly like how is it separated into a post office and a General Store both by the colour scheme and the fact that the areas are mostly kept to one or other side of the door. There has been attention paid to the elements that both the store and the Post Office might need to make them playable - the stock and the cash register for the store, and the desk and chair, letters and telephone for the Post Office. Overall it is a pleasing structure, and I especially like the porch with its pillars and balcony. The real disappointment, as I’ve already pointed out, is the slight covering over of the shelves in the general store. It would have been great if the design could have included a way to have all aspects of the shelves visible, and still have the external walls flush with the roof still covered. This is the only gripe I have with the design, though, as the rest is pure Fabuland joy to me. Parts 9/10 The System bricks in this set aren’t really anything much, however the Fabuland parts are plentiful, with some being relatively uncommon. The lamp posts are a very welcome addition to any collection, especially mine, but there’s a plethora of pieces I’m delighted to have. Other stand out parts for me are: the multitude of printed tiles, the red telephone, the petrol pump, the postbox, the apple tree.... There are so many parts included that I’m spoilt for choice. FabuFigs 7/10 Talk to anyone about Fabuland figures and they’re referred to as FabuFigs, so no mention of Minifigs here. This isn’t a huge set overall, so receiving three FabuFigs as part of it is quite a boon. The hippo and the bulldog have always been higher up the adorability list, and Freddy Fox is still nice, if a little sinister. As mentioned earlier, there’s nice printing on all the torsos, and the hats on Boris and Freddy are great, too; it’s just a shame they aren’t removable. The biggest shame, though, is that TLG gave these cute and adorable Fabulanders monstrous eyes when they reincarnated them in this second generation. The older eyes were significantly cuter and didn’t make the Fabulanders look like they’re strung out on Crystal Meth. I love these figures, but unfortunately the eyes are a disappointment to me. Why TLG?? Why??? The first generation eyes were soulful and cute, these are.... dreadful. Build 9/10 The basis of the building comes together pretty quickly as the main structure is composed of the larger pieces. Once those are in place, however, there is some “traditional” LEGO building, followed by the plethora of details that can be positioned “just-so”. Following the story/instructions makes the build interesting and fun, and of course oh-so-cute as you join with the characters in building their store, so overall the build is lots of fun with plenty to add interest. Attempting the alternative builds once more opens up new and interesting ways of combining the pieces; ideal for those not used to MOCing, and just fun to build in all their bonkers glory. Playability 9/10 With the addition of the stories and so many little details, there’s oodles of playability here. Boris’ car is extremely sweet and very zoomable, and it can be set up as a grocery delivery van, or a post vehicle, and can be used to fill up with petrol. The other elements provide seemingly endless scenarios also, with growing the produce (as in the story) and selling it, not to mention posting and delivering letters and working at the desk with the telephone. The cash register makes for an ideal play shop, so there’s plenty for children to play with here (and adults, too). Price 7/10 I find it very hard to comment on price for these sets. There’s no information available in the usual source for how much this set may have sold for at the time of its release, and I honestly don’t know how much this set cost to buy this time (and I don’t really want to, it was a present after all). Looking on BrickLink, at the time of writing there are three sets available; a used and incomplete set for £37.82 GBP (60.89 USD, 40.04 EUR); a complete used set without the box for £86.38 GBP (139.04 USD, 98.31 EUR); and a MISB set available for £210.98 GBP (339.57 USD, 240.09 EUR) so there is a huge variation in prices and what you might get for your money. This is a used e-bay lot, which came with the box and instructions and only a couple of missing parts (which were replaced, sort of). There are many useful items here, some relatively rare, and fortunately in pretty good condition, mostly. For an old set like this, a reasonable price is really whatever that particular buyer is willing to pay; some may think the price is extortionate while others may think it is reasonable for the Fabuland goodies within. I myself am happy to own this set, and even happier that it was given as a present. Overall 82% This is another nostalgic piece of Fabuland charm. Not everyone loves Fabuland, but I do, and this set is so jam-packed with detailing and accessories, not to mention Fabuland parts for building houses and a car, that overall it is a great set with endless playability. The accompanying booklet adds pathos to the characters and introduces them to you or to children who may play with the set. The one big down-side is the FabuFigs, unfortunately. The second generation eyes are just too much, just a bit too crazy, and sadly reduce the cuteness of the otherwise adorable characters. However, if you have a few first generation figures in your collection, you can still make the set adorable, and the first generation figures will fit in perfectly. Thank you for reading, comments are always very welcome. High-Res pictures can be found on my flickr account.
-
Number – 3628 Name – Perry Panda and Chester Chimp Theme – Fabuland Year – 1981 Minifigs – 2 Pieces – 3 Price – GB £26.14/ EURO 30/ $42.28 (when bought) Links : BrickLink, Brickset, Peeron Everyone loves Fabuland, don’t they? It’s a bright and happy world where sweet little animals go about simple lives, and many real-life people find that they have resonance with a particular character or animal. For hopefully obvious reasons, I personally found this resonance with Perry Panda, who really is.... adorable. Through the power of BrickLink, I bought a used and lonely figure of Perry Panda, but unfortunately, though still adorable, he was a little grubby and faded, and required a lot of photoshop work to restore him in pictures. A return to BrickLink and a slightly more thorough search returned this set, MISB! An opportunity to have a new Perry Panda, plus a friend and a vehicle, for our Fabuland friends must have some of their world around to make them feel at home, this is an opportunity not to be missed! Review: Perry Panda and Chester Chimp 3628. It’s an old box, and the passage of time has not been kind but the front of the very colourful box shows our heroes going about their daily business. An old price sticker indicates the box was likely originally bought in Germany, costing 10.20 Deutsche Marks. The back of the box is equally beaten up. It shows what good friends our heroes are and further scenes of day-to-day business, including an inability to put the ladder in the tricycle, and Perry’s concern for Chester as he horses around at height. The sides show identical scenes of further chimp and ladder acrobatics, and you can see where I have tried (and failed) to open the box carefully. The base shows yet another comic scene. Inside the box are two booklets, one with a specific story for Perry and Chester, and the other showing off other Fabuland sets. The Story Booklet shows a wordless comic describing the adventures of the pair as they set about cleaning windows. It is lovely to look at so here are all four scenes. Another page describes the relationship between the pair, unfortunately not in English, so I have translated as best I can: Percy is the owner of a window cleaning company. They say he is a real a businessman- but perhaps a little too good-natured. Gabriel Gorilla works for Percy. Intelligent he is not, but in the story (or in his mind?), he is king. It’s interesting that BrickLink and other resources call this set Perry Panda and Chester Chimp, when the Story Book clearly calls them Percy Panda and Gabriel Gorilla. The booklet also shows a drawn picture of Fabuland itself and its inhabitants. You can see Perry and Chester at the top of the right-hand side (click the picture for a high-res view). The second booklet shows a photograph of Fabuland and its inhabitants. As this set is not easy to get hold of I’ve included some small pictures of the pages inside the second booklet; please click on them for links to high-res pictures. The last page of this booklet shows Charlie Crow building his own truck (Carry-All) and also has instructions for parents. I shall translate (I hope!): Each box contains a book of stories on the small animal from the box, and gives ideas for building and play. If you read the story aloud, your child will better know each new character. Onto the LEGO! There are but three parts, the first two are a ladder and a red tricycle: The tricycle is an attractive red and seats (stands) one at the front, with space for equipment at the back. When I saw this, I immediately remembered my childhood Fabuland set, Ricky Raccoon and his Scooter, as the tricycle is remarkably similar: The ladder is a simple piece with hand grips at one end and attachments for the tricycle at the other. There’s also a brush (but I got two ) Our adorable heroes, Perry and Chester, from the front: I’m slightly miffed that, given the main reason for buying this set was to get a brand new Perry Panda, the 30 years of rattling around in the box has still left his nose and ears a little worn Here they are from the back, and Chester is looking a little short... The build requires simply attaching the ladder to the tricycle. Here you can see the holes in the bed of the tricycle into which the ladder attachment is inserted. The ladder stands upright when attached in this way. It can also be placed using the hand-holds to lie horizontally. Here are all the elements of the set together, emulating the scene on the front of the box. And once you get them all together, you can start to have even more fun! Conclusion Design and Parts –8/10 this is classic Fabuland, not that there’s any other kind, and it’s a beautiful red tricycle. It coordinates well with the scooter, and the fact that the ladder can attach in two different orientations is great. The brush is the same as those used by classic LEGO minifigs and looks a little small. Given that other Fabuland sets have Fabuland specific accessories, a Fabuland brush would have been nice, as would a bucket. Build – 8/10 it takes under five seconds; attaching the ladder to the tricycle is neither taxing nor time consuming, but still makes you smile. Minifigs – 10/10 these are the headline of the set for me. I bought this primarily for Perry, who is just able, but Chester is also entirely loveable, with his cute little ears, even if he is a little short. The addition of the background story adds depth to the characters. Playability – 9/10 the characterisation gives a springboard for setting up scenes of comic mishap with these two, plus the tricycle is fun to zoom around and the ladder attaches firmly in both orientations, preventing dislodgement when zooming. Price – 8/10 At the time of selling, this set was evidently priced at 10.20 Deutsche Marks, which equates to EUR 5.22, GB £4.52 and US$ 7.36 at todays exchange rates. I'm not sure how reliable the conversion is, but GB £4.52 is certainly a more expensive price-to-parts ratio for 1981, but this was the case with Fabuland back then. Nowadays a MISB set can be bought from GB £25.99 to GB £43.28, and used sets range from GB £4.98 to GB £19.06 (values from BrickLink at the time of writing). This was a MISB set with a known battered box, and I paid GB £26.14; I bought from a seller I had used before who also had other things I wanted to buy. This set is undeniably expensive, and I can only comment for myself, but I felt it was worth every penny. If only a secret stash of old MISB Fabuland sets could be found so that they could be cheaper to buy (and I’d feel less guilty for opening it ) Overall 88% I adore this set, it’s just gorgeous. The characters are cute and the story is great, the only thing missing are more appropriate accessories, but those can be acquired by other means. Thanks for reading, High-Res pictures can be seen on my flickr