Polo-Freak

42130 - BMW M1000RR - MODs and Improvements

Recommended Posts

First modification I made, added two #22 panels on the left side. Literally one of the last steps in the instructions, pg.366, shows adding two #22 panels on the fairing for the right side, so I just did the same on the left side. It really does look like somebody just forgot to include them to be honest. They fit perfect, I just built them the same as the other side only mirrored. Not sure if they left it off on purpose, or if is supposed to represent something as on the real bike.

Anyway just finished the set, so now time to mod it a bit. Really enjoyed building it, the sticker fest, not so much. This coming from a guy that really doesn't mind a few stickers.

Edit: Small mistake, I meant to say I added two #21 panels to mimic the two #22 panels on the right side. Just wanted to clarify. Really itching to modify this set, looking forward to seeing what others come up with too.

Edited by Johnny1360

Share this post


Link to post
Share on other sites
On 1/9/2022 at 5:46 PM, paul_delahaye said:

I think we will give it 6 months to drop a 1/3rd in price..... :classic:

I really cant see that happening. Its new and its big.

Share this post


Link to post
Share on other sites

@williamyzfr1

You can get (well reserve it when it come to the stores on march 1st.)  the set  already here in the Netherlands  for €159,99. I do think It will drop in price to at least 145...

@Johnny1360

The panels on the leftside were left out on purpose.. Just look at the real model. Left and right side of the bike are slightly different.

For me personally:

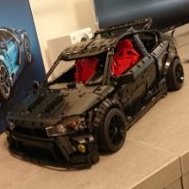
I made some changes to the colouring as I do not use the stickers. I do not think the stickers add anything to a model and they are usually used as a easy design choise for brick-built alternatives.

img_20220113_005257klein.jpg


Share this post


Link to post
Share on other sites

As much as I disliked putting all the stickers on, I do however feel if you want to represent a racing vehicle it will need a certain amount of stickers or better still, printed parts.


Edited by Johnny1360

Share this post


Link to post
Share on other sites

I solved TLGs persistent transmission idiocy for this model. As a follow up, I will post pictures.


In Milan's review on page 3 it is discussed in length that either a 1st up or 1st down shift pattern would be a "real world" pattern for this transmission as long as the pattern is 1-N-2-3.

In no case is TLGs pattern of 1-2-N-3 ever realistic. I realize they do this deliberately so that the engine goes faster and faster as you upshift gears. This make the "play" factor better. THIS IS A 18 AND UP MODEL, REALISM SHOULD BE THE PRIORITY. For those of us who ACTUALLY know how transmissions and engines work, this just makes things worse.

The simple solution is:

1) Identify the Red Bush used for N (It is installed in Step 47)
2) Identify the Red 16T Idler/Clutch Gear used for 2nd (installed in step 55)
3) Reverse them
4) Reassemble

Your transmission will now shift up to 1st, 2 down to second, one more down to 3rd.... The Race transmission configuration for a BMW M 1000RR.

Your welcome.


-edit-

Sorry, I do not think there will be pictures, there is no way I can figure out how to downsize the pictures to fit within the tight file constraints that have been allowed. If someone has a suggestion of how I can do that, I will get them uploaded. I have the files, but nothing I can do will get them under 1K and still be viewable (IMHO)

Edited by jfb9301

Share this post


Link to post
Share on other sites

Man I wish I would have known it was that easy to change the shifting order, before I finished the build, as I would much prefer a slightly more realistic shift pattern. Oh well time to tear her down, at least it should go back together much faster, as all the stickers are applied.

Share this post


Link to post
Share on other sites

I only built my 42130 to step 133. I thought this was a good time to pause and solve the transmission issue.


2nd and N are on the left side of the transmission... so go after that side.

1st and 3rd are on the right and both use 12T and 20T gears. First is tricky because it move those gears away from the clutch.

All I did was crack open the transmission, slip off the LBG 16T gears, swap the bush for the 16T clutch gear and put it all back together. I can't cram a 6 speed in there, but at least it shifts correctly.

I have been stuck on this step for a week now. I just couldn't spend the time to focus enough to solve the problem until this morning.

Edited by jfb9301

Share this post


Link to post
Share on other sites

For those who have not completed the transmission already or are starting the model....

Use this as instruction errata to correct the shift sequence

Step 47) replace the red bush with a red 16T clutch gear
Step 55) replace the red 16T clutch gear with the red bush

0 extra parts and the transmission works correctly now.

I've been recovering from COVID, and while you would think that would give me extra time to solve this... I've been so wiped out and short energy, I could not focus on it enough to solve it. Today, I had the energy to focus on it. Took me a bit though, I kept trying to figure out how to swap 1st and 3rd, but after about 15 minutes of thinking about it, I realized that was impossible to do simply and swapping 2nd and N would be much easier and would solve the issue without extra parts.

Edited by jfb9301

Share this post


Link to post
Share on other sites
2 hours ago, jfb9301 said:

Step 47) replace the red bush with a red 16T clutch gear
Step 55) replace the red 16T clutch gear with the red bush

 I kept trying to figure out how to swap 1st and 3rd, but after about 15 minutes of thinking about it, I realized that was impossible to do simply and swapping 2nd and N would be much easier and would solve the issue without extra parts.

Awesome, thanks for sharing this. Most of the racers riding these bikes in real life will be using reverse direction shifting so I think the fix that you ended up doing was more realistic anyway. Best of luck with your recovery.

Share this post


Link to post
Share on other sites

Hi guys,

I'm still playing with the outlook and modifying the racing stands. LEGO has done a great work when comparing with the real one. So just need to fill some 'holes' here and there...

51865199996_dd0abbfd91_c.jpg

Share this post


Link to post
Share on other sites
On 1/22/2022 at 9:33 PM, jfb9301 said:

For those who have not completed the transmission already or are starting the model....

Use this as instruction errata to correct the shift sequence

Step 47) replace the red bush with a red 16T clutch gear
Step 55) replace the red 16T clutch gear with the red bush

0 extra parts and the transmission works correctly now.

I've been recovering from COVID, and while you would think that would give me extra time to solve this... I've been so wiped out and short energy, I could not focus on it enough to solve it. Today, I had the energy to focus on it. Took me a bit though, I kept trying to figure out how to swap 1st and 3rd, but after about 15 minutes of thinking about it, I realized that was impossible to do simply and swapping 2nd and N would be much easier and would solve the issue without extra parts.

I was so bothered by the wrong shifting order. Your solution is pure perfection ! Thanks !!

Share this post


Link to post
Share on other sites

Hi,guys. I made the RC 42130. Here to share the following 2 videos which are controlled by BuWizz App and Brickcontroller 2 app, enjoy


Edited by WW Bricks Studio

Share this post


Link to post
Share on other sites
On 2/12/2022 at 11:44 AM, WW Bricks Studio said:

Hi,guys. I made the RC 42130, enjoy

https://youtu.be/RUSy8h0PPjQ

Quite impressive. Thoughts on having the steering just control the tilting, and letting the castor angle on the front fork do the steering?

Share this post


Link to post
Share on other sites
7 hours ago, amorti said:

Could you give some more information, specifically how you mounted the drive motor? Thanks

Hello, First of all, I removed the fake engine to mount the BuWizz motor and succeed to drive the rear wheel but the link chains are not durable.

So, I mount the BuWizz motor on the swingarm and drive the wheel with gears.

4 hours ago, Bartybum said:

Quite impressive. Thoughts on having the steering just control the tilting, and letting the castor angle on the front fork do the steering?

Hello, Thank you. Do you mean remove the auxiliary wheel? 

Share this post


Link to post
Share on other sites
1 hour ago, WW Bricks Studio said:

Hello, Thank you. Do you mean remove the auxiliary wheel? 

I mean have the steering motor not control the handlebars, but the side arms

Share this post


Link to post
Share on other sites

Yesterday I got around to thinking about converting the 3+N transmission to a 4-speed, and came up with a solution I'm pretty happy with. It has an unfortunately small range of speeds, but they are still distinct and shift in order. Interestingly, the setup is dependent on the new non-beveled 12T gear to run a chain, although since I don't have one yet, I'm using a 3D-printed stand-in. Here's some pictures of the drivetrain model on its own, giving a good view of the modified gearing:

800x600.jpg

So, the orange loop drawn on the bottom represents the chain, with drives its 16T gear, and then everything along the green line, causing the 20T and 16T clutch gears on opposite ends to rotate at different speeds. The axles the driving rings are kept running at slightly different speeds thanks to the chain drive with the orange line on it. At the top, under the red circle, is the new 12T gear, and at the bottom, in the purple circle, is a 12T gear. The upper driving ring's axle then continues through the blue drivetrain to run the engine.

640x853.jpg

640x853.jpg

I forgot to take decent pictures of this before putting the bike back together, but the white 2L beam that is used to limit the shifting has to be rotated by 90 degrees in a specific direction relative to the wave selector to make sure that it shifts in the right order.

Anyways, I think having a four-speed sounds a lot more impressive than a mere three-speed, so while there isn't really a functional advantage here, I'm happy to have the upgrade.

Share this post


Link to post
Share on other sites

Yes it really needs a fourth gear and your solution seems to fit the bill. Might have to see if I can whip one up out of spare parts, not sure what to do about not having that one gear yet though, lol. Good job and thanks.

Share this post


Link to post
Share on other sites

Anyone tried to change the fork rack?

I'd like to "verticalize" the steering column to increase the joint stability when you push down the suspension.

I will try to switch the 5L with a 6L liftatms that hold the 3x3 dbg liftatms Thin.

Have you other ideas?

Share this post


Link to post
Share on other sites

Create an account or sign in to comment

You need to be a member in order to leave a comment

Create an account

Sign up for a new account in our community. It's easy!

Register a new account

Sign in

Already have an account? Sign in here.

Sign In Now

  • Recently Browsing   0 members

    No registered users viewing this page.