

MikeTwo9398
-
Posts
136 -
Joined
-
Last visited
Content Type
Profiles
Forums
Gallery
Everything posted by MikeTwo9398
-

General Part Discussion
MikeTwo9398 replied to Polo-Freak's topic in LEGO Technic, Mindstorms, Model Team and Scale Modeling
Look at the review of Lego City 60216 Downtown Fire Brigade from AustrianLegoFan and you can see where its used for https://youtu.be/ymtZPv07OPs?t=763 -
Axle Collection Thread
MikeTwo9398 replied to efferman's topic in LEGO Technic, Mindstorms, Model Team and Scale Modeling
Axel looks great but got one question. Is it strong enough to hold the weight of the cabin? When I buid my refueler truck the front weels bended outwards because of the weight. -
I saw it this massive fairground attraction last friday too. Not fully completed but is was a beauty to see it in action.
-
Here is my modification of the upper gearbox. With this modification you can control the upper functions of the crane simultaneous (raising, extending and hoisting). On the left side of this picture you can see the parts I added. On the right side are the parts I did not use. All other parts seens are avaiable in the model. Here you can find a PDF file of the building instructions. The building numbers correspond with the building numbers in the 42082 instruction book. Here is a video where you can see the working of the modification (the video also includes the building instructions).
-
Yeah, thats her name, Kitty . She's a very polite cat, but always sits in front of you so cannot get or see the pieces you want to use . So it takes me days to build this big, beautiful crane (I can only work a few hours a day ). I am making a modification so I can use the three separate functions to work without having to switch. I build in three switches on their own axel. Up to now the motor does not have any problem with operating the three function at the same time.
-
I just started building too and encountered the same. I found that the 8 teeth (number 1 in the picture) was touching part 4211779 number 2 in the picture. I fixed it by repositioning the parts around the gear until the 8 teeth gear did not touch anything. 42082-8gear
-
Washing in Dishwasher
MikeTwo9398 replied to monaghanman's topic in LEGO Technic, Mindstorms, Model Team and Scale Modeling
When I think my models are to dirty, I take them apart and was the parts by hand in water with some dishwashing liquid. The motor, battery boxes and other electronic or metal parts I just use a wet dish cloth, otherwise they get damaged (as mention before). This way I get the uppertunity the build the model again. It keeps me building without having to buy new boxes -
Today I found a nice article about Niek van Slagmaat in our local Dutch newspaper (Brabants Dagblad). Here you can find the digital version Niek van Slagmaat in Dutch News paper ED
-
When I look at all the pictures I think the bottom LA is for tilting the hole structure the dig deeper (or to lift the bucket higher) and for creating a smaller turning radius. The back looks like a balancing body that can move back and forward controlled with the knob at the back (visible when you look at the different pictures: position of the balance weight towards the HOG). All function do not look linked and all controlled manual.
-
Lego Technic 8479
MikeTwo9398 replied to kancs3118's topic in LEGO Technic, Mindstorms, Model Team and Scale Modeling
In 1997 I bought this set as new. A year after I bought the set I found a software program for the code pilot on lego.com. It's an old program but still works on windows 8.1. Text from the readme file: DESCRIPTION ---------------------------------------------------------------------------- With this fun program, you can create an original Code Card for your 8479 monster truck. After downloading the program to your computer, you are ready to code, load, and go. The six red arrow keys at the bottom of the control panel are the command buttons for your truck. When you click these keys, you'll highlight some buttons in the middle row to give you a choice of commands. Click the commands you want the truck to do, in any order, and this sequence appears in the green panel. I uploaded the program to Bricksafe.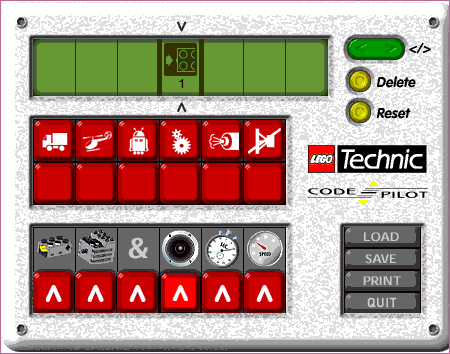
-
I have a Samsung S5 and it works perfect.
-
42083 - Bugatti Chiron
MikeTwo9398 replied to Jurss's topic in LEGO Technic, Mindstorms, Model Team and Scale Modeling
When I saw this video, I thought I saw this type of engine before. I found it again. It was in the video from GT Mechanicmaniac "LEGO Technic VW Phaeton 6.0 W12 scale 1:7 (Part III)" Check his video here: At 26:44 you van see the engine without the cars body. -
9: 10 2: 6 18: 4 3: 3 14: 2 17: 1
-
4. The Big Racoon Driven by "Ricky Racoon". Ready to stop all other racers. Big enough to block the race track. Steering and drive of the Big Racoon are Remote controlled. Wacky functions are manual. Build with mostly old Lego Technic bricks (my tribute for the 40th anniversary of Lego Technic). Although the wacky functions are performed by nowadays Lego Technic. Wacky functions: Road Blocker / Road Sweeper (fully manual function) Cannonball (Part manual, lifting and loading, and partly driven by motor, the shooting) Large Heavy Big and very Old...... The Video:
-
Land Carrier Khagaan
MikeTwo9398 replied to mahjqa's topic in LEGO Technic, Mindstorms, Model Team and Scale Modeling
I saw these vehicles on Lego World last year. You showed them already and told me that there not finished yet. But what you show us now is amazing. And what an amazing video. Great job -
Looks nice. The front is is rotating more than the back. But be careful by placing a lot of weight in the middle, especially when placing the center of gravity above the axes. It will become instable and making the vehicle steer on it own.
-
I used this type of steering in the Lego Rebrick competition "Lego Technic Porsche of your dreams" . I knew I did not make any chance to win so I made something different.
-
[TC12] The "Big Racoon"
MikeTwo9398 replied to MikeTwo9398's topic in LEGO Technic, Mindstorms, Model Team and Scale Modeling
Yes, it's done. Maybe some small updates.... The wacky functions doesn't look strong but it's about the idea . I builded it in the last week of my vacation, 2 weeks ago. Took pictures and made the video . I probably don't have time before the end of this contest. I enjoyed building it. Specially because it's built with old Lego, with a little help of the current technic PF Lego. Will see what the members think of it. -
Hi everybody. This is my entry for the Wacky wheels contest. The "Big Racoon". A few months ago I was thinking about rebuilding my old truck build in 1987. I build it with almost all the Lego parts I had at that time. I dismantled the truck 1997 and made some pictures. There were no digital cameras at that time so the pictures I took where very bad, I realised that when the negatives where printed. Picture taken in 1997 When I was rebuilding the truck, Jim came with the Wacky Wheels contest. I am not familiar with the game but took a look at some youtube movies about the game and came up with the idea to use Fabuland figure “Ricky Racoon” (the only Fabuland box I own). Ricky Racoon or on Brickset Have a look at the pictures and movie. My temporary building place. The "Big Racoon" Wacky functions: - Road Blocker / Road Sweeper (fully manual function) - Cannonball (Part manual, lifting and loading, and partly driven by motor, the shooting) The truck is equipped with: 1 servo for steering 1 L-motor for driving (at this moment only 1 axel is driven with a possibility to add a L-motor to another axel. 1 m-motor to drive the cannonball Build with mostly 40 year old Lego technic and regular bricks. The Wacky functions are built with new Lego technic parts. The movie: See all pictures at flickr.
-
[MOC] Airport Refueler
MikeTwo9398 replied to MikeTwo9398's topic in LEGO Technic, Mindstorms, Model Team and Scale Modeling
42068 is to small for this scale. Would even fit your airport catering truck It fits the scale of the Mercedes Arocs 42043. I made some pictures with the Mercedes and the Dump truck with Barcode 8479. Click here for larger pictures. -
Here I present my Lego Technic Airport Refueler. Yet another airport vehicle. I wanted to build a truck with a remote controlled gear box, changing gear using a Servo motor, all wheel drive and with suspension on every axle. I started with the gearbox setup from Didumos69 used in his beautiful Rugged supercar. Ideal for use with a servo motor to change gear. But I had problems shifting down gear and slipping gears when driving. My biggest concern was the amount of space the gear box needed. The distance between the axles was to large. (I wanted to build a tractor truck and not just a big truck). After a few attempts, using other examples found on the internet, I finished with a ordinary, simple inline 3 speed gear box. I had to rebuild it several times because of slipping gears….. not robust/strong enough. Shifting gear only works well during drive. Sometimes the middle gear jams causing a bad shift of gears. Finally the distance between the axles was still big, but that gave me the idea to make my truck an airport refueler truck, seen on the airport. On top of the gearbox I could place a platform lift and on top the rear axle the 5th wheel for coupling a trailer. I hardy had bricks to build the trailer, I did not want to dismantle my Mercedes Arocs (or other vehicles) because both trucks have the same scale. Therefor I used I 125 [mm] tube to create the tank on my trailer, it also saved weight. The axles of truck and trailer have suspension. Coupling the trailer is done manually. The 4x4 truck functions are controlled by the SBrick from Vengit. SBrick: 1 Drive: 2 XL motor Platform lift: 1 L motor Steering: 1 Servo motor Shifting gear: 1 Servo motor (3 different speeds). Size: Length: 110 studs - 860 [mm] Width: 21 studs - 165 [mm] Height: 28 studs - 260 [mm] platform down (about 14 studs higher with the platform lifted) Here is movie of my Refueler, hope you like it. Click here you can find more pictures.
-
Nice review. Just came home from work and to check if there is a review... It's goning to be hard this time. I normally buy only one box each year but 42070 and this one are great.
-
@Good old Lego builder I know where you might have seen how the motor was build in. It is in the building instructions of the Excavator 8851. Unfortunately on all the sites where you can find the building instructions (I tried 3 via Brickset.com), the instruction on how to build in the motor is not shown. In my book it starts just behind the instructions of the B-model starting at page 26 until 30. I do not know if the motor is strong enough. In case you don't have the book of 8851 here are the instructions: 8851_page_26 by mike verstappen, on Flickr 8851_page_27 by mike verstappen, on Flickr 8851_page_28 by mike verstappen, on Flickr 8851_page_29 by mike verstappen, on Flickr
-
A few month ago I was able to by 9695-1: LEGO Mindstorms Education Resource Set (for € 80). Maybe this set is an idea 45560-1: Education EV3 Expansion Set These sets have a lot of parts and costs about € 120 = $ 170.7582 and fits perfect to the Mindstorm NXT set.
-
It's a beaty. Just like the real one. I have seen them in action during construction work at my work. There where 3 or 4 trucks working at the same time on several locations. The trucks are remotely controled. One man was standing at the pipe controlling the vacuüm pipe and moving (driving and steering) the truck of needed (at a low speed). Nice job Efferman