
Erik Leppen
-
Posts
2,179 -
Joined
-
Last visited
Content Type
Profiles
Forums
Gallery
Everything posted by Erik Leppen
-
Er, yes, that one. (If he/she sold those against current Bricklink prices, he/she could buy a new Millennium Falcon set (75192).)
-
 Very nice alternative to the original crane. I like how compact the base is, compared to the official version. Although rotation of the crane seems to be manual? Also, good color choice (neutral colors). One thing I like in particular are the rotatable outriggers. So simple, but you rarely see them, so it's an original little feature. Nice touch :) One suggestion to add would be to have an extending section at the end maybe, 8258/42043 style (not necessarily pneumatic - that would complicate things and add lots of extra tubing).
 -
This is because Nintendo and Ford are countable, meaning you can have "a Nintendo" or "a ford" (with an article), and everyone understands that "a Ford" is a car and a Nintendo is a game console. So you can have one Ford, or two Fords. Can this be done with Lego too? What's one Lego? What if I say that there's a particular Lego that consists of about 1100 Legos? Do you need hundreds of Legos to build a car, or do you just buy one nice Lego in the toy store and build it? I wouldn't be surprised if this was wrong because there's no clear definition of a Lego like there is for a Ford. Anyhow, my own pet peeves... 1. That old gray is still Gray and new, standard gray is Bluish Gray. I think it's about time that this is switched, and current gray is called Gray and old gray is called Old Gray. (Yes, I know a switch would generate a truckload of problems, but it's still something that seems to disturb me from time to time) 2. That Reddish Brown is alphabetically far away from Brown, where I expect it. Same goes for all colors with a prefix. I'd much rather see colors renamed so that their alphabetic ordering groups by color; that is: Blue; Blue dark; Blue medium, so that all blues are together. 3. That there's no easy way on Bricklink to hide all the old colours that are out of production. I still click on "Dark Gray" or "Brown" regularly only to realize that that's not the color I mean, and I still have to think "OK, Light Orange is old, Bright Light Orange is current". 4. That MLCad still defaults to the old colors with no way to change them (but I guess MLCad is just old...) 5. That LDView part list export seems to sort the part list by part ID, which is about the least intuitive way possible. 6. When people are full of praise for a Technic set because it looks cool or has an original subject matter, even though it's lacking in functions (the 42064 Ocean Explorer was a bad offender) I mean, come on, what theme are we talking. For looks, there's basically all other themes. 7. That there are very obvious gaps in the part/color availability. I.e. basic parts not existing in basic colors (or existed once, 1x in one set 20 years ago, and therefore so expensive it could just as well be considered non-existing, like Tan slope 33 3 x 1 inverted) 8. That many Technic tyres are too wide compared to real-life tyres It seems like a lot, but don't worry, I'm a pretty positive person, but since there's a topic for this... :P
-
I like where this is going so far. Seems to become a really collaborative effort, which is cool and unique. One suggestion: I think you really don't need 8 hard springs (red or yellow). A soft spring (dark-gray) accounts for about 600 grams, but the leverage effect of the linkage used means you probably get about 300-400 grams of support per spring (yellow layout), so 8 springs can support about 3 kg. I don't expect this to be come a 3 kg model, so soft springs (dark-gray) would be more than enough. I know it could just be color coding for easier communication, but I wanted to note this anyway :)
-
[REVIEW] 42077: Rally Car
Erik Leppen replied to Milan's topic in LEGO Technic, Mindstorms, Model Team and Scale Modeling
I still don't get the hype on this set. I mean, it's good for kids who want big sets, but I still think it's hardly worthy of the name Technic, and too ugly to be any good as a Racers set either. For me, it has a Nitro Menace (8649) feel to it, which I don't really see as a good thing. Basiclaly, there's three things I like about it. The dark azure color The rollcage (except the fact it's impossible to enter the car because the rollcage is in the way) The flappy side panels that open together with the bonnet (the only innovative function it offers) Also, it will look great on a shelf next to 42039; I think dark azure and bright green look great together. (But Technic isn't meant to put on a shelf. For that, almost every other theme is more suitable.) For the rest, this car feels like it's big for the sake of being big, which I find the wrong reason. But as I said, kids will probably love it. It doesn't make it worth >25% more than the hovercraft (42076), which has more functions and play features than this for the same number of pieces. (I'm not saying the hovercraft is so brilliant, but at least that's a proper Technic model). Don't get me wrong, I think the review is fine (except it's way too lax. Come on, what theme were we talking? Technic, right? Where's the technic on this set?). You cover all the points, and provice nice animations on each moving part, and I always like the build photos. So thanks for making this extensive review. Also, apparently, lots of people agree with you, so I guess I'm the minority here. I probably won't get the set, but I'm happy to see Bricklink stores be stocking those new dark azure technic parts. -
Super nice, I also really like the styling with the minimalistic use of red and the minimalism overall in the design. You did a lot with only a few pieces, I like that. I like how you used only three white pieces (except the wheels) but that works really well with the white rims. You could have used 36t - 12t instead of the 24t - 8t you used now, but that would have required a wholly different chassis around it, probably losing more than you'd be gaining by it. Another option could have been 24t - 24t and then swapping the 12-20 to a 20-12 in some way. But then the U-joint would have run 3x slower and hence needed to process 3x more torque, so that wouldn't be good either. I think this is the best setup possible in the limited space. And if it works, it works
-
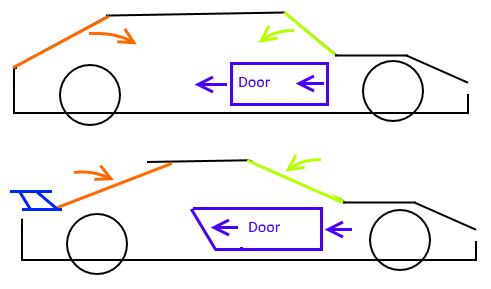
If I may give some advice: take a side-view picture of your car, and check a few side-view pictures of real cars. You'll immediately see the difference. You could do the same for top-view images. The roof is probably too wide as well. I'm not sure if your model has opening doors, but if the first flex-axle is part of the door and the second is not, then the problem I think is that the door is too short. The second behind the door is huge and could be shortened. But yes, bodywork is hard. It's easy to comment on other's works but it's really hard to do good bodywork. I find that if there's any problem with proportions, it's a problem that lays dormant for a while and then comes about and stabs you in the back when you're doing the bodywork. I mean, if the proportions of a model are wrong, you're going to find out when you do the bodywork, because we instinctively "see" it when the bodywork doesn't "feel right", while we don't have such an intuition when we see a chassis, because in real life we normally don't see many car chassis (plural?) :) And personally, I think the reason for the long roof is because the proportions of the chassis are off. (most notably, I think the car is too long.) If some parts are in 1:8 and others in 1:10, then by continuing each section in their own ratio, you'll end up with huge unexplainable gaps because the larger your model becomes, the more apparent every mismatch will be. (OK, it's hard to explain what I mean in English.) I think what I would do is, make a roof by using 2 of those 5x11 panels to form an 11x11 square, and let that be most of the roof. Then, the windshield will become longer, and the back as well. Move the red diagonal 13L beams at the back a few studs forward (towards the roof) and make them longer, so that you have a horizontal part behind them where a rear spoiler could fit. I think that would improve things. Edit: here's an image that shows what I mean. Top image is your long-roof, exaggerated. Colored segments are what I would move. bottom image shows what I move them to. (Approximately. It's a quick sketch.)
-
Sorry, @Wolf_Zipp, I forgot about the renders But your rebuild of the axle seems correct :) I see you used linkage-based steering, which is an interesting idea. I don't think I replace the steering I already have, what I have seems to work fine right now. Thank you! I hope you are right, because I'm really struggling with the pneumatic tubing. There need to be tubes rom the compressor (right side) to the switches (left side) and from the main boom switch to the 4 boom cylinders. And theres almost no room underneath the boom, and I don't want to raise it because the top is nicely flat like the real crane. What doesn't help is that the V2 tubing is stiffer and I have most of the correct lenghts only in blue, and I'd rather not have blue tubes everywhere. I'll show what I have in a minute. Edit: here comes! This is the clearest picture of the tubing right now. As you can see, it's not very tidy yet, and of coures the tube running over the boom needs to find a place somwehere. Maybe I have to lead it all the way behind the main structure, and move the battery box a half-stud to the rear (the batterybox has to be connected to the vertical brown 5L axles are on the right of the photo. Unfortunately, The structural ridigity of the cabin joint is lost to make room for the tubings, so this has to be redesigned in a way. Which is hard with a limited choice for beams in green. Anyhow, the main problem with this version is that the main boom sits one stud too high - it is not connected to anything right now and you see the gears for the extension mechanism don't mesh. Here it is without the boom and the undercarriage. I really want to connect both ends of the cylinders, but this means I need 8 tubes, so it's necessarily messy. The main issue is there's no room for the 3 tubes running underneath the main boom. The one to the compressor might be rerouted as I described above, but the two that go to the main cylinder has to be approximately where it is now. Ok, the following is unrelated to the whole pneumatic problem, but I do have a little update. I changed the geartrain for the outriggers to a worm-based version. Unfortunately, this is 1/2 stud higher than the old version, so the fake engine had to be either shortened or raised. I went for the former, also to give more room to the main boom cylinder (the white 13L beam was slightly in the way for that, so I was glad I could move that 2 studs forward too). So the outrigger drive from the superstructure works! I also made a nice easy-to-control "hitch" for the turntable. The left and right slider in the 5x11 frame are connected via a linkage. Unfortunately the turntable is held with axles, not pins, so it has a slight bit of play, but was the best way to achieve a modular build and be able to connect and disconnect the superstructure without having to take the whole undercarriage apart every time. With a stretch of the imagination, you could view this as an extra "function" :D
-
Thin liftarms are no problem, if the forces are in the right direction, which they are here. Also, there'four of them per wheel. No problem at all. There might be slightly more play (in the longitudinal direction of the car), but I don't expect it to be problematic. You seem to have used an illegal pin connection though, for the 3L grey pins where the wheel hubs sit on. If you want to stay purist, I'd suggest 3L axles with stop and replace the red 3L beam with two half-beams.
-
I don't know, @NeilJam. Does it looks like one-and-a-half 42069? (that would be about 3600 parts) What I mean is, sets can have a lot more pieces than you'd think. That 42069 has 500 more parts than 42070 is hard to grasp for example. Maybe this is one of those dense builds with all kinds of (studded?) details again. That said, I get where you're coming from. I have to see it to believe it as well.
-
@I_Igor Red clutch gears have alignment problems with the light-gray extender pieces. Together they are just more than 2 studs in size. This is because the extender is designed for the old gera, which is asymmetrical and hence can have a 0.5 stud deep inset. The red gear is symmetrical and can't hvae a 0.5 stud deep inset at both sides because it is only 1.0 stud thick. Therefor, the ridges on the extender don't fall in to the red gear entirely and the result is that together they are slightly bigger than 2 studs.
-
Well, and here's the thing. Someone's going to have to make the call what it is that people will be building. We can't all wait for a decision to fall, because no decision will be made unless someone actually makes the decision. Maybe not everyone wants to build a car, or even a vehicle, but whatever you'll pick there's gonna be some people who are not interested. At least, with the proposal of @letsbuild, he gets very concrete and stuff will happen. The most important thing when doing something like this is get started. Just start somewhere, and ideas will pop up. Click a pin into a beam and before you know it, it's 3 AM. If you wait endlessly, people who are enthousiastic now will drip down disappointed and you end up with no project at all. I've seen that with the game dev project I talked about. Personally I think a supercar is a good project, because we all fairly agree on what a supercar is and what components it has, and there is relatively little variety. For starters, you don't have to discuss the number of wheels but secondly, there are only approximately two common scales which narrows down the options, so the first decision to make will be an easy one to get into the groove
-
Interesting idea, but will be a challenge to do. Partly because it's over the internet - someone (ideally multiple people) will have to do physical builds to test everything. Also, be sure to pick a suitable subject matter. Something modular - that's easily subdivided into separate sections - lends itself better than something that's tightly interconnected. Also, I find that when I do physical builds I always find small areas to improve Even if it's replacing these three parts with three other parts. What if three people are doing these builds and come up with different improvements? Who's gonna decide on a final option? Someone will have to do that, you can't vote over everything. However, the biggest hurdle I see is the risk of it becoming a "collaboration for collaboration's sake". I have seen the same problem on a hobby game development forum, and it might crop up here as well. The key to good co-operation, I have found, is that there are people who can do what the others can't (and need). If everyone has the same talents, it will be hard to do co-operation, because you'll get in the way of each other, and you won't get a better build than each individual person could do. People can only co-operate constructively if they need each other's strong suites. For example. I, as a game mechanics programmer, shouldn't co-program with another game mechanics programmer, or we'll get into fruitless discussions (especially if you're as stubborn as I can be sometimes). It's much wiser if I find an artist and make him responsible for the visuals, because that's a skill I don't have, so working together with him/her would actually improve the result. For my game development I work together with one other guy (most of the time), and the reason it works so well is we view things from quite different angles and both have different ideas that complement each other very well. I'm more detail-oriented, technical-oriented and a number-cruncher, he is more looking for the bigger connecting themes/principles and is more theme/setting/story oriented and not hindered by programming know-how. The reason this works, is because we both bring different talents to the table. The same goes for this project. Let's, for the sake of the argument, assume @Didumos69 will be joining. Then, if he would be going over structural ridigity (which is something he is good at), this aspect of the build would become his responsibility and is hence covered, so no need to have someone else doing the same thing (or specialized in the same skill). Rather not, because too many people doing the same thing will lead to fruitless arguments. So, I think the key is to find the different specific talents of the people who want to join in, and see how they complement each other. I know there are prople doing great gearboxes, or axle design, or shaping, etc. If some of those can sit together and cover each other's weak spots, then this can go very interesting ways. (So you need people who have weak spots and accept them to be covered by others. That is, you need specialists, not generalists. I'd probably not join, because I see myself as more of a generalist; also, I lack the dedication to work on a longtime Lego project).
-
Good review, seems to cover all points well. I think it's a great set. I don't own it, but it seems to have plenty of functions in a decent size. Steer, drive, suspension, a light tower and winch in about 500 parts seems a great deal. Not too big for what it offers. Would be an ideal starter set and it would please many children I think. Also it's good to see a set that is all in a single colour. Thanks for reviewing it. I am looking forward to your reviews on the bigger sets, because I'm curious how your review of the hovercraft will compare to other reviews I have seen. The reviews of the first responder all quite seem to agree.
-
Interesting, and cool that you're showing your progress. Those are the best topics :) Your model looks a bit wider than the original (from the photos) but that's mainly due to the wide wheels, so not much can be done about that. What I really like is the planetary gearing, the way the axle is pendular, and the LA for the steering. It all looks quite realistic in terms of functionality. (Edit: But indeed, if the steering articulation joint is about halfway the axles, you don't need the center diff) What I don't really understand is the "three point hitch" as you call it. The way I interpret the pictures, there's only one movement (up - down). Why are there ball joints? I could understand if there was a way for the attached, eh, "instrument" (how do you call the module that does the actual agricultural work?) to sway left and right, similar to a life axle. But that doesn't seem to happen, because from the worm-to-8t gear assembly there is perfect symmetry. There is only one input, as far as I can see, so only one degree-of-freedom. What am I missing?
-
It's connected to the changeover catch that toggles one of the two driving rings inside the superstructure. There's another gear on the opposite side. I may replace it by some kind of handle later, to indicate it's a switch, not a pulley. It doesn't skip. It is "friction locked" (so not form-locked, so don't tell @Didumos69): in the two vertical round holes of the gear rack I put black pins with pinhole, the vertical 10L axle through these holes holds the worm. The worm is "locked in" by two cross blocks connected to the dark-gray horizontal 14L gear rack. The 10L axle stays in place becuase the worm holds onto the axle with friction. Or, as a picture says more than a thousand words... If you have the new worm gear, you should try it out :)
-
I've made some good progress over the weekend, so I have another update! Much of the progress is cosmetic, however I have a small functional update as well. I added more body to the carrier, mostly wheel arches and the cabin (there's not much else). I went for dark-gray for the wheel arches, which I find a good contrast with green and white. Here's a better look on the cabin and engine bay. On the original engine bay I used 3x11 white panels, but these had two problems: I needed them for the boom, and the mechanism for the outriggers didn't fit underneath them. So I used system parts. I think it works well. I also managed to lead the gearing for the steering to the roof, although the geartrain isn't really nice here (another U-joint had to be added). But it seems to work, and it has a 1:3 reduction so not too much force is needed to steer. There's no seats yet. I decided the seats will be yellow, because then the color usedin the pneumatics comes back in other places, which is more coherent than adding another color. And I think gray seats are a bit boring :) Also, and this is the functional update, I came up with a mechanism for the outrigger feet. It has only 2 studs of vertical travel, so they won't touch the ground even when extended, so support plates are needed. But I think this is nicely compact. The picture is a bit dark, but I used the new dark-gray worm gear on a 7L gear rack. I also made quite some cosmetic progress on the superstructure, and I added the counterweight which is the battery box with some white boxes at the sides. I again used system parts for this. The biggest challenge in the supestructure will be to find room for 2 pneumatic switches + tubing. Especially for the main boom. Speaking of which... I finished (hopefully) the first boom section, and covered it with panels and tiles. I also started on the superstructure cabin. Here's a final photo of the entire thing so far (without wheels). What I personally like here is how the entire superstructure stays nicely within 9 studs height, including boom and cabin when lowered. The two parts aren't connected yet, they lie loose together in this picture. The boom looks too short, but that's the projection in the photo. It will overhang the roof of the cabin by one or two studs, which is slightly less than the real version but much better than 42009. Now the hope is that the pneumatics are strong enough to lift it (when filled with another two sections), but with 4 large cylinders I expect this to work fine. I really hope I can get a third boom segment in. Two is a bit simple, but these double-extension mechanism are things I find really difficult, with all the ropes and stuff. So, plenty of stuff still to do. The pneumatic tubing, boom segments, and the extension mechanism are the most important.
-
I also think manual lowering will be the only option. About the drive axle: I will reinforce it at the front end, but I won't move it somewhere else; I see no options to route it differently. Regarding the superstructure: I think I'm on to something. I added a third driving ring right from the motor, with 1 gear going to the compressor, and the other going to the existing 4-way function switcher. Then, I swapped the motor and the compressor, so the compressor is in the front, and the motor in the back (hard to see in this photo), which solves the cable problem. The main gaerbox is still in the center, because most functions have to "go" there. But I think I have nice short geartrains to all functions. Here's the bottom view: Becaues the motor axle goes right to a driving ring, this means that if the compressor is engaged, the whole 4-way gearbox is disengaged, so it doesn't eat up motor power by friction. And all the functions have a wormgear anyway. Thanks to the idea by @Wolf_Zipp. The second update I have today is that I started experimenting with colors. Testing a green-white combo right now. Thinking of adding dark-gray as an extra color (see front wheel-arch), and some black for the cabin. I do notice I'm a bit limited on green parts though, so I might switch to something different entirely. I personally do think the yellow cylinders match nicely (and these can't be recolored). I do hope I have enough room to route all the wires for the pneumatic functions though. I think a tilting cabin would be a nice touch...
-
I really liked the medium blue versions, too bad some parts aren't available. I don't care too much, it's your model, but if it were my model I would prefer a rare color over a common color. So I'd probably go with medium blue where possible, but I also understand the limitations so orange is fine too. I'd rather have complete orange (as you had on page 9) than half medium-blue (because then the rest will be black or white, and those are overused already in Technic).
-
Yes, I did, but I quickly dismissed that idea because I didn't see a driven steered suspended axle doable within the desired width. Maybe it's possible with a driven live axle, but I haven't thought of that option before. I do expect it to be quite a challenge - doing all the drivetrains for 4 steered axles and 1 driven axle was already a challenge, so I don't expect 5 steered and 5 driven axles feasible. If you drop the suspension, things get a lot easier. But it's certainly an option for a future model :) (Maybe I should try that for a 2-axle crane one day, instead of going for 5 axles). You're right, this is a temporary solution. I might go 8460-style, with an extra linkage connected to the boom. And I will experiment with placing the cylinders sideways. You're right about the steering pivot point of the wheels. I wanted specifically to have the steering joint as close to the wheel as possible. Although the current solution uses the axle for the wheel also as a linkage for the steering arm, so it's not optimal, friction-wise. The added benefit though is that it has Ackermann steering :D I won't add another motor just for the cmpressor, but what I might do is add a switchbox before the main gearbox with two options: compressor, or all the rest. So that when the compressor is used, all the rest is not engaged so won't eat up motor power. In the meantime, I experimented some more with the superstructure gearing, and for the second and third version I first checked out the dimensions of the actual superstrrcture on the real crane and laid that out digitally first. But I keep running into problems so I am looking for suggestions here. I'll show 2 attempts: In this version, the motor operates 4 functions, the compressor is not placed yet. It has fewer gears than the first version, but there are several problems. The 5x7 frames (drawn transparent) I think are needed for strength, but they intersect with the gearing for the slewing. The gearing for the slewing has the problem that the 8t gear that mates with the turntable ring is "hanging" from below without reinforcement, so it might slide off during play. (See the red vertical 6L axle that intersects the frame). The third problem is that I think the motor wire will not be long enough to reach the batterybox which will come under the yellow 3x11 panels. The fourth problem is that the batterybox doesn't fit there beacuse the dogbones (drawn in red) are in the way. So, lots of problems, time for another attempt: (I use a lot of color coding for beam lengths for easier distinction.) Geartrain for slewing is moved to the side (color-coded light-lavender), using the new worm on a 20t gear. The function through the turntable (color-coded medium-lavender) needs to "climb over" the gearing for the gearbox (color-coded bright-light-yellow) which is unwieldy and hard to reinforce. Also, the 16t gear on the red 6L axle intersects with the boom (which is not drawn) I want to try this version with real bricks, to see if I can make improvements. I needed to dismsis some of the panels/shaping to make the functions fit. Also, I foresee a structural/rigidity problem around the transverse medium-azure 13L beam. Also, still, no sign of a compressor... There is room though, for a pneumatic cylinder that I want to add for tilting the cabin (drawn at the bottom of the image using normal parts, as I don't have that part digitally yet) So yeah, this is a hard part of the build/design :) (This does give you a sense of how I use digital means when designing. I use digital methods to set out measurements in 3D, route geartrains and place the main structural elements, and then try building it in real to refine/finalize it and connect everything.
-
Thanks for sharing your version fo the superstructure gearbox @grego18f! In fact I was working on the same part of my model as well, but my gearbox is far from as compact as yours. I will get back to that, because: it's update time! :D It looks like a lot has happened, but most of the change you see is just panels. I came to the conclusion that the boom needs to be almost 60 studs long to match the scale So I clicked 5 panels together to get 55 studs and tried to fit the main boom cylinder. I went for pneumatics because these can be coupled in series, like is done in 8460 and 8421. The new longer cylinders have almost twice the range of the old ones (6 studs against 3.5) so I have plenty of length (12 studs range). In this version I used 2 cylinders, but I think I will use 4 in the final version to get enough lifting power (but I only have 2, so another 2 are on my bricklink wanted list). The hose nozzles on the cylinders are kinda in the way though, so I hope I can place them sideways in a later version. The other things that have happened, besides a rudimentary first tryout of the superstructure, is: outriggers fake engine rudimentary first layout of cabin size I just placed some beams where the cabin will be, to help me get the measurements correct. As for the engine, the drive axle runs underneath axle 1 and 2 and then upwards via a chain. An observant reader may notice that the chain is driven with the old 14t bevel gears. It's not an official building technique and those gears are very old, but I still sometimes use it. in thise case, when I used 16t gears the chain was either just too tight or way too loose. That's the reason for the 14t gears. Another important addition are the outriggers. Thanks to the new sliding elements I could make them two-stage in a reasonable size. The second stage will not be driven though (I don't see room for any drive system, not even a 1x11 pneumatic cylinder), and I have no idea yet how the feet will work, but most likely, sadly, is like in set 8053: manual and not linked. I might try pneumatic here too, but that will be hard with all the wires needing to be tucked away when retracting. Also I'd need to buy new parts for that. The other update is that I started with the part that @grego18f also showed: the function switcher in the superstructure. Mostly for getting an idea about the size and space needed to operate the functions. It's huge... A normal batterybox can be stuck at the back and then the length of the entire thing is about right, but the space on the original Liebherr where the counterweight is placed during crane operation, is entirely filled with gearbox (and batterybox)... The thing is that I found out that ideally, I would need 5 functions... slewing one axle through the turntable for the outriggers boom extension winch pneumatic compressor There's a normal 4-way switcher inside, and an extra driving ring with only one clutch gear to engage/disgage the compressor. The drive axle to the comprssor takes a lot of space and is not reinforced, so this needs a revision. The underside shows the long drivetrain through the turntable (over the other side than where the L motor is. The 20t gear will be linked to one of the clutch gears of the switcher), and the long drivetrain for the slewing (in the center, with the worm). So this takes a lot of space and I hope I can find better ways for this. The 4-way switcher is a separate module (currently - it is not locked in place right now)). The 20t on the axle of the L motor that sits between the 5x7 frames, drives the 12t on the side of the switcher module. After this first version I will see if I can find a cleaner way of doing everything, and I might try a variation of Grego's version with the driving rings placed above each other on the side instead of horizontally at the bottom. So yeah, in total, it's quite an update, but poses quite some challenges as well. Which is good - it wouldn't be fun if it was all easy
-
I believe that's what it is called, but I'm actually not sure myself. I can put up a render when I have more time. Could be an option, but personally I don't like a yellow-white combo. But maybe. I am playing around with pneumatics, which are yellow so they are kind of an eyesore on the model unless there are some yellow details. (I really would have appreciated if Pneumatics V2 cylinders would have been gray or another neutral color...) Currently I'm working with white for body parts and boom (update coming tomorrow when I have time to take/edit/upload pictures), but I consider most of it temporary. I'm thinking of white-blue but I'd like to use more unconventional colors, so I will just do some experiments and take a pick later. Actually to be honest, no, I haven't considered that. It's a good idea to keep in mind, but in this case I'm not sure what I would gain by doing that. There's enough space for the springs currently (although barely), and I think the current setup with vertical springs has the least amount of play in it. I'm afraid that an extra linkage will mostly complicate things and increase more play and unwanted forces and friction. Although with studded bricks the flex can be kept to a minimum (indeed, they are great for these sorts of purposes) The main problem with the chassis is not that I don't have 6 studs vertical space for the springs, but that the underside of the chassis must sit 3 studs above the axle to give it space to move. Which means I have 5 studs height to play with. Even running everything with 5x7 frames probably wouldn't make it as rigid as the current studded setup. In a set like 42009 the bottom of the chassis is 3 studs lower, giving much more room to strengthen it. I'm just thinking, I could use studded bricks for the boom too by the way, 8421-style. Depends on what would keep the weight lowest. Currently I'm going for panels, similar to 42009 but with less holes. (Pictures tomorrow.)
-
Interesting update, Ludo. I think the decision to go for 6.5 stud offset works very well. The wheel spacing is not at all distracting, which is a good thing. I really like your "internals" photo, it shows what a dense build this is. I really like these smaller but tightly packed models. However, from the render, I do feel the proportions are slightly "off" though. After looking at it for a while, I think the reason is that the cabin is pretty big and sits pretty low to the ground. The ground clearence is rather bad. I understand that you need all room you have in the chassis, but maybe you can increase the "visual" ground clearance by raising the bottom of the cabin? By making the cabin 8 studs tall instaed of 9? What would happen if you were to raise the entire bottom half of the cabin, but keep the roof at the current level? (so, the windscreen will then be one stud lower) And then work from there? Although it could be that if you do that, the outriggers will look weird, because they are also low to the tround, and probably can't so easily be raised. Speaking of which... how do your outriggers work? Do you have any pictures of those?
-
Since the beginning of my AFOL-hood, I have been a crane guy, with many mobile cranes built in the past. Now, during the more recent years I tried to diversify, partly thanks to competitions like those on Eurobricks, and built various other vehicles. I think it's time to see if I haven't unlearned how to build a crane :) So, the goal. I aim for a five-axle crane in the same scale of 42009. I think five axles is a perfect balance: enough to be imposing, but not so much it becomes awkward :) I use the Liebherr LTM1200 as a source of inspiration. The extra space between axle 3 and 4 gives me some extra leeway, but I also find it to look better. This image is from the Liebherr folder; I drew a grid over it with 8 studs for the wheels, and some markings in red. Most functions will be manual. Not sure if I can even get a motor in, but I will try. But there is one function I really want: suspension. I think it just looks cool to have a multi-axle vehicle with suspension on all wheels, and it makes my model less of a 42009-clone. To do this, some other functions will have to be dropped, like the motorized double-acting outriggers. This is the progress so far. Each axle is a fixed unit that is connected to the frame by two shocks and two ball joints. As vertical space is limited and Lego suspensions always tend to become taller than desired, I had to find a way to create a sturdy frame, so I went for studded Technic bricks. This makes the frame very strong. Also I think it's a nice deviation from all-studless building :) (This will principally be a studless model, don't worry.) Then, the steering. If you ever want to add and connect the steering to so many suspended axles, let me warn you: it's not fun. Every axle needs two U-joints. I just ran an axle with lots of U-joints (at least 6) through the entire thing. Not optimal, but it works. The outrigger housing is a real pain to work around. Steering angles per axle are varied the 42009 way: by having different steering arm lengths. The ratios are 100% : 50% : 0% : -67% : -100%, or, in easier numbers: 1/2 : 1/4 : 0 : -1/3 : -1/2, where the denominator is the length of the steering arm. Axle 3 is the only axle connected to the fake engine. Speaking of which, there's hardly any room left for that! So I decided I will add a boxer engine (which is lower), and it will still have to stick out one stud above the roof of the cabin. So be it. Driving the fake engine will be a challenge by itself too, because the unwieldy geartrain for the front axle's steering is in the way. I will have to sacrifice a lot of ground clearance for the driving axle. Next up: add the fake engine, add the outriggers, lay out the measurements of the cabin, and see if I can get the first boom segment in place. One note about colors. It will not be yellow. I just don't want to add another yellow crane, but I'm still in doubt about color options. I love trying out weird color combos as you might know, but the boom will probably be white, because of the panels I have (thanks to 42025). So I will probably do a multicolor scheme where white and black/gray are combined with one or two non-grayscale colors. I love to hear what you think of the first take :)
-
I figured it would be useful to have a topic for models that I'd like to show, but are "smaller" in a way, and I don't consider interesting enough to warrant their own topic. They are already finished, so no WIP, so no intent to "update" the models after feedbacks (sorry). They are usually single-build (instead of iterative design and build-and-rebuild) so they probably can be improved upon if rebuilt, but I hope they can serve as inspiration for others. If not, they are interesting side-projects for trying out new things, new subjects or new colors. If this is not against forum guidelines I'd like to open this topic for these "in-between" projects, and I like to show 2 models I made during the last month. There was a meeting two weeks ago, and I had some time in-between so I just started building things and they turned out pretty nice and gathered some positive response on the meeting. First-up is an update of a 2015 model I built for TC9 (A-and-B-model contest) where I never got to building the B model. I changed the colors and redid the paneling, it turned out pretty nice I think. Its only functions are drive (where a V8 engine and fan are coupled to front wheels hidden below the cabin) and steering (where the rudders are connected to a HOG and to hidden rear wheels). It's obviously inspired by the small hydroplane set from a few years back (2015 I believe). Also, it was a nice opportunity to try out new colors, and I have collected quit some orange over the years but I don't use it often. Here's the rear: The 40t gear you see it actually only used as a round liftarm with a central axle hole. MLCad says it's about 650 parts. Quite a lot for only 2 functions, but still. Someone on the meeting said that at least it's stable and not wobbly like the new hovercraft set (I think he watched Sariel's review)... My second in-between project was a rally car. The goal was to create a "better" model than 42077, where I defined "better" as: doing the same core functions (drive/fake engine, steering, suspension) in a smaller model, and still have a rollcage. Also I wanted to try out new colors. The functions it has common with 42077: independent suspension front and rear (I like the solutions for the suspension; the front is very compact, and the rear is a mix beteen independent and live-axle, due to some sort of a "floating differential", as I would call it). rear drive to a V6 in the front front steering to HOG on the roof Functions lacking that 42077 had: the flappy side panels that open together with the rear bonnet the opening rear bonnet. (unfortunately, I have no opening elements in the back) Functions this has that are not in 42077: front hood opens (but there's no way to leave it in extended position) rear spoiler can be extended and retracted (it's pretty lame, but I had some empty space so I wanted to do something there) the steering wheel is connected to the steering mechanism I'm particularly happy about that last fact, and I discovered you can insert an axle in the bottom of an 1 x 2 log-brick (did you know that?) It even has exhausts on the side :D Also I used quite some studded parts, which is a style I'm trying out. I think it works better for these new colors, becaue it vastly extends the array of available parts in those colors, and with all the tiles and curved slopes there's still the option to have no studs showing anywhere. Of course, it has doors that open. Unlike the official set, the rollcage has a side link that can easily be removed to allow stepping in and out the car. Unfortunately, my hope of doing more in less pieces than 42077 hasn't been fulfilled, because it's actually more parts than the set; about 1100. Probably due to the system details. If only the 2x5x11 L and R panels existed in dark purple, I could have saved lots of parts on the doors... As I have started a new main project (which I will be posting in a minute) there will probably be no updates here the coming while, so I hope I don't forget about this topic by the time I have new "smaller" projects.