

Selander
-
Posts
648 -
Joined
-
Last visited
Content Type
Profiles
Forums
Gallery
Everything posted by Selander
-
Technic Powered Up hubs 88012 new going cheap on UK eBay
Selander replied to idlemarvel's topic in LEGO Train Tech
No I never provide any instructions, but I could let you buy a locomotive. Otherwise, study pictures and use your creativity. -
Oscar Wilde: "Imitation is the sincerest form of flattery that mediocrity can pay to greatness"
-
Beautiful train set 👍👍👍Very well done.
-
Technic Powered Up hubs 88012 new going cheap on UK eBay
Selander replied to idlemarvel's topic in LEGO Train Tech
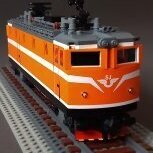
I've also built a locomotive with 88012. It's a Swedish class RC locomotive in 8-wide, about 34 studs long, with 2* train motors and LED lights. All is controlled by a custom program in the Lego PuP app. There it is easy to reverse direction of one of the train motors. 88012 has indeed a bulky format, so that becomes a bit of a challenge. Here I positioned 88012 approx 2 studs below the "base" (heightwise) and tried to disguise the lower section as undercarriage details with a bit of striping. 4 channels and AA batteries with more "juice", are really big advantages, compared to the smaller 2 ch hub. -
Small Powered Up Shunter with Pybricks control
Selander replied to Toxic43's topic in LEGO Train Tech
I always enjoy small shunter moc:s. Thanks for sharing the technical details ! Well done , 👍🙌 -
Nicely captured !
-
[MOC] The German BR 50 with Cab Tender+[IDEAS] need your support
Selander replied to Railtobi's topic in LEGO Train Tech
That's a phenomenal introduction ! 👍👍👍 Great detailing.... -
LOL ..I read "Tube sock" Nice realization anyway 👍
-
LEGO Malayan Railway 20 Class - Narrow Gauge Train MOC
Selander replied to LEGOTrainBuilderSG's topic in LEGO Train Tech
Great job on this one !!! -
Yes....really fantastic little machine !!!
-
Octrainber 2021 | Vollert Robot DER 100 "Leonhard Weiss"
Selander replied to HoMa's topic in LEGO Train Tech
Thanks for your kind recognition, and good luck with your entry -
Very impressive scenario you built. And the realistic texture for the stone house walls is superb.
-
Lovely selection of vehicles 👍😎😉
-
Nice designs 👍 I love V60:s 😉
-
A question: I count overall length to 24 studs, and it looks like your buffer beams and magnets are fixed to the chassis. Based on own experience I would suspect problems, like loco buffer hitting wagon buffer when going through standard R40 switches ? What's your experience ?
-
Nice build!! One of my favorite locomotives. And motorized too
-
【BCPL MOC】China Railway DF11G diesel locomotive
Selander replied to BC01pool's topic in LEGO Train Tech
Great looking locomotive, and the roof of wagons looks amazing 👍 -
😉👌👍 ...46-50 studs long, with ball bearings and reasonably priced at 29,99 EUR /each 😁
-
Thanks for sharing your experiences. One immediate comment: I concider technic liftarms less prone to cracks, since they have a (thick) consistent wall thickness all way through the hole. If you compare with technic bricks where the middle section around the hole has quite thin wall, and here is where most cracks occur that I have seen. (look at the technic brick from underneath). Concequently I was surprised that you had some cracks in your technic liftarms. None the less, I am really happy if some of my findings helped you.
-
An old "trick" is to change to o-rings with a slightly larger cross-section for axle 1+3, and to completely remove o-rings on axle 2. That way it manages R40 curves and standard switches much better.... Like this:https://flic.kr/p/aL6LHK
-
Lego FS E.656 in H0 Scale - and Italian UIC-X coaches
Selander replied to Paperinik77pk's topic in LEGO Train Tech
I like it too very much. So toy-ish, yet with realistic colors and proportions. Very well done. -
I thoroughly enjoy seeing your well-engineered and good looking builds 👍
-
When starting to implement ball bearing into lego trains, I thought it would be a simple and straight-forward process. However, I soon came across various issues, so after some further work I now have an updated approach as can be studied in pictures and text below. h The content in this text is based on personal experiences and observations. Depending on the exact bill of materials, available tools and engineering skills, you may come to other conclusions. Still I hope some of my observations can be of help/guidance for you. Ball bearings – Why? -A fun technical challenge from an engineering point-of-view. -Benefit of lower rolling resistance (good for ever wider and heavier rolling stock). -Diversified bogie design and detailing, -TLG metal axle based train wheel sets are no longer in production. Technical challenges: -To incorporate precision manufactured BB:s and axles, with less precise lego bricks (tolerance-wise). -To find out an assembly method which can be repeated, with an even and satisfactory end result. How to: Let me run you through my prefered process, step-by-step, including some pictures (see above). -Start by building a bogie frame. For tolerance and alignment reasons, I use two technic liftarm thick, which are sandwiched between elements 30414, 11211 and/or 87087 depending on bogie version. Also sandwich these bricks between 2-n plates to get a solid unit. No bricks on axle positions. Note that I only use bricks with hollow studs inserted into liftarms (for mechnical stress reasons). -Firmly hold the drill with a pair of pliers (polygrip) and manually crank (rotate) the bogie around it, so you slowly let the drill go through both liftarms in the same operation. By doing this manually you remove a minimum of material, leaving a slim-fit for the BB. Drilling through both ensures a good alignment. -Insert metal axle through both BB:s.My ”China-axles” are ever so slightly deformed in each end from the cutting process, so I use a hammer and gently tap the axle end to get it through.Note that other manufacturers (Bricktracks?) seem to have smoother axle ends allowing insertion into BB:s without any tools, -Check that BB:s can slide sideways very easily on the steel axle. If needed, gently polish the axle surface with steel wool. It does not matter if the very end of steel axle is not perfect since that is inserted into the plastic train wheel. -Remove 2-n support plates, and assemble correct plates on top of 30414/11211/87087. -BB:s and axles shall be possible to be introduced into liftarms by hand. A small screwdriver may be of help to push each BB into the middle of each liftarm. Control again that axles slides freely sideways. (if not, try to polish further with metal wool). -Put on plastic train wheels. Bricktracks wheels sit firmly on the steel axle without any need for glueing. -Finish all detailing acc to your preferences. -If successful, bogie should roll with a minimum of friction. Notes to the above: -I use technic liftarms, but I dare assume long technic bricks also would be fine. Just remember the later will give a ½ stud offset. It is better to use one long element, than individual bricks for each BB, because of tolerances and risk for misalignment. -Be careful not to scratch or damage the axle surface. My conclusion is that a freely sliding axle is the best indicator of a good final result. -Since my holes are enlarged to 5,0mm, I do not use M2-washers (which are 5,0mm O,D) since I've seen washers sliding into the brick causing friction. -I have tried numerous ways of introducing BB:s into bricks without drilling. But regardless of assembly method, I have experienced problems with misalignment and occasionly stress cracks in bricks. It worked sometimes, but I never managed to get a safe and repeatable process. Hence my recommendation for drilling first.... Summary of key findings: -Use few and long elements, sandwiched to a solid assembly. -Drill a common through-hole. -Ensure axle slides freely in BB:s. Bill of Materials used: -China produced BB:s type MR52ZZ. -China produced cut steel axles, 2,0 x 40mm. -Technic liftarms thick, #32524 or 40490. -Bricktracks plastic train wheels. Tools used: -Hammer (depending on axle end …). -Pair of pliers (polygrip). -Drill 5,0mm, aimed for cutting metal. -Steel wool. (polishing of axles, if needed)
-
A review of the first elements from the FX Track system
Selander replied to zephyr1934's topic in LEGO Train Tech
Nice review and really good looking products 👍👍👍👍👍 -
Good ! Since you build digitally you could try plate with rail in blue color, and eliminate the layer of blue plates which is now on top of roof supports. It might give the roof a more elegant look.