
sed6
-
Posts
416 -
Joined
-
Last visited
Content Type
Profiles
Forums
Gallery
Everything posted by sed6
-
Here's my newest creation, digital format for now but I'll build it next month when I return from vacation. It's a whopping 7200 bricks not counting the landscape. Thanks to @PeterPNL for the landscape and minifigs and thanks to @maciej_drwiega for the door and window inspiration. Here's the .lxf if anyone wants it. https://bricksafe.com/pages/sed6 Hope you like!
-
I want that Saturn V launch tower! Lucky you!
-
Maybe try a green bed sheet. LOTS of color variations out there.
-
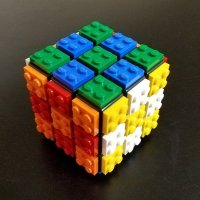
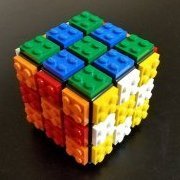
I've found a good solution to fix loose bricks or to make a brick extra grippy. I use a very small flat head screw driver and press it into the top edge of the stud at a 45 degree angle. I then wiggle or rock the screwdriver (or both) to slightly deform the stud. Usually only one spot is needed but sometimes I'll do it in 2-3 different spots. The slight deformation or displacement of the plastic is usually plenty to increase its grip strength. Alternatively the same can be done on the bottom side of a brick to the circle in the middle or the edge of a 1x brick. If you do it gently enough the deformation isn't visible to the naked eye unless you examine it up close. Some might consider this cheating or whatever but I don't.
-
LDD - Extremely slow loading model
sed6 replied to GoldVillage's topic in Digital LEGO: Tools, Techniques, and Projects
Excellent! I'm glad that worked out for you. Happy building! -
LDD - Extremely slow loading model
sed6 replied to GoldVillage's topic in Digital LEGO: Tools, Techniques, and Projects
A template is like a group but a template is available for use in other models whereas a group is confined to a single model. To create a template highlight (or otherwise select) all the pieces in you want to be in the template. Then hit ctrl-alt-g, the highlighted bricks are now a template. You can verify this by clicking on the templates tab and you'll see it there. Just click on that template to paste it into the new file. This is a useful feature if you want to a) combine several files into a single one like I suggest you do or b) you create a small model that you want to use over and over in different files. Groups are similar, highlight or select all the pieces you want to be in the group and hit ctrl-g, those pieces are now part of a group. The benefit of groups is it allows you to easily combine or separate groups of pieces so you can modify them or access parts under them. Once you start using groups and templates LDD gets much easier. I didn't understand why you would create a model and split it between 7-8 different files, that doesn't make sense to me at all. I'm guessing now it's because you're not familiar with templates and groups. Start using the hide button also, that really makes things easier as well. Once you're comfortable with templates, groups and hide you can create utterly massive builds in a single file and edit and manipulate them with ease. Edit to add: click on my sig link and download one of my locomotives, in each you'll see that I've made great use of groups to simplify the assembly, disassembly and modification of the locomotive. Come to think of it, most of the .lxf MOC's I download and look at contain no groups. Perhaps others are not aware of their usefulness. Every time I see a model I think to myself how hard that must have been to create and how much faster and easier it could have been done it only some groups were used... More edit: if you want to share you .lxf with me I'll be happy to look to see if i can help or to see how it runs on my system for comparison. -
LDD - Extremely slow loading model
sed6 replied to GoldVillage's topic in Digital LEGO: Tools, Techniques, and Projects
I think I understand. So with each module being a seperate file have you imported each module into a single large file and saved it? Is that what's running slow? In my experience a large file created by importing many smaller files can run slow. That was a large 5-6k piece file created by a half dozen or so smaller files. I still think creating a new file and pasting in templates as opposed to importing files could be the solution. -
LDD - Extremely slow loading model
sed6 replied to GoldVillage's topic in Digital LEGO: Tools, Techniques, and Projects
By modules and sections do you mean groups? If so you can try saving each group as a template (ctrl-alt-g), then starting a brand new file and importing each template. Perhaps that will clean up the .xml file? Maybe you can even verify that idea by looking at the file size of your current model and comparing it to the file size of the new file. Let us know how it goes. -
Don't get so butt hurt. My observations weren't a personal attack against your thin skin. There's been discussion about dragging around an unpowered engine with a motor in this thread and others. Read more carefully before you randomly attack someone who's just trying to help others.
-
Honestly that would be impossible to tell from watching the video. Even a child can push an unpowered train with zero perceived effort. See my measured results below.. I strongly doubt the motors and gearing are improved in any way to reduce rolling resistance. There's no reason for TLG to re-engineer this motor beyond the connector. See my test results below. Not as long to be sure. How can I be sure? I just took some measurements. Keep reading. I have always found the drag of an unpowered motor to be huge compared to that of a train car. I first noticed it when I gave my cars the "flick test" months ago. Pick any single car you have and give it a flick with your finger, as hard as you can and see just how far it will roll on the tracks. Mine roll a long way. Do the same with an engine. It doesn't roll far at all! That's because of the drag from the unpowered motor. I took some measurements on the force required to push my 60051 train. I used a small gram scale turned on it's side. Here are my results: Two engines with motors and three passenger cars: 100 grams Two engines alone: 70 grams Three cars alone: 30 grams These results show that the unpowered engine with a motor requires over three times the force to move as a car! Or for every unpowered engine you drag around you could pull three additional cars with the same effort. Or an unpowered engine on the back of a three car train nearly doubles the amount of work the powered engine does to move the train! I hope this puts to rest the speculation that an engine with an unpowered motor dragging along on the back isn't that big of a deal, because it is. (A couple of notes about my testing methods. It doesn't matter if my gram scale is accurate nor does it matter if my testing is an accurate measure of the forces required to move the cars. My testing is designed to measure the differences between the cars and engine. This is the difference between accuracy and precision. If you need to further understand what I mean check out the link below. Secondly my results don't translate directly into running time for the train. Just because an unpowered engine at the back of a three car train doubles the load the powered engine must pull, that doesnt mean running time is cut in half. Runtime is determined by the capacity of the battery divided by work. I'd speculate that the majority of the work comes from moving the powered engine itself. I could measure this properly with a small watt meter but don't feel inclined. You could measure this yourself by running a set of batteries thru a single engine by itself until it quits, then repeat pulling three cars, then repeat pulling three cars and an unpowered engine with a motor in back. Then compare their running times. If I had to guess I'd guess that 90 percent of the battery goes to moving the engine alone and the two cars of 60051 or 60197 reduce run time by only about 10 percent. If you double up the train and drag the unpowered motor around also that number probably increases to a 30 or 40 percent reduction in run time.) http://www.statisticshowto.com/accuracy-and-precision/ Final thought: Why drag around an unpowered motor anyway? Pull that sucker out and sell it or use it in another project. Or, better yet, power it for more speed or power!
-
I'm sure it will. I'd bet it will run at least half as long a single train, maybe even 75 percent as long if you remove the motor from the back engine so it doesn't drag.
-
Lego Digital Designer HELP!
sed6 replied to GoldBrick's topic in Digital LEGO: Tools, Techniques, and Projects
You can't create any parts in LDD. If they don't have the specific base plate you want you'll just have to use a bunch of regular plates and pretend it's a baseplate. Many are in there already. Just search for their part numbers. 32x32 part# 3811 16x8 part# 3865 Etc, etc The easiest way to find parts in LDD for me is to search and find them on Bricklink and then search for their part numbers in LDD. The LDD part naming convention isn't intuitive nor always in line with the official Lego names. Good luck! -
The battery box couldn't serve as a structural part if the top and bottom were easily seperated, hence the screws. Plus most childs toys now days require a screwdriver to access the batteries as a safety precaution. And you can always leave the screws out of the box if you like. You should consider yourself fortunate if the screws are your only concern with this new release :)
-
Unless you can pair the transmitter with more than one receiver this "new technology" is useless to me. I currently run four trains with two IR transmitters. I don't want to be limited to one remote per train. I can run EIGHT trains with one PF transmitter! The BT seems to have a very limited range advantage over the IR, not enough to matter to me. Not needing line of sight is a nice feature as it allows for more design flexibility with no IR receiver and no need for the IR receiver to be visible. Seems like one step forward and two steps back IMHO.
-
Here's a good method to reverse the polarity. Best part is you never need to un-modify a modified motor. You use the modified motor on dual motor trains, or put them back into service on a single motor train and just the reverse switch on the PF remote. On the new PU controller there's no reverse, so you'd just rotate the knob so the "-" symbol is at the top and that then would be forward.
-
I bet you can. It would be silly if we couldn't. Every BT device I own I can pair with multiple things. There's no reason to think this would be any different. It would be extremely shortsighted of TLG to leave out a function as simple as pairing with multiple devices. Edit to add: think about it from a practicality stand point. I want to build an XYZ that requires a battery/receiver. I have a tranmitter at home already. I now have to buy another transmitter instead of using the free channel on the one I have? No way...
-
Powered Up
sed6 replied to dimaks13's topic in LEGO Technic, Mindstorms, Model Team and Scale Modeling
You guys are over thinking this. You have to rotate past 30 or 45 degrees to get to 90 or 180 degrees. Just because you can stop there doesn't mean you have to nor that Lego intends you to. And let's be honest had Lego only put a positive stop at 90 and 180 degrees we would be complaining that we can't stop it at 30 or 45 degrees! Cars and tanks, like trains, accelerate from a stop to full speed through a progression of increased speed. In this case 10 steps. 10 clicks of the + button will equal full forward speed and 10 clicks of the - button will give you either full reverse speed if starting from a stop or bring you to a stop if already at full speed. There won't be any programming of the buttons required. -
I think we're trying to say the same thing? The controller has two channels, A & B, just like the current ones have a red and blue channel. The receivers also have two channels, A & B. Therefore you can control two trains from a single transmitter. The new controller and receiver seem to be lacking the 1-4 slide switches which allowed for 8 seperate trains to be controller by one controller.
-
No way. There's a reason there's two channels on each controller and it not so it can only control a single train.
-
Nope. TLG isn't going going to make one of those for us. They already offer us two options, they won't muddy the water with a third option.
-
Pursuit of Flight by JKBrickworks https://ideas.lego.com/projects/9f20e63f-79a7-4625-bb09-1b51a7b17842 This fantastic kinetic sculpture was created by Jason Allemann of JKBrickworks. Many of you will recall that Jasons Labyrinth Marble Maze was approved by LEGO and became set 21305 - Maze which is now retired. Jason also has another project Pop-up Book which has already reached 10,000 supporters and is currently in review status by LEGO. This newest creation is a dream theme for me. I'm a fan of small sets, the Fokker Dr.1, and kinetic LEGO sculptures. Please click on the Ideas link above or below and lend your support. This project already has over 4600 supporters in only 5 weeks! With your help we can see it on shelves at a LEGO store soon. Thanks! https://ideas.lego.com/projects/9f20e63f-79a7-4625-bb09-1b51a7b17842
-
I understand. The good news is you can simply push your train around to get a good idea of how it will run. Binding of parts, like the front truck going around corners, will be pretty easy to spot. Push from behind the tender, not on top of the locomotive. Holding the locomotive with your hand will add weight and false traction which will mask problems. That said, I would think a couple of wires would be easy to fix!
-
Awesome! Keep us posted! Do you not have track to run it on?
-
I'd argue that designing a train with easy access to the battery box is part of the challenge! Most of us do it, Lego does it, you can too! But I do understand where you're coming from. Infact in my two engines the bottom of the battery stays fixed in place. I leave the screws loose and slide the battery cassette in and out to change batteries. I do the same on 60051 and 60052. This method has two other advantages; it allows you to use the bottom of the battery box as a structural support since it doesn't have to be removed each time and it lowers the height required for the battery by one plate since you don't need tiles underneath it for easy removal.
-
Thank you. But I can't claim credit, I learned it from someone myself years ago. The nose is stickered though, if you zoom in on some of the official pics at S@H it's evident.