
sed6
-
Posts
416 -
Joined
-
Last visited
Content Type
Profiles
Forums
Gallery
Everything posted by sed6
-
Changed title and updated first post with .lxf file and pics. Hope you like!
-
Updated title and added LDD .lxf file. Hope you like!
-
Agreed. The standard 3 axle bogies driven by a PF motor in the body would only be 2 studs shorter each, so save 4 studs total. Problem is there's no room for a motor or motors in the body.
-
Kind words. Thank you Murdoch!
-
Ugh, well I stretched it to 58 studs and it looks great in profile, but now I think it's too skinny! It's 6+ studs wide (handrails stick out a bit) and now I'm thinking it needs to be 7 or 8 studs wide to look more proportional. This started as a simple, let's make a BNSF version of the 60052 locomotive, and has grown into a 1300 brick behemoth...
-
Sure do. Thanks for all the replies so far. The tank in the middle needs to be 20 studs long (12 studs currently as pictured) to scale perfectly with the 3 axle bogies. But mostly I just want to avoid the inevitable 'your fuel tanks too short' comments on this 50 stud version. Comments welcome! (But be nice, this is my first loco moc and only my 4th LDD model)
-
I'm working on a locomotive, an ES44. In LDD it's 50 studs long, but the scale is just a little off. I need to lengthen it to 58 studs to get the large fuel tank between the three axle bogies to scale properly. Is 58 studs too long?
-
Changing the polarity of PowerFunction train motors
sed6 replied to legotownlinz's topic in LEGO Train Tech
Fantastic write up! I just completed this mod myself and it was super easy, and effective! -
Doh! Fixed it, tanks!
-
Thanks! Yes, I borrowed basic design (cylinder pieces and their connecting middle) from 7939's tank car.
-
My first IRL MOC! Just 20 studs long. Also my first real BL order, man is that a learning experience in itself. I made three with the intent to sell two to cover my cost in the third, but they look good together so I'm keeping them all! Link to LDD .lxf file https://drive.google.com/file/d/17IfTRjH6xD9hLf4vkaMDg6bxapVdKN4U/view?usp=drivesdk
-
Thanks! Ordered! Got it from Amazon here in the US for $16 :)
-
What book we talking about?
-
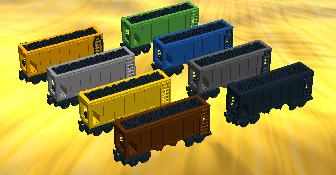
I downloaded LDD just 48 hours ago and got right to work on designing a hopper car. Well eight hoppers to be exact. I know they just look like simple color changes but the first one took me the better part of eight hours. Then I spent many more hours getting familiar with groups and templates. Simultaneously I hand keyed them into Bricklink and spent many more hours getting them from about $90 per car to the to $40-$50 range with careful parts and color editing. So now I have a choice to make, I'm going to order parts for three cars and want your input. Which colors combinations do you like the best and why? Most favorite and least favorite? I also welcome any opinions, or suggestions. They are 24 studs long and I won't be making any changes to their length. Thanks in advance, hope you like! -Scott Link to .lxf file. https://drive.google.com/file/d/1e9qqypkfY-aygmPB61na6wNFS1eNDONc/view?usp=drivesdk Link to a high quality pic. https://photos.app.goo.gl/MgeiD3S4d71siK5c2
-
European freight cars: gondola and detailed tank car
sed6 replied to Brickwolf's topic in LEGO Train Tech
I too like the tank car. Is that dark orange? I have dark orange parts coming to build three custom tank cars, mine though will have two trucks on each end. -
Well, the exact same can be said for AFOL's. We should buy the 1000 piece PF trains for $150, sell the PF parts for $50 on the secondary market (doing other AFOL's a real favor given their relative scarcity) and now we're back to $.10 per piece and have exactly what we want. I win (PF fan), Lego wins, secondary market wins and push train fans win. Everyone wins!
-
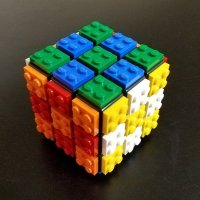
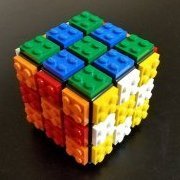
I love Tyrannosaurus Rex! That's what drew me to this 3in1 Creator set, my first ever. I picked up two more sets to make it fun. A little background about me, this is my first attempt at custom building of almost any sorts. I'm more of a set builder and then buy another set to compliment it. As such I completed this landscape with a very limited selection of loose bricks to choose from and even had to buy the base plate. I may eventually buy some bricks specifically to improve the landscape and grow and practice my technique. I still have a lot to learn but hope you like!
-
Got a few more done this weekend. The Motorcycle Shop, set 6373 from 1984. Somehow the motorcycle STAMP (sticker) survived in great shape, not even a crease down the center. Unfortunately all the bikes are missing. But all the stickered windows are in great shape too! Also easy to spot are the hulls for the Fire Fighter Ship, set 775 from 1978. I'm missing one center hull, another is cracked, but the bow stern and one center section are in great shape! I didn't have the instructions for most of these so I printed them online. The site I prefer for instructions, including online instructions and downloadable pdf's is toysperiod. https://www.toysperiod.com/lego-set-reference/
-
I'm gonna put the display cases on hold, too many other projects. Plus I'm happy with how they look on the bookshelf. The said I pulled them each off and took a well lit pic of the seven scenes holding all thirty three sets. I've got the name plates in place for each and my family and friends think they add a nice touch. Plus they are great reminders for me! That's gonna wrap up my classic space pile. Head on over and check out my next project, my classic town pile!
-
Thanks! I will. Look closely at the Public Works pic, it's there already. I might stick with gray tiles as they blend in well with the gray baseplates and don't scream look at me.
-
Now here's some progress! Five sets all bagged up, waiting on BL parts to finish them up. They include; Police Headquarters, set 588, 1979 Exxon Fuel Pumper, set 554, 1979 Exxon Gas Station, set 6375, 1980 Fire Station, set 6382, 1981 Main Street, set 6390, 1981 They're not shown but I also have the baseplates for all these as well :)
-
I've just dug out my box of town lego from when I was a kid in the 70's. I suspect I have a dozen or so sets hiding in there. I have several sets of instructions that also survived the last 40 years. The lost instructions and lost bricks I can print online or buy from Bricklink. My plan is to build until they are all gone! First up is the Public Works Center from 1981, set 6383. It was easy to discern in the pile because of the crane bucket and tracks so I started with it. While I'm the main kid playing with these my granddaughters and nephews also get to enjoy them. I started on my town pile right after I finished up my classic space pile. From it I was able to rescue 33 sets! Here's a link if interested. Up next is the Tow Truck from 1980, set 6679. The blue Exxon doors and tow hook made it easy to pick out of the pile. There are several substituted colors in there which I'll replace off BL soon. This next one has me stumped! Steam Shovel with Carrier, set 730 from 1973. I was born in '73, why do I have a Lego set from the year I was born? My father has passed so I can't ask him. I asked my uncle and he's never seen it. Did my dad buy a Lego toy for his newborn son or did he buy it for his then 29 year old self? I may never know...
-
I want to throw in a pic of my Millennium Falcon. I mentioned in my first post I had just finished building it and the itch to keep building led me down this road. I've just recently got the MF hung up for display. Hope you like!
-
I'll make the glass boxes 20 or 30 inches long to for 2 or 3 baseplates. I also finished up the signs, 33 in total. It took many hours but I think it was worth the effort.
-
Here's my plan. Picture a basket ball display case like the one below. The clear plastic cube will be 10 inches on each side, perfect for a base plate. Pretend the base is one of those floating shelf designs you see. They are simple to make and simple to hang. So I'll combine a floating shelf with a 5 sided glass box and stretch it out to 20 or 30 inches long perfect for 2 or 3 baseplates. I want to display 15 base plates, so I'll make 5 cases each 30 or so inches long to hold three baseplates each.