
DugaldIC
-
Posts
453 -
Joined
-
Last visited
Content Type
Profiles
Forums
Gallery
Everything posted by DugaldIC
-
 Well done! It turned out better than expected, good featured and a smooth coherent body! Definitely a good "first" sports/supercar
 -
@Thorsten50 also I had the gearbox set up with stops which makes shifting more difficult as you can't go through the gears and you have to worry about what gear you're in, if you don't mind could you remove them accordingly? The horizontal 5L L shaped lift arm here. And the 3L lift arm T in these photos. With hose two pieces gone the gearbox will be able to shift from 4-1 and vise versa without stopping!
-
[MOC] 1955 VW Beetle RC
DugaldIC replied to JamesJT's topic in LEGO Technic, Mindstorms, Model Team and Scale Modeling
This an awesome build! I love the use of panels and the curves at such a small scale well done! -
@Thorsten50 I that was connected but it might have gotten skipped in the teardown, good eye, thanks for catching that! I can't believe you've gotten so far already, looks great! Awesome, I can't wait to see it all done. Keep me posted, if you have any questions you can always pm me. Also any feedback always welcome!
-
@Aventador2004 unfortunately building from scratch without building in LDD there's always going to be little things that go unseen(even with all the testing done). This was pretty minor in the grand scheme of things and easily fixed thankfully. And like I said this never came up until after hours of testing and driving and not being nice to it haha! But anyways, I'm glad it's resolved! Not a problem, if you have any questions feel free to ask! Did you see the correction in the gearbox we've been talking about? I can't wait to see this come together in a digital file!
-
@Aventador2004 that's the pic that explains it, you can see the 5l protruding and rubbing the other gear unfortunately, replacing it with a 5L stop would fix this issue! Thanks, I hope it does us drinking maple syrup out of a hockey skate, whilst eating poutine Canadians a solid !
-
Thanks, I agree this is my first full out proper build and I'm very pleased with the end result! As for 0:45 unfortunately after hours of driving this trying every possible situation we found out what caused this (litteraly happened just before we shot the video unfortunately) there was an axle in the transmission that slipped out and was rubbing the face of another gear but with a 5L stop pin will prevent this from happening and will be added in the instructions *@Thorsten50
-
https://goo.gl/photos/a6wZTUhhPvUe7Qc86 The photo teardown is complete @Thorsten50 if you have any questions feel free to ask! Thanks in advance for all your hard work
-
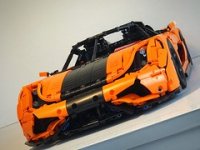
The final edit, enjoy ! This video was all filmed and edited by @Lox Lego it turned out awesome, thanks bro. Final list of functions, Front suspension: unequal length control arms, with cantalievered single shock, torsion bar and sway bar. Rear suspension: single shock, torsion and swaybar with torsioned swaybar. Steering: geared down and controlled with a servo motor. Drivetrain: AWD, two differentials, driven by 2 XL motors, 4 speed sequential gearbox shifted by an M motor. Exposed shifting linkage in footwells. Lights: 4 Lego LED lights, one pair per corner. Engine: miniature v12 driven via drive axles from gearbox. (change in speed depending on gear) Interior: pedals with feedback, slide and tilt seats, adjustable steering wheel, and steering wheel turns via servo. Hood/doors: hood opens and stops upright in place, doors are flush mounted and can be opened and or closed via the mirrors. Rear wing: tilts via Gearing through gap in either side of rear diffuser. Rear lip also raises and lowers slightly with the rear wing. Dimensions and weight: the car in studs is 18 tall, 29 wide, and 74 long and weighs in at 6.5 pounds. (Additional to anyone building this, gearbox works well but due to weight doesn't shift well while driving and I'd recommend shifting at a stand still and easing into throttle. It also has stops on the gearbox to limit you from going 1st-4th and vise versa. If you'd like you could remove the stops and then not have to worry about what gear you're in) Let me know what you think! The teardown is almost complete.
-
Some pictures from the filming today! And the unfortunate but imminent tear down! We're a half hour from each other, so that makes it quite easy!
-
As you can see we definitely had some beers while tearing down! (thanks anyways ;) we're almost there, @Lox Lego is on the final stretch he's a machine when it comes to photo teardowns I definitely would not have been able to do it as well or quickly! Thanks bro! Always the best solution! He was tearing down and photographing and I was disassembling and organizing.
-
The filming is done and the teardown has commenced, I have to admit it was hard to start tearing it down ! Myself in the red and lox doing his thing! Thanks so much bro, @Lox Lego
-
I mentioned a while back a few possibilitys but I've figured out what I'll be doing, an R34 Skyline GTR with a whole whack of features but I'll leave that for the build thread !
-
I never really thought of that however if I ever rebuild it from Thorstens instructions I'm sure I could do a motor delete and make a full manual version. I don't think it's something I would be doing right away though as I already have plans for my next moc. Which will also be my first ever HOG model!
-
@filuS I'm glad you'll be building it! I think it's awesome that people world wide will be building something I've designed! And yes it really is quite big! @Myers Lego Technic that was taken fairly close to the end, thanks though! Thanks! I'm glad you like the outcome! Even though I never commented as I didn't want to revive an old topic, I must say absolutely love your Koenigsegg build not only is it one of my favourite cars but you nailed the shaping and the details are excellent! (sorry to go off topic on my own thread haha)
-
Torque question
DugaldIC replied to tomek9210's topic in LEGO Technic, Mindstorms, Model Team and Scale Modeling
@PKW I think you're right, torque vectoring allows torque distribution to send more to the front or more to the rear and from side to side and vise versa but what you've described is only giving you higher torque in either front or rear and cannot change once selected. I guess what I described would be doing the same thing as it's not able to move around from wheel to wheel or front to rear. -
Torque question
DugaldIC replied to tomek9210's topic in LEGO Technic, Mindstorms, Model Team and Scale Modeling
Thanks, that saves me from destroying one myself -
Torque question
DugaldIC replied to tomek9210's topic in LEGO Technic, Mindstorms, Model Team and Scale Modeling
I think the only way this would/could work is running an xl at the rear axles and a geared down L motor for the front, the rear would produce more torque but both would be running at the same speed. I know Brunojj1 used it in his Mercedes DTM car and it works really well, however he hard coupled the L-XL so I'm not too sure if it would work that well being entirely separate. I hope this helps and or makes some sort of sense. Unfortunately what you described I can't wee working as wheels turning at uneven speeds would just cause binding, unless the differential would soak up the difference but I don't see that happening? Now I'm intrueged and I'll see if I can't try this later! -
The Technic Confessional
DugaldIC replied to Didumos69's topic in LEGO Technic, Mindstorms, Model Team and Scale Modeling
I have to confess, I mucked up! I ran a long extension through my Aston the wrong way and didn't realize till I went to hook up the front lights so I got my hands on a torn extension and a broken reciever and made a double DBG end extension to correct my mess up (don't worry it will be corrected in the instructions haha)! Other than that the only thing I've done is shaved a 3l stop pin to mimic the new brown ones before I got my hands on the Porsche set. Not too bad I don't think ! -
Looking good, nice shape for the roof. It kinda reminds me of a Gallardo (the side view at least)!
-
Sorry to offend, I didn't mean it like that and wasn't implying it's a dtm. I simply meant it would be cool to see it lined up next to some dtm cars built by others, like the yellow BMW, the Mercedes, and auto builds. This was very much designed and shaped after a GT3. Well instructions will be coming if you ever get the urge to! It's probably around 1:8th scale, it's narrower than the Porsche but just as long I believe! Hopefully next weekend I'll be able to film the video edit and complete the photo teardown from there, then Thorsten l has offered to do some LDD file and instructions from there! If anyone else is curious for a Porsche size comparison aswell! (Ps this was taken a while back before all the final touches were done)
-
[MOC] APC v2
DugaldIC replied to syclone's topic in LEGO Technic, Mindstorms, Model Team and Scale Modeling
Looks good, very compact and chuck filled with functions! Have you ever thought of doing a large model one? -
@filuS the car in studs is 18 tall, 29 wide, and 74 long. Unfortunately I'm not at home this weekend or I would take some actual measurements for you but I hope that helps! I'm glad you like it enough to build it, I look forward to seeing it next to some other dtm cars !
-
@Aventador2004 way correct! Any ideas VK? Thanks!