
Kiwi_Builder
-
Posts
293 -
Joined
-
Last visited
Content Type
Profiles
Forums
Gallery
Everything posted by Kiwi_Builder
-
 Because some machinery is too tall to fit under the maximum vehicle height (don't know about Europe but here in NZ it's 4.25 metres from ground to top) while sitting on a trailer with normal wheels. This along with the fact that it is always good to lower the centre of mass to reduce the chance of a rollover. Even on other trailers the 'more load height' can be extremely useful, increasing the amount of load space available to maximise efficiency. But none of that matters, I love what you have done. You have found a potential problem and found ways to solve it. Fixing numerous problems with one design by making vehicles with low ground clearance be able to be loaded easily, removing the aerodynamic drag of ramps (which can also be solved by making the ramps out of mesh, but this is far cooler ) and keeping the same diameter wheels, removing the increased rolling resistance of the smaller ones. This is what I love and you have inspired me with your building to problem solve a real life issue. You've done a very good job and I LOVE it
 -
I thought that might be the case, do you know what page they were posted on?
-
The better way is to click on the smiley face in the tool bar at the top of the post writing window, next to the 'My Media'. When you click on it it opens a bar of smileys at the bottom of the box Could the prerelease images that got shown a few pages back be put on the first post (unless they've been removed of course)? Because if you haven't been following this thread every day it's impossible to find them.
-
I've noticed a problem with your instructions on pages 10 onwards. There are two floating ball joint pins at the rear of the suspension setup, one on each side. From what I have found so far they have no purpose shouldn't exist. Is there a reason they're there or are they just a little mistake that got missed?
-
I have to agree with nerdsforprez, I'm not normally a fan of supercars or BMW, but this MOC just amazes me with how beautiful it looks. I would even go to say that it looks better than the original (Thus, the not usually a fan of BMW ). I would definitely recommend this and I'm sure Blakbird is clearing a space on his shelf for it right now
-
I'm not normally a fan of supercars, or BMW for that matter. But this MOC is amazing The shapes of it are just wonderful and you've replicated them perfectly I can't stress enough how great this model is. I found it through the HoF recommendations topic, because I wouldn't have clicked on it otherwise, and I'm glad I did. Now I'm going to recommend this for HoF too
-
Rosomak WZT 8x8 APC
Kiwi_Builder replied to Sariel's topic in LEGO Technic, Mindstorms, Model Team and Scale Modeling
Yes it is, and when Sariel first posted this gearbox I created an LDD with the old driving rings. You can download that here: Sariel's 4 Speed RC Gearbox 1.1 Using 2-Wide Driving Rings.lxf -
I think what I'll do is I'll build all of the options in LDD (The TNL truck with six-axle B-Train, the PBT truck with a 1980's trailer combination and the Red Log Deck with trailer), put them in a single LDD and see which I prefer. At the moment I'm leaning towards the Red log-deck and I think what I'll do is that I'll give it a custom colour scheme as that it isn't based off of any company's truck.
-
So I've hit a small major problem where there are no colours that I can build the truck out of that matches the classic Hall's colour. This is, as you can guess, a very big problem which means that I can't really make it in this colour scheme without using a custom sticker over the entire bodywork to do the colour which is just cheating. I have found some other options though, I could do: Either that red log-deck with a three axle trailer or the PBT unit above. I'm favouring the red option at the moment. The other option is to stay with the original TNL option. What are your thoughts?
-
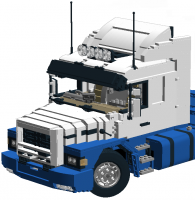
I have finished converting the truck into TNL colours I must say that it looks really, really good IMO. Personally it makes it look tidier than the original colours. I fitted Silver Metallic wheels to it as the finished model will have properly chromed wheels and exhaust pipe. As I said I'm really pleased with how it turned out, but I'm considering possibly building this instead: It is another New Zealand company, however this photo is from the 1980's showing a Scania T142M towing a four axle B-Train, common at the time. I'm considering this because: I haven't found any recorded proof of a Scania T143M being used by TNL Freighting I'm not going to build a second T143M so this would be my only opportunity to build the above unit, which I would like to do Putting an HPMV six-axle B-Train behind a T143M is just crossing time borders, the truck is from the 90's and you barely see any of them around and the HPMV permit only came into life in 2010 (approximately) This B-Train would be a hardsider because Hall's are a refrigerated haulage company and it would be nice for my future array of studded trucks to include a classic combination that the older visitors to the Lego shows could recognize and connect to. I will still build a TNL six-axle B-Train but instead it would be pulled by a Western Star 4864 FX which is a very common TNL unit: So that's what I'm thinking at the moment, if you could give me your thoughts on that I'll make a decision from there and at some point tomorrow I'll work on converting the truck to classic Hall's colours to see how it looks
-
You asked and now you shall get I have built the cab, bonnet and fuel tanks with just the wheel arches and air deflector on the roof to go. These are all of the segments which are going to be recoloured to match TNL colours. I couldn't connect all of the parts together as they should be due to LDD constraints but what I couldn't put in I added on the side, all part of my plan for getting the right parts ordered. My plan is that I will finish the bodywork that I described above as they are in instructions, then copy the truck into a new LDD where all the magic happens I will then remove all of the bodywork stage by stage, placing the removed parts in an organized manner on the side, and replace it with the right parts to complete the new colour scheme. I will then be able to find out which parts I removed and take them from the parts list. I will create yet another LDD copy of this version where I will remove the new bodywork piece by piece until I get the list of new parts. This is probably a very slow, bad way to do it but it's what I thought of Any suggestions as to a more efficient way to find the new parts required and the old ones I don't need would be great but we'll see. I think that once I've completed everything as original I'll start my WIP topic and keep you updated on there.
-
To get the body roll and steering, mount the ends of the linear actuators and the rest of the connections between the modules on a turntable, that way it can still roll while having steering.
-
Thank you for sorting that out nice and quickly Chase, everything's been running nice and smoothly all day Ingmar, I have made good progress on the cab in LDD and have the floor and doors so far. Once I've completed this I'll be able to modify it to the right colour scheme and start a WIP topic!
-
I didn't know who ran it so now I know for next time. Turns out he found us anyway so it's alright. Thanks for clearing that up and finding us here. I'll just have to wait until this gets sorted out and then I can make progress, just let us know when everything's up and running again
-
Coming along very nicely mate, I thought you were going to get rid of the driven axle idea in the trailer though. Do you think this will be finished in time or will it be finished after the competition ends like my one will be?
-
So I've struck a problem where I'm about to go and build the cab in LDD so I go to MOCPlans and find that it's got a Malware problem... I don't really want to on the website when it says that 18 out of 20 tested MOCPlans pages had Malware detected that download without permission. You can see it for yourself if you visit there of course. *Sigh* Everything can't go perfectly all the time I guess In better news I have found that the Metalwork teacher I know has an aluminium rod the right diameter to fit in the pin hole. I just have to wait for him to get a bit more as that I'm looking at 2100mm of the stuff
-
I think what I'll do is I'll build the cab and bonnet in LDD and then modify it for TNL colours, hopefully that should work. I'll have one LDD with the original parts and one with the new version and remove the old ones from the parts list and replace them with the ones in the LDD.
-
Ok so I've now found out that I'll get my parts to build the truck in two or three weeks and I will build it directly in TNL colours. That's where you come in, do you have an easy way to get the parts list for just the bodywork? I'll need to replace all of the bodywork pieces with their counterparts in blue/white so having the parts list of just them would make it far easier. Otherwise I'll spend a few hours trying to put it together
-
Kenworth K100 Crane Truck
Kiwi_Builder replied to efferman's topic in LEGO Technic, Mindstorms, Model Team and Scale Modeling
Very nice superstructure, that boom looks great. The whole colour scheme works really well. Good to see your project coming together nicely and quickly. -
I'm pretty sure it's a 3L pin with stop mounted so that the stop and about one stud of it are sticking out of the bottom.
-
I don't expect that I will end up entering the competition even though I made the WIP topic and made good progress. I have a big, good looking, strong boom that can extent successfully. I have half of a superstructure that looks brilliant and a carrier chassis with five steering modes and all wheel drive. My problem, as with many people, is time and inspiration. In order to complete the crane I need to finish the superstructure, get a working boom elevation system, build the rest of the carrier (outriggers, cab, bodywork) and somehow make them all fit together and look good. This will be particularly difficult because my problem is that I build all three modules separately and as a result, none of them really go together properly. They're all different sizes so only a few parts of it are actually in scale. This means that most parts of the crane will probably have to be redesigned completely to make them fit together. All of this wouldn't be a problem were it not for me being extremely busy at the moment with other parts of life that are extremely important. I don't have time for building and when I do, I just don't have any inspiration for it. I will probably continue to work on it when I have the time and inspiration, but that won't be until well after the competition is over unfortunately.
-
I have finally done the LDD of the roof It's four plates thick with 1x8 flat tiles on top. On the bottom there are 6x24 plates, the next layer up is bracing with plates connecting the joints in the bottom plates. The next layer is three rows of 6x24 plates with tiles on top. At each end there is the 1x1 Technic brick on each side for the aluminium tube to go in. Here it is with the 1x8 tiles and 6x24 plates removed, I made the bracing a different colour so it's easy to see it and the LDD is attached to this post to download and look for yourself because that gives by far the best idea of what it's like. Roof.lxf
-
Some interesting combinations there, in New Zealand we don't have Type 2 but all of the others are legal (sort of) and have been for a long time. Type 1 is very similar to the standard full trailer combinations we use though there are some key differences there, the main ones being that for it to be a five axle trailer it has to have a 8x4 towing it and have an HPMV permit. Alternately you can have a four axle trailer towed by a 6x4 or more that you show. Type 3 is very similar to our B Trains but instead it's either a two axle lead trailer towing a two axle rear trailer, a three axle lead trailer towing a two axle rear trailer, a three axle lead trailer towing a three axle rear trailer or very uncommonly a four axle lead trailer towing a three axle rear trailer (this requires an HPMV permit also). Type 4 is the same as Type 1. Given your axle configurations you must have a higher axle weight limit than we do. Ingmar, Thanks for the link to the video, you hid it under a different name I'm planning on starting a WIP thread once I get some good progress going, which I haven't been able to do thanks to being extremely busy until mid-November This is the best photo I can find of the fifth wheel under the cargo area. Here's the link for it and if you click on it it comes up bigger but blurry: http://trademe.tmcdn.co.nz/photoserver/tq/412525930.jpg
-
Kenworth K100 Crane Truck
Kiwi_Builder replied to efferman's topic in LEGO Technic, Mindstorms, Model Team and Scale Modeling
Is that rear axle liftable as well or is it just off the ground for some unexplained reason? -
Kenworth K100 Crane Truck
Kiwi_Builder replied to efferman's topic in LEGO Technic, Mindstorms, Model Team and Scale Modeling
Looks good, I think that removing the Aerodyne section on the top of the cab would be best because as everyone says, it's too high and you wouldn't have an aerodyne cab wuth a crane because it sticks up to where the boom should be resting.