

Tommy Styrvoky
-
Posts
1,132 -
Joined
-
Last visited
Content Type
Profiles
Forums
Gallery
Everything posted by Tommy Styrvoky
-
42056 - Porsche Speculation
Tommy Styrvoky replied to Jim's topic in LEGO Technic, Mindstorms, Model Team and Scale Modeling
Ok here's some progress, I think I have most of the parts in the correct places, I just need to figure out how the two knob gears are connected together and to the CV joint. Here's the file to play around with. http://www.bricksafe.com/files/Tommy_styrvoky/Lego%20Porsche%20paddle%20shifting%20mechanism.ldr Lego Technic Porsche paddle shifting mechanism by Tommy Styrvoky, on Flickr Technic Porsche paddle shifting mechanism by Tommy Styrvoky, on Flickr] Technic Porsche paddle shifting mechanism by Tommy Styrvoky, on Flickr -
42056 - Porsche Speculation
Tommy Styrvoky replied to Jim's topic in LEGO Technic, Mindstorms, Model Team and Scale Modeling
I am mocking up part of the shifting system, I think there's 2 of the knob gears, one for each paddle on each side. -
42056 - Porsche Speculation
Tommy Styrvoky replied to Jim's topic in LEGO Technic, Mindstorms, Model Team and Scale Modeling
I Think the changeover catch allows it to toggle only when the 0.5x4 beam with boss is all the way back, maybe the other side has a similar mechanism, but rotates the knob gear the opposite direction.I think it's also a pulling motion, not a rotational motion with the paddles, when it's operated,then swings out of the way to toggle it to a new position. -
42056 - Porsche Speculation
Tommy Styrvoky replied to Jim's topic in LEGO Technic, Mindstorms, Model Team and Scale Modeling
I have more speculation on the paddle shifting mechanism. I think the unknown CV joint has a function in this with another u-joint. Lego Porsche 2016 Reference photo by Tommy Styrvoky, on Flickr -
42056 - Porsche Speculation
Tommy Styrvoky replied to Jim's topic in LEGO Technic, Mindstorms, Model Team and Scale Modeling
Could the orange piece below the dash be for return to center steering with a Hockey spring ? -
I think a solution to making this model look better, would be to remove the back half of the main arm and mounting PF components inside the tracks/lower hull. Maybe add a cable system to elevate and lower the bucket. Then make the entire model not as wide, and use the older technic treads for the conveyor belts, that would cut down on the size too. It would be cool to convert it into something like this . http://www.fam.de/ge...6/tbt060202b002 Perfect timing for Sariel to start working on his bucket-wheel excavator.
-
42053 - Volvo EW160E
Tommy Styrvoky replied to Jim's topic in LEGO Technic, Mindstorms, Model Team and Scale Modeling
It looks like there's a clamshell bucket in front if you look on the left of the image part of it is visible. worm gear attached to back of linkage behind cabin, that's what the 12z gear on top is for. -
42056 - Porsche Speculation
Tommy Styrvoky replied to Jim's topic in LEGO Technic, Mindstorms, Model Team and Scale Modeling
I considered it too, I like the stickers on it, it's something different than another red supercar, it's similar to the series of car sets released in 2006 like the Nitro Intimidator, it had black bodywork with stickers of flames. -
42053 - Volvo EW160E
Tommy Styrvoky replied to Jim's topic in LEGO Technic, Mindstorms, Model Team and Scale Modeling
Looks like it has at least 3 pneumatic cylinders, 2 large and a smaller one for the bucket or dozer blade, as there is 3 valves in the back. maybe a PF compressor too ? -
Wow it has at least 5 of the new turntable pieces, looks like a replacement for hailfire gears. Maybe it's time to get a couple of those and make a turntable for a MOC. Though I think this set is too tall and ugly, hopefully someone will make a ultimate version of this and make it look like a proper bucket wheel excavator with several sets of tracks.
-
Those tires though.... they would look awesome on a 8X8 truck. The crane is really ugly though, it would almost make the set better if it wasn't there.
-
42056 - Porsche Speculation
Tommy Styrvoky replied to Jim's topic in LEGO Technic, Mindstorms, Model Team and Scale Modeling
Looks like a great set, I love the shaping with the panels, It would be cool to see this vehicle in a dark blue, orange or lime green/dark green. -
RC Maus Tank
Tommy Styrvoky replied to Sariel's topic in LEGO Technic, Mindstorms, Model Team and Scale Modeling
I don't know how well that will work with the Tortiose the main problem I had when building one was having issues with the trunnion being mounted too far from the front of the casemate, thus causing a massive hole in the casemate. -
RC Maus Tank
Tommy Styrvoky replied to Sariel's topic in LEGO Technic, Mindstorms, Model Team and Scale Modeling
Will it still use lego springs? As I feel that severely limits the power of the mechanism. Also I had a couple of thoughts for converting your autoloader to be similar to the rotary style racks in the AMX-13. It would only have a single benefit, the entire mechanism isn't as tall and doesn't protrude through the top of the turret. I Thought about implementing it when I was designing my AMX, though it would have been too large. I think a concept would be cool, but more mechanically complex than necessary with wedge belt wheels and the process of reloading.I think a mechanism with a side loading system will be more compact and allow you to cover up the hole on the top of the vehicle's turret. -
RC Maus Tank
Tommy Styrvoky replied to Sariel's topic in LEGO Technic, Mindstorms, Model Team and Scale Modeling
Do you have any photos of how the shooting mechanism was changed between the T29 and the Maus? I'm interested in the improvements. -
RC Maus Tank
Tommy Styrvoky replied to Sariel's topic in LEGO Technic, Mindstorms, Model Team and Scale Modeling
I have been looking forward to see your rendition of the mighty Maus. I wonder how well a sprung suspension/torsion bar system like the real Maus used would be able to function at this weight and not just be compressed and bottom out? it looks as if there's a lot of free space above the sponsons and center of hull below turret. I sometime want to replicate a Maus and possibly use that space to replicate the internals of the original vehicle. Or maybe build a E-100 with the Maus turret, It have some ideas for making the skirts for it, and maybe replicate the Belleville washer suspension with opposing springs, as I don't really see the purpose of me building another Maus. You did a great job at replicating all of the features except suspension and maybe replace the shooting mechanism with a recoil system. I bet this devours the LIPO batteries. I know 7V delivered by the LIPO decreases the rotation speed of the motors, but does that have a similar effect to the torque too? Tommy Styrvoky -
It's a great idea, but I think there would be too many new parts involved in it for TLG to produce it. I also think there would be issues with the 2 halves coming apart under horizontal stress on the wheel, though this could be solved if a 4L axle with stop is used. A 3D printed version would work great, though I am unsure of how it would work with the ball bearings.
-
I don't think It could be too difficult, you could measure it a wide variety of ways. A caliper would be decent for this application, or even a orthographic picture of the part with a ruler next to it could be used to scale it in a image editing software. It would be easy, and you could calculate every distance on it. (pixels of unknown)(pixels of known distance/known distance) If there is a worry on if it would be too small, it could be upsized slightly and filed down if necessary. I worry that a 3D printed part could fail though, maybe make a resin cast of a 3D printed part, as it's one uniform part cast solid.
-
I have a couple thoughts, maybe build up the area where the teeth are gone with epoxy, then after it dries, it could be re shaped with a file to have the teeth again. Maybe buy a burned out motor on bricklink and use it for the innards. Or maybe efferman could make a 3D printed gear replacement, though I am unsure of how well a 3D printed gear would work, but it's an option.
-
[MOC] [WIP] The Command of the AT-AT
Tommy Styrvoky replied to LiLmeFromDaFuture's topic in LEGO Star Wars
I wouldn't trust it unless it would be supported like this . This structure is very solid, and can only fail where the 0.5x4 technic liftarms are. Otherwise, the whole axle that the leg is mounted on could bend too, if there is no where else for the mechanism to fail.AT-AT leg/hip joint by Tommy Styrvoky, on Flickr -
[MOC] [WIP] The Command of the AT-AT
Tommy Styrvoky replied to LiLmeFromDaFuture's topic in LEGO Star Wars
I think I have a solution, this should work, as there are 2 worm gears to keep the 8z gear somewhat supported. There needs to be a back support on the side of the worm gears to support the shaft, and pieces have to be added above the 8z gears with friction pins to keep them from falling out. The 2 worm gears need to be turned in opposite directions to move the turntable. I think this will be solid enough, but I am unsure of the new worm gears, and if they could fail. AT-AT leg/hip joint by Tommy Styrvoky, on Flickr AT-AT leg/hip joint by Tommy Styrvoky, on Flickr -
No problem there seems to be an issue with receiving notifications from the forums, as there was a change with the email. It now puts everything into junk mail.
-
PDF instructions are complete along with a .LDR model on Rebrickable. Instructions here Lego Technic driving ring shooting mechanism 2.0 instructions by Tommy Styrvoky, on Flickr
-
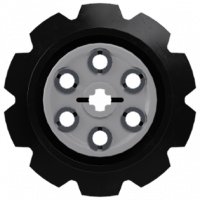
Efferman's Custom Parts
Tommy Styrvoky replied to efferman's topic in LEGO Technic, Mindstorms, Model Team and Scale Modeling
Thanks, these sprockets are the perfect size for a Panther tank, as the sprocket should be larger than the road wheels, this will work great for 6 stud inverted radar dishes when used as road wheels. I may be putting 4 XL motors through both sprockets, so I think this will give me plenty of contact points to secure it to the final drives. -
[MOC] [WIP] The Command of the AT-AT
Tommy Styrvoky replied to LiLmeFromDaFuture's topic in LEGO Star Wars
Hopefully sometime this week I can have some more time to take a look at this and see if there are other options for the shoulder joint.