
JopieK
-
Posts
4,716 -
Joined
-
Last visited
Content Type
Profiles
Forums
Gallery
Everything posted by JopieK
-
I think you are right that those are H-bridge chips, what else could they be.
-
12V Train Motor(BB12V) disassembly and repair
JopieK replied to Andromeda's topic in LEGO Train Tech
He seems to be still active since he fixed the images :) -
Well I really Infrared is old, I still remember the numerous stunts my pupils/students needed to pull of with the Mindstorms RCX when the firmware was lost... again... Of course from an electronics perspective IR is easier, I had working proof of concepts controlling my trains using no more than an Arduino UNO and an IR led, but... I nowadays use Bluetooth Low Energy for a lot of applications, if you get the hang of it it is quite easy to use. Although sometimes I lose bytes in translation, uh receiving, presumably the good old 'two army problem' you know. I think if LEGO would open up the firmware it would be doable for us. The version of the CC2640 they use is BLE 4.2 I think, but they could easily move to CC2640R(2F) that is fully Bluetooth 5 compliant (the 4.2 modules are mostly Bluetooth 5 compliant but the range isn't). If it would be Bluetooth 5 you can control from about 100 meters away! But giving us the firmware would really help so I really hope they will so we can do something about large layouts. @snefroe: back when they changes from 12V gray to 9V we missed all the remote control options (we still do don't we? I make my own arm signals but I still miss them). But in the 9V era we still had that blue hopper and other train-related sets. Now that LEGO thinks no one likes trains anymore we don't get any additional sets. That is a major problem for the kids, I mean most of us have a fairly good income and buy tons of ABS anyways (and compensate sometimes with Lugbulk parts), but for the kids. When especially my cousins come by they like the cars but like the trains even more. I don't think a lot of parents can afford giving their kids 200€ presents with their birthday / 'Sinterklaas' / Christmas.
-
For now our best chance is doing it ourselves I guess (reverse engineering like the Boost-enthusiast did). I use nRF52 BLE chips with Arduino (SAMD21) and they work very well.
-
Welcome Planb4u, but don't revive threads from years ago!
-
Nevertheless the severity of the effect depends on how the motor is built, how they did the gear setup, etc (I mean if they would use worm gears it would be impossible to turn the wheels). Even the way the electronics are designed matters, if one would e.g. use an inductor that might influence the end result quite a bit. So it is not that obvious at all! (To be clear: maybe that is not what you did, but still valuable information for others).
-
12V Train Motor(BB12V) disassembly and repair
JopieK replied to Andromeda's topic in LEGO Train Tech
Welcome to Eurobricks catmat36 / Matthieu, Andromeda hasn't been in for a while, so maybe he will never see this and since you are a new member you can't yet PM him. If you read the rules you can also see that we do not appreciate reviving old threads (2 years+ in this case). -
I think so! You can also see that at the top of the remote (GND, TMS, TCK, TDC, TDI, RESET, VCC) that is obviously used to program the chip after the board is soldered. But then I need to desolder the battery connectors if I want to show the backside of the controller. I will do that but not before the weekend. The CC2640 chips could be reprogrammed (see: datasheet), they actually have two microcontrollers in it (A cortex M0 and M3 processor). I assume they allow for OTA (over the air) updates and I assume the app that LEGO promises to provide on the box will be able to update the firmware.
-
MOD - 12 volt wheels with axle hole for Power Functions motor
JopieK replied to Paperinik77pk's topic in LEGO Train Tech
Or maybe put it in the Shapeways shop so we could order it from there :) (designers then get also some small revenue out of it). -
Well I guess we might be able to bridge the two systems, at least indirectly, but indeed this seems to be the end of Power Functions. Although it is still speculation, it is odd that no new Technic set includes Power Functions at this point. Apart from that one can see that the internals of Powered Up and Boost are very much alike, so that might also be a strong indicator of LEGO moving towards PU altogether.
-
Sed6, after opening the motor and reading your arguments I totally agree with you after all ;)
-
Hi guys and gals, I started with my Powered Up tear down. For now I chose the non-destructive path of least resistance: For this phase I just needed a TORX T6H screwdriver: These are the internals of the train remote control. You can see the Bluetooth chip right in de middle. I might also desolder the battery terminals so I can show the backside of the print as well. I think they did a great job in designing the PCB, looks neat and tidy (although I am an CS/Informatics teacher I design / solder a lot of PCB's for one of our college research projects). So this is a close-up of the PCB: The Bluetooth chip is de CC2640 by Texas Instruments: datasheet / details. I would have used a SoC, but they created everything of their own and integrated the antenna etc. right into the PCB, hope the backside will show the traces for it :). You also see the RGB led (D2). The 'grain circles' are the trick they used so that the knobs can be turned and the buttons will still ensure a proper reaction. For now that's it for the controller. Next up: the receiver. It needs to be a little more intricate: - you need a motor controller (one can't directly control a motor from a microcontroller chip since motor draw too much current for such electronics and also often require a higher voltage) - you need of course also a bluetooth chip Not the best picture bu I focussed on making the IC's readable (and that worked quite well I think, you should be able to click on it for the larger / sharper version): So it uses an STM32F030 micro controller. I already guessed that since that is the same one they use in Boost. For the non-electronics people: a microcontroller is a computer on a small chip. These chips are getting so powerful that their processing power and memory is approaching our first personal computers (but then for a fraction of the size, price and power usage). In fact this one is a 16 Kbytes Flash, 48 MHz CPU (my first 486 when I was a teen ran at only 25 MHz). To the left near the PU ports are two tiny chips. I assume these have to do with the output ports, but I could not trace them for now. The chip at the top right is a tiny chip by Texas Instruments for power management of the board and system. Again you see the same RGB led. Just like with the controller, to see the backside of the board requires desoldering the battery leads. That is not a problem at all but I don't want to melt the ABS below it so it requires some special care. Last up is the inside of the motor: It seems to look very much like the PF motors. It gives at least something away about the connectors: Two motor leads, two 'identifaction' leads (people trying to hack Boost suggested handshakes find place over these wires to determine what device is connected to it, but here ID1 on lead 5 is connected to lead 4 VCC (the 9V motor power) and ID2 (lead 6) is connected directly to GND (lead 3). That HL05 golden thing is a self resetting fuse, would protect the system from harm if a short / stall occurred. The other little thingy (C2) is a capacitor that tries to prevent spikes coming from the motor while running, harming the rest of the electronics (read the controller). So this is the pinout as seen from the controller: That's it for now. I see a lot of possibilities to test the PU stuff even more. I already did some Bluetooth scanning using my iPhone, I could connect to the devices but one needs to send / receive commands in a certain way apparently so there is still a lot to do in that direction, hope LEGO will open up their commands to us, would be very beneficial for hobbyists and educators alike (I'm both ;)). Here is b.t.w. a very useful link for the software part of Boost: https://github.com/JorgePe/BOOSTreveng We will need some modifications for Powered Up, but it shares the basic principles and even the basic Bluetooth addresses.
-
Review of the new cargo train 60198 is now available: Read it here in Train tech!
-
If LEGO would release the STM boot loader (I guess there is an STM chip in it just like with Boost), then we would be able to overrule / void that watchdog.
-
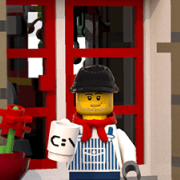
Introduction: Thanks to @Jim the brand new Cargo Train has arrived early in LEGO City. Here a review of the set. I was very excited to get my hands on the set, not only because it offers a large potential but also because of the Powered Up system. Set Information: Number - 60198 Name – Cargo Train Theme – City (Trains) Year – 2018 Minifigs – 6 Pieces – 1226 Target age – 6+ (6 – 12) Price – €189.99, CA$ 269.99, $ 229.99, £ 179.99 Available from: July 1rst 2018 Links: Brickset - https://brickset.com/sets/60198-1/Cargo-Train Poll on the review: https://www.surveymonkey.com/r/GTQWQVX (suggestion: fill it in after you finished the review). LEGO Product Information Load up the powerful LEGO® City 60198 Cargo Train and deliver the goods on time! This cool LEGO City set features a motorized engine with 10-speed Bluetooth remote control, accessible driver’s cabin, a crane wagon with rotating and extendable boom arm, container wagon with 2 containers, and a log wagon, plus an armored truck with opening doors, and a forklift with opening roll cage and lifting forks. This cool LEGO train set also includes a full circular track with 16 curved rails, 16 straight rails and a railroad switch with lever, plus a control center with ladder and 2 buildable pallets with money bills, gold bar elements, a snow scooter and 6 LEGO minifigures. Includes 6 LEGO® minifigures: 4 train workers, a security officer and a crook. Features a motorized engine with 10-speed Bluetooth remote control, pantograph on the opening roof, and driver’s cabin with control panel. Also features a log wagon, crane wagon with rotating and extendable boom arm, and a container wagon with 2 containers with hooks on the roof for loading and space for pallets. Includes a control center with ladder and signal lights, a full circular toy train track with 16 curved rails, 16 straight rails and a railroad switch with lever, a money transport truck with opening doors, and a working forklift with opening roll cage. Accessory elements include a wrench, 12 gold bar elements and 4 money bills, plus 2 buildable pallets, 3 logs and snow scooter. Open the roof to access the engine car filled with cool details. Operate the cargo train with the 10-speed Bluetooth remote control. Lift and load logs onto the log wagon with the crane's rotating arm and hook. Push the lever on the railroad switch to drive the train to a different track for loading or unloading. Load pallets into the containers with the forklift before lifting them onto the container wagon with the crane. Set up the tracks in different configurations to load or offload cargo around your city. This product requires batteries (not included). Please refer to the product packaging for type and quantities. The included Bluetooth remote is not compatible with older infrared remote-controlled LEGO® train sets. Cargo Train in total measures over 4” (11cm) high, 32” (82cm) long and 2” (6cm) wide. Engine measures over 4” (11cm) high, 10” (27cm) long and 2” (6cm) wide. Log wagon measures over 1” (5cm) high, 5” (15cm) long and 2” (6cm) wide. Crane wagon measures over 4” (10cm) high, 8” (22cm) long and 1” (5cm) wide. Container wagon measures over 3” (9cm) high, 7” (18cm) long and 1” (5cm) wide. Armored truck measure over 2” (6cm) high, 6” (15cm) long and 2” (6cm) wide. Control center measures over 8” (21cm) high, 3” (8cm) wide and 4” (12cm) deep. Forklift measures over 2” (7cm) high, 2” (5cm) wide and 4” (12cm) deep. The Box: The box is huge, feels filled and heavy. This is the front of the box: and this is the back: They clearly mention that set is not compatible with older systems (read: Power Functions). They also promote the upcoming app(s) and the passenger train (+ the track sets). I found it a bit odd that they did not include the Bluetooth Low Energy logo and standard they use on the box. They mention Bluetooth but that could have meant Bluetooth Classic. Not too easy to see in the smaller resolution of the image, but they mention near the lightning bolt: "The Bluetooth technology is not compatible with older train products". For kids I think the box would be very appealing since they give a lot of hints on how to play with the set. Inside The Box: The box contains 12 numbered and additionally four unnumbered bags (three with tracks, train bases and a few other parts including the ladder, and then the PU train motor). Two stacks of four curved track sections and the PU controller and receiver came loose (interesting since the PF parts always came inside cardboard I think). The Instructions: The six booklets and the stickers came in a separate plastic sealed package, good thing since that keeps both stickers and booklets in much better condition of course: The Build: It is a massive set so I decided to take it on in a very structured way. Booklet 1/6: The Forklift The first pages of the forklift booklet contain some instruction on how to move forward bag by bag. It also explains the brick separator and scanning the QR code will even lead you to a tutorial video about the separator. Ok, well these are the parts of bag one: For the price of the set they really focused on money, so while you spend quite some money on the set, you also are rewarded with a lot of money related items. Some nice modern parts, a lot of familiar parts. They could have used the goldish version of the 'bars' (Piece 99563) but apparently they didn't (the piece was included in other 2018 sets though) and just used jumper and normal tiles. They have a lot of color variations, especially the jumpers, I thought that was a minor draw-back. At first I also found the "Bright Light Orange" parts looking somewhat poorly (reminded me of some clone bricks) but it worked out very well in the end. First one needs to build the minifig and the pallet. Here is what the figure and pallet look like. To the left the base of the forklift: Here is the final forklift together with the minifig and pallet full of cold uh, gold and banknotes. Here you can see for yourself that it wasn't a bad decision to make the forklift Bright Light Orange after all: Booklet 2/6: The Bank Truck Bags 2 and 3 are needed to build the bank truck. I guess they did this to make the set suitable for the 6 year olds. This is the heap of bag 2 after I structured it: Not that many special parts, really straight-forward. There was one interesting step: You build the driver seat / engine compartment as 'one piece'. The engine is place in the middle of the truck as it appears. I guess they looked at real car factories and their "Hochzeit"-moment (German for marriage) moment when the bottom of the car and the body are coming together. That is it for the first part of the truck. This pile represents the contents of bag 3. The left-hand corner is the finished first half from bag 2. I always build using 'heaps' but I must say restructuring the parts means one can build very fast so I would recommend it to kids from now on: I like these parts better then the base parts. They did a very neat job with the smooth nose of the vehicle: it is basically a four-wide car piece and integrates very well. No bulky 'Jack Stone'-era like parts, but still a smooth and very buildable truck. I thinks kids and T/AFOL's alike will enjoy building it! Here is what the truck looks like when completed. A really nice and easily accessible cargo bay, nice for the 'players', but they did in fact also include those nice doors at the back. So fortunately they did not save on details making the set also interesting for a more mature audience. As you can see the pallet with money and gold bars will fit right in! The only draw-back I could think of is when the bay is closed you can see the gaps on the top. Hope it doesn't rain in your LEGO city and the bank notes are water proof (well, they are made from ABS so I guess they are ;)). A view from the front: you see how smooth and detailed it is while still using relatively small pieces. I did not apply the stickers yet, later you'll see why (and a neat trick). I would advice that also for kids, wait till your have built everything and ask a 'pro' to apply your stickers. Booklet 3/6: A stopper, crossing and... Part one of the Locomotive! Finally, the first real train builds! First some 'battery management'. The set needs a staggering amount of ten AAA batteries! Four for the controller and another six for the receiver / motor controller. I did only have for when I started and the shops were already closed so you'd better prepare and get good deals on AAA batteries before you start your PU (Powered Up) adventures. You need to pair the Bluetooth devices first. The controller and receiver probably have some initialization periode where they are able to pair to each other. We will see how that works if we will power on more than one controller or receiver in the future :) Maybe they rely on the signal strength though and will only pair to the closest devices that just booted up, just speculation, we will need to see when PU parts become more readily available and further experiment with it. As Sariel showed, powering of is easy: The receiver will apparently (from the video by Sariel) also power down after one presses the controller momentous switch for +5 seconds. Hope the troubleshooting guide will appear there around July 1rst, for now it does not exist (https://www.lego.com/themes/city/trains). Here are all the PU parts together: From top to bottom: - the receiver / battery box / motor controller combination - the remote control for two motor channels - the PU version of the train motor Now we should have started building the loop with the 'dead-end' behind the switch. The set comes with 16 straight and 16 curved tracks, and a (left hand side) turn out. Interesting to see that they included quite some straight track compared to older sets, but also that they did not include an extra curved track to make the 'dead' section behind the turn out in line with former LEGO guidelines that suggested us to always add a curved piece right after the diverted section of turn outs and never directly connect a straight section. B.t.w. booklets 3 and 4 show a yellow / orange tile on the turnout so you can remember that train will react to what side of the controller, but they included a green tile and correctly show you to add that green tile to the controller for 60198. Maybe they should have included a sticker that looked like 60198 for that tile as well but they didn't. You then are instructed to build the (unsafe) railroad crossing, more or less just like the one from the winter village station. There is also a rail stopper for the end of the dead section. Here are the parts for both builds: This is the rail stopper: The crossing is plain but effective: They could have added barriers for even more playability but I guess in freight shunt yards like this, have a crossing without barriers is most common. Bag five contains the first part of the engine. The baseplate is 6 x 28 which is very common for recent trains (see: BrickLink). The inside of the train is very colorful. I know from designers that they typically do this for sets targeting a younger age, I don't mind it since the outside is still very acceptable. You see already quite some typical Train parts, so the LEGO Train story just continues with this set. The engine is very much symmetric as you can see, I value this very much since for children it helps them to better understand concepts like symmetry (I'm a beta teacher after all). Here is the half way built engine, I actually made a mistake with the yellow 1 x 4 panels, they should have been facing towards the inside of the train. The head is more or less a fusion between typical US and EU trains. We all know of course that the leaked initial images very much looked like typical EU engines, I think this way the train appeals to a wider audience (remember Jamie Berards recents comments on trains). Since the nose is SNOTted, it would be very doable to modify it without a lot of problems to suit one's taste maybe even better. The tile on the front will be fitted with a 'cargo' instead of the typical Train ('Northern') logo (<-O->). That was the end of booklet 3. Booklet 4/6: The rest of the Locomotive Booklet 4 lets you start with bag 6. You need to add the buffers and the motor as well. Here you see the parts from bag 6: Yellow bogie plates this time. The green train windows are not unique but after all most parts would also be reusable for MOC's etc. Here you see the finished bogies, one with the new UP motor, the other entirely brick-built: The buffers for the locomotive are of the snowplow variety. After finishing bag 6 we have this: The cockpits are easily accessible and the battery bay is very spacious: we don't have an IR receiver anymore of course :) There are two train parts in bag 7 that I have never seen before: the new pantographs! They look really neat I think. Here is the finished train with the controller next to it: You can see that the vertical part of the panels are now facing the inside. The 1 x 3 panels on top make a the entire engine very sturdy while it is still very easy to remove the entire middle section, just remove the four panels and one can lift the entire thing. It looks very much like a real cargo engine after all I think (although it appears a fusion between a continental and US train as we already discussed earlier). The roof section acts like a lever (comparable to what we have seen in e.g. the yellow and red cargo locomotives) for the battery box. Booklet 5/6: Crooked trees and a female operated rail crane Bag 8 contains the crook with the rail car and lumber. Not spectacular, but they did a nice job. I like the dark tan 1 x 6 fences. Looks like the crook is up to no good! Here the finished lumber rail car. The lumber fits very well and won't fall off that easy. Apparently this car is also the crooks ideal place he can observe from. Bag 9 contains the base for the rail crane. We have seen quite some rail cranes already (1972, 1975, 1977, 1980, 2006 and 2015 (I might have forgotten one or two), I already owned one (set 7814) when I was 2,5 years old, but I think (arguably) that only set 4552 from the 9V era tops this one. These are the parts, another (6 x 24) train base, the typical train railings again. The female crane operator has the same uniform as the train driver. Here you can see the finished base: The stabilizers are fully retractible as you can see and have a sturdiness to it as needed for performing heavy lifts common in railroad situations. This is also true for the bogies, very compact, really appropriate for a genuine real crane I think. This is what the crane base looks like after being but on it's bogies: Bag 10 contains the crane itself: I like the large round turntable. Also those technic parts. A good starter for engaging youngsters in Technics. This is what the finished crane looks like: M(r)s operator is now totally ready for every conceivable heavy lifting duty. B.t.w. those 'stamps' that you see connected to the hook are also used as joysticks for the operator. Behind the 'container' doors on either side are 2 x 2 tiles that will get a human machine interface / operator panel (stickers). Booklet 6/6: Rail yard control tower and container rail car. The final booklet contains the instructions for a duo container rail car and the yard control tower. First up is bag 11 that contains the rail car, containers and even a snow scooter. All the parts for the train car and the containers. No very special parts but nice color variations. First we build the rail car itself. A very straight-forward open rail car with a somewhat heavy duty base. Then the bank container that also doubles as a safe. Wondering why the crook only has binoculars, maybe he wants to steal the combination? I guess no explosives this time :). The container has a hook so the rail crane can easily lift it. The 'money pallet' will fit in just like with the truck. The second container comes with a pallet that can fit a snow mobile. The back of booklet 4 already promoted the arctic explorer sets so I guess they wanted to link the set also to the arctic theme enthusiasts! The snow mobile next to the car and both containers. The last bag! Number 12 contains the following: There is one peculiar item that was new to me: It fits a cross axle to the side and can fit a 20482 part to both other sides. Although the signal tower might not be that realistic, it adds extra playability and is quite fun. We can always MOD it of course work more like the real deal. Initially I though, did they finally reintroduce the yellow helmet again to a train set after about 40 years, but alas, although the female hairpiece of the operator also looks very neat. The back of the tower has a knob so you can signal the train engine driver that he can start / stop shunting in the rail yard. So that was it for building. Here are most of the left-overs: There is also an extra small chain piece (from the lumber car). This is what the entire set looks like from a 'helicopter' vantage point: The Minifigures: Here is the line up of the minifigs: Having some diversity in the LEGO train world isn't that bad I would say. I like the uniforms, a lot of details in their prints. All torsos also have a printed back: Apart from the 1 x 4 train cockpit, 1 x 2 money tiles and these torsos all other artwork is done using stickers. Stickers, love them or hate them?! I think without the stickers the train would not look that great at all, but we have them so we can upgrade the looks of our set by applying them. Here they are: The artwork was done quite well, I like the metallics in the bank logo's. Nothing too complicated but nevertheless making the set much more appealing. The sticker paper does then to curl better put it somewhere safe till you are ready to apply the stickers. I obviously have a lot of experience applying stickers, my wife always ask me to help out on e.g. her technic sets for applying them, so do my cousins and nieces. But that does not mean that I never fail at applying the stickers just perfectly. Fortunately I know a trick and used that trick to apply the stickers on set 60198 as well. The solution: adding some drops of (mild) dishwashing soap to some water: You then moisturize your finger and apply the solution to the place where the sticker(s) need to be applied. The thin film soapy water prevents the sticker from immediately sticking to the ABS. You can then readjust the sticker till you are satisfied, squeeze a little to make the sticker stay in place and just let it dry. Applying the stickers makes all the difference don't you think? I just wanted to finish off with a last view from the yard tower: What a job, a great view... and: Even your own coffee maker: I just love that they added this detail! Summary: Playability: 10/10 Design: 7/10 Price: 6/10 Parts: 8/10 Minifigures: 9/10 Overall: 7/10 Wrap-up and some final notes: Hope you like the review, I did not have my photography tent / spots up and running at the moment so sorry about the differences in colors / shading, hope it wasn't too disturbing in the end. At my flickr page you can see more pictures I took while building the set. Now I just need some AAA batteries to start the engine! And remember: don't forget to fill in your opinions on the set: https://www.surveymonkey.com/r/GTQWQVX The quality of the video could be better but at least you get the idea I hope. One more thing: I have started a Powered Up review that includes a tear-down here. Hope many more will contribute to that! I'll do that in a separate topic since it is of course not only about set 60198.
-
I noticed the same with the 60198 engine. I'm working on the review, built the entire set already, need still add the stickers and make the entire loop. Then I need to find my very tiny torx screwdrivers to open the electronics, (but I will probably do that part at a later moment).
-
Are there lego sets with both system and duplo bricks?
JopieK replied to Foreman's topic in Special LEGO Themes
There are, mainly those serious play sets! -
MOC: Red square Soviet Union military parade
JopieK replied to Kou2000R's topic in Special LEGO Themes
Very nice, red and green, nice contrast! I must say that the black and white images especially from a low perspective also work very well though! You probably could make a stop motion version of it without too much trouble, would make it even more powerful. -
The Worldwide Developer conference of Apple (WWDC 2018) shows how LEGO and Apple integrate their products. You can now play with your physical modular buildings! Check it out at the Apple developer website (developer.apple.com). Looking forward to their apps, my nieces and nephews will love it I'm sure. Link added: https://www.apple.com/apple-events/june-2018/
-
Wild Western railroad locomotive Armstrong turntable
JopieK replied to Murdoch17's topic in LEGO Train Tech
I don't have a version built up anymore, but you need a large pit and that is the downside of it, although most European turntables are built like that. In Holland there are only a few that survived, but in Germany they are many more. -
Very nice work guys! Making the Train community even better!
-
Here is the link to what Sariel posten in Technic:
-
Here is a Powering Up review of the Train by our German fellow AFOL Henry (Caulius), it is unfortunately in German but I think you will get the idea even without understanding everything since he shows it very well:
-
Great job Janet! It sure looks like Link :)
-
Wild Western railroad locomotive Armstrong turntable
JopieK replied to Murdoch17's topic in LEGO Train Tech
Very nice! Making the turning mechanism is always the hardest part though. I did one with round monorail tracks and a monorail motor, that worked well.