
ScottishDave
-
Posts
368 -
Joined
-
Last visited
Content Type
Profiles
Forums
Gallery
Everything posted by ScottishDave
-
Totally, insanely amazing. I want one.
-
BrickLinking (another) 10179 UCS Millennium Falcon
ScottishDave replied to Lobot's topic in LEGO Star Wars
Congratulations, good luck and let me know if you need any more photos. ROFL! Better hope that Chewie doesn't find out that Benny was sitting in his seat. Perhaps it's just seeing the two minifig-scale UCS sets together, but the thought occurs that if you get these two together with enough rebel fighters together on a dark grey floor, you could have a minifig-scale Home One Hangar bay scene from ROTJ. -
No problem, and I'm glad you liked it! I'm looking forward to seeing it in place on your Falcon, rollermonkey.
-
Bricklinked UCS Millennium Falcon - MODded heavily
ScottishDave replied to ScottishDave's topic in LEGO Star Wars
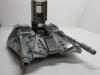
Hi there Mr. Wonderpants, I finally got a few uninterrupted hours to take my Falcon apart for you. This is looking from the rear of the Falcon towards the front. You can see the cockpit on the right. Here is an overhead shot: Now, as to the vertical level: my new framework starts two plates below the level of the original framework. This allows me to join the old to the new using 1x3 liftarms as in the original design. This can be seen clearly in this shot of the (new) rear landing feet and the side of the docking tunnel: The red technic beam is part of the NEW framework. The yellow "L" beam is one of the last few remaining parts of the original framework. I cannot remove this piece because I cannot fill the starboard docking tunnel with beams below the floor for strength: This is where the ramp goes. I hope this helps! -- David. Edit: Flickr images not showing. -
Bricklinked UCS Millennium Falcon - MODded heavily
ScottishDave replied to ScottishDave's topic in LEGO Star Wars
Nope. Sorry! I don't have the time/energy/enthusiasm to pull it apart again right now. Why not have a go yourself, once you have the basic UCS model assembled? You can fit most of the existing framework into the landing gear boxes. You have to slim it down under the docking tunnels, and it's best to keep the mandibles, forward landing gear and the wall of technic beams they attach to as they are. Take it in stages and make sure each modification works before trying the next one: and don't expect miracles. I can pick mine up without it falling apart but it creaks and sags a little in places. This is best done to a static model designed to show off the interior. -
It's looking really good! Sorry that the nose attachment wasn't clear from the LXF - Lego Digital Designer balked at the "illegal" build.
-
Chirs, Assuming that you refer to the nose of the snowespeeder - the pair of wedge plate 4 x 2 and the tiles on top of them: Yes, it is attached. There are two pairs of stud jumpers under the nose: it joins securely to the front pair, but only rests on the back pair, due to the angle of the sloping wedge plate 6 x 3s on either side. I hope this helps. -- David.
-
Thank you for the advice, Lobot: much appreciated. I'll make sure that I'm the person doing the assembly of the big pieces, and I'll do it very carefully!
-
I've just ordered the bits for this from bricklink (I'm awaiting the final order now) so I'm interested in these comments. I can see that, since I'll be building it with the kids, I'll have to plan in plenty of breaks and do lots of parallel building to keep us all from getting bored!
-
Yes, that works perfectly. It puts the transition from sloped edge to straight a stud too far back, but what can you do? As to the rest of the model... Wow. That's a LOT of changes in one week. I see you've decided to use the Lars nose. It works (of course) but I kinda miss your original nose design - it was good that you were doing something original. I see you are also using the Lars heatsink. Again, it works, and I like it better than your old heatsink, because it has the right number of fins. I'd love to see if you can angle it by a few degrees like mine. I never quite figured it out, but I'm sure it is possible. The rear gun deck looks much better now - it is just the right size. The rear gun.... what is UP with you and the rear gun? Every update, you have a new design . It's crazy! I'm not sold on this one - the radio does make a nice body, but the gun should have two barrels and... it's a radio. The rear flaps look good - again, the Lars dsesign. You may find when you build In Real Bricks (soon, I hope) that it is a little bit fragile. I still say that the power converter is too thick. I see your problem with the brackets: could you not use 1x1 bricks with studs on the side, or headlight bricks?
-
I've made a few changes to the landing gear on mine. I found quite a bit of reference on therpf.com, for example this thread: As you can see from the photos of the actual TESB Falcon, the landing gear flaps are NOT fore and aft but to either side of the gear. I used 2x16 plates for the the rear landing gear flaps and 2x8 plates for the forward landing gear flaps, held on by a combination of clip plates and handles. The landing gear on the UCS Falcon is also hopelessley out of scale. I scrapped it all and started again recently. Here are some pictures (Sorry for the quality, I only had an old iPhone to hand...) Rear landing gear: Forward Landing gear: [
-
Go for it! There is absolutely no reference for the stand, and the 1x2 bricks worked, so I just used those. If you can come up with something cooler, I'd love to see it.
-
Well done, and thank you for sharing the steps in your progress with us. It's great to see a project evolving over time. There is a lot to like in your model. The SNOT wings look fantastic, especially on the underside: much, much cleaner than the brickbuilt ones on mine. It makes me wish I wish I had a box of 1 x 4 white slopes in front of me right now! I also like some of the little touches - the cannon tips, the rear gun (your first version, using the space console as a stand) and the grilles on the repulsor units. These are all excellent, and I may well incorporate them if I ever rebuiild my own snowspeeder. Some small suggestions: How about some 1 x 3 tiles on the exposed mix of hollow and closed studs on side-slopes of the nose? I like the stands you have used for the lower airbrakes, but wouldn't it be cooler if they were fuctional? I think that the power couplings are too thick - I seriously think that they should be one brick thick (yes, like on mine!) I also think that the repulsor units are too thick, but I can live with that: it gives you a better proportioned stripe and those lovely grilles. I also think that the deck on which the rear gun rests is too long: perhaps the cockpit could be made 1 stud longer at the back? These are just quibbles - things I would do differently. Overall, I think that your snowspeeder looks really good, and I'm very interested in seeing it in real bricks. I'm also interested in seeing it with the canopy you mentioned - it certainly looks like the correct part to use, perhaps with some cut-up white stickers applied to represent the frame.
-
It looks really cool: some tantalising hints of great things around the engines and the guns. There's one thing I'm not too sure about, however. Check out the shot of the X-Wing from this trailer on this page: http://www.polygon.com/2014/12/1/7314463/star-wars-force-awakens-trailer-analysis Notice that the lower wings are connected to the guns a lot further forward than the upper wings. It seems pretty clear that the wings are side-by-side when closed, as shown in this reconstruction: http://deeplyobsessed.blogspot.co.uk/2014/10/episode-vii-x-wing-lock-s-foils-in.html I'd be very interested to see how you've achieved this - I can't quite see it working that way from your preview image.
-
For 7965 I'd simply use 2440 in dark bluish grey, perhaps with a custom sticker: http://www.bricklink.com/catalogItem.asp?P=2440 I think this is what Lego will use on the next Falcon anyway... :-)
-
[MOC] The GHOST from Star Wars: Rebels
ScottishDave replied to DarthTwoShedsJackson's topic in LEGO Star Wars
Thank you very much indeed! That was well worth the wait . -
That is definitely one of the parts in the model.
-
Ah, I see. I'm typing this on a Mac mini: so I do sympathise. It's an xml file for uploading to Bricklink. You could open it in TextEdit, but it isn't really human-readable. If you want a plain listing, try navigating to http://www.brickulus.com/parts/upload/ and upload the LXF file there. This will generate a plain-text parts listing with part and colour names for you. One word of warning: it's a bit beta. It works fine in Safari, but for some reason not Firefox. I don't know about other browsers.
-
Thanks for all the nice comments, guys. Veynom - thank you for the suggestion. If you download the lxf file from the dropbox lin in the first post, you'll notice that the tiles are already as you suggested. It's been like that for months, honest. I just didn't have any 1x1 tiles to hand when I built the physical model rollermonkey - I've added a bricklink xml parts list to the first post. Pro tip: do you know that you can use LDD Manager to easily generate a parts list fromany LXF file? I believe that online services like rebrickable.com do the same, if you're on a non-Windows computer.
-
My attempt at a 10179 UCS Millennium Falcon!
ScottishDave replied to EddScott's topic in LEGO Star Wars
Yes, it bends a bit when I swoosh it, and no. BTW, there is a well-used thread for discussion of UCS Falcon mods. I'll happily elaborate on my answers over there: http://www.eurobricks.com/forum/index.php?showtopic=90828 -
BrickLinking (another) 10179 UCS Millennium Falcon
ScottishDave replied to Lobot's topic in LEGO Star Wars
(ahem) You might be interested in this the LXF I posted over here then... -
I've been following this thread with great interest. It's great to see the finished design, and especially to see it compared to something which I know very well :-). I like your design for the nose. It's a tricky area to get right, and it's nice to see someone doing something new and original in this area. I also like the SNOT wings, and I think you've done some interesting things with them. I do feel that the join between the snot wings and the nose looks a little messy, and could do with a bit more work - but it's your design! I'm looking forward to seeing pictures of it in real bricks.
-
My attempt at a 10179 UCS Millennium Falcon!
ScottishDave replied to EddScott's topic in LEGO Star Wars
Lego bricks have a wee bit of give in them. If you use 1x2 bricks and plates, as this mod does, and stagger them like a brick wall, you can then bend them into a curve. If you have a bunch of small bricks handy, give it a go! It's immensely satisfying. -
Large 10,000 pieces Millennium Falcon is minifig scale
ScottishDave replied to Lego Otaku's topic in LEGO Star Wars
I happen to agree with you mortesv: but as I am currently struggling to fit the infamous extra TESB corridor into my UCS Falcon, I am beginning to wish I'd rebuilt it 30% bigger! I'm happy to give the builders a pass on the whole "minifig scale" thing as this model is so gorgeous. -
Thank you for the updated photo. You've made some great changes :-). The turret base looks really good.