
ScottishDave
-
Posts
368 -
Joined
-
Last visited
Content Type
Profiles
Forums
Gallery
Everything posted by ScottishDave
-
[MOC] Midi-scale Super Star Destroyer Executor
ScottishDave replied to Pellaeon's topic in LEGO Star Wars
That has made my morning! You are the first person I've heard from who has followed my instructions and completed one of these (apart from my nephews, who had my help). I know it's been a few months since you built it, but did you have any problems with the instructions or the parts list? I'm always looking for feedback. I might have a go at that myself, to see how it looks. Out of curiosity, which part needed to be dark grey? You are very welcome: and congratulations on the awesome build. -
Excellent stickers - really well done. The dish in particular is excellent. I also had problems getting my dish sticker (available to download here) properly centered. In the end, I added a square the same size as the central piece on the lego dish: by carefully cutting around this with a sharp knife, I was able to center my dish pretty well. I also sprayed my completed sticker with ink jet fixative before applying. This allowed me to use the soapy water trickfor easier application. I see you updated your blog also - that is one good looking Falcon. Congratulations!
-
[MOC] Minifig-scale B-Wing (with instructions and LDD)
ScottishDave replied to krispy's topic in LEGO Star Wars
Could be. It's looking great. I may need to have a go at this myself! Thanks! -
[MOC] Minifig-scale B-Wing (with instructions and LDD)
ScottishDave replied to krispy's topic in LEGO Star Wars
Wow! Nice revisions I see that the curved 4 x 1 slope is available in dark red - so the rear of the cockpit could have even less studs on the dark red model. I'd never heard of that incredibly handy round tile with the hole before - I clearly haven't been buying enough sets this year. You've reminded me that I've been meaning to put up photos of the landing leg on my B-Wing for a while now. -
Congratulations! That is an excellent blog entry. I wish I'd had that level of information available when I bricklinked my 10179. Do let me know if you need any more photos or information about my engine mod. This is the exact tool I have been looking for. Thank you for sharing info about that. I printed my own radar dish sticker at home on inkjet decal paper and sprayed it with inkjet sealer. YMMV, but I think it looks quite good.
-
Your interior looks great. The computer really looks the part, and the seats make a huge difference. I'm also impressed with the way you attached the windows: it looks great and saves a lot of space inside. Did you drop the floor by a plate to fit all the figures in? What about the rear of the car - did you lengthen the floor, or remove one of the brackets? How did you attach the steering wheel? It doesn't seem to be attached to the normal steering wheel post! Is it attached to this piece or something similar? Finally: I just saw your engine mod. Wow. .
-
Yes, and it was definitely cheaper. I added the numbers up once... I built a non-accurate-coloured clone of the 10179 for about £350 £392.45. It was my first project out of my Dark Ages, and I only discovered Bricklink half-way through: so I might have saved more money if I'd known what I was doing. Light and dark gray pieces (as opposed to the more modern blueish-gray) look really good, and really add to the feeling of it being a beat-up old ship. Substituting greeblies is not a problem either, in terms of the overall look. I also have quite a few black technic angled beams in my model, and the frame is a hodge-podge of colours. However... I then I got carried away accurising it, and it all got expensive again . That aside: you might find my radar dish decal template useful - it should save you a few euros on the expensive printed piece.
-
[MOC] Minifig-scale B-Wing (with instructions and LDD)
ScottishDave replied to krispy's topic in LEGO Star Wars
I spent almost exactly $100. However, I built about half the model from existing bricks - mostly the technic frame and internals - then started buying when I needed particular bricks to finish the model. Also, I built it in dark red which helped a lot. Sand blue is expensive, at least in the UK. May I ask, which bricks are causing the expense for you? -
10212 UCS Imperial Shuttle - any good mods?
ScottishDave replied to ScottishDave's topic in LEGO Star Wars
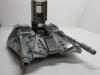
Just as an experiment, I coupled my one and only motor, which happens to be an "M", to one of the crank handle axles. I made no changes at all to the original gearbox: It works very nicely. It's a bit jerky, but that might be the nature of the mechanism. Video is here The motor sticks out the back of the ship by a stud's length. I am not too bothered by that: as lowlead pointed out, the shuttle needs to be built up in that area anyway. Added bonus: since, with this system I don't need to fill the body of the shuttle with batteries, motors and gears to power the wings, I was able to build the "play" interior that my son has been wanting: The floor of the troop compartment is sitting right on top of the gearbox - I removed everything down to and including the the yellow technic bricks and blue beams which support the top fin. I also moved the bricks underneath the side walls out a stud to make room for the seating. The compartment at the rear is for a AAA battery box. I still have to work out how to make the landing gear fold up, but that is a problem for another time! More pictures are in the flickr set. I shall resume building on this in a month or two, when finances allow. -
10212 UCS Imperial Shuttle - any good mods?
ScottishDave replied to ScottishDave's topic in LEGO Star Wars
Thank you! I do appreciate your kind permission. Thank you for the pictures and the information :-). two "M" motors work fine. -
10212 UCS Imperial Shuttle - any good mods?
ScottishDave replied to ScottishDave's topic in LEGO Star Wars
Many thanks for taking the time to look out a picture. Your explanation is nice and clear, and I can replicate your work from that photo. Your mechanism looks robust, and I do like the approach of making as few changes as possible to the original model. I also like the idea of using a single motor. A few questions, if I may...? I was thinking of using two smaller motors directly coupled at the back. Did you ever explore that method? When you say, "Compact reduction gearbox", do you mean one of these, or some other mechanism? Can you recall which gears you used, or even roughly what the ratio was? Where did you put the battery? Was it at the front, with the motor? Many thanks! -
10212 UCS Imperial Shuttle - any good mods?
ScottishDave replied to ScottishDave's topic in LEGO Star Wars
Ah well, it was worth a shot. Thanks for the tip about the linear actuators - I've never seen them before. They do look ideal. I'm always happy to spread the affliction . By the way, I can't completely recommend bricklinking this one in parts. There are some expensive and hard-to-find pieces in this set. The most problematic for me (in the UK), were: 2x2x3 75 degree white double slopes (3685) (need 6 for just the shuttle) 1x9 white liftarms (40490). (need 30) Not as individually expensive as bley boat rigging or printed Falcon dishes , but unless you have a few crates of white parts lying around, including at least some of the ones mentioned, you might be better off buying one of the many fine mint boxed examples still available on Bricklink or eBay. Of course, I would not dream of suggesting that you spray any parts white. That would be wrong. -
I just finished bricklinking a 10212 UCS Imperial Shuttle - the last order arrived today. Obviously, I plan to modify it. I'm hoping to add: - motorised wings - boarding ramp - folding (motorised?) landing gear For one extra wish, I'm also hoping to cram in an interior: but as I have not yet passed the advanced course in trans-dimensional engineering, I may have to settle for just the motors. I recall that back when the shuttle was released, there were a few people on this forum who were planning to put in motors... has anyone done so? Would they be willing to share construction pictures? Also, does anyone have any other good mods for this set? As a starter for ten, I have found some nice mods already: All studs replaced by tiles. It's an easy win, so I'm doing this first! Cockpit shortened and heatsink/grille added under nose. I'm not convinced by making the nose shorter, but the grille under the nose looks really good. Lowlead's engine mods. Much, much better! DMAC's Imperial Shuttle - not so much a MOD, as the original AFOL design which Lego based the UCS model on: but it contains some good ideas. (BTW, before anyone gets too excited: Lego used DMAC's design by agreement, it was all very friendly. ) On a similar vein, Cavegod's model, which he based on DMAC's... BTW Cavegod, if you are reading this: I know you recycled your model, but do you happen to have pictures of the internal workings of the landing gear mechanism? it looked really cool, and I bet it would fit the UCS kit. Thanks in advance!
-
[MOC] Minifig-scale B-Wing (with instructions and LDD)
ScottishDave replied to krispy's topic in LEGO Star Wars
Glad to hear it . I wouldn't mind some feedback if you do use the 1.2 file! Your build looks great. Black and dark grey work well together! I see that the 4x4 wedge slope is causing you problems. Have you considered using black? I think it would go well with your colour scheme. -
[MOC] Minifig-scale B-Wing (with instructions and LDD)
ScottishDave replied to krispy's topic in LEGO Star Wars
Now there is an idea... The biggest problem for me was the 4x4 wedge slopes which only come in four colours: brown, black, light blueish grey (2 in the UK at time of writing, 12 total anywhere, no seller has more than 2) and dark red (7 lots in UK with four or more: one seller has 28.) Plus, your dark red version looked soooo good . I'd be very interested to see what you do. If it helps, I left a (roughly) 2x6 stud gap in my LXF, down by the gun pod. -
[MOC] Minifig-scale B-Wing (with instructions and LDD)
ScottishDave replied to krispy's topic in LEGO Star Wars
Thanks for the feedback, guys. I've tried both methods. LDD rejects the stud method (and IRL it is slightly less sturdy) so I've gone with TheBear's suggestion. LXF is in the usual place. Trans-orange is a good choice for B-Wings. LDD only lets me position the half-pin at the end of the the hard plastic wheel, which doesn't allow for the trans-orange dish. I see from Krispy's post and my own messing about with real bricks that LDD is wrong: IRL the half-pin is positioned further in. This helps explain why, when I look at 1.1 and 1.0, the engines dissappear in a cloud of "incorrectly positioned bricks": I'm guessing that at some point in the last 14 months an LDD update broke the geometry of the wheel. However, if Lego ever correct the geometry for that part, there might be more problems with 1.2. -
[MOC] Minifig-scale B-Wing (with instructions and LDD)
ScottishDave replied to krispy's topic in LEGO Star Wars
... so they are . Personally I quite like them that way... However, in order to do the job properly: RenegadeClone, could you possibly post an image of how you attached your engines originally? I can't see a clear shot in your "instructions" folder. Fixed. New file is in the same location. There was a parts collision with one corner of one of the plates on the wing. Annoyingly, this only appears to be the case in LDD's fevered little mind, and only on that side. The other side is FINE, and should be taken as the template for building the wing surface. Needless to say, I have no such issue on the actual model, I've shortened the plate on the wing, removing a stud's worth of material. Don't worry, nothing important will drop off if you do build it that way . -
[MOC] Minifig-scale B-Wing (with instructions and LDD)
ScottishDave replied to krispy's topic in LEGO Star Wars
Please find, for your consideration: B-Wing 1.2 I have included notes with the file, reproduced below. I know, we've covered most of it in topic already, but someone might get the file without the having read the topic and I want give them a fighting chance. Before anyone asks: no landing gear in this version. I'm still footering around with real bricks. Feedback, either on the model or the notes, expressly welcomed. File History: Original design by RenegadeClone. 20130111 v1.0 by Krspy - initial release 20130115 v1.1 by Krispy - Strengthened internal framework 20140310 v1.2 by ScottishDave - Strengthened engines and framework - based on original work by RenegadeClone. - Strengthened wing mount, as suggested by TheBear - Added opening cockpit Notes: Reference This file and its contents are extensively discussed in this topic on Eurobricks.com. Please look there for the latest version of this file and for further building tips and advice. Hidden Bricks Bricks in "bright blue" are hidden by other bricks. You can therefore substitute any colour you like. I seriously doubt that you can get some of these bricks in bright blue, so please don’t even try! Colour This version has Dark Red squadron markings. For the most part you can build the Sand Blue version the same way: however, the wedge bricks and slopes on either side of the engine should be substituted with Light blueish gray bricks - if you can find them. Also, due to part limitations, I used six dark red 1x1 brick with stud on one side to attach certain parts. If building in sand blue, you should use three 1 x 2 brick with Studs on 2 Sides. If building in dark grey, you should use six 1 x 1 brick with Studs on 2 Sides. LDD problems The 7-long technic lift arm will not attach to most studs. Rather than include an extra part, or weaken the framework for the sake of that beam. I've left the beam "floating". I trust that it is obvious where it should go. The outer guns under the cockpit refuse to attach to the nubs on the sides of the thin 2x2 hinge plates. They really do attach, and rather securely, in real life. Once again, they have been left floating. The rear of the main wing looks OK as it is in the LDD. However, in real life I built it half a stud further outwards towards the gun pod (Notice that all the parts I use to hold it on have hollow studs). LDD refuses to allow this, as it causes part collisions inside the gun pod. LDD is being silly again - real plastic flexes! There are two pneumatic hoses missing from the LDD, which make a nice loop with some detail parts between the Proton torpedo launchers ( or to get technical, the big blunt cylindrical thingies). Krispy discusses one of them in this post. Both are visible in this picture from RenegadeClone’s instructions. I used two different lengths: At the rear I used one which was 11 studs long. I had to trim it slightly, so 10 studs long will probably do. This loops through a 1x1 technic brick also left off the model, this time due to part collision with the engine covers. At the front I used a six-stud length Rare Bricks At the time of writing, and especially in Scotland & the UK, it is very difficult to get hold of: Large Hard plastic wheel in LBG - Dark grey looks good. 2x6 curved slope in LBG - use 2x4 curved slope or 1x4 curved slope + plates (thanks to TheBear for the suggestion) 4x4 wedge brick in LBG - this is why I used Dark Red. Your only other choices are black or dark brown, or use another part. 4x6 modified tile with studs around the edge in LBG - Any old plate will do Ribbed hose with ends, complete in light blueish grey - you can purchase the hose and the ends separately. You can get away with only one end per hose, as the hose will push into the “O” clips securely. Anything in sand blue - use Dark Grey, or Dark Red... or get creative! Dark Blue also looks good. I strongly suggest that you check availability of those parts before starting this build. -
Thank you very much for the superb model. Thank you especially for the LXF file. I fully appreciate that this is an A-Wing/Eta corssover, but the shape of the cockpit strongly reminds me of the IRD-A fighters from "Han Solo at Stars End". Now, I'm sure I had a bunch of 75-degree slopes somewhere around here...
-
[MOC] Minifig-scale B-Wing (with instructions and LDD)
ScottishDave replied to krispy's topic in LEGO Star Wars
No problem, TheBear. Nearly there with the 1.2 LXF now... just the lower engines to do. I should have it ready to post in the next few days. -
[MOC] Minifig-scale B-Wing (with instructions and LDD)
ScottishDave replied to krispy's topic in LEGO Star Wars
Thanks, Scott-S6. That's a great help. I hadn't thought of a retracting block on the engine. Not entirely sure if that's possible, but we'll see. -
[MOC] Minifig-scale B-Wing (with instructions and LDD)
ScottishDave replied to krispy's topic in LEGO Star Wars
Fan-dabby-dozy, that man. All I found was a bunch of film stills It's that rocking forward that I would like to eliminate. The gun on my S-Foil keeps bending and/or dropping off. How about a 1x1 round tile on top of the jumper plate in the mid-top of the engine? In dark red, it would hardly change the look, and it would give the engine one more solid point of contact. I've tried it with a square tile, and it works pretty well. Combined with my opening cockpit and a temporary stand, I have four points of contact, and I have to go some to get it to rock forward. It might well do. Does it have the same gear as the Dagger Squadron model pictured in the page I linked to, or different gear? -
[MOC] Minifig-scale B-Wing (with instructions and LDD)
ScottishDave replied to krispy's topic in LEGO Star Wars
Thank you for suggesting this mod in the first place! I hope you and the kid are happy with the result. The key insight for this mod came from - ironically - a Jedi Interceptor which I saw on MOCpages. Check out that rear landing gear. Droid arm + a pair of handles = 2 stud slide-out. I always knew I'd find a way to use that little snippet of info someday (And yeah... the Jedi Interceptor whose purchase I am planning will never, ever be built as Lego intended. But that's another MOC, for another thread.) On to the next B-Wing Mod! One thing that has been bugging me I'd like to change about this model (no offence intended to Renegade Clone or Krispy) is the lack of integrated landing gear. To my surprise, I can't find any refs or pictures for actual landing gear. In ROTJ you see the back or top of the cockpit (as a matte painting), or the craft in flight: never the entire ship landed with the gear visible. The closest I've gotten is from some photos of the Hasbro "Dagger Squadron" toy. Oddly enough, I'm not about to treat that as a primary source. Before I start footering around with my own design (perhaps inspired by the Hasbro lump, perhaps not) can I please ask: - have any of my fellow B-Wing squadron members added landing gear which I could take a peep at? - Or do you all have accounts of failed attempts, from which I can take dire and solemn warnings? - Does anyone have any bright ideas or suggestions? - has anyone turned up a better reference for the actual landing gear than the Hasbro model? -
[MOC] Minifig-scale B-Wing (with instructions and LDD)
ScottishDave replied to krispy's topic in LEGO Star Wars
Fair's fair... I'm trying to resist building an Arc-135 just to see if it's possible in real bricks. -
[MOC] Minifig-scale B-Wing (with instructions and LDD)
ScottishDave replied to krispy's topic in LEGO Star Wars
Thanks chaps! I was worried that I was restricting people to an unpopular canopy choice. Looks like I'll be buying a Jedi Interceptor this weekend.